Many motorists who own a VAZ-21099 car have most likely encountered difficulties associated with the correct operation of the engine. A common problem is that turning the engine key starts the engine, but the engine does not respond correctly to idle ignition. Let's try to figure out the reason for this problem, which is most likely associated with an incorrectly set ignition.
Basic technical concepts
The ignition system is a variety of interconnected instruments and devices that guarantee the appearance of an electrical discharge, which in turn ignites the mixture of fuel and air in the internal combustion engine system. This system plays a huge role in the vehicle’s technical equipment and electrical equipment.
We are not interested in the entire ignition system, but only in the moment the spark appears, which determines the correct operation of the entire system. This moment is called the ignition moment, because. determines the time for ignition of the working mixture in compressed form. Incorrectly set ignition timing entails many problems in the operation of the car. With the help of this article you will learn how to identify the problem, what it means and how to fix it.
VAZ-21099: under the hood
Distributor operating method
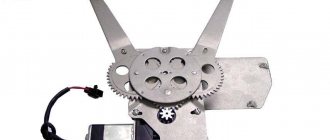
The part is based on a rotating roller, which is connected to the engine camshaft. Parts of the mechanism are attached to the roller, working depending on the rotation of the roller.
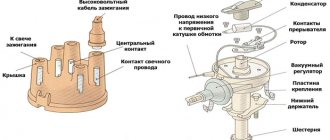
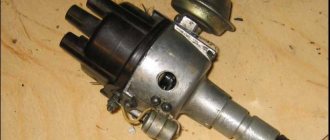
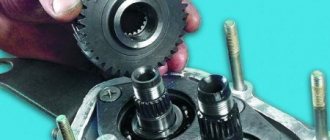
Distributor VAZ 2109 device: 1 - sealing ring, 2 - coupling, 3 - adjusting washers, 4 - roller with centrifugal regulator, 5 - support plate, 6 - dust shield, 7 - slider, 8 - Hall sensor, 9 - lock washer, 10 — thrust washer, 11 — body, 12 — vacuum corrector.
The principle of operation of the distributor on the VAZ 2109
The action of the distributor depends on the operation of all elements of the mechanism. So, the distributor mechanism for the VAZ 2109 consists of the following parts:
- The rotor rotates and thanks to this it can distribute the spark along the distributor, after which it enters the spark plugs through the wires. The runner (another name for the rotor) receives a spark through the ignition coil using a moving part in the center of the cover.
- There is a gap in the Hall Sensor and it is into this that a moving four-tooth screen with an equal number of slots enters.
- The distributor also includes a centrifugal and vacuum regulator, a coupling, a housing, an O-ring, adjusting washers, a support plate, a lock and thrust washer, and a correction vacuum.
- It is also important to know that for VAZ models 2109, 2108/099 two different types of distribution ignition (i.e. distributor) with different types of covers can be installed. They are very similar in design and distinguish these mechanisms only by the characteristics of the assembly of vacuum and centrifugal regulators. Both covers for distributors can be replaced with one another (as they do not differ).
What are the dangers of ignition malfunctions?
Problematic engine starting, acrid smoke from the exhaust pipe and other troubles that can happen to your car are often a consequence of incorrectly set ignition timing, and not problems with the carburetor. Ignorance of this simple fact forces drivers to spend a long time futilely delving into the details of the car. However, if the spark does not appear at all, or the spark plugs flood, the fault must be looked for elsewhere.
VAZ-21099 with a carburetor engine requires precise adjustment of the ignition torque. This can be done without specialized equipment, but it is easier to use a strobe. This tool will greatly facilitate your job of setting the ignition timing, which will most likely need to be done more than once.
The problems described in this article can arise for many reasons, but it is easier to check the first failure that comes to mind - incorrectly set ignition angle. So, the most common problems with the engine system:
- too much detonation in the piston system. Characteristic signs: when you press the gas, a characteristic ringing sound is heard. This problem often occurs among inattentive motorists who do not pay proper attention to their car. The reason for early detonation is premature ignition, which threatens not only uncomfortable operation of the car, but also subsequent deformation of the piston rings. It should be noted that repairing the piston system is not the cheapest “pleasure”;
- When the engine starts, strong black smoke comes out of the exhaust pipe. This problem may also indicate that the ignition is too fast;
- engine power is significantly reduced; use of larger fuel volume compared to conventional displacement; the engine cannot quickly change operating mode, throttle response is reduced. All the problems described above are associated with the opposite problem - ignition too late. The reason is that the mixture does not burn completely at the highest point of the piston. This top point is also called dead. Thus, even when the piston moves in reverse, the mixture continues to burn. A second reason is also possible - the temperature of the exhaust pipe system is too high;
- If the problem is diagnosed when the gas pedal is pressed, then its most likely cause is too late ignition. In this case, the engine operates with significant interruptions, and when the gas is pressed, so-called “failures” are diagnosed, during which the engine does not work. This problem can cause uneven driving;
- An idling engine runs unevenly.
Therefore, if you see one of the listed problems in your VAZ-21099, pay attention to the angle set in the ignition system. Perhaps that is where the problem lies.
Angle set in the ignition system
Possible malfunctions of the BSZ
If the VAZ 2109 ignition switch stops receiving pulses, it means that the wires may be broken and need to be replaced or connected. The second reason lies in the malfunction of the Hall sensor. Its condition is checked with a voltmeter. And if there is no voltage in an electronic device, it needs to be replaced.
The Hall sensor is located inside the distributor housing. To change it, you need to open the cover and disconnect the old sensor. Damage to the wires is also possible between the sensor and the ignition coil. The pulse supply is disrupted if the wires are loosened or their ends are oxidized.
Interruptions in the operation of the VAZ 2109 engine occur for various reasons. For example, carbon deposits and dirt accumulated on the walls or rotor of the distributor are observed. There are other negative factors.
| Causes | Actions |
| The electrodes are worn out or the spark plugs have been exposed to oil that flows from under the seal, and carbon deposits have formed on them. Cracks in the ceramic body of the spark plugs also do not contribute to the smooth operation of the engine. | Oily spark plugs can be washed in gasoline, dried, and the carbon deposits removed. But repair will not help worn electrodes or cracked insulators. Such spark plugs require immediate replacement. |
| If everything is fine with the spark plugs, but the engine does not start. | The carbon brushes in the breaker housing should be checked. |
| Faulty ignition switch. | It requires adjustment. |
It happens that the weights in the ignition timing regulator get stuck. This occurs due to the weakening of the springs, which have exhausted their service life and need to be replaced. You can repair this defect yourself.
Adjusting the ignition yourself
To normalize engine operation and fix problems, you need to correctly set the ignition timing of your car. Only if these conditions are met can the engine operate correctly. To diagnose and correct errors in the ignition angle, you will need the following tools:
- strobe (desirable);
- tachometer. Most often, such a tool is built into the autotester, so there should be no problems with it;
- slotted screwdriver;
- wrench 10 (socket or open-end).
Having a strobe light will make all your work much easier, so it is better to purchase it for private use.
Before you start directly adjusting the ignition timing and angle, you need to do some preparatory work. First, place the key in the ignition and start the engine. Afterwards, you need to bring the system to a temperature of 90 degrees and increase the idle speed to 800 rpm (using a tachometer) using the fuel regulator knob on the carburetor body.
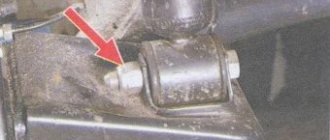
Hatch in the gearbox
After the engine has warmed up, remove the silicone tube that supplies vacuum from the fitting. You will find the adjusting lever on the panel of the ignition torque distributor, otherwise called the distributor. Its base is attached to the carburetor. Place the free edge of the silicone tube close to your finger to find out if there is a vacuum. If there is one, then the finger will stick to the tube. Reduce the number of revolutions until the vacuum disappears.
How to repair equipment yourself?
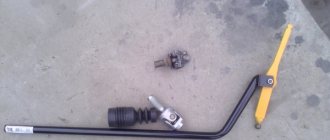
- 1. Disconnect all kinds of wiring, fastenings, remove the distributor according to the diagram shown below;
- 2. Pay attention to the presence of burning stains and damage to contacts;
- 3. A fully functioning slider must fit tightly to the equipment, otherwise it must be replaced;
- 4. Assess the degree of tension in the spring; if it is weak or has changed its appearance, replacement will also be required.
Only correct identification of the causes of failure can guarantee high-quality repairs.
Setting the ignition
Now that the preparations are complete, you should set the correct ignition timing angle for the VAZ-21099. This is easy to do using the step-by-step instructions below:
- start the engine. The number of revolutions should be minimal - no more than 800 rpm. Use a tachometer to check;
- the strobe beam should shine through the observation window on the hatch;
- The longest mark on the flywheel should be set at the zero mark (in degrees). Determine the position on the mark specific to your fuel.
You need to change the ignition angle from the zero position of the long line, i.e. from the center of the triangle towards the windshield of the car. To avoid mistakes, gradually turn the ignition distribution housing to the right. This movement increases the advance angle, while counterclockwise movement decreases it.
The exact direction of movement will be helped by the scale on the distributor with a plus and a minus drawn. It is very convenient to use for proper adjustment. It is worth keeping in mind that each division is equal to 8 degrees, so to avoid errors you need to adjust slowly. Once the desired position is achieved, disconnect the distributor and secure it in the desired position.
Distributor 2109, like all parts, tends to break
What signs indicate a malfunction, what to do in this case, and is replacement possible?
Signs indicating distributor failure and possible future repairs:
- Jerking of the car while driving;
- Failure of the power unit to start;
- Tapping of the piston pins when the car picks up speed;
- The car cannot reach the required speed;
- Fuel is consumed more than expected.
What causes the VAZ 2109 distributor to fail?
- The slider has failed;
- Damaged contacts;
- Malfunction of the sensor;
- Bearing failure;
- The cover is damaged, there are cracks on the surface;
- Broken contact in the hall sensor plug.
In order to eliminate the malfunction, replacement of faulty spare parts will be required. Repair of the distributor can be carried out either in a car repair shop or independently. The first option is more acceptable, since only a qualified specialist can determine whether parts need to be replaced or the entire element needs to be repaired.
Checking the ignition system
To check the ignition module of a car with an eight-valve injection engine, you will need the following items:
Ignition module with injection engine
- a computer with an injection engine diagnostic program installed on it;
- testing tool;
- wrench with screwdriver.
Do not rush to check the ignition module before testing the entire system. It should work correctly and properly, with all devices connected. If necessary, turn on the ground and ignition. After this, gasoline should begin flowing into the system. If the red indicator is on, diagnose problems on the VAZ-21099 on-board computer to which the laptop is connected.
After all preparations have been made, check the throttle valve. To do this, turn on the ignition and use a tester to determine the voltage value of the on-board computer sensor. There should be the following indicators: on-board system voltage - greater than or equal to 12 volts, sensor - at 0.5 volts, damper opening degree - up to 1 percent.
Press the gas pedal. The indicators should change - within 4.5 volts and from 90%, respectively. For better results, it is better to increase the throttle system indicator to one hundred percent. After all this, turn off the additional air supply regulator and achieve 50 percent opening. The last stage is to adjust the throttle system until it is completely closed.
Required parts and tools
It goes without saying that first you need to purchase a “contactless ignition kit” for the VAZ 2107
When purchasing it, it is very important to know what the engine size is and its brand. Remember this and do not believe unscrupulous sellers who assure you that this data is completely irrelevant
The cost of such a kit ranges from 2-3 thousand rubles.
You will also need a set of high-voltage wires, four spark plugs (they must have DVRM written on them).
The tools you will need are a couple of self-tapping screws, a set of wrenches, drills, and various screwdrivers.
Video - how to set the ignition on a VAZ 2109
Basic aspects of replacement
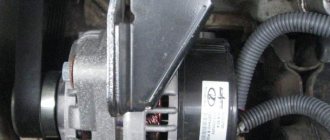
As for repairing the VAZ distributor, the first thing you need to do is remove the device. The unit is located on the line of the cylinder head cover of the power unit. You can see the battery next to it. First of all, in order to remove the mechanism, it is necessary to de-energize it, which means that the negative terminal must be removed from the battery. Then you need to disconnect all high-voltage cables connected to the unit cover. It is also necessary to disconnect the pipe that is supplied to the vacuum corrector line.
Having done this, you can proceed to the next step. Now you need to disconnect the throttle cable, as well as the bracket itself that secures the cables. If you plan to repair the unit, then, of course, you will have to disassemble it. In this case, you should put all the necessary marks and marks on the body of the interrupting element, its cover, and the drive in advance.
It should be noted that this measure is forced, since otherwise you will not be able to maintain the required ignition timing. Accordingly, after repair and installation of the unit in place, the ignition will have to be adjusted. On our resource you can find instructions for adjusting the ignition timing on a VAZ 2109 car - in the case of a VAZ, the adjustment procedure will be similar. Several adjustment methods are presented in detail in this article.
Before removal, the mark on the flywheel must be aligned with the mark on the mechanism body. Then you can unscrew the distributor itself from its installation location and disassemble it to identify failed elements. The assembly procedure is carried out in reverse order. Of course, the contact marks of the slider and the ignition timing must be aligned. Remember that timely maintenance of the device will prevent possible repairs and replacement of the unit.
Sorry, there are no surveys available at this time.
Video “Repair instructions for distributor for 2108”
You can learn how to repair a unit on a G8 with your own hands from the video below (the author of the video is Semyon Pedan).
High voltage wires
Construction and maintenance of the VAZ 2106 car distributor
Often, the main difficulty when repairing a carburetor VAZ 2109 is the reconnection of high-voltage wires that were previously disconnected from the distributor cover. It's also an ignition distributor.
The difficulty is that many people forget the connection procedure or simply do not know. But in practice, returning high-voltage wires is much easier than understanding the ignition module used on the injection VAZ 2109.
By following a few simple rules, you can easily return the wires to their rightful places.
- The ignition distributor cover is installed in its place, that is, on the distributor, only in a single position. Therefore, even if you wanted to, you won’t be able to confuse anything here. Otherwise the lid simply won't fit.
- There is an installation mark on the cover, which indicates the location of the wire socket from the first cylinder.
- The wires must be connected in the following sequence - 1, 3, 4, 2. Move counterclockwise when looking at the distributor cover from the side of the expansion tank.
If for some reason there are no installation marks on the VAZ 2109 carburetor distributor cover, just follow the connection principle shown in the image.
Removing and installing a distributor (ignition distributor) on a VAZ 2108, VAZ 2109, VAZ 21099
To remove the distributor from a VAZ 2108, VAZ 2109, VAZ 21099 car, do the following: 1. Disconnect the wire from the “-” terminal of the battery.
2. Disconnect the high-voltage wires from the distributor.
3. Disconnect the vacuum hose from the vacuum corrector of the distributor.
4. Remove the throttle cable from the holder.
5. Unscrew the nut securing the wire holder bracket (there is a special washer installed under the nut), remove the bracket from the stud and set it aside along with the wires.
7. Disconnect the wiring harness connector from the distributor by squeezing its spring retainer with a thin screwdriver or awl. 8. Remove the rubber plug from the clutch housing hatch and install the piston of the 1st cylinder to TDC (top dead center) by turning the engine crankshaft by the flywheel ring gear with a long screwdriver.
9. Unscrew the remaining two nuts securing the distributor and remove the distributor from the VAZ 2108, VAZ 2109, VAZ 21099.
10. Install the distributor on a VAZ 2108, VAZ 2109, VAZ 21099 car in the reverse order of removal. At the same time, unscrew the two fastening screws and remove the distributor cover.
11. Turn the ignition distributor shaft so that the outer contact of the slider is established against the terminal of the 1st cylinder in the distributor cover, and install the ignition distributor into the auxiliary drive housing. 12. After installing the ignition distributor into the accessory drive housing, align the previously applied marks. Check and, if necessary, set the initial ignition timing (see “Setting the ignition timing”).
Dismantling
After dismantling the distributor, you can disassemble the device in order to repair its components, or completely replace the distributor with a new unit.
- De-energize the car by removing the negative from the battery;
- Disconnect the high-voltage components and the vacuum ignition corrector hose from the distributor;
- Remove the drive cable responsible for the throttle valves from the bracket. Next, the fastening nuts are unscrewed and the bracket is dismantled;
- Before removing the ignition distributor, apply a mark to the housing of the distributor and drive of auxiliary elements. This way you can simplify your task of setting the ignition timing for its precise setting. The mark is applied to the metal by scratching;
- Press the latch holding the block with the power wires and disconnect it from the distributor;
- Place the piston from the first cylinder to the top dead center position by moving the engine flywheel clockwise;
- Unscrew the remaining ignition distributor screws. The first fastener was removed when removing the damper cable sheath bracket;
- Remove your damaged distributor.
Disassembly and repair
Quite often, repair work with the distributor is associated with wear and the need to change the seals (coupling). To change the oil seal, as well as other failed components of the distributor, we bring to your attention the appropriate instructions, as well as video tips.
- Remove the ignition distributor cap by releasing the locking clip.
- Remove the slider. It is wiped with a clean rag and checked for mechanical damage. If there are chips or cracks, the element must be replaced.
- The runner must fit tightly on the shaft, which is achieved due to the presence of a plate spring with a pressing action. If it stretches or breaks, replace it.
- There is a resistor in the slider housing. The normal reading of its resistance is 1 kOhm. By measuring the data with an ohmmeter, you can draw conclusions regarding the performance of the component.
- Remove the low voltage wiring terminal. To do this, unscrew the mounting screw from the housing.
- Remove the plastic screen that serves as dust protection.
- A power wire comes from the Hall sensor and is held by the holder's claws. Using a screwdriver, the claws are opened and the wire is removed. Next, you need to unscrew the pair of mounting screws securing the Hall sensor support plate.
- Remove the vacuum corrector. Just be sure to disconnect it from the support plate lever before doing this. To perform this operation, carefully remove the retaining ring from the pin.
- The next step is to remove the pair of screws that hold the corrector to the distributor body.
Disassembling the unit
- Lift the corrector lever slightly, which will allow you to remove it from the sensor plate pin and remove the corrector itself.
- These steps will allow you to easily remove the support plate by lifting it with a flat head screwdriver. Remove the element. The plate must be replaced if the bushings are worn out or there is mechanical damage to the unit.
- Unscrew the two fasteners to disconnect the plate and the Hall sensor.
- You need to remove the oil seal, that is, the coupling. It is located on the distributor shaft. The coupling is closed with a thrust washer. That, in turn, is fixed with a retaining ring. You first need to remove the ring, which will make it possible to remove the thrust washer.
- Remove the oil seal by knocking out the pin with a small-diameter borer. Determine the dimensions of the boletus during the repair process.
Checking for damage
- There are adjusting washers under the oil seal.
- Remove the roller along with the centrifugal regulator from the distributor body.
- Clean the housing using kerosene and a dry cloth. Make sure that there are no mechanical damage, chips or cracks on the case.
- Examine the condition of the bushings. The roller rotates on them, and with severe wear, the roller begins to become loose. Also, the device is replaced along with the bushings if there are signs of wear, defects, or damage.
- To disassemble and replace damaged elements of the centrifugal regulator, you first need to remove the weight springs using a screwdriver.
- If the springs are intact and undamaged, not deformed, make notes on their seats. If you mix them up during assembly, problems may arise.
- Remove the driven plate along with the screen from the shaft.
- Make sure how effectively the weights move along their axes. Movements should be free, without any jamming. If there are problems, the weights are changed.
- It is a mistake to check the movement of loads without first removing and cleaning them.
Distributor removal and installation, ignition adjustment VAZ 2108-2109-21099
VAZ / 2108, 2109, 21099 / repair / electrical equipment / ignition system / Distributor
Distributor.
Using a screwdriver, press the spring clip on the block and disconnect the block with wires from the low-voltage terminal of the ignition distributor
2. Remove the two mounting screws.
3. . remove the distributor cap, leaving it on the wires.
4. Disconnect the hose from the vacuum corrector.
5. Set the piston of the first cylinder to TDC. Unscrew the three nuts securing the satellite fret distributor.
6. Remove the high-voltage wire holder bracket.
7. Remove the ignition distributor
8. If you need to remove the cover, remove the high-voltage wires from the cover sockets.
9. The Lada Samara ignition distributor is installed in the reverse order of removal. Before installing the distributor, turn the shaft so that the outer contact of the slider is against the terminal of the first cylinder in the cover.
Not all car enthusiasts can answer the question “How is the ignition installed on a VAZ model such as 2109 (carburetor)?” This process, of course, is quite painstaking, but in general even inexperienced drivers can carry it out.
As practice shows, VAZ-2109 owners sometimes encounter improper operation of the power unit, caused precisely by problems with the ignition being set incorrectly.
The most common symptom here is the engine starting easily when it is not functioning correctly at idle.
According to experts, in 9 out of 10 cases, repairs, replacements and adjustments can be made directly on site. That is, having dealt with the nuances, any car owner will save a lot of money by refusing to visit a car service center.
Signs of a faulty contact system
As we know today, there are distributors with non-contact and contact spark generation systems, let’s begin to understand the contact system. If you have a contactless device, then the instructions are a little lower for you:
- Symptoms that appear in the contact system are usually caused by either a change in the gap between the contacts or their contamination
- Since the performance of the contact distributor (see Design of the VAZ 2109 distributor: the difference between contact and non-contact ignition systems and ignition timing adjustment), the condition of its contacts has a huge impact, unlike a device that has a contactless system
- The condition of the contacts should be checked every 10,000 kilometers
- When a problem arises in the distributor in a VAZ 2109, it should be identified, since this includes wear on the shaft cams, the development of the contact stop that slides along them
- Possible wear of the bushings in which the shaft rotates, as well as destruction of the bearing in the movable contact plate, weakening of the contact spring, possible jamming of the contacts on their axis, as well as their burning, erosion or contamination
- Such malfunctions inevitably lead to changes in gaps or poor contact in the contacts
- And as a result of this - loss of engine power, complete cessation of its operation at idle, a noticeable decrease in throttle response, and the appearance of jerks when the gas pedal is sharply pressed
- With severe wear or destruction of the bearing in the movable contact plate, as well as with critical wear of the bushings, and a break in the negative shunt, a violation of the contact of the lever or contact pair, or even the contact itself, causes popping noises in the muffler or intake manifold
- This can also occur when the noise suppression resistor, which is located in the distributor runner, burns out
- If the engine does not start at all, this is most often due to either a lack of contact or a lack of gap in the contact pair, and also a breakdown of the slider (remove the slider and purchase a new one)
- The complete absence, contamination or burnout of contacts is easily determined visually, and if there is no discharge in the high-voltage armor wire coming from the ignition coil, then you need to replace the wire; if this does not solve the problem, change the coil
- If there is a spark on the central wire, but not on the spark plug wires, this indicates a malfunction of the slider
- Malfunctions also include - malfunction of centrifugal or vacuum regulators
- If a weak spark appears on the central wire or too much sparking between the contacts, this indicates a malfunction of the capacitor
- Note: During repairs (and in general) you should not install additional capacitors or capacitors with a larger capacity
- At nominal value, the capacitance of the capacitor is allowed within 0.15 - 0.35 microFarad
How does an ignition malfunction manifest itself?
If the unit in question is adjusted incorrectly, the following alarming symptoms are almost always observed:
- starting difficulties;
- black or gray exhaust color;
- instability of the engine at idle.
Meanwhile, the vast majority of car owners spend energy on carburetor prevention, mistakenly believing that this is where the cause lies.
Naturally, their work is wasted.
If the angle adjustment was made incorrectly, then the following are observed:
- too strong detonation of the fuel-air mixture;
- thick smoke from the exhaust pipe;
- loss of power;
- high fuel consumption;
- uneven work at XX.
All this leads to rapid wear of the engine as a whole.
Reasons why oil can get into the distributor
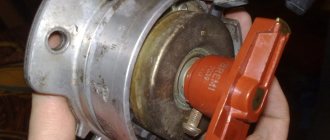
In a VAZ 2109 car, oil from under the distributor can get inside this product through the oil seal on the shank. Externally it will look something like this. When disassembling the distributor, rust is clearly visible on the slider, the ember installed there is often completely erased, and everything under the screen is covered in oil.
The reason that led to the appearance of oil in the distributor of the VAZ 2109 is the clogging of a small hole in the base of the carburetor, which is structurally related to the ventilation system of the crankcase of the engine.
At idle speed of the engine, excess pressure arises in the crankcase, which forces oil through the oil seal into the distributor. To prevent the problem from reoccurring, the hole mentioned above should be cleaned. But the operation is quite complicated technically. Therefore, it should be performed at a service station.
Another reason leading to the appearance of oil in the distributor on the VAZ 2109 is severe wear of the oil seal.
To identify and eliminate this malfunction, the distributor must, at a minimum, be removed and, after completing the required amount of work, reinstalled.
How to regulate
Practice shows that most often problems with the ignition system are observed in older models with a carburetor type of power plant.
To perform the setup you will need the following tools:
- Screwdriver Set;
- strobe light (you can basically do without it, but with its help you can set the angle more accurately);
- 10mm wrench (suitable for both socket and socket wrenches);
- tachometer (it is available in almost any car multimeter).
Detailed structure and principle of operation of the distributor
Let's start looking at the VAZ 21093, distributor diagram (below) with a contact group:
Diagram of a VAZ distributor with a contact group
- The breaker is assembled from the following parts: housing (photo above), shaft, slider, contact plate with weights and springs, vacuum octane corrector, capacitor
- The shaft itself is made of two parts movably connected to each other
- There are cams on the upper or lower part of it, it all depends on the design, the number of cams corresponds to the number of cylinders
- Both parts of the shaft are movably connected to each other by means of a centrifugal octane corrector, which is assembled from cams, as well as springs of varying degrees of rigidity
- When the shaft rotates, the cams diverge under the influence of centrifugal force, while the springs stretch and only the upper part rotates relative to the bottom at a certain angle
- And the vacuum octane corrector is connected through a rod to a contact plate and a vacuum tube is connected to the intake manifold
- When the throttle valve opens, then the air vacuum in the intake manifold increases, which leads to the rotation of the movable contact plate relative to the cams
- To reduce sparking and increase the secondary voltage, there is a capacitor on the distributor body, which is connected to the electrical circuit parallel to the contacts
- And on the top of this shaft there is a rotor (popularly called “runner”), which is designed to distribute high voltage current to the spark plugs; distribution occurs through the terminals on the distributor cover
What is the difference between the distributor device on a VAZ 2109 with a hall sensor:
- The distributor of VAZ cars with a contactless ignition system is distinguished by the complete absence of contacts in its design; their role is played by an electronic switch
- Here, instead of contacts in the distributor, a sensor is installed, the operation of which is based on the effect discovered by Hall, who studied the behavior of semiconductors in an electromagnetic field
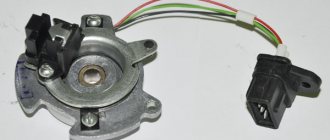
Hall Sensor
- A sensor with a special slot is installed on the movable plate of the distributor
- This slot contains a permanent magnet on one side and a semiconductor on the other side.
- A metal shutter is installed on the distributor shaft, having a rectangular slot, which during rotation passes through the sensor slot; it blocks the magnetic flux going to the semiconductor from the magnet
- At this time, the sensor stops passing the current passing through it to the switch
- Rotating further, the curtain passes the cutout past the sensor and then the semiconductor enters the field of action of the permanent magnet, and then passes a current that passes to the output of the switch
- And the switch, depending on this, opens or closes the power transistor, through which the terminal from the ignition coil is connected to ground
So we looked at the VAZ 2109 distributor device, and the principle of operation; in order to disassemble it and repair it, you will need another article. Drivers often have to deal with adjusting the ignition timing, I think it will be useful for you to know this too.
Preparation
As previously noted, you can do without such a device as a strobe light, but if you want to set up the ignition yourself, then there is still a reason to purchase it.
Before you start setting the angle, do the following:
- start the engine;
- heat it up to 90 degrees;
- increase the speed to 800;
- remove the pipe used to discharge the fitting;
- the dismantled tube is clamped with a finger - this will allow you to find out whether vacuum is actually occurring;
- if it is present, the speed is increased until it disappears;
- then the engine is turned off and the pipe is bent so that there is no gap left in it;
- use a wrench to unscrew the nuts securing the distributor;
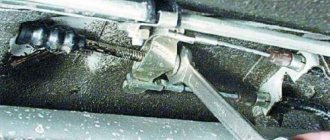
- clean the inspection hole from dirt (it is located in the crater of the gearbox and is closed with a plug).
There is a special scale with which the set angle is determined. This should be discussed in more detail, since you need to set the ignition according to the marks. For this:
- Use a flat screwdriver to turn the flywheel until a long strip appears;
- in the future, during adjustment, you need to ensure that it remains clearly in the triangular cutout (this is the zero angle, that is, the starting point of adjustment).
If everything is done correctly, then cylinders 1 and 4 move to the TDC position.
When the scale is poorly visible and you are not sure that you have found the necessary feature, then you can verify the correctness of the position in another way.
There are pulleys on the camshaft gears. They must coincide with the mark on the wall of the timing belt protective housing.
Why do my fingers knock in the engine when accelerating? Let's understand the problem"
Why do my fingers knock in the engine when accelerating? Let's understand the problem
Why do my fingers knock in the engine when accelerating?
To answer this question, you need to understand why this phenomenon occurs. In normal conditions, ignition of the combustible mixture occurs evenly. Explosive combustion of fuel begins near the spark plug and simultaneously spreads in different directions. The explosion propagation speed is about 20-30 m/sec. In the event of detonation, the over-enriched mixture begins to explode immediately after entering the combustion chamber. The blast wave moves chaotically, colliding with the walls of the cylinder, the remainder of the mixture explodes. The wave speed can reach 1000 m/sec.
Consequences
. As we have already found out, detonation is essentially uncontrolled combustion of fuel. At the same time, the cylinder walls heat up unevenly; in places where the blast wave hits, the temperature rises significantly. This can lead to deformation of the cylinder block. The piston may also overheat and become deformed. A blast wave under certain conditions can damage the valves. It can also damage the connecting rods. In any case, systematic and severe detonation will lead to the need for major engine repairs.
This phenomenon can be caused by a large number of factors. They have varying degrees of danger. Sometimes, a small detonation is quite acceptable. All possible options for the occurrence of this phenomenon will be discussed below.
The most harmless is detonation, which occurs with a sharp increase in speed. If you sharply press the gas pedal at 1000 rpm, accelerating the operation of the power unit to 4000-5000 rpm, you can hear a short-term detonation. This is quite a common occurrence. There is no need to be afraid of this; in this case, detonation will not lead to dire consequences. The reason is a sharp increase in the fuel supplied to the engine; the amount of air initially remains at the same level, this causes premature oxidation of the fuel, which is accompanied by explosions. The only way to combat this phenomenon is to avoid a sharp increase in speed.
But sometimes detonation can appear during normal operation of the power unit. In such cases, it is necessary to identify and eliminate the malfunction as quickly as possible. Otherwise, it will lead to engine repair. So, detonation may have the following reasons:
- Incorrectly set ignition timing. As this indicator increases, the point with maximum pressure during fuel combustion shifts to TDC. Because of this, increased pressure occurs in the cylinder, and accordingly appears. If you experience unexplained knocking noises, be sure to check that the ignition is working correctly;
Error in operation. If the fuel consumption sensor fails, the on-board computer may give erroneous commands. As a result, the engine begins not only to twitch, but also to detonate;
Almost all modern cars are equipped with a knock damping sensor. If you observe the phenomenon regularly, then check the condition of this small device. If necessary, you need to replace it;
Low octane number. Each car has its own compression ratio; accordingly, this indicator is calculated based on the fuel that will be used in the engine. The higher the compression ratio, the higher the octane number should be. If you fill the tank with fuel with a lower rating, an uncontrollable reaction will occur in the cylinder. If, in order to save money, you have filled with lower quality gasoline, then it is advisable to drain it and fill with fuel with a suitable octane number. Sometimes, a similar phenomenon may occur.
Settings
The strobe is used like this:
- the red wire is applied to the “plus” on the coil;
- black – to the body;
- the clamp is connected to the veins installed on cylinder number 4.
After this, the actual adjustment begins.
The work is carried out in the following order:
- start the engine, bring its speed up to 800 and no more (measurements are made with a tachometer);
- the beam from the strobe is aimed at the inspection hatch;
- the long line is placed in the zero position (scale in degrees).
The angle is adjusted by rotating to the right - this increases the angle, respectively, movement in the opposite direction decreases it.
It is not difficult to find out the exact direction - it is indicated by the scale marked on the distributor (there is an o and a “plus” there). Each division corresponds to 8 degrees. For this reason, adjustment is slow. After finding the desired position, the distributor is secured.
Symptoms indicating a malfunction
It is not difficult to determine that a VAZ-2109 distributor with a carburetor is broken. The car will jerk when driving. However, there are no other reasons for this behavior. If the tank is filled with high-quality gasoline, the fuel pump and carburetor are working properly, then the distributor is to blame for the vibrations. When the car picks up speed, the engine will rev.
Malfunctions can also be judged by an engine that refuses to start. When you press the accelerator pedal and increase speed, detonation occurs. This also indicates a non-working distributor. If the dynamics have deteriorated significantly, then the distributor should be checked. When the fuel rises, the first thing you need to do is find out if the breaker is working, and only then turn the carburetor.
Checking with a light bulb
It will simplify your work when using a strobe. The lamp requires a 12-volt lamp.
The procedure is as follows:
- one contact from the light bulb is connected to the wire running from the coil to the distributor;
- the second is applied to the mass;
- the central (high-voltage) short-circuit cable is installed there;
- start the engine and loosen the bolts on the distributor;
- the housing must be rotated to the right until the lamp goes out;
- then it is turned slowly to the left - when the light flashes, the distributor is fixed.
To better understand how torque is set, we suggest watching this video:
>
Why do you need a distributor?
In many ignition systems (no matter whether it is contact or contactless), there is a high-voltage and low-voltage circuit.
The ignition distributor is a mechanism associated with high-voltage and low-voltage wiring. Its main action is to distribute high voltage among the candles at the right time and in a certain sequence. The distributor is designed to receive a spark from the ignition coil and distribute it in accordance with the operating principle of the engine (VAZ2108/09) to further vehicle mechanisms. In addition, the distributor allows you to set the “sparking” point (the part makes it possible to issue a controlled impulse), which depends on the number of revolutions, the overall load of the engine and the method of establishing the ignition.
What is a distributor
A distributor is a mechanism that distributes electric current between the spark plugs and is responsible for the appearance of a spark that ignites the combustible mixture in the cylinders. In VAZ 2109 models it is located near the battery, where the cylinder head cover ends. Its official name is ignition distributor-distributor. Car owners use two types of breakers: contact and contactless.
Conventionally, it can be divided into two parts: a cover made of durable material that does not conduct electric current, and the body itself, inside of which there is a shaft ending with a runner with a contact armature. The inlet hole for the high voltage cable is located in the center of the cover, closer to the edges there are outlet holes with contact brushes, from which the wires diverge to the spark plugs. Thus, the lid is an independent and functional part. During operation, under the influence of vibrations, it wears out, cracks or chips form on it, carbon brushes wear out, and it needs to be replaced.
The slider, whose axis receives a central high-voltage wire, rotates, alternately closing the carbon contacts of each spark plug wire in the order in which they must supply a spark to move the pistons in the cylinders. The speed of the runner directly depends on the crankshaft and other engine parameters.
The interruption is performed on the left side of the device according to the principle of a hammer and anvil. The rod mounted on the shaft has a ribbed shape (like a nut). The number of ribs corresponds to the number of cylinders. During rotation, the protruding ribs push the “hammer” towards the “anvil”, and the reduced sides, on the contrary, push them away. This is how connection and interruption of contact is made.
A vacuum corrector connected to the carburetor and throttle, when you press the gas pedal, creates a vacuum that pulls up the lever in the breaker, as a result of which the ignition angle changes and the electric charge is supplied earlier.