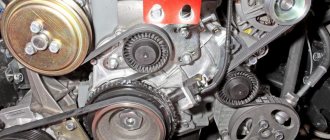
Connection diagram for generator in VAZ cars
The generator in cars is designed to generate electricity and charge the battery. If the normal operation of a car electric generator is disrupted, the battery begins to discharge and soon the car will stop starting completely - there is not enough battery charge. This device consists of a three-phase diode bridge, which, in turn, has 6 silicon diodes. Electrical voltage is created by the excitation of the rectifier at the moment when the rotor poles change under the stator windings. When the rotor rotates inside the machine stator, the poles of the rotor change. To increase the value of magnetic fluxes, the stator contains an electromagnetic exciting winding in the area of the magnetic cores. Marking and designation of wires:
- P - pink.
- F - purple.
- O - orange.
- B&W - black and white.
- KB - brown and white.
- CHG - black and blue.
- K - brown.
- H - black.
- B - white.
The principle of operation of the power supply VAZ 21099, VAZ 2109, VAZ 2108
There are 6 coils mounted inside the generator set, the material is copper, the connection is star-shaped. The stator is a stationary structure, and the rotor rotates inside the stator. Magnetic brushes are pressed into the back of the rotor axis, and the excitation winding is wound and sealed.
After the key is turned in the ignition switch, the current from the battery creates a magnetic field, passing through the graphite brushes and copper winding. Alternating current is converted to direct current.
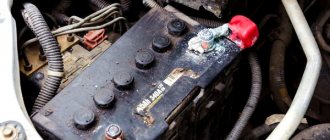
On the front side of the IP there are two power outputs with polarity “+” and “-”. Terminals with the appropriate polarity are connected to the battery.
To turn the generator set you will need a battery. After the battery has accumulated the spent amount of energy, the generator distributes the excess to other power sources. Thus, the size of the on-board network is maintained within an acceptable range.
Connection diagram for the VAZ-2101 generator
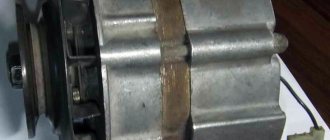
Structurally, generator 2101 consists of the following main elements:
- The rotor is a moving part that rotates from the engine crankshaft. Has an excitation winding.
- The stator is the stationary part of the generator and also has a winding.
- Front and rear covers , inside of which bearings are installed. They have eyelets for attaching to the internal combustion engine. The back cover contains a capacitor necessary to cut off the alternating current component.
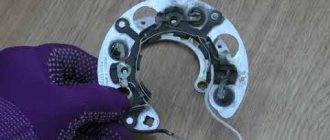
- Semiconductor bridge - called a “horseshoe” for its similarity. Three pairs of semiconductor power diodes are mounted on a horseshoe-shaped base.
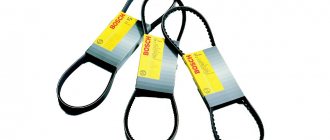
- A pulley on which the VAZ-2101 generator belt is placed. The belt is V-shaped (on modern cars a multi-ribbed belt is used).
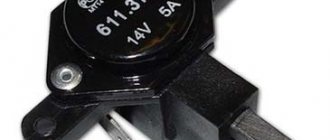
- The voltage regulator is installed in the engine compartment, away from the generator. But still it must be considered part of the structure.
- The brushes are mounted inside the generator and transmit the supply voltage to the field winding (on the rotor).
Generator set price for VAZ 21099, VAZ 2109, VAZ 2108
| Catalog item | Serial number | Price | |
| A2110-80A (original) | BOSCH (9501.3801) (original) | From 3000 – 3200 | |
| 9501.3801 | FINWHALE 687-04 | 62022 / 180545 | From 3000 – 3200 |
| 9568.3749 | 922.3801 | SKL622RS | From 3000 – 3200 |
| 3701010 (HORT) | 3701024 | Contitech | From 3000 – 3200 |
| 3701971 | 3701953 | Electro 3701747 | From 3000 – 3200 |
| *prices are as of August 2022 |
Connection diagram for the VAZ-2107 generator
1 - battery; 2 - negative diode; 3 - additional diode; 4 - generator; 5 - positive diode; 6 - stator winding; 7 - voltage regulator; 8 — rotor winding; 9 — capacitor for suppressing radio interference; 10 — mounting block; 11 — battery charge indicator lamp in the instrument cluster; 12 - voltmeter; 13 — ignition relay; 14 - ignition switch.
Generator device
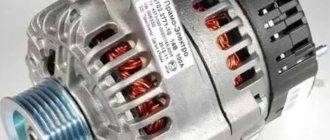
The design of a car generator implies the presence of its own rectifier and control circuit. The generating part of the generator, using a stationary winding (stator), generates three-phase alternating current, which is then rectified by a series of six large diodes and the direct current charges the battery. Alternating current is induced by the rotating magnetic field of the winding (around the field winding or rotor). Next, the current is supplied to the electronic circuit through the brushes and slip rings.
Generator structure: 1.Nut. 2. Washer. 3.Pulley 4.Front cover. 5. Distance ring. 6.Rotor. 7.Stator. 8.Back cover. 9.Casing. 10. Gasket. 11.Protective sleeve. 12. Rectifier unit with capacitor. 13.Latch holder with voltage regulator.
Connection diagram for the VAZ-2108 generator
The VAZ-2108 generator has a rather massive stator winding, since it uses a large cross-section wire. It is with its help that electricity is generated. The wire is wound evenly over the entire inner surface of the stator into recesses specially provided for this purpose in the magnetic core. It’s worth talking about the latter separately. The middle part, the generator stator, consists of a series of thin metal plates pressed tightly together. They are often boiled on the outside to prevent separation.
How to remove the generator on a VAZ 2108 yourself step by step instructions
In order to remove the VAZ 2108 generator with your own hands, you must perform the following procedure:
- In order to easily remove the VAZ 2108 generator, it is necessary to remove the engine protection.
- During the dismantling process, the VAZ generator must be removed together with the bracket, since its fastening bolt will be impossible to pull out due to the position of the body side member.
- Now disconnect all electrical terminals from the generator
- Then you need to loosen the adjusting nut and the generator mounting nut from below.
- Move the generator forward and remove the loose belt
- Unscrew the bolt and remove the adjusting bar
- We find it at the bottom of the engine compartment (shown in the photo) and unscrew the two bolts securing the bracket.
- Then, carefully pushing down, remove the VAZ 2108 generator
- After repairing or purchasing a new generator, we install it in the reverse order, taking into account the fact that the long bolt securing the bracket should be closer to the generator drive.
- After completing the installation of the VAZ 2108 generator, tension the drive belt
How to install and connect a VAZ 2108 generator - step-by-step instructions
Installation of a new generator is carried out in the reverse order. Take a close look at the condition of the bottom bolt. If there is damage to the threads, it is better to replace it.
It will be easier for you to repair the generator later. When installing, pay special attention to belt tension. If it is not tensioned enough, your battery will not charge well. But if you tighten the belt too much, the bearing in the front cover will be destroyed. As a result, you will get an unpleasant whistle when the engine is running. And the reason for this is the appearance of play in the bearing.
The installation of the generator on the VAZ 2108 must be carried out in such a way that even the slightest distortion does not occur.
Connection diagram for the VAZ-2109 generator
- Alternator. The 37.3701 or 94.3701 series can be installed.
- Negative diode.
- Additional diode.
- Positive diode.
- Alternator warning lamp, also known as battery discharge lamp.
- Instrument cluster.
- Voltmeter.
- Relay and fuse box located in the engine compartment in the compartment between the engine and the vehicle interior.
- Additional resistors built into the fuse mounting block.
- Ignition relay.
- Egnition lock.
- Accumulator battery.
- Capacitor.
- Rotor winding.
- The voltage relay is located in the engine compartment.
Features of work
What might a faulty unit look like, how to remove and disassemble the generator, how is it rebuilt? If the device does not charge the injector or carburetor of a VAZ 21099 or 2109, first of all, let's look at the features of its functioning, namely the power circuit.
Generator power circuit
Node power circuit
So, what does the scheme include:
- The VAZ 2109 generator itself.
- Negative diode.
- Additional element.
- Positive diode.
- The warning light also informs the driver that the battery is low.
- Vehicle dashboard.
- Voltmeter.
- The fuse box is installed in the engine compartment under the windshield opposite the driver's seat.
- Resistor elements installed in the same block.
- Ignition relay "nine".
- The castle itself.
- Battery
- Capacitor device.
- Winding.
- Generator voltage regulator relay installed in the engine compartment.
It should be noted that the connection diagram for the VAZ 2109 generator is relevant for all cars with front-wheel drive of the eighth line - both 2108 and 21099 (the author of the video is Semyon Pedan).
Connection diagram for the VAZ-2110 generator
On VAZ-2110, 2111 and 2112 cars, a 94.3701 generator was installed with a maximum output current of 80 Amperes and a voltage = 13.2–14.7 Volts.
Here is a breakdown of the connection diagram for the generator on the ten :
- Battery 12V;
- generator 94.3701;
- mounting block;
- egnition lock;
- battery charge indicator lamp in the instrument cluster
Generator Modifications
On newer VAZ-2109, 21099, 2110 cars, modifications of generators with the designation 94.3701 were installed. Their power is much higher than those used on eights. But the dimensions of the VAZ-2108 generator are the same as those of more modern ones installed on dozens. Therefore, they are interchangeable, but have different characteristics. Here are the differences:
- The current strength of 94.3701 is 80 A, which is 25 A higher than that of the figure-eight unit.
- The voltage adjustment range on the 94.3701 generator is larger.
- The gear ratio between the generator rotor and the engine crankshaft is higher.
Installing a new unit is advisable if a larger capacity battery is used, and in the system of electricity consumers there are a lot of those that have greater power. And if you use standard electric cars, the battery will be discharged and will not have enough current.
How to check the generator yourself
How to check a VAZ generator using the example of model 2109. Generator type 94.3701 alternating current, three-phase, with a built-in rectifier unit and an electronic voltage regulator, right-hand rotation.
Generator connection diagram . The voltage to excite the generator when the ignition is turned on is supplied to terminal “D+” of the regulator (terminal “D” of the generator) through indicator lamp 4 located in the instrument cluster. After starting the engine, the excitation winding is powered by three additional diodes installed on the generator rectifier block. The operation of the generator is controlled by a warning lamp in the instrument cluster. When the ignition is turned on, the lamp should be on, and after starting the engine, it should go out if the generator is working. If the lamp is brightly lit or glows half-lit, it indicates a malfunction.
The “minus” of the battery should always be connected to ground, and the “plus” should always be connected to the “B+” terminal of the generator. Failure to turn the battery back on will immediately cause increased current through the generator valves and damage them.
It is not allowed to operate the generator with the battery disconnected. This will cause short-term overvoltages to occur at the “B+” terminal of the generator, which can damage the generator voltage regulator and electronic devices in the vehicle’s on-board network.
It is prohibited to check the functionality of the generator “for spark” even by briefly connecting the “B+” terminal of the generator to ground. In this case, significant current flows through the valves and they are damaged.
Charging diagram for VAZ with injection engines
This scheme is identical to the schemes on other VAZ models. It differs from the previous ones in the method of exciting and monitoring the serviceability of the generator. It can be carried out using a special control lamp and a voltmeter on the instrument panel. Also, through the charge lamp, the generator is initially excited at the moment it starts working. During operation, the generator operates “anonymously,” that is, excitation comes directly from pin 30. When the ignition is turned on, power through fuse No. 10 goes to the charging lamp in the instrument panel. Then it goes through the mounting block to pin 61. Three additional diodes provide power to the voltage regulator, which in turn transmits it to the excitation winding of the generator. In this case, the indicator lamp will light up. It is at that moment when the generator operates on the plates of the rectifier bridge that the voltage will be much higher than that of the battery. In this case, the control lamp will not light up, because the voltage on its side on the additional diodes will be lower than on the side of the stator winding and the diodes will close. If the control lamp lights up while the generator is running, this may mean that additional diodes are broken.
Replacement and removal of the electric generator
The generator on a VAZ car is removed either for complete replacement in case of failure or to carry out repair work to replace faulty parts. To perform dismantling, prepare a standard set of tools; it is advisable to drive the car into the inspection hole.
- Disconnect the battery.
- Remove the protective rubber cap from terminal “30” and unscrew the nut and remove it from the wire stud.
- Disconnect the block with wires from the generator connector.
- We loosen the tightening of the generator to the adjusting bar, then lift it all the way up to the cylinder block and remove the belt from the pulleys.
- Completely unscrew the bolt securing the adjusting bar to the cylinder block, then from the bottom of the car unscrew the 2 bolts securing the lower bracket to the block and remove the generator, pulling it out of the engine compartment.
Source
Removing the generator on the “eight”
To dismantle the unit for replacement or repair, you will need “17” keys and a mounting blade. Before starting work, be sure to generously treat all threaded connections to facilitate dismantling. The procedure looks like this:
- Disconnect the negative terminal from the battery.
- Unscrew the top nut securing the generator housing to the bracket.
- Unscrew the nut on the lower mounting bolt.
- Slide the generator housing towards the engine block and remove the belt.
- Unscrew the nut from the power contact and move the wires to the side.
- Remove the lower mounting bolt.
After all these manipulations, you can completely dismantle the unit. This can be done either from below, if protection is not installed on the car, or from above.
Exciting the generator (LADA Samara and similar)
To answer the question briefly, is it possible to provide excitation from a battery , then yes, it is possible, but through a diode.
In details . If the generator excitation suddenly disappears, then you can supply voltage from the battery to input D of the generator during or immediately after starting the engine. Soon, a working generator should switch to self-excitation mode from the voltage it generates. You need to connect through a diode, but not directly, otherwise you risk burning out the generator's additional diodes. And of course, only with the ignition on, otherwise you will drain the battery while parked.
Now in more detail. By itself, simply by rotating the rotor, the generator will not generate voltage. In order for it to start doing this, it needs to be excited - “kicked”, and for this it has an excitation winding that consumes some current. Voltage is supplied to it through contact D of the generator and the voltage regulator. The regulator also turns off the winding when the generated voltage is exceeded, in fact, this is its entire function. There are 2 power modes for the excitation winding. Starting, when the engine starts; and working, when the generator is already running. In the first case, power is supplied to the winding from the battery through a charge control lamp and a diode connected in series with it. In the second case, when the generator begins to generate voltage, the winding is powered through its 3 additional diodes - autonomously.
It happens that the generator does not want to be excited. The very first and simplest possible option here is to check the terminal on contact D of the generator, there may be a bad contact there, everything is very simple: tighten it up, clean it, and be happy. Another option: the charge control lamp has burned out. Naturally, it can be replaced. But if there is no way to change it now, on the road, for example, there are the following options: - “turn on the gas”, and it is likely that the generator will be excited due to residual magnetization; — apply voltage to the excitation winding artificially, i.e. separate wire from the battery. Let's talk about the last method.
Car generator operation
But there is no magnet in the generator; its functions are performed by the excitation winding. The states can be briefly described as follows:
- When the engine is stopped and the ignition is turned off, all vehicle systems are de-energized and no voltage is supplied to the excitation winding.
- When you turn on the ignition, constant voltage is supplied to the regulator.
- The voltage regulator allows you to stabilize the value at the same level.
- Next, the current is transmitted through the brushes and slip rings to the rotor winding.
- A magnetic field appears, but it is stationary, so no voltage is generated at the power terminal. But it is there, since this terminal is electrically connected to the positive terminal of the battery.
- As soon as you start turning the crankshaft with the starter (or even by pushing the car), the alternator rotor rotates and current is produced.
After starting the engine, the generator takes on the main load of powering electricity consumers, while the battery is charged at this time.
Excitation wire for generator VAZ 2109
It so happened that the battery charge died on the way. In the evening the traffic jam drained all the charge. Using the test method, the cause was determined - the voltage on the gene excitation wire when the ignition is on is 6.5V, which is clearly not enough to excite the generator normally. After lighting the cigarette, charging did not appear. 12V was supplied to pin 61 genes (thin wire) directly from the adjacent wires coming from the battery. Oh miracle! charging appeared - the car started working with the battery disconnected. That is, the problem is clearly not in the gene.
Question No. 1 – Who had this and how was it treated? Suspicions about tidy or CY. Is it really possible to fix it yourself or is it easier to give it to a competent electrician?
Question No. 2 – Is it normal that a working generator is not able to revive a dead battery? I idled the engine at 2.5-3000 rpm for about 20 minutes, but the battery was still not charged and I couldn’t start it myself.
Question No. 3 – Does anyone know a competent electrician in the Golyanovo area?
Etta. was the lamp not on?
If not, then there was enough power from the additional excitation diodes, so this is not the problem. After checking the bridge and regulator, you should think about a complete disassembly with troubleshooting (what is the mileage?)
Everything is real, a matter of desire and time