Electric generator VAZ 2109
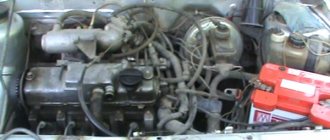
The generator produces electricity and recharges the battery. Violation of the stable operation of the electric generator leads to a gradual discharge of the battery. As a result, the car ride will be short until the battery is completely discharged. A sudden breakdown of an electric generator often causes a lot of problems for the car owner. Although repairing a generator on a VAZ 2109 is a very simple procedure that you can easily handle on your own. Anyone can carry out repairs with their own hands; no special tools or professional skills are needed. The electric generator is located under the hood of the car and is driven by a drive belt. The causes of failure are the following common malfunctions: worn out (broken) brushes, broken diode bridge, charging relay, jammed shaft bearings.
How does the generator work on the VAZ 2109?
On the VAZ 2109, a generator is constantly installed according to the traditional scheme, which plays an incredibly important role in the power supply system. That is, it makes it possible to work correctly. In addition, it charges the battery. Therefore, during operation of the vehicle, it is necessary to constantly monitor the operating process of the generator. Therefore, it is not recommended to wait until suddenly a special light comes on on the dashboard. It is necessary to regularly carry out diagnostics, then immediately replace or repair broken elements.
Generator circuit 37.3701
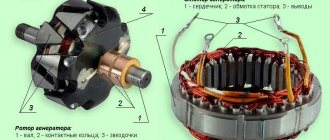
The generator, as a rule, consists of such main housing components as: an armature, two covers, a stator and a pulley with a fan. There are windings on the stator as well as the rotor. The first is divided into three parts, because at the output you need to get a voltage consisting of three phases. There is only one reason - this scheme makes it possible to get rid of all kinds of pulsations. This means that the efficiency of the device will be much higher. However, all this in turn imposes certain requirements. The basis of the work is that the rotor moves inside the stator winding. There is a coil on it, powered by the on-board transport system. As a result, a moving magnetic field appears around the rotor. Therefore, for efficiency it is imperative to ensure voltage stability on the rotor winding. Which is precisely an important condition for the operation of the generator set, which comes in two different types.
Generator connection diagram 37.3701
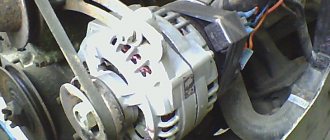
One part of the machines operates on a 37.3701 series V-belt drive, and the second uses a 94.3701 series poly-V-belt drive. However, in any case, all of them are necessarily located in the front part of the car, that is, on the internal combustion engine.
Technical specifications 37.3701
| Maximum output current at 13 V and 5000 min-1, A | 55 |
| Adjustable voltage limits, V | 14,1+0,5 |
| Maximum rotor speed, min-1 | 13000 |
| Engine/generator ratio | 1:2,04 |
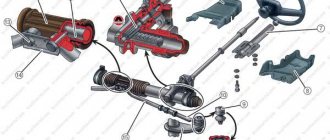
What does generator 37.3701 consist of: 1 – capacitor; 2 – voltage regulator assembled with brush holder; 3 – terminal block for additional diodes; 4 – insulating bushings; 5 – rectifier block; 6 – contact bolt; 7 – stator; 8 – rotor; 9 – spacer sleeve; 10 – inner bearing mounting washer; 11 – drive side cover; 12 – pulley; 13 – outer bearing mounting washer; 14 – coupling bolt; 15 – front rotor ball bearing; 16 – bushing; 17 – cover from the side of the slip rings; 18 – buffer sleeve; 19 – clamping sleeve.
But there are also some differences here. So in the first series, the VAZ 2109 generator device consists of a large number of different components:
- bushings,
- capacitor components,
- stator mechanisms,
- rotor windings,
- pulley,
- rear bearing of the rotor shaft,
- rear cover of the unit,
- fixing bolt,
A more complex design is the second series, which has many more of the above parts:
- bushing,
- brush assembly holder,
- capacitor device,
- shaft,
- coupling bolt,
- cone washer,
- fixing device for positive diode elements of the rectifying mechanism,
- fixing negative diodes and the like.
The range of the first model is often approximately 120 thousand km, but the second one is a little more, and all thanks to the slip rings, which have a smaller diameter. It all depends on the technical characteristics. As well as proper switching on of the electric generator.
Since each brand of this device is different:
Generator 37.3701: 1 – cover on the side of the slip rings; 2 – rectifier block; 3 – rectifier block valve; 4 – screw for fastening the rectifier unit; 5 – contact ring; 6 – rear ball bearing; 7 – capacitor; 8 – rotor shaft; 9 – output “30” of the generator; 10 – output “61” of the generator; 11 – voltage regulator; 12 – terminal “B” of the voltage regulator; 13 – brush; 14 – stud securing the generator to the tension bar; 15 – pulley with fan; 16 – rotor pole piece; 17 – spacer sleeve; 18 – front ball bearing; 19 – drive side cover; 20 – rotor winding; 21 – stator; 22 – stator winding; 23 – rotor pole piece; 24 – buffer sleeve; 25 – bushing; 26 – clamping sleeve.
When using 37.3701 , when turning the ignition key, voltage is connected through a special light bulb on the instrument panel, as well as resistors. When the internal combustion engine is started, the voltage goes to the excitation winding of the motors located on the rectifier block (the main voltage goes to the output of the regulator, the current does not pass through a special light bulb, as a result it does not light up).
Generator 94.3701: 1 – casing; 2 – output “B+” for connecting consumers; 3 – noise suppression capacitor 2.2 μF; 4 – common terminal of additional diodes (connected to the “D+” terminal of the voltage regulator); 5 – holder of positive diodes of the rectifier unit; 6 – holder of negative diodes of the rectifier unit; 7 – stator winding terminals; 8 – voltage regulator; 9 – brush holder; 10 – back cover; 11 – front cover; 12 – stator core; 13 – stator winding; 14 – spacer ring; 15 – washer; 16 – conical washer; 17 – pulley; 18 – nut; 19 – rotor shaft; 20 – front rotor shaft bearing; 21 – beak-shaped pole pieces of the rotor; 22 – rotor winding; 23 – bushing; 24 – tension screw; 25 – rear rotor bearing; 26 – bearing sleeve; 27 – slip rings; 28 – negative diode; 29 – positive diode; 30 – additional diode; 31 – pin “D” (common pin of additional diodes)
When using 94.3701 , approximately the same thing happens (as soon as the ignition is turned on, the voltage goes through a special light bulb to the regulator output).
It is important to constantly pay attention to ensure that everything is working properly. So the light bulb should light up immediately when you turn the key. And as soon as the internal combustion engine is started, it will turn off instantly. But if it does not immediately stop working, then the generator is faulty.
First aid for a car
The first step in such cases is to check the battery terminals; perhaps they are not making good contact. If there is poor contact at the battery terminals while driving , it will not be charged sufficiently, which may cause problems during further operation of the car. To fix this problem, you need to lubricate the terminals and tighten them.
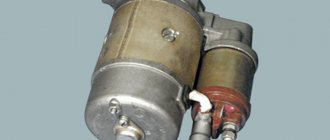
If your car's alternator fails, you need to have it repaired immediately. the voltage regulator fails . The failure of this generator element has rather unpredictable consequences. While driving, the regulator controls the required amount of current for the car; if it fails, the voltage in the network changes and can be either more or less. Very often, fuses blow at high voltages.
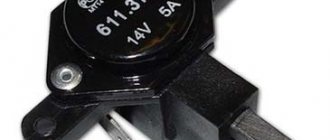
VAZ 2109 3-level relay regulator
relay is clearly shown here
-regulator after replacement instead of the factory one (faulty...
How to change the voltage regulator (tablet) on a VAZ 2115-09, etc. (part 1)
EARNING ONLINE IN CASHBERY I invite you to Twitch...
2109 voltage regulator is located directly in the car’s generator itself. When it fails, most often the generator relay breaks. It consists of several elements such as an electromagnet, an armature and a switch. These elements interact with each other when electric current is applied to them.
Replacement and repair of generator for VAZ 2109
If any problems are detected, it is imperative to carry out only high-quality work to replace or repair the device. Remembering to connect everything correctly during assembly. Since this is a good guarantee of good performance of the repaired or replaced generator.
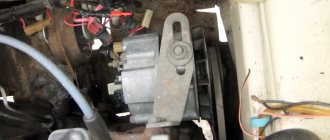
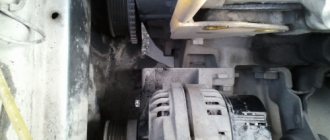
How to remove a generator on a VAZ 2109
Moreover, you can replace or repair the generator not only at a service station, but also with your own hands.
1. Disconnect the block with the wire from the generator terminal.
2. Slide the rubber boot, unscrew the nut and disconnect the wires from the “ZO” terminal of the generator.
3. Loosen the adjusting nut and the lower generator mounting nut.
4. Move the generator to the engine and remove the belt.
5. Unscrew the bolt securing the adjusting bar.
6. From the bottom of the engine compartment, unscrew the two bolts securing the bracket, holding the generator.
7. Remove the generator from the vehicle.
8. Install the generator in reverse order. When attaching the generator bracket, the longer bolt is installed closer to the generator drive! After installation, adjust the belt tension.
But at the same time you should always adhere to the necessary stages:
- disassembly,
- troubleshooting,
- replacement of broken elements,
- installation,
- connection.
Replacing a generator on a VAZ 2109 takes approximately 30 minutes. And for this you will definitely need to take spanners for 10, 13 and 17, as well as screwdrivers and a vice.
- The battery is turned off to de-energize the entire on-board system,
- All existing wires that are connected to the generator are disconnected,
- The top nut is completely unscrewed,
- The generator is held at the bottom thanks to a long bolt, which should be held with one key, and the nut should be tightened with the second,
- The generator is carefully removed,
- All broken elements are removed and replaced with new ones,
- Then everything is reassembled and installed. Moreover, the work is done in the opposite direction.
And the final touch is a mandatory check of the generator belt tension. To do this, you need to charge the battery and start it to understand that everything is working as it should again.
Generator repair for VAZ 2109
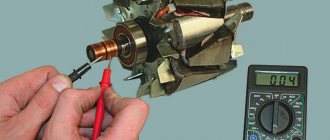
Repair of the generator on the VAZ 2109 is carried out only when faults have been discovered inside the device. In such a difficult situation, it is definitely worth doing a special diagnosis with a multimeter.
Thanks to the basic principles of operation, it is possible to very successfully replace or repair the device. But sometimes there is only one way out - installing a new one.
The main thing to remember is that timely detection and identification of breakdowns will help you avoid all of the above problems. Plus, you can extend the life of the generator itself for a long time.
Electric generator diagnostics
Let's start by identifying the causes of the breakdown:
- Noisy operation of the electric generator means wear on the generator bearings
- If the voltage at the “output” is low, most likely the brushes are worn out or the tension of the drive belt has simply weakened
- An increase or decrease in the electrical voltage at the “output” may indicate a malfunction of the diode bridge
We carry out initial diagnostics of faults:
- We check the voltage at the battery contacts with a voltmeter. If the generator is working properly, then with the engine running, the voltage at the terminals should be 13.8 - 14.5 volts
- We place our palm against the body of the unit and detect vibration. If the shaft bearings are worn out, vibration on the housing will be noticeable; it is almost impossible to confuse it with another malfunction
- Check the belt tension: with the engine turned off, press the belt with your finger, the deflection does not exceed 1 - 1.5 centimeters (if more, then it is necessary to increase the belt tension)
We check the diode bridge using a 12-volt test lamp and a battery:
Note: The rectifier unit (aka diode bridge) is checked without removing the electric generator from the machine. To do this, disconnect the wires from the battery, then the generator, and remove the block from the voltage regulator.
- To check the positive diodes, we connect a test light to the “+” (plus) of the battery, and the second contact of the lamp to terminal “30” of the electric generator, and the wires coming from the “-” (minus) of the battery to any bolt of the diode bridge. If the light is on, this means a short circuit in the positive diodes - the unit needs to be replaced
- To check the negative diodes, we connect a test light to the “+” battery and the second contact of the lamp to any bolt of the diode bridge, and connect the wires coming from the “-” battery to the unit body. If the light comes on, this means a short circuit in the negative diodes - the unit must be replaced
How to remove the charger
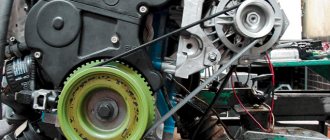
Replacing the generator drive belt 37.3701 for VAZ 2108, 2109, 21099 cars
The generator for the ninth Zhiguli model is designed for alternating current and is three-phase with a built-in rectifier. The device is electronic, rotating clockwise. If you know how to check a current-generating device, you can save on car service costs. You can diagnose the charger using simple electrical measuring instruments (ammeter, voltmeter). A broken VAZ 2109 generator bearing can be identified by the sound it makes or by inspection.
In order to replace or repair damaged parts, the electrical current-generating device must be dismantled.
To do this, the car is driven onto an overpass or pit. Dismantling is carried out according to the following algorithm:
- the car is de-energized by disconnecting the battery terminals;
- then remove the rubber cap, which protects the negative terminal of the mechanism from moisture and dirt particles;
- then unscrew the fastening nut and remove the conductors from the stud;
- then disconnect the block with the wires on it from the generator connector;
- now you need to loosen the tightening of the generator fastening to the bar, which regulates its position relative to the vertical axis;
- it is necessary to lift the device to be dismantled to the highest point and remove the generator belt from the pulley;
- at the penultimate stage of dismantling the part, the bolt is unscrewed, with which the adjusting bar is attached to the cylinders;
- now two bolts are unscrewed from the bottom of the car, with the help of which the lower bracket is attached to the cylinder block;
- the mechanism can then be removed from under the hood.
The number of steps required to remove the generator is small, and dismantling can be done with your own hands. Upon completion of the repair work, you should check the condition of the belt and tighten it onto the generator pulley. The pulley size must exactly match the belt.
Rotor and stator windings
First, it’s worth talking about what a stator winding is. It is from it that the voltage is removed to power the vehicle’s on-board network and charge the battery. On a VAZ-2109 car, the generator is very similar to an AC asynchronous motor. However, if you make minor changes to the design, the generator can also be used as an electric drive. Three windings on the rotor, each with a beginning and an end. The ends are connected at a common point. This connection is called a “star”.
As for the rotor winding, it is much simpler. There are no extra taps, the copper wire is wound in bulk on the rotor. The ends of the winding are connected to contacts that are located on the back of the rotor
Particular attention, of course, is paid to the magnetic circuit, due to which the field is formed around the coil. When rotating, the magnetic field induces a certain potential in the stator windings
Actually, this is what the entire operation of the generator is based on. But there are many smaller nuances that we can talk about for as long as we like.