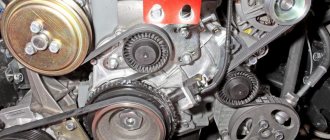
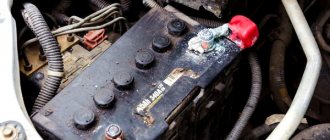
The generator of each car is designed to supply all consumers with electric current and to charge the battery. The VAZ 2107 generator is an alternating current device with a unique electromagnetic excitation. It is installed to the right of the engine and is driven by a V-belt from the crankshaft. The key elements of this assembly are the rotor, stator and covers, cast from aluminum alloy.
In the history of the VAZ 2107, there are cases when models were equipped with generators 9412.3701, which have some design differences.
Before dismantling the “seven” generator, you need to realize that this work is considered difficult. In some cases, dismantling causes some problems, so first you need to think about how and what tools you will do everything with.
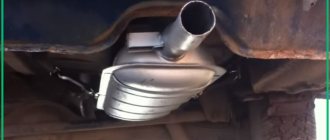
Fasteners and bolted connections usually stick tightly to the fasteners, so it is usually not possible to carry out dismantling work without WD-40. To remove the generator, you need to work from under the right wheel arch, which is not very convenient, so it is better to dismantle it by driving the car onto a lift or inspection hole.
Assembling a VAZ 2107 generator
Before assembling the generator, it is necessary to clean the parts from contamination. It is better to wash metal parts with gasoline, and wash windings and other complex parts with air from a compressor.
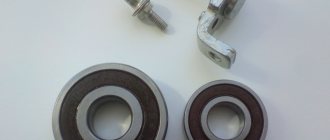
The new bearing is pressed onto the rotor using a mandrel. You can use a head or tube with a diameter that matches the size of the inner ring of the bearing.
Before installing the rear and front covers, it is necessary to check the condition of the bearing seats. They must not be damaged or scratched.
If there are cracks in the cover, they must be replaced with new ones. Bolts and nuts of poor quality must also be replaced.
The sequence of assembling the generator corresponds to the procedure for disassembling it.
After installing and connecting the generator, it is necessary to tighten the belt with the necessary force. If it is overtightened, the bearings will fail; if it is loose, the generator will slip under load and will not produce the required charging current.
Repair of generator on VAZ 2107
Hello, dear users of our site! Today we are publishing relevant material for all owners of a VAZ 2107 car - do-it-yourself generator repair. Here we will look at the main faults that classic owners often have to fix.
— wrench size 19—socket wrench is more convenient;— socket heads size 8 and 10;— extension cord;— hammer.
Let us remind you that in the previous article we looked at how to replace the wiper motor on a VAZ 2107 with your own hands. The windshield wiper motor is very vulnerable in winter, so this breakdown occurs quite often in the cold season.
Now below I will describe in more detail the disassembly procedure, and I will also analyze the dismantling of each part separately.
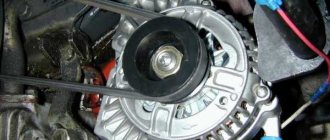
Replacing brushes on the generator
For this we need a Phillips screwdriver and that's it. The photo below shows the location of the brush holder.
Take a Phillips screwdriver and use it to unscrew one bolt securing the brushes to the generator.
After this, you can remove them from their seat.
Next, you need to check how much the brushes protrude, that is, their working area in height. Make sure it is at least 12mm. If this value is not reached, then the brushes need to be replaced. It is also worth paying attention to the uniformity of wear.
If necessary, we replace this part, the cost of which is no more than 100 rubles in most stores. And after that we perform the installation in reverse order.
Complete disassembly into parts
First, unscrew the 4 nuts that are located on the back cover of the device, and they are very clearly visible in the bottom photo.
Then we try to unscrew the pulley mounting nut with a 19mm wrench. Usually, it is very tightly tightened and it is quite problematic to do this with the generator removed, unless you clamp it in a vice. But there is a way out of the situation - you can press on the bolts from the reverse side, where we unscrewed the nuts, so that they rest against the impeller blades, thereby fixing it in a stationary state. Next, you can try to unscrew this nut, holding the generator stationary.
Now we take a hammer and, with light tapping, try to separate the generator into two parts, as is clearly demonstrated in the photo below.
As a result, it should look something like this.
As you can see for yourself, there will be a rotor on one part, and a stator (winding) on the other. Removing and replacing the rotor
It is very easy to remove; first we remove the pulley, removing it from the shaft.
Then we remove the key.
And now you can easily remove the rotor of the VAZ 2107 generator, since it is easily released from the housing.
Now you can move on.
Let us note that our website has long published an article about replacing the generator on a VAZ 2107 with your own hands. When the generator cannot be restored, you simply need to replace it.
Removing the winding (stator)
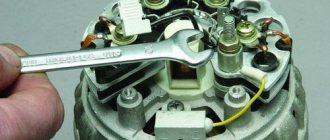
To do this, you need to unscrew the three nuts from the inside with a head, as shown in the photo.
And after this, the stator can be removed without any problems, since it is disconnected from the diode bridge.
If it needs to be replaced and you need to remove it completely, then of course you will need to disconnect the plug with the wiring, which is visible in the top photo.
Replacing the diode bridge (rectifier unit)
Since after removing the winding, the diode bridge is practically free, there is almost nothing to say about replacing it. The only thing you need to do is push the bolts from the inside so that they pop out from the outside.
And the diode bridge has been completely removed and can be replaced.
After carrying out the required repairs to your generator, we reassemble it in the reverse order and do not forget to connect all the winding wires correctly.
How to disassemble a generator in a VAZ-2107
To quickly disassemble the VAZ-2107 device you will need the following set of tools:
- open-end or socket wrench designed for 19;
- ratchet equipped with an extension;
- heads size 8 and 10;
- hammer.
You need to disassemble the generator with your own hands, starting with unscrewing the 4 fixing nuts securing the roof located at the rear.
After they are unscrewed, follow these step-by-step instructions:
- Turn the unit over and lightly press the ends of the bolts. Your task is to ensure that the fastener heads penetrate between the pulley blades; this is the only way to secure it in a stationary state.
- Armed with wrench 19, unscrew the pulley fixing nut, securing the VAZ-2107 generator well in a stationary position.
- Next, separate the 2 parts of the device; this is easy to do if you tap the ear of the fastener with a hammer. You should have two parts left in your hands: the rotor and pulley, as well as the stator and winding.
- There is a pulley in the rotor that needs to be removed by pulling it towards you.
- Be vigilant - after removing the pulley, the key is no longer fixed and may get lost, so remove it carefully and set it aside for now.
- Pull out the rotor with bearing. If you need to replace the old rotor with a new one, now is the time to do it. A new device costs 350 rubles in auto stores. If you need to replace the winding and stator, then you will have to pay a little more - 400 rubles.
Disassembling the VAZ 2107 generator
For a comprehensive repair, you need a puller to remove the bearing from the shaft, a mandrel for pressing and knocking out the bearing in the generator cover.
- unscrew the nut securing the pulley and impeller using a socket wrench, holding the rotor with a screwdriver so that it does not turn;
- dismantle the pulley and impeller, remove the key, remove the washers from the shaft;
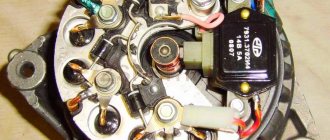
- unscrew the screws securing the voltage regulator relay and remove it, having first disconnected the wire block;
- remove the regulator relay along with the brush assembly;
- unscrew the nuts and remove the bolts securing the generator cover;
- knock down the front cover by hitting the shaft with a rubber hammer (the cover must be rested against a wooden block);
- remove the spacer sleeve from the shaft;
- check the condition of the bearing in the front cover;
Tip: To check the bearing, you need to rock the inner race of the bearing while holding the cap. If there is play, the bearing must be replaced.
if necessary, unscrew the bearing mounting nuts;
Attention: if the nuts do not unscrew, you should cut off the ends of the fastening bolts. During assembly, it is necessary to install new bolts and, after tightening the nuts, rivet their ends with a core.
- knock the bearing out of the cover using a drift (mandrel);
- rest the back cover against a pair of wooden blocks and knock out the rotor using a soft metal drift and a hammer;
- check the condition of the rear bearing (similar to the front);
- if necessary, replace the bearing by pulling it from the rotor with a puller;
- unscrew the nuts holding the VAZ 2107 diode bridge and the winding terminals;
- remove the bolts;
- remove the stator winding;
- visually check the condition of the winding;
- if the winding has breaks or has turned black from overheating, replace it;
- remove the generator output nut and insulating washer;
- dismantle the diode bridge;
- remove the capacitor by unscrewing the fastening screw;
- remove the bolt securing the rectifier unit;
- check the rotor and stator windings with a test lamp;
- check the diode bridge of the VAZ 2107 generator for broken diodes.
https://youtube.com/watch?v=WPRxQJC_lIQ
How to remove the generator
First you need to de-energize the car by removing the negative terminal from the battery. After this, you need to remove the engine protection and the mudguard on the right.
Note how the wires are connected to the generator and disconnect them. Now the difficulties begin - you need to unscrew the nut securing the generator to the motor housing. Pull out the device, and if difficulties arise, use WD-40. Gently hit the bolt to knock it out from the back. If this does not lead to anything, the generator will have to be dismantled along with the bracket on which it is supported.
To remove the bracket, unscrew a couple of bolts. Some VAZ 2107 models have three-bolt generator mounts. Sometimes you need to remove the radiator, but do not rush to disconnect the supply pipes - just move the radiator a little to the side, providing access to the bracket. After unscrewing the generator from the car, you need to remove the belt and remove the generator.
Sometimes the problem of dismantling the generator can be solved in another way. For example, if the car is new or the generator was installed relatively recently. In these cases, craftsmen reach it through the wheel arch on the right. Technically, the procedure is not much different. You won't need to remove the radiator, and you will need to remove the belt before removing the alternator. To get to the device, turn the steering wheel all the way and remove the mudguard.
Repair parts
To repair the generator you will need the following spare parts:
- device capacitor;
- bearings;
- diode bridge;
- four nuts for 8;
- relay regulator
If the relay regulator is in normal condition, it does not need to be changed.
Tools
To work you may need the following devices and tools:
- universal puller for dismantling the bearing - a rod puller can be used, but it is not very convenient;
- hammer;
- a good metal brush and sandpaper;
- set of screwdrivers and keys;
- WD-40.
Signs and causes of diode bridge failure
As mentioned above, a generator equipped with a diode bridge is the most important component of a car. If the alternator fails for some reason, the battery will stop charging. And this is the only sign of a faulty diode bridge. Without additional recharge, the battery will work for a few hours at most, after which the car will be completely immobilized. A diode bridge fails when one or more diodes burn out in it. Here are the reasons why this happens:
moisture has entered the generator. Most often, this is condensation that forms on the internal surfaces of the generator in the autumn-spring period, when relatively warm weather alternates with frosts;
The diode has simply exhausted its resource. Like any other part, the diode has its own service life
The manufacturer of 2D219B diodes claims that the service life of their products is about 10 years, but after this period no one guarantees anything to the car owner; The diode burned out due to the negligence of the car owner. This usually happens when a novice car enthusiast tries to “light” his car from another car and at the same time confuses the battery poles
After such an error, the entire diode bridge and part of the generator usually burn out.
About installing an additional diode
Installing an additional diode is quite rare. Why is this being done? In order to slightly increase the voltage of the on-board network. The need for this increase arose due to new laws. As you know, in 2015, changes were made to the traffic rules, forcing drivers to constantly drive with their running lights on. And owners of classic VAZ models are forced to constantly drive with their low beams on. In such a situation, both battery charging and on-board voltage drop significantly. To somehow solve this problem, craftsmen install additional diodes, which are located between the voltage regulator terminals and the common output wires for the additional diode, as shown in the figure below.
An additional diode is placed between the terminals of the voltage regulator (number 1) and the common wire for additional diodes (number 2)
For installation, KD202D diodes are usually used, which can be found in any radio parts store.
The KD202D diode is very popular among owners of “Sevens”
If the above diode is not available, you can choose any other one. The main thing is that the direct forward current is at least 5 amperes, and the maximum permissible reverse voltage is not lower than 20 volts.
So, in order to change the diode bridge on a VAZ 2107, you do not need to go to the nearest service center and pay a mechanic 800 rubles. Everything can be done on your own, and in a fairly short time. To remove and disassemble the generator, 20 minutes is enough for an experienced car enthusiast. It will take a beginner more time, but in the end he will cope with the task. All you need to do is follow the recommendations given above exactly.
Generator bearing and belt diagnostics
To check, the generator does not need to be removed. The test is carried out using a tester. You can use a cheap Chinese tester. The two probes of the measuring device need to be connected to the battery terminals and the voltage checked.
Analysis of voltage values makes it possible to judge the health of the generator set. What voltage the generator device produces can be found in the manual.
Signs of device malfunction:
- The charging indicator light is constantly on or flashes when the engine is running;
- the battery either does not discharge completely or receives an increased charge;
- The headlights do not shine well enough when the engine is running, poor performance of other electricity consumers;
- the headlights are too bright, the electrolyte in the battery boils;
- heats up at high voltage;
- increased noise during engine operation from the generator side.
If the brushes are less than 0.5 cm long, that is, they do not correspond to the required size, they need to be replaced. The condition of the brushes is checked to see how the brushes move in the grooves. After replacing the brushes, the generator restores its operation after a few minutes when the slip rings and brushes grind in.
The three-level regulator should be checked along with the brush holders. If the regulator is working properly, the voltage should be 14.7 V. If the voltage is less than 13 V, the regulator must be replaced with a new one, since it maintains the required voltage for devices in the on-board network.
Problems are possible not only with the cheeks, but also with the diode bridge.
Signs of a diode bridge malfunction:
- There is no charging at all;
- charging significantly exceeds the permissible values.
While the generator is running, with or without noise, it is rarely noticed. But as soon as it stops producing current, its absence is immediately noticed
The battery charging light comes on and the search for a fault begins. But it was enough to just listen to the sounds that the generator makes, and the trouble could have been avoided.
Replacing the VAZ 2114 generator bearing may be required as early as 60-80 thousand km
It all depends on how much the owner pays attention to such little things as the tension of the generator drive belt. First of all, this is what affects the resource of the generator
For prevention, let's check the degree of belt tension.
An ordinary eight-cylinder engine, which costs 2114, does not require special maintenance skills. On the tenth family, the belt is tensioned through a tension roller, but in 2114 there is none of this, and the belt itself no longer drives any mechanisms or assemblies.
Symptoms of generator bearing failure
Problems with the generator cannot be ignored. After all, they significantly affect the ability to use the car. The following symptoms usually indicate that the bearings have failed:
- Crunching noise when the engine is running. It often indicates wear on the generator ball bearings, but can also be caused by other reasons. When such a sound appears, you need to make sure that it comes from this node;
- Whistle, noise when the engine is running. These sounds also often indicate failure of these parts, but can also occur due to other malfunctions. It is important to check that the generator is whistling;
- Unstable battery charging. The battery can either work normally, or quickly discharge, literally overnight. Often there is a drop in voltage in the on-board network and the inability to start the car due to a dead battery. These signs often indicate a broken ball bearing, but can also be caused by a malfunction of other parts of the generating device. There may also be a problem with the battery, terminals or wiring;
- The generator housing is hot. This can be noticed by touching it when the power unit is running or has just been turned off.
You can check the serviceability of the bearings by removing the generator belt from the pulley. If, after starting the engine, the crunching, whistling or other noise disappears, the unit requires repair. It is possible to understand which of the two elements has failed only after disassembling the generator. These parts can travel on average up to 100,000 km. But usually they break down at about 60,000-80,000 km. This can happen sooner if the belt is too tight or slipping. Dampness and dirt in the engine compartment can cause their bearings to fail ahead of schedule.
How the generator works on the VAZ 2114
This device is a three-phase AC electrical installation. It is equipped with a built-in rectifier unit, where alternating current is converted into direct current. Main components of the generator:
- front and back covers (material – aluminum alloy). Each of the covers has mounting sockets for mounting bearings;
- battery connection terminal;
- connector to ensure the required voltage is supplied to the excitation winding;
- a capacitor that suppresses various radio interference;
- seat for installation and reliable fastening of the brush assembly;
- block of diodes (power – 6 pcs., additional – 3 pcs.). Such a block is fixed on the back cover (on the inside). In order to ensure cooling of semiconductor devices, they are mounted on horseshoe-shaped plates (material - aluminum alloy);
- stator core cylinder (material – transformer iron). Both covers are attached to the stator using bolts (4 pcs.). There are grooves inside the stator that serve for laying power windings (they have leads for connection to the rectifier block);
- excitation winding, which, using its terminals, is connected to slip rings installed on the rotor shaft. There is a special keyway on the front of the rotor shaft that houses the drive pulley;
- brush assembly - in the VAZ 2114 generator this assembly is non-separable. It is combined with an electric relay-regulator (the relay is in a metal case and is rigidly riveted to the brush holder). The brushes used are carbon-graphite.
Generator repair
First, you need to clean the generator from dirt, oil, dust and everything that has accumulated on it over the entire period of operation.
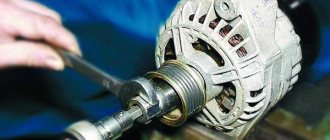
Unscrew the pulley nut, placing the generator so that the pulley rests on the floor, and then put a 19mm wrench on the nut. While holding the pulley from turning, it is necessary to make several strong and accurate blows on the key. It is unlikely that you will be able to clamp the pulley tightly with your hand, but your efforts may be enough to tear the nut out of place.
Using a 10mm wrench, you need to unscrew the 4 bolts of the tie rods that assemble the generator device into one whole. Using a chisel, knock out the key. This can be done by installing the generator with the shaft up. Place the chisel against the key and start knocking it out with a hammer. Once you have knocked out the key, remove the front cover of the device. If it goes too hard, you need to try to knock it out by weight.
Belt whistles
Often, when a certain malfunction of the VAZ 2107 appears, you can hear an extraneous sound, which allows you to confidently diagnose the problem. One of the malfunctions may be the belt slipping, resulting in a whistle from friction against the pulleys. This problem leads to unstable operation of the generator and lack of battery charge.
Due to the fact that the generator always has the same type of drive, the problems are always the same. The main difference between injection and carburetor models is the presence of a crankshaft position sensor, which must be removed when replacing the belt.
In fact, you can determine the cause of a belt whistling without any problems by eliminating it without the help of professionals. It is only necessary to determine the diagnosis. Among the main causes of slipping are the following:
- generator bearing failure;
- insufficient tension;
- contamination of fuels and lubricants.
In all these cases, self-repair takes little time and does not require special tools. You will need two wrenches and a pry bar.
How to tighten the belt?
Low tension may be due to the fact that the belt has stretched during operation and began to slip on the pulleys. If its length does not exceed the permissible limit, you just need to tighten it. Otherwise you will have to change it. To tighten it yourself, you should do the following:
- using a 17mm wrench, loosen the nut that secures the generator to the bracket;
- loosen the generator rod nut;
- if you cannot tighten it manually, you need to use a pry bar;
- Having fixed the position with a nut on the adjusting bracket, you should check the degree of tension.
Checking the tension is easy. You need to press the belt between the crankshaft and the pump. The deflection should be within 12-17 mm, and between the generator and the pump - 10-17 mm. After tightening the belt, taking into account these requirements, you need to tighten both nuts in order to prevent spontaneous loosening.
Bearing problem
If the cause of slippage is related to difficult rotation of the VAZ 2107 generator pulley caused by bearing failure, repairs will be required. It is necessary to dismantle the generator and replace the bearings. After this, you should install the device in place and tighten the belt as described above. Not every motorist can replace bearings on their own, so it is often better to immediately contact a workshop. This way you will avoid problems with the generator in the future. The last reason for slipping is a dirty belt. Perhaps the problem can only be solved by replacing it, since you are unlikely to be able to completely clean the belt of dirt without damaging it.
Sometimes, especially in the cold season when the engine is not warmed up, a whistle may be due to the poor quality of the belt, which has become stiff in the cold. After the engine warms up, the whistle disappears. This is a normal phenomenon, that is, no repairs are required in this case. You just need to make sure that the drive belt is intact to avoid it breaking on the road.
Video:
Video:
Video:
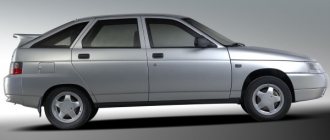
Lada 2107 2003, engine Gasoline 1.6 liter., 75 hp, Rear drive, Manual - DIY
Comments 3
I also broke my first generator during disassembly, then I used it for spare parts. On the second generator, the seat for the rear bearing on the rotor was worn out, the rotor was pulled out of the back cover without the bearing, the bearing got wedged, replaced the back cover, installed it from the first generator, but due to the wear out of the seat, the rotor scraped against the stator. Now there is a third generator, just as shiny as yours, before that they were painted, the other day the pulley on it fell apart and the key was cut off, the nut seemed to be tightened, but the pulley was not clamped, it started with a whistling belt, I didn’t notice it the first time, I tightened the belt, for the second time something started to rattle, I thought it was the bearing on the pump, which I had recently changed, and again the belt whistled, I looked and it was weak again, I started looking at the pump, and it turned out to be a generator. From this generator I threw out the pulley, impeller and all the spacer washers, installed everything from the old one, where the pulley mount seemed more reliable to me. So save the old one for spare parts
Playlist about generators. Play the video and click on YouTube. There is something about assembly and disassembly there.
So in this article I will describe the generator overhaul. We will talk about the 37.3701 generator, although everything on the G-222 generator is almost identical and this article will be suitable for it with some adjustments. I bought for replacement: 1. Diode bridge - 190 rubles 2. Generator capacitor - 15 rubles 3. Bearings - I took Andycar - 65 rubles 4. four nuts for 8. The relay regulator on the generator is new, so I decided not to change it. We will also need a universal puller (I personally used a rod puller instead, it wasn’t very convenient, but after fiddling around I removed the bearing with it). It is very desirable to have a brush for metal; I bought a set of three brushes and some sandpaper.
Clean the generator from dirt with a brush. And unscrew the pulley nut. We place the generator so that the pulley rests on the floor, put a 19mm wrench on the nut and, holding the pulley with one hand from turning it, apply strong and sharp blows to the wrench with a hammer. The pulley will of course turn, but the nut will eventually begin to unscrew, I knocked like this for 2-3 minutes
Using a 10mm wrench, unscrew the four bolts and remove the studs holding the generator together.
further, unfortunately, several photos were lost