Triangular levers stinger PU for VAZ 2108-2115, 2110-2112, Lada Priora
Triangular stinger levers for VAZ 2108-2115, 2110-2112, Lada Priora
Lower suspension arm with hinges for VAZ 2108-21099, 2110-2112, 2113-2115, Lada Kalina, Kalina 2, Priora, Granta
Razgon triangular levers, reinforced blue, PU for VAZ 2108-2115, VAZ 2110-2112, Lada Priora
Wishbones TechnoMaster for VAZ 2108-21099, 2113-2115
Reinforced triangular razgon levers for VAZ 2108-2115, VAZ 2110-2112, Lada Priora
VolgaAvtoProm SPORT front suspension arm with polyurethane silent blocks for VAZ 2108-2115
Front suspension extension for VAZ 2108-21099, 2110-2112, 2113-2115, Lada Kalina, Kalina 2, Priora, Granta with manual transmission
Front suspension arm VolgaAvtoProm for VAZ 2108-21099, 2113-2115
Adjustable front levers autoproduct for VAZ 2108-21099, 2113-2115
Front suspension extension joints 213R on VAZ 2108-21099
Whether you are turning or driving along what you think is a flat road, the VAZ 2108, 2109, 21099 car rushes smoothly, like a ship floating on the waves, swaying slightly. Turn the steering wheel to the right or left, the vehicle continues its journey along the highway smoothly and without bumps.
The reason for everything: the main link of a car suspension is the lever between the chassis and the wheel of the VAZ 2108-15. This is a very important part of the car's suspension system, allowing you to control the movement of the wheels, keeping the car level on the road surface and, at the same time, softly on uneven surfaces. The task of supporting the car on the road and absorbing bumps is performed by the suspension arm.
The lever and its components for the Lada Samara and Samara 2 are designed for stability and maneuverability, made from heavy-duty steel, cast iron or aluminum (depending on application) and powder coated or painted for long-lasting rust protection and enhanced corrosion resistance.
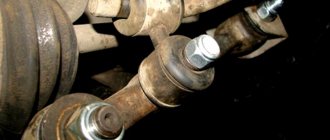
The inner side of the lever is attached to the body by a rod, controlling the position of the outer end only vertically, maintaining radial distances. Control of the vehicle is provided by equipment attached to the lever and support frame of the vehicle. The lever is often shaped into a "V", a sort of triangle. The assembly is made of metal, rubber bushings are used to prevent direct contact with the metal, which could cause damage to the frame and a potential hazard to traffic. Over time, the bushings wear out, allowing the lever to move more than the required distance, resulting in an annoying knocking sound. If the bushings are significantly worn, the driver experiences increased vibration.
Gradually, the rubber seals wear out, the bushings break, and the lever may be damaged. Replacing a suspension arm on your own car is a labor-intensive process that requires a lot of money and effort. You need to set aside enough time, equip yourself with the proper tools and a lot of patience.
Advantages of installing a triangular front suspension arm on the VAZ 2108, 2109, 21099:
- free, independent fastening of levers;
- management stability;
- sensitivity of steering response when turning;
- improved grip of the front tires;
- smooth ride quality;
- increased directional stability and maneuverability
- predictable steering;
- high vibration-absorbing and self-centering characteristics.
When setting off on a road trip, a car enthusiast must be confident in the technical condition of any unit, especially the supporting chassis. A faulty lever will result in unstable control. An aggressive driving style leaves its mark on the condition of the suspension. Any degree of wear is a ban on driving both a production car and a sports car. Daily inspection and periodic maintenance will help to promptly identify the malfunction and replace the damaged unit.
The silent blocks of the chassis suspension, and the functions that they perform, are a necessary component for the comfortable and safe operation of the car. Silent blocks dampen all torques and bending moments that occur during driving, ensuring a stable position of the car on uneven roads and in turns.
Silent blocks consist of a rubber base and a metal sleeve, which is vulcanized into an inextricable connection with the base material. It is this design that provides vibration damping and absorption of various types of deformations, and does not require maintenance or lubrication during vehicle operation.
How the front suspension of the VAZ-2109 works
It is very important to do timely maintenance of the vehicle’s chassis, since the main load during operation falls on it. Moreover, the load also occurs at rest. The chassis includes the following elements: frame, wheels, rear and front suspension. Early diagnosis will help avoid many problems.
What is the front suspension? This element of the car is independent, which allows the car to be more maneuverable, since the front wheels work independently of each other. If one of them hits a pothole, the other avoids this impulse. Such design features allow you to adjust the wheel alignment of the car; you can also correct the “behavior” of the car on the road using a small negative value for the rolling radius.
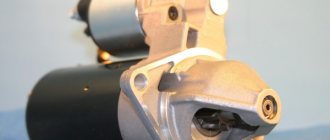
The main part of the front suspension is the shock absorber struts, the springs are attached to them. There are 3 bolts and a bearing attached to the top of the rack. All this as a whole provides the ability to rotate the stand with the wheels of the machine.
The next main part is the rotary cam. Its lower part is attached to the ball joint, and its upper part is connected to the bottom of the rack. The connection is provided by bolts. The upper one adjusts the camber. The lateral stability of the car is ensured by a rod, which is secured by silent blocks to the base of the car using brackets.
Thus, we see that the front suspension includes a lot of parts, but the most basic of them are:
- spring;
- lever arm;
- shock absorber;
- ball joints;
- tension joint;
- brackets.
Troubleshooting
Like any part, the silent block has a limited service life and must be replaced if it fails. Signs of unusable silent blocks:
- cracking of rubber (decreased elasticity of rubber, and as a result, reduced absorption of shocks and vibrations);
- breakage of the internal, precision bushing (complete absence of absorption, knocking in the chassis, sharp deterioration in vehicle handling);
- displacement of the central hub from the center (wear of tires and chassis parts, impossibility of setting wheel alignment angles, decreased handling);
- turning the entire silent block in the body (quick failure of the part due to the formation of friction force, increasing play in the suspension);
Front suspension assembly for VAZ 2109
Hello everyone, in this part we will assemble the front suspension, here is the finished result
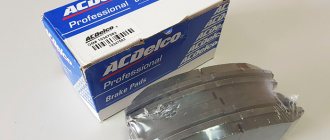
I started with the steering rack; in the last posts you could see how I installed the steering rack. I decided to replace the tips, they were dead, the brake discs were also tired, you can see in the photo
Here are the new spare parts for assembling the front chassis
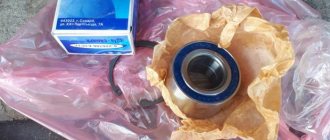
We also bought a right grenade, the old one became unusable, and the rest of the grenades are in excellent condition
New metal brake disc protectors were purchased, the old ones rotted
The stand is assembled, with a -70 spring, and with new supports
The chipper was cut, leaving 1 bagel
At the moment the front chassis looks like this
Everything looks like new, I also replaced the old bolts that were rusty.
Scheme
The diagram below will allow you to determine what components the assembly is divided into and what it represents in the assembly. The table will help you figure out where each suspension element is located.
| Item number | What is |
| 1. | Upper shock mount |
| 2. | Spring support cup (upper) |
| 3. | Compression stroke buffer with protective cover |
| 4. | Compression Buffer Support |
| 5. | Spring |
| 6. | Spring support cup (lower) |
| 7. | Tie rod joint (ball) |
| 8. | Swivel lever |
| 9. | Strut (shock absorber) |
| 10. | Eccentric washer |
| 11. | Adjustment bolt |
| 12. | Shock absorber bracket |
| 13. | Rounded fist |
| 14. | Brake disc guard |
| 15. | Brake disk |
| 16. | Retaining rings |
| 17. | Hub cap |
| 18. | Splined shank of the wheel drive joint housing (outer) |
| 19. | Guide pin |
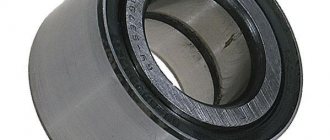
| 20. | Wheel bearing |
| 21. | Control arm ball joint |
| 22. | suspension arm |
| 23. | Adjusting washer |
| 24. | Shock absorber (strut) of anti-roll bar |
| 25. | Anti-roll bar |
| 26. | Barbell cushion |
| 27. | Rod fixation bracket |
| 28. | Body bracket for fixing the suspension arm |
| 29. | Lever stretch |
| 30. | Stretch Fixation Bracket |
| 31. | Suspension arm joint bushing (rubber) |
| 32. | Suspension arm joint bushing (spacer) |
| 33. | Shock absorber rod |
| 34. | Upper strut housing (outer) |
| 35. | Upper shock mount housing (inner) |
| 36. | Support bearing |
| 37. | Rubber top support component |
| 38. | Travel limiter for upper shock absorber mount |
| 39. | Protective cap for upper shock absorber mount |
| 40. | Front joint bushing |
| 41. | Front joint cushion |
| 42. | Washers |
| 43. | Stabilizer link joint |
| 44. | Rear joint extension |
| 45. | Joint housing (ball) |
| 46. | Joint bearing (ball bearing) |
| 47. | Ball pin |
| 48. | Ball pin protective cover |
Bottom view
It is not enough just to know the name and location of the suspension elements. Be sure to understand how the entire system works and how all the components interact with each other.
Device Features
- The suspension consists of a guide device, elastic, damping components. The guide element serves to regulate the movement of the wheels and transfer force and moment to the car body.
- The steering device includes a telescopic strut and a lower suspension arm, which are connected by a steering knuckle. Another important element of the guide device is the stabilizer bar.
- The lower arm is made of steel and mounted to the bracket. To ensure stabilization of the lever, a brace and a stabilizer bar are fixed to it. The extension is connected by means of hinges located in the hole of the lever. The opposite end of the stretcher is combined with the bracket. On the stretcher there are flats with a key and a hexagon. They serve to ensure stabilization of its position when turning the nuts.
Levers
- The rod is mounted on the suspension arm of a short strut with a pair of heads. The stand has two heads, and a rubber-metal hinge with a stand mounting bolt is inserted into one of them. The second head contains a rubber bushing where the end of the stabilizer bar passes.
- The bracket has oval holes that make it easier to install the bar on the VAZ 2109. The outer end of the suspension arm is mounted with a steering knuckle.
- The ball joint includes a one-piece housing with a bearing. The latter is made of Teflon fabric. To ensure sealing of the hinge, its cover is treated with a special lubricant - ShRB4. If this seal is not broken as the VAZ 2109 is used, then the lubricant can easily last the full life of your car.
- Adjustment of the front wheels when turning the top bolt is ensured by the presence of a special fastening of the steering knuckle to the bracket.
- The design of the steering knuckle includes a ball bearing with a hub fixed to the shank with special splines. The cap protects the hub. It is covered with dirt-reflective rings.
- The protective casing of the brake disc is fixed to the steering knuckle, which, in turn, is connected to the hub.
- The telescopic strut is connected to the body and the steering knuckle. The upper support secures the rack with the car body and is mounted on the rod. It consists of an outer and inner body.
Telescopic stand
Knowing the design of the front suspension of your own VAZ 2109 and understanding the diagram, it will be much easier for you to carry out repairs, look for weak points, and identify areas where malfunctions or breakdowns have occurred.
Suspension repair is a rather labor-intensive and complex issue, therefore, in the absence of experience and at least basic knowledge in the field of this component of the car, it is strongly not recommended to do the work yourself.
Problems with the front end
You need to regularly monitor the condition of your suspension parts.
| Malfunctions | What is the reason and what to do |
| The cause of minor deviations in operation may be loose fasteners or failure of some small part. | The fixing bolts of the stabilizer bar or the nuts securing the upper support (under the hood) may become loose. Then repairing the suspension yourself comes down to tightening the fasteners with a wrench. Also, worn out cushions, rubber components of the upper support, and silent blocks may require replacement. |
| More serious malfunctions are excessive wear of the ball joint, spring, and compression buffer. | The service life of the ball when handled with care is designed for the entire service life of the vehicle. In this case, it is necessary to replace the broken part with a new one as quickly as possible. If you ignore this problem, other suspension components may suffer. |
| If your VAZ 2109 does not vibrate for a long time after driving through a hole, it means there is a malfunction inside the shock absorber. | Most likely, the tightness of the valves, which are responsible for the resistance during the upward stroke of the piston, is broken. |
A clear sign of worn valves is the presence of fluid leaks on the strut body. In this case, it is necessary not only to replace the valve. It is necessary to replenish the oil supply in the cylinder.
Additional problems with the suspension may be associated with large differences in tire pressure, irregularities in wheel alignment and wheel balancing. It is necessary to monitor these parameters. If the elasticity on one side has become noticeably less, urgently change the spring.
Replacement
To replace silent blocks, you need to remove the part on which it is installed (for example, a lever) and remove it using any available method (hitting it with a hammer, pressing it out with a puller or a yew, sawing the inside with a hacksaw, and even burning rubber with a blowtorch). After removal, it is necessary to clean and prepare the landing site of the new silent block from rust and burrs.
Pressing procedure
- after preparing the seat, the silent block must be lubricated with a soap solution or any detergent such as “Gala” (lubricants and oils are prohibited, since the rubber on the silent blocks is not oil-resistant and their use will cause premature failure of their parts);
- There are several ways to press in a prepared silent block, using yews, a press and special pullers (they are designed for removing and installing silent blocks). Some silent blocks must be installed using a mandrel and impact;
- when pressing, it is important to maintain the alignment of the silent block in relation to the lever, since misalignment will cause damage to the rubber;
- after pressing, it is necessary to set the equivalent distance of the inner sleeve from the center;
Tightening
After replacing and installing the levers on the car, it is necessary to correctly tighten the levers on the silent blocks. Due to design features, the movement of the lever on silent blocks has a limited range of action, and if the silent block is not tightened correctly and the radius is exceeded, it can be damaged on the first day of operation. In order to properly tighten the silent blocks, and thereby significantly extend the service life, it is necessary to load the car in the way it is most often used during normal operation (for example: driver + passenger + 70 kg load), in order to set the same lever stroke in both directions .
Stabilize the suspension (by pumping up and down several times) and tighten the silent block mounting bolts one by one with the required force.
The front suspension of the VAZ 2109 is an independent element of the car, which allows each wheel to work separately from the other. This moment is a very important emphasis in driving a car. Due to this, the VAZ 2109 handles better and feels the road, allowing you to perform complex maneuvers and elements of extreme driving.
The main element of the front suspension of the VAZ 2109 is a telescopic shock absorber strut. There are racks:
- Buttered ones are soft and comfortable. A good choice for bad roads. But on the highway you will be thrown around at high speed.
- Gas - rigid racks. A good choice for highways, highways and roads without holes and potholes. With such struts, the car holds the road well at high speeds.
- Gas-oil ones are something between the two previous racks. Usually they install just such racks, since they are not too hard and soft.
The racks are equipped with coiled springs for rigidity, which also determines your comfort. The top of the strut is secured with 3 bolts along with a support bearing that allows the strut to turn with the car's wheels.
- Shock absorber strut.
- Rod bracket.
- Traction.
- Front lever.
- Spherical bearing.
- Rotary cam.
- Front stabilizer
- Stabilizer bar
The next most important mechanism in the front suspension is the steering cam. Its lower part is connected to a ball joint, which allows us to rotate our mechanism. The top of the steering cam is connected by two bolts to the bottom of the strut. The top bolt allows you to adjust the camber. A thrust bearing is attached to the rotary cam itself, on which the hub is in turn attached.
The anti-roll bar is a rod, which is attached to the car body through silent blocks using a bracket (popularly called crabs), and on the other side to the lower suspension arm.
Replacing the front suspension arm of a VAZ 2109 with your own hands
To replace the front suspension arm of a VAZ 2109, we lift and install the front part of the car on supports. We remove the wheel. We brake the car with the parking brake and install wheel chocks (“shoes”) under the rear wheels. We loosen and tighten the wheel bolts only with the car standing on the ground.
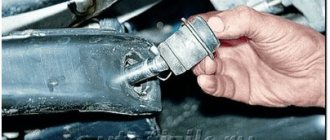
Unscrew the nut securing the ball joint.
Using a puller, press the ball joint pin out of the lever.
Loosen the rear brace fastening nut.
Unscrew the fastening nut and disconnect the stabilizer bar from the lever.
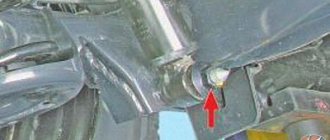
Unscrew the nut securing the lever to the body bracket and remove the bolt.
We remove the lever.
Notes:
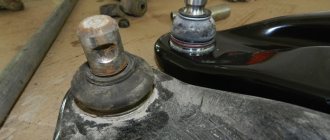
It is necessary to carefully inspect the suspension arm and replace it in the following cases:
a) the geometry of the lever is broken;
b) rubber-metal hinges are torn, swollen on one side or their rubber has lost its elasticity.
Replacing rubber-to-metal lever joints requires special tools and skill. In garage conditions, it is easier to replace the entire lever assembly.
Install the lever in reverse order. Having lowered the car to the ground, you need to rock it strongly several times. Tighten the nuts securing the ball joint to the lever and securing the lever to the body bracket with appropriate torques.
After driving 100 km, we tighten these threaded connections again to the required torques.
Front suspension of VAZ 2109 diagram.
The first photo shows the chassis of the VAZ 21099, typical of front-wheel drive cars produced in the 80s of the last century. Below you will find an image of a MacPherson front suspension with telescopic struts and wishbones with braces and a stabilizer. The rear suspension of the VAZ Sputnik has shock absorbers located inside coil springs and trailing arms connected to each other by an elastic beam.
Front suspension diagram of the VAZ Sputnik-Samara.
This diagram does not show the braces and front stabilizer.
Among the methods for identifying faults, the visual method is good because it allows you to identify minor damage to parts long before they lead to a serious breakdown. In this case, emergency repairs to the front suspension will not be required, and most importantly, there will be no risk of creating an emergency situation.
- First, drive the car onto a lift or pit. If this is not possible, raise the front of the car with a jack. Don't forget to put the car on the handbrake and support the rear wheels.
- For convenience, remove the front wheels.
- Carefully inspect the protective covers of constant velocity joints, ball joints, as well as stabilizer pads and silent blocks. If ruptures, cracks or one-sided bulging of rubber are detected, replace the damaged parts.
- Inspect metal parts for cracks and bends. If problems are found, supply new spare parts.
- Check for oil leaks on the struts. If there are any, replace the shock absorbers or entire struts.
- Inspect the compression buffer and spring for cracks. Replace them if necessary.
- Measure the distance A (in the above diagram) between the support plate and the front suspension arm. If, when rocking the travel distance, the distance increases by 0.8 millimeters or more, replace the ball joint.
- Rock the hub left and right and up and down. If it sways and a knock is heard, the car needs to be repaired and the wheel bearing will have to be replaced.
If you don’t want to waste time, do a little tuning - install a front stabilizer from a Lada Priora during diagnostics. It is perfect for the VAZ 21099. With it, the chassis of your car will become more rigid, but the car’s stability at high speeds will improve.
replacing the front suspension arm on a VAZ 2108, VAZ 2109, VAZ 21099
1. To replace the front suspension arm on a VAZ 2108, VAZ 2109, VAZ 21099 car, lift and place the front part of the car on supports. Remove the wheel.
WARNINGS Brake the vehicle with the parking brake and install wheel chocks (“chocks”) under the rear wheels. Loosen and tighten wheel bolts only with the vehicle on the ground. The tightening torque of the bolts is 65-95 Nm (6.5-9.5 kgf-m).
2. Unscrew the nut securing the ball joint.
3. Using a puller, press the ball joint pin out of the front suspension arm. For more details, see “Replacing a ball joint on a VAZ 2108, VAZ 2109, VAZ 21099”.
4. Loosen the rear extension nut.
5. Unscrew the fastening nut and disconnect the stabilizer bar link from the front suspension arm.
6. Unscrew the nut securing the front suspension arm to the body bracket and remove the bolt.
7. Remove the front suspension arm from the brace.
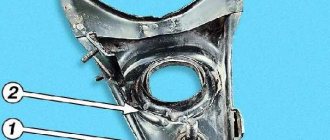
8. Remove the special washer 1 and the package of adjusting washers 2 from the extension, counting their number (if installed). Mark the washers so that you can later install the washers on the same side of the front suspension arm.
9. Signs of wear on the silent blocks of the front suspension arm are ruptures, one-sided bulging and detachment of the rubber from the metal bushing. Replacing the front suspension arm silent blocks requires special tools and skill. Two replacement options are recommended: either replace the front suspension arm assembly with silent blocks, or, by removing the lever from the VAZ 2108, VAZ 2109, VAZ 21099, replace the silent blocks in a specialized workshop.
10. Install a new front suspension arm on a VAZ 2108, VAZ 2109, VAZ 21099 car in the reverse order of removal. In this case, the adjusting washers of the extension are installed in the same quantity and the chamfers on the adjusting washers of the internal diameters should be directed towards the thrust collar of the extension. Having lowered the VAZ 2108, VAZ 2109, VAZ 21099 car to the ground, rock the car several times. Tighten the nuts securing the ball joint to the front suspension arm and securing the front suspension arm to the body bracket to a torque of 80-96 Nm (8.0-9.6 kgf-m), the nut securing the brace to the front suspension arm - 160-180 Nm (16. 0-18.0 kgf-m), nut securing the stabilizer bar to the front suspension arm - 42-52 Nm (4.2-5.2 kgf-m). After driving 100 km, tighten these threaded connections again to the required torque.
Levers Taiko VAZ 2101, 2102, 2103, 2104, 2105, 2106, 2107
Set of front levers for VAZ 2101, 2102, 2103, 2104. 2105, 2106, 2107 cars
Designed for installation in cars with lowering from -25 to -50mm
Parameters obtained on this kit: Camber -1 degree Caster 7 degrees Toe 0
The kit includes: 1. Upper lever – 2 pcs.
2.Lower lever – 2 pcs. 3.Left steering gear bipod – 1 pc.
4. Bipod of the steering mechanism, right – 1 pc.
5. Shock absorber mounting bracket – 2 pcs.
6.Nut M8*1.25 – 4 pcs.
7.M8 washer – 4 pcs 8.Grover washer M8 – 4 pcs
9.Installation instructions – 1 piece
Wishbone suspension, reinforced, lightweight (set)
Set of reinforced wishbones for front-wheel drive cars VAZ 2108, 2109, 21099, 2113, 2114, 2115, 2110, 2111, 2112, Lada Priora, Lada Kalina, Lada Granta on rubber silent blocks.
The installation significantly improves vehicle handling and reduces suspension angle drift during operation. The design changes the direction of load on the front frame of the car from longitudinal to transverse. By providing an additional rigid connection between the frame and the attachment point of the spar to the body, the levers help to increase the rigidity of the front part of the body and increase the stability of the suspension geometry.
The lower triangular arm prevents the suspension from moving back and forth relative to the arch. By reducing the number of such suspension amplitudes, the strut clearly fulfills its task and work - the move is strictly up and down. Thanks to two silent blocks, there is additional damping of vibration from the suspension.
It is possible to install levers on both lowered and standard car suspensions.
To achieve the maximum effect of improving vehicle handling, it is recommended to install triangular arms in combination with a subframe.
In warehouse in Samara
2800 RUR 3000 RUR
Wishbone suspension, reinforced, lightweight (set) and polyurethane elements
Set of reinforced wishbones for front-wheel drive cars VAZ 2108, 2109, 21099, 2113, 2114, 2115, 2110, 2111, 2112, Lada Priora, Lada Kalina, Lada Granta on polyurethane silent blocks.
The installation significantly improves vehicle handling and reduces suspension angle drift during operation. The design changes the direction of load on the front frame of the car from longitudinal to transverse. By providing an additional rigid connection between the frame and the attachment point of the spar to the body, the levers help to increase the rigidity of the front part of the body and increase the stability of the suspension geometry.
The lower triangular arm prevents the suspension from moving back and forth relative to the arch. By reducing the number of such suspension amplitudes, the strut clearly fulfills its task and work - the move is strictly up and down. Thanks to two silent blocks, there is additional damping of vibration from the suspension.
It is possible to install levers on both lowered and standard car suspensions.
To achieve the maximum effect of improving vehicle handling, it is recommended to install triangular arms in combination with a subframe.
What problems can there be and how to fix them
The condition of the front suspension should be monitored regularly. The most common damage is abrasion of the joint covers. These damages are classified as mechanical. Among the malfunctions of this element of the car, unevenness of the lever located on the suspension or on the stabilizer bar is noted. This may result in incorrect and inaccurate operation. In all these cases, you need to check the parts and then simply replace them with new ones.
Among the malfunctions there may be minor ones that should be eliminated using a regular repair kit. For example, loosening the bolts of the stabilizer bar or the nut of the support. You should tighten them tighter.
If you hear the suspension making sounds (knocking, creaking), then this indicates more serious damage. First you need to determine where the sound is coming from. You can use a jack for this. Rock the wheel in a vertical plane; if there is a knock in the center of the wheel, then most likely there is a fairly large gap in the bearing. It is better not to change the bearing yourself, as it can be destroyed. It is better to contact a car service center that has special equipment for these purposes.
We draw conclusions: it is better to diagnose and prevent your car and protect yourself while driving than to invest in tuning.