22.06.2021
| (Votes: 1, Rating: 5) |
Issues discussed in the material:
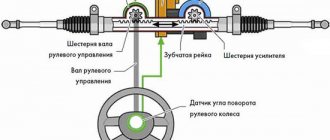
- Steering rack device
- Types and principle of operation of steering racks
- Signs and causes of steering rack malfunction
- Steering rack repair stages
- Car owners' opinions on steering rack repairs
Repairing the steering rack becomes an urgent need when light knocks when driving over uneven surfaces turn into real pounding even when hitting a small pebble, and the steering is weak and unpredictable.
Of course, you can just buy a new rack, but repairs are much cheaper and last a long time. It should not be confused with adjustment; these are different procedures. From our material you will learn how to identify signs of a part malfunction and how to carry out qualified steering rack repairs.
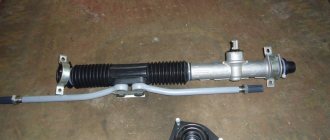
Signs of a broken steering rack
When driving on bad roads, as well as when turning the steering wheel, a tapping sound is heard in the area of the steering rack.
- Control has deteriorated, the car “throws”, this is especially noticeable at high speeds.
- The independent steering travel (clearance) has been increased.
- The steering wheel turns more difficult than usual, or in gusts.
- The steering wheel does not return to its original state after turning; you need to turn it by hand.
- The pump hums, the sound increases when you turn the steering wheel.
- The amount of oil in the power steering reservoir decreases.
- Oil stains are noticeable in the area of the rack or close to it.
Almost without exception, all the properties on the list do not directly indicate wear of the steering rack; for this reason, before repairing, you need to make sure that it is the problem.
What is needed for dismantling and installation
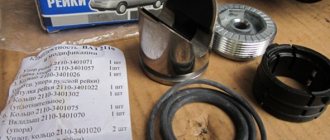
If the driver decides to change or restore the unit in question himself, he will need a repair kit. It is a set of specific spare parts for maintenance. This list includes parts that are not consumables, but periodically need to be replaced due to wear.
Sets are available in complete and incomplete configurations. The differences between them are the presence/absence of rubber rings. It is also worth considering that each repair kit is adapted for servicing a special unit. In this case, it is called a “steering rack repair kit”. When purchasing a set, you need to take exactly the one that is intended for a specific brand of car.
In addition to the above you will need:
- corrugation;
- bearing for shaft gear;
- lubricant that is used by the driver for car maintenance;
- octagon by 17;
- pliers for installing the retaining ring;
- puller;
- jack;
- anti-kickbacks;
- wrenches, ring wrenches, balloon wrenches and open-end wrenches;
- nuts;
- cotter pins;
- flat screwdriver;
- drill;
- emery or grinder;
- welding machine.
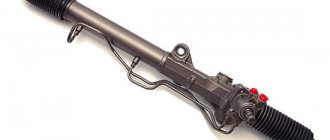
Removing the steering rack from the car
Removing the rack has its own characteristics for all machines, but in general, the procedure is as follows:
- Place the front part of the car on supports and remove the wheels.
- Press out the steering wheel ends (use a special pneumatic puller).
- Remove the protective display of the rack.
For cars with a booster, unscrew all supply hoses, as well as oil return hoses. For cars with hydraulic booster, turn off the micro connector or remove the control shaft position device.
Unscrew the nuts securing the control rack to the subframe or engine shield (the brand and modification of the machine plays a role here).
Reduce the ligament pin of the universal joint between the rack and the control shaft.
Pull the rack in the direction of the control shaft to release the pin joint (if the rack does not give in, it can be knocked down with small blows of a hammer).
Remove the rack through the left or right wheel arch. After removal, the rail must be cleaned of dirt and washed.
Checking clearances
To check the gap between the steering rack stop and the stop nut, proceed as follows:
- Remove the steering gear from the “ten”.
- Set the rack to the middle position, which is determined by a special size - 87 ± 0.25 millimeters from the end of the rack to the gear axis. Using a special device, the rack should be loaded with a force of 51±2 kgf at a distance of 84 millimeters from the gear axis towards the steering rack stop.
- The maximum permissible gap between the stop and the nut is 0.2 mm. The maximum permissible movement X of the steering rack, measured through the relative movement of the pressure punch, should not be more than 0.16 mm.
So, you now know how to replace and adjust the steering rack yourself, saving money on professional service.
Video: Steering mechanism. We remove and disassemble. VAZ 2110-2112
Video: Repair of VAZ steering rack. Do it yourself!
Acura Audi BMW Cadillac Chevrolet Chrysler Citroen Daewoo Dodge Fiat Ford GMC Honda Hummer Hyundai Infiniti Isuzu Jaguar Jeep Kia Land Rover Lexus Mazda Mercedes Mitsubishi Nissan Opel Peugeot Porsche Renault Rover Saab Seat Skoda Ssang Yong Subaru Suzuki Toyota Volvo VW
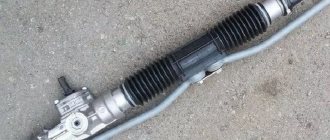
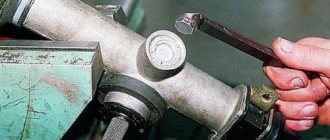
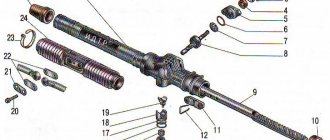
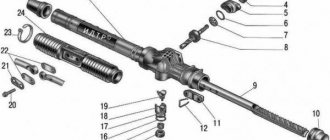
Disassembling the steering rack
It is necessary to remove the clamps and tighten the control rod boots.
- Thoroughly secure the rack block, and also unscrew the steering wheel (the carved coupling has channels for an open-end wrench).
- Unscrew the lock nut, as well as the bolt of the adjusting device, remove the bolts and bushing from the mounting socket.
- Unscrew the block or the drive shaft bolt (a special tool is required) and remove the shaft from the housing.
- Remove the friction rod of the control rack.
- It is necessary to remove the seals, pipes, and fluoroplastic rings from the rack body.
Troubleshooting elements
The elements of the disassembled rack must be treated with oil, cleaned of deposits, and also carefully examined. As a rule, repair kits contain only rubber seals, as well as fluoroplastic pipes with rings. This set may not be sufficient for repairs.
- It is necessary to thoroughly examine the plane of the friction rod; it must be without any damage and not worn out.
- Particular attention should be paid to the working area - the teeth, as well as the shares of the rod; they come into contact with the rings, oil seals, and bushings.
- Every violation, rust, and risks will lead to rapid wear of the seal, and the rack will simply leak.
The teeth of the drive shaft gear cannot have cracks, chips, nicks or excessive wear. Installing a shaft with such defects is risky; the rack can get stuck in movement.
A frequent cause of knocking in the rack is wear of the pressing bushing. The flying plane of the element must be smooth, without indentation marks or defects. The pressure bushing is usually not included in the repair kit, but for many machines it can be purchased separately.
Very worn or damaged rack elements cannot be repaired in a garage. If difficulties are identified during troubleshooting, you must go to a special service station for support. Further, it is possible to repair the shaft, as well as the rack rod, using high-quality equipment.
What tools will be needed for the work?
Required Tools
In order to replace a failed or poorly functioning mechanism, it is necessary to prepare a certain set of tools in advance:
- wooden supports;
- liquid key;
- thin screwdriver;
- medium hammer;
- a set of socket wrenches and a set of sockets with a ratchet;
- puller for tips.
Preparatory activities
Before changing anything, we strongly recommend that you read the service manual, which consistently describes the entire process and tips for its implementation. Generally, there are 3 steps to complete first:
- The machine should be placed on as level ground as possible, and then the parking brake should be locked. To secure the vehicle, it is necessary to place bricks under the wheels.
- The steering wheel is set to neutral position.
- Then you need to loosen the wheel nuts, and this must be done one at a time.
Loosening Wheel Nuts
Having completed the preliminary work, the car is placed on a jack and the wheel is removed from one side. After which the car is lowered again, but on wooden supports. The wheels on the other side should be removed in the same way. The described steps are aimed primarily at gaining access to the steering tips, which will greatly simplify the removal of the steering rack.
Advice! Before unscrewing the bolts, they are cleaned with a metal brush and treated with a WD-shkoy.
Unscrew the absorber
While the liquid consistency destroys rust, it makes sense to look under the hood and clear the area for access to the problematic mechanism. In order to remove the steering rack, it is necessary to remove the alarm siren and gas adsorber, having previously unscrewed the corresponding terminals. The extracted solutions are removed so as not to interfere.
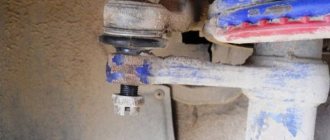
Removing the tips
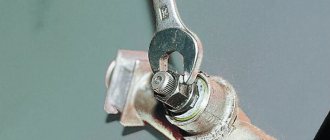
Experts emphasize that very often the steering rack is replaced along with the tips. They are dismantled using a conventional puller or knocked out with a hammer. Using pliers, the key is removed from the fastening nut, after which it is unscrewed.
Removing the steering tips
A fork-shaped mount should be inserted under the rubber seal, and the upper part of the pin should be placed on the base of the tip bolt. The puller nut is tightened to the maximum, and then a hammer is used to strike the rack mount, so that the tip can be removed without any problems. Removal and installation of all elements must be carried out extremely carefully.
Steering rack installation
It is more correct to install the control rack in a car with an assistant; one guides the rack from the edge of the engine compartment, the second orients the universal joint into the shaft spokes from inside the cabin.
- A cardan connection can only be installed in one state; in a spitz combination there is a special blank that must be combined with a groove on the opposite part.
- There is no need to clamp the ligament pin at the same time; the cardan joint will take the correct position on the pins after the rail and subframe have been completely screwed in.
- It is necessary to install and secure the bolts for strengthening the control rack, as well as the subframe. Only then completely secure the ligament pin of the main drive of the control rack.
It is necessary to install the tentacle of the control tips into the trunnions and screw the bolts. Attach all tubes, as well as amplifier hoses. Pour special liquid into the tank to the maximum level.
Put the wheels on and, without removing the car from the stands, start pumping up the concept.
If you still had to deal with the repair of the control rack, it would be more correct to give preference to reconstructed ones rather than used ones, which were purchased at disassembly. In the first option, they can give at least a small guarantee.
Knowing about the breakdowns listed above, it will be easier to understand what is needed to restore the control rack, and just like with any other part of the machine, there is no need to delay repairs.
Complete Guide on How to Remove Steering Wheel
The right guide will help you remove the steering wheel from your car and save money that would have been spent on professional service. This easy-to-follow guide will ensure that you do everything right and there will be no chance of failure after that.
Required Tools
Although the steering wheels look different from one to another, the process for removing the steering wheel is more or less the same. Before going through the steering wheel removal procedures, gather these tools:
- Protective gloves
- Set of tools including screwdrivers
- Protective glasses
Step by step procedures
Before you continue, remember that safety comes first. There is no need to take risks if you don't have the necessary skills. Entrust this task to a professional. However, if you do decide to remove the steering wheel, park the vehicle on a level surface with the wheels pointed straight ahead to ensure it remains in a straight position. Apply the emergency brake and stop the engine. Your car is ready. Here are the necessary steps you need to follow to remove the steering wheel:
We recommend: There is now an opportunity to obtain the services of a car lawyer remotely
Remove the negative battery cable.
This is the first step. This will prevent any short circuit when replacing the steering wheel. Disconnect the airbag located in the middle of the steering wheel.
Remove the mounting bolts.
After carefully removing the airbag, locate the steering wheel mounting bolt or nut. If the steering wheel is held in place by a mounting bolt, a wheel puller is not required. Turn the steering wheel 90 degrees and unscrew the bolt counterclockwise. Most cars have a steering lock that needs to be unlocked to make the unlocking process smooth. Using an air gun will make this process easier. However, if you don't have one, use a socket or wheel clamp to loosen the bolt.
Pull out the steering wheel.
After removing the bolt, carefully inspect the threads to make sure you did not damage them when removing the steering wheel. Now grab the handlebars firmly and pull outward with equal force with both hands. If the steering wheel resists, change your hand position and try pulling again by twisting and turning it a little. The steering wheel will come out of the shaft. Here's how to remove the steering wheel.
Check wiring etc.
Keep an eye on the alignment indicator, which you will need when reinstalling the wheel. Indicator mark at the top. If you don't notice the mark, please create one for your reference. (Note: Some shaft splines contain a flat spot that serves as a marking.) Once the wheel is free, route the wiring, connectors, and terminals through the access hole located in the center of the steering wheel.
Inspect the steering wheel.
Inspect the steering wheel for damage. When planning to replace, check the similarity with the new unit. The clock spring assembly consists of a bundle of wires that remains attached to the steering wheel when you turn it in any direction. You must be careful when handling this device. Do not turn it when the steering wheel is not attached.
Be careful when removing and reinstalling the steering wheel.
Reinstall the wheel.
Once that wheel is ready after repair or you have a new steering wheel ready to install, connect it to the wiring and connector that comes out through the access hole on the steering wheel. While maintaining alignment with the indicator mark, install the steering wheel onto the steering wheel shaft and press gently. Alignment will help you avoid future driving accidents. Take the mounting bolt and apply a thin coat of Loctite Blue to it. This will help the mounting bolt stay firmly in place. Insert the mounting bolt by hand. This will prevent cross cutting. Tighten the bolt according to the manufacturers recommendations. This is the last step in installing the steering wheel.
Do one last check.
Here's how to remove your steering wheel, inspect it, and reinstall it. Before the trip, check the routing of the wires and the tightening of the bolts again. Completion
Steering wheel removal information will save you a lot of money. All you have to do is follow the instructions in this guide and act accordingly. Also be careful when handling components because even minor damage can lead to costly repairs.