How to tighten the steering rack on a VAZ 2115
How to tighten or replace the steering rack of a VAZ-2115
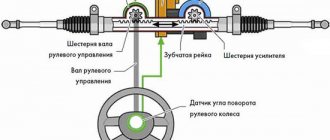
Drivers who have at least a little understanding of the structure of a car understand perfectly well that force is transmitted to the wheels using helical and spur gears. They, in turn, interact with the rack. Thanks to the use of pressure springs, play is established in the rack. If you hear a knocking sound while driving over uneven surfaces, this indicates that it is time to adjust the rack.
Many drivers believe that the VAZ-2115 steering rack cannot be repaired. This is the main mistake. The fact is that the steering rack can always be tightened. This action ensures safe driving and elimination of all play. Nevertheless, such adjustments must be carried out efficiently, since otherwise they can lead to loss of vehicle controllability. Often the cause of this is overtightening of the adjusting screw.
Steering rack VAZ 2115 - how to eliminate play
While the car is moving, there are times when the driver feels a slight kickback when the car hits a pothole or a small obstacle on the road, in the steering wheel, and a knock appears in the mechanism. Then there is a need to fix the problem.
In this case, VAZ does not require repair of the steering rack, but only adjusts the gap formed between the rack and gear. Why are there special instructions?
Work order _
- If there is protection on the crankcase, it can be removed.
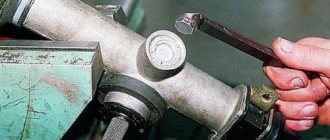
- Using a special 17 mm wrench, turning clockwise, the adjusting nut is tightened until the play in the rack gearbox is eliminated.
Eliminating play in the steering rack
If such an operation does not eliminate the knocking, you need to disassemble the steering mechanism, check the condition of all its parts, and replace worn elements with new ones. The cost of such repairs will be higher.
- Then, after assembling the steering gear assembly, the rack stop, which has an O-ring, is installed until the stop makes contact with the rack.
- After this, the retaining ring and thrust spring are installed and the nut is lightly screwed on.
- The nut is tightened with a torque equal to 1.12 - 1.37 kgf.m, the two divisions marked on the nut or on the 24 wrench are released, which provides the required gap of 0.12 millimeters, from the nut to the stop of the rack.
- The ease with which the rack moves is checked, the absence of knocks or jamming.
- The steering rods are mounted to the steering mechanism in such a way that their axes should be parallel to the steering mechanism housing.
The play is eliminated, but the knocking does not stop, then one of the options is chosen: buy a new steering rack or repair the steering rack on the VAZ 2115, which is much cheaper.
How to do pull-ups less often?
Experienced drivers say: once you start adjusting a nut tightened at the factory, you become a hostage to this process forever. To avoid doing this kind of activity too often, you need to follow basic safety rules:
- Move over all obstacles at low speed, tram and other tracks - diagonally, do not jump on edges and curbs - the car is not a hare or a kangaroo;
- Do not leave the wheels turned left or right for a long time. Especially if you parked for a long time;
- In winter, do not turn the steering wheel sharply on a cold car. It is better to smoothly turn it back and forth so that the steering mechanism has time to wake up and develop.
Knowing how to tighten the steering rack on a VAZ 2114 and the ability to do it do not always save the situation. If you have done all the necessary manipulations, and control has not improved at all, then the problem is not a loose fastening. Most likely, your transmission pair, consisting of a gear with a rack, has been damaged. However, whether this is so, or something else has gone wrong in the steering mechanism, will only be revealed by complete dismantling of the steering rack. Which, we note, is also quite tough for a person who does not shy away from communicating with tools.
How to remove the steering rack?
For dismantling you will need the following tools:
- open-end or socket wrench for 22, 13, 10, 8;
- flat screwdriver;
- jack.
The steering rack can be dismantled either from below the car (from a pit or a lift) or from above through the hood. As practice has shown, doing this from above is not much more difficult. Let's consider the option of dismantling without a pit or lift.
1. Preparation. We park the car on a level surface and tighten the handbrake. Just in case, we put wheel chocks under the wheel heel.
2. Now you need to disconnect the absorber. To remove it, you must first disconnect the power supply and hoses. After this, unscrew the screw of the retaining clamp with a size 8 wrench and remove the adsorber. Access to the rail has been obtained.
3. Disconnect the steering rods. They are fastened with two 22mm bolts. To prevent spontaneous unscrewing, they are fixed with a plate. To remove the stopper from the bolts, use a flat screwdriver to bend the tabs of the plate.
Disconnect the rods. If they cannot be removed by hand, you can use a screwdriver to help.
4. Here it would not be superfluous to inspect the rubber bushings of the rods. If there are cracks or oval holes in the rod bushing, they must be replaced, since they may be the cause of play or knocking.
5. From inside the car, under the pedal assembly, we find the junction of the column and the steering shaft. We lift the carpet. Use a 10 wrench to unscrew the nut. Using a hammer, the fixing bolt is knocked out through a small soft metal insert.
6. Next, you need to unscrew the nuts of the clamps securing the rail to the body. Using a 13 key, unscrew 4 nuts, two on each side. The clamps are removed. The rack is disconnected from the steering column.
The rack is removed through the gap between the right or left wheel and the engine compartment.
VAZ 2114, we get rid of the knocking of the steering rack. Video:
Steering rack adjustment
The steering rack can be adjusted either directly on the vehicle or by removing a spare part. The first method is usually used after car repair. But the second one is used to slightly adjust the rack. For this work you should have the following tools:
- adjustable wrench;
- universal octagon 17 mm.
Any work related to the steering rack must be carried out while the car is either on the inspection pit or on a lift.
How to tighten the steering rack on a VAZ 2110, 2112, 2111, 2114 and 2115
Overview of steering
slats on VAZ
2110-2112 and Samara 2114 and
2115
. The only differences will be...
Adjusting the steering rack of a VAZ (how to tighten the rack) Is it possible to adjust the steering rack of a VAZ 2115
Sorry for the quality of the footage, I'll fix it soon. How to tighten the steering rack on a VAZ
— 2115
... The procedure is as follows:
- The car is put on the handbrake. If the car is in a pit, it is necessary to install a stop under the rear wheels.
- The steering wheel is locked.
- The car's on-board network is de-energized (to do this, you need to remove the negative terminal from the battery).
- Find the nut with which the steering rack is adjusted. It is located on the rail mount on the trunk side.
- The bottom of the car is washed. It is best to use a special device for this. This is done to clean the nut responsible for adjusting the rack from dirt.
- Next, use a wrench to tighten the nut to the desired position. The nut rotates clockwise.
After this, the steering rack adjustment can be considered complete. If this procedure does not bring the expected result, it is necessary to check the condition of the tips. It is likely that they will have to be replaced.
The steering rack of the VAZ 2115 is knocking
How to tighten the steering rack of a VAZ 2115?
- adjusting nut
- Technical inspection
Some motorists, especially beginners, ask the question: “How to tighten the steering rack on a VAZ 2115? “Many of them believe that this cannot be done without the help of others. But it is safe to say that this is a complete mistake, and such an adjustment is likely. The control mechanism on this model can be tightened with a 17mm octahedron. If a person has heard a knocking sound while this mechanism is operating, this signal must be properly explained. AvtoVAZ 2115sam announces system problems that must be eliminated at the same time as quickly as possible.
This moment can occur after a wheel has fallen into a hole or the car has collided with an obstacle. The control rails are adjustable, if you go into an inspection hole or overpass, the lift will still fit, because otherwise it will not be possible to remove the protection from the engine. A flathead screwdriver will help remove the protection. After performing these manipulations, you need to get to the place on the back side of the rail where it intersects the control shaft. Next, find the adjusting nut on the body, the main thing is not to confuse it with the plug. Usually this nut is covered with a layer of dirt, and sometimes it is difficult to find without help, but it is possible. It should also be clarified that the nut may end with a plastic plug installed at the factory.
READ Steering Rack Malfunctions VAZ 2114
External sound in the Rack steering area. knock steering rack VAZ 2115,2114,2113,2199,2109,2108
Sounds of a stranger in the area steering rack
As for management problems, this is the main problem.
VAZ 2114, getting rid of knocking steering rack
Vas
2114, we extend the control
of the Rail
as a result of a knock that irritates us on uneven roads.
If you find such a plug, you can be sure that no one has accessed the control mechanism before. The plug must be removed to allow the adjusting nut to rotate. Tighten the nuts clockwise, but the main thing is not to overdo it. It is necessary to focus on the impact force of the control mechanism. To check whether the operation was successful, you need to sharply turn the rail in both directions and, if there is no noise, then everything went well. You do not need to plug the plug back in as it will lose its purpose.
The entire operation should take about 30 minutes if not done without assistance. At WTO they can change the entire steering mechanism because it costs more than just tightening a nut. Therefore, it is better to do it yourself if you do not have extra money. In conclusion, you can follow from this information. The VAZ 2115 has an adjustable steering mechanism, and the whole process can be completed without outside help and wasting time, but remember that tightening the nut may be difficult with a helmet.
READ Replacing the Boot of the VAZ 2110 Strut
It is better if you have an adjustment assistant who will turn the steering wheel back and forth. Some car lovers install a front guard on their car. Judging by the reviews, this thing is useful, but there are also opponents. In any case, it is up to the car owner, but it is believed that to obtain even greater effect, it is necessary to install another support along with the amplifier. This reinforcement will not affect the technical inspection, since all parts have passed the necessary certification.
Adjustment
So, the situation is such that tightening the steering rack can still give a positive result. Therefore, you need to find out how to tighten the knot and what is required for this.
You can adjust the rack through the bottom of the car, removing the engine protection, or through the top. In the second case, the work will have to be done by touch. So decide for yourself what is more convenient for you.
- To adjust the steering rack, you will need to tighten the adjusting screw. You can find it in the steering mechanism. To be more specific, in the end cap.
- It is optimal to have an overpass or a pit at your disposal in the garage. If there are no such conditions, you can get by by raising the car with a jack. Only in this situation will it be necessary to additionally secure the car in order to avoid it sliding off the jack and the likely consequences.
- Before lifting the body with a jack, be sure to align the front wheels straight.
- You can measure the backlash using a backlash meter. Moreover, they can be old or electronic. The latter are more relevant and convenient to use, but some people don’t have to choose. What you find is what you will use.
- According to current norms and standards, for the VAZ 2109 the steering wheel play should not exceed 10 degrees.
- Find the adjusting screw and begin to tighten it gradually. The operation is carried out slowly. Periodically check the steering wheel movement and any play or knocking in the steering column.
- Use a special key for adjustment. It is available at any auto parts store.
- The key is inserted into the adjusting screw and turned counterclockwise. Scroll a little and check the result.
- The procedure may take a long time. Still, take your time.
- When you feel that the adjustment has reached the desired level, take a test drive in your car, feel how the steering wheel moves, whether the knocking or play has disappeared, how hard the steering wheel rotates.
- If the steering wheel has become too tight, you will have to slightly loosen the tension on the adjusting screw.
Signs of faulty tie rod ends
The steering tips need to be replaced if, when driving over uneven surfaces, or when accelerating, you feel the steering wheel beating and vibration reverberating through the gas pedal. It is possible to visually determine the condition of the steering rack tips only when checking the anthers. These parts have a direct impact on wheel alignment, which means they should be replaced on time, since the rubber will begin to wear unevenly. Replacing steering rack tips is also carried out when the car is on a lift or in a pit. By the way, this procedure is best left to the masters, since the work requires precision and strength in the hands. In total, the entire process of replacing tips takes no more than one hour, so you don’t have to part with your favorite car for a long time.
Remember that if you replace the tips in a timely manner, your car's steering rack will last much longer, and the ride quality will noticeably improve.
There is a special offer on our website. You can get a free consultation with our corporate lawyer by simply submitting your question in the form below.
Do-it-yourself repair and adjustment of the steering rack on a VAZ 2114
Every car owner wants his car not to fail at critical moments, to cause a minimum of problems and bring maximum benefit. But this directly depends on how the owner cares for, monitors, and repairs his car on time.
One of the most important components affecting safety is steering. VAZ 2114 owners do not have to repair steering racks very often, since these units have a fairly long service life. But a number of factors and time lead to the fact that you have to pay direct attention to the helmsmen, diagnose the problem in a timely manner and promptly fix it.
Why does the backlash increase?
The main reason is the condition of the roads and the dust on them. The imperfection of Russian roads has already become the talk of the town; It’s no longer interesting to joke about him. However, in recent years the situation has been somewhat aggravated by the widespread installation of speed bumps. No question, this is necessary for the safety of both pedestrians and drivers - if only these structures met the standards everywhere. But in many cases, such obstacles are either too high or have too steep sides.
As a result, we have an increased load on all car components, including the steering rack, and it becomes loose.
Symptoms of a problem
To understand that the racks require repair, you need to monitor the behavior of the car and know the characteristic signs of a malfunction of this element.
Is it possible to determine whether the unit requires a complete replacement, or can you get by with simple repairs? We will tell you about this in the table below.
| Sign | Necessary actions |
| When turning the steering wheel, a knock is heard and play occurs | If the situation occurs while the car is moving, it is enough to carry out repair measures, use a repair kit |
| Knocking and play occurs when the steering wheel is turned when the car is stationary | This is clear evidence of the critical state of reiki. The problem can only be solved by completely replacing it. |
Tightening and adjustment
As the practice and experience of VAZ 2114 owners shows, if problems arise with the racks, they can most often be repaired. The only condition is that you have an inspection hole at your disposal.
Full analysis
After tightening the bolt, take your car out for a few kilometers to check whether the knocking or play remains. If these symptoms of the problem disappear after you have tightened and adjusted the steering rack, the repair can be considered complete.
But this doesn't always happen. The knock may remain, but the play may go away, or vice versa. In any case, if at least one sign still remains, you will have to begin a full-fledged repair with your own hands. Now you can find a number of useful videos that describe in detail the procedure for repairing this unit. Take a look, it will be useful for you.
Steering rack bulkhead
1. Using side cutters or any other suitable tool, cut off the plastic clamps on the sides of the protective casing.
After this, the casing can be easily removed. We inspect it for damage. The presence of tears or cracks is unacceptable, since water and dust enter the rack and pinion mechanism through them.
2. The side protective caps are also secured with plastic clamps. After cutting the clamp, the caps can be easily pulled off. They are visually inspected for damage.
3. It would not be superfluous to check the steering rack for wear in the gear-river pair. To do this, hold the rack with your hand at the place where the rods are attached and try to rotate the mechanism shaft left and right. The presence of play may indicate wear or incorrect adjustment in this unit.
Let's move on to adjustments
What is its meaning?
YES, everything is simple, this connector (nut) begins to tighten the bushings, which actually compress and compensate for wear. That means you can still drive for a while! Personally, after the facelift, I drove another 10,000 kilometers and then simply sold the car.
Where to carry out the work?
To be honest, each car (brand) is unique, for example, on many foreign cars the nut is visible from above, on others it is at the bottom (that is, the “head” looks down), in our VAZs it is also at the bottom. So - preferably a pit or lifts, or, in extreme cases, jacks - just be careful, the car must be well secured.
How to tighten up?
- We take a key (special or not - individually), select the connector, for example on our VAZ 2113, 2114, 2115 this can also be done by turning the wheels to the right all the way. And on the left side we begin to look for the connector.
- It will have a protective cap, usually made of rubber, remove it.
- We insert the key and make about ¼ of a turn no more, that is, 25% of the circumference.
We repair it ourselves
To get started, you will need a set of tools and repair kits.
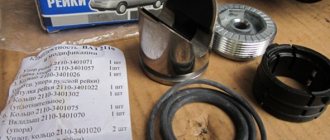
Replacement kit
Be sure to include the following in your list of tools and materials:
- Repair kit for one of three configurations (more about them below);
- Bearings;
- Lubrication;
- Set of keys and screwdrivers.
Selecting a repair kit
Spare parts As for repair kits, the standard minimum set includes four elements:
- Washers;
- Nuts;
- Bearings;
- Bushings made of fluoroplastic.
But is it enough for your specific steering rack situation? Let's try to understand the purpose and configuration of each of the three types of repair kits.
- The cheapest repair kit, the contents of which you are already familiar with, allows you to solve the most minor problems that have arisen with your slats.
- The middle kit additionally includes other bearings and shafts. Designed for more serious repair work.
- The most expensive repair kit may consist of whole new slats, that is, it involves not a repair, but a simple replacement of units.
DIY repair
First you need to stock up on the necessary set of tools:
- repair kit for the steering rack (as mentioned above, they are sold in three variations);
- bearings;
- lubricant;
- necessary keys and screwdrivers;
- We should talk separately about repair kits.
Minimum basic sets. Such sets usually have only 4 elements:
This set can only fix the simplest faults. Medium priced sets. Here, in addition to the things described above, there are shafts and other bearings. Expensive sets. There may already be entire slats here.
When purchasing, please note that you are purchasing a set specifically for your car (the brand is indicated on the package). Sometimes it happens that a car has a non-original rack, then it is necessary to purchase a repair kit for the car from which this rack was removed
Actually, any repair must begin with disassembling the steering rack. Often the problem is just a small bearing, and the entire rack does not require replacement.
Work order
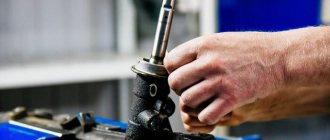
- Removing the steering rack
- Unscrew the thrust nut using a 17mm hexagon.
- Remove the thrust nut, retaining ring, rack stop and spring.
- Remove the drive gear shaft boot, and then the retaining ring.
- Unscrew the nut holding the steering gear bearing. It goes quite tight - this is normal.
- Press out the drive gear shaft.
- Remove the rail itself from the housing.
- Remove the support sleeve, then lubricate it and insert it into place (this will need to be done with force)
- Replace all bearings. Some will be difficult to get (very difficult), so you can simply chop them with a chisel and pull them out with tongs.
- Inspect all parts for defects, replace broken ones with new ones (from the repair kit), lubricate all moving parts.
- Reassemble the rail in reverse order.
- That's all, if you did everything correctly, then the rack works with a bang. All that remains is to put it in place.
Putting the rack in place
- First, you need to enlist the help of a partner; without him, you won’t be able to do everything quickly and accurately.
- We install the rail in the same place and attach the fasteners.
- With the help of a partner, we insert the rail into the spitz.
- To loosen the clamp, use a chisel.
- We tighten the mounting bolt.
That's all, now the rack is in place, then we put the wheels on, tighten the nuts and remove the car from the jack. Now you know everything you need to repair your steering rack in a timely manner. The main thing to remember is that you shouldn’t delay repairs.
What else could be knocking?
To be honest, there are a lot of things, in my practice people tightened the rack, but it was all about the tie rods and ends. Let’s just say that if they were recently replaced, then perhaps they simply weren’t tightened properly, try tightening them yourself.
If you haven’t changed them, and they start knocking, you may need to replace them; driving with broken tips is simply dangerous; they may fall apart at the wrong moment.
I hope the article was useful, like it on social networks. Sincerely yours, AUTOBLOGGER.
( 6 votes, average: 5.00 out of 5)
Repair
To perform the repair, you will still have to disassemble the steering wheel. You can see detailed instructions in the material on replacing the steering rack.
Replacement process
Let's move on directly to the repair procedure.
- Remove the rail from its seat.
- Remove the thrust nut with a 17mm hexagon.
- Remove the thrust nut, remove the retaining ring, spring, and rack stop.
- First, the gear shaft boot is removed, after which you can easily get to the locking ring.
- Remove the nut that holds the gear bearing in place. Be prepared for the fact that it will be quite difficult to unscrew it; use some force. This is fine. It's worse if it practically doesn't hold on.
- The drive gear shaft is pressed out.
- The rail is removed from the housing.
- Next, remove the support sleeve, lubricate it and put it in place. It may take some effort to push it back.
- Replace all bearings present in the assembly. Some are difficult to extract, while others are almost impossible. But it needs to be done. If you cannot remove it at all, then cut the bearing with a chisel and remove it with pliers.
- Examine the condition of all surfaces, parts, and assemblies for any defects or damage.
- If you notice faulty elements, replace them using a repair kit.
- The design will have quite a lot of moving elements. Each of them must be lubricated with high-quality lubricant. Litol will perform well here.
- Reassemble by following the reverse disassembly sequence.
- You will definitely need help for reassembly. Therefore, agree in advance with a friend or someone else who can help you in this matter.
- Place the repaired rail in place and attach its fasteners.
- A rack is inserted into the spitz. This is where you will need an assistant. It is almost impossible to do this yourself.
- Use a chisel to loosen the clamps.
- Tighten all mounting bolts in place.
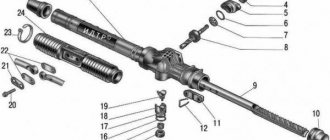
Steering VAZ 2108-2115
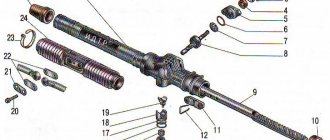
VAZ 2108-2115 steering gear assembly with drive
1, 12 – inner tie rod ends 2 – steering gear mounting bracket 3 – steering gear support 4 – protective cover 5 – steering gear housing 6 – pinch bolt 7 – elastic coupling flange 8 – adjusting rod 9 – outer tie rod end 10 – ball joint of the tip 11 – swing arm 13 – bolts securing the inner tie rod ends to the rack 14 – intermediate steering shaft 15 – elastic coupling flange 16 – boot 17 – protective cap 18 – support sleeve 19 – rack 20 – stop seal ring 21 – rack stop 22 – spring 23 – stop nut 24 – stop nut retaining ring 25 – roller bearing 26 – drive gear 27 – ball bearing 28 – retaining ring 29 – protective washer 30 – sealing ring 31 – nut bearing
The steering is injury-proof, with a height (angle) adjustable steering column. The steering mechanism is rack and pinion type. It is secured in the engine compartment on the front panel of the body with two brackets through rubber supports. The fastening bolts are welded, two on each side of the front shield.
Steering parts
1 – lower part of the facing casing 2 – steering shaft mounting bracket 3 – shaft bearing 4 – coupling bolt 5 – spacer sleeve 6 – upper part of the facing casing 7 – upper shaft 8 – steering wheel 9 – horn switch cover 10 – adjusting sleeve 11 – steering column position adjustment lever 12 – retaining ring
Steering gear housing 5 is cast, made of aluminum alloy. It has a drive gear 26 mounted on two bearings, which meshes with rack 19. The front bearing 25 (at the end of the shaft) is roller, the rear bearing 27 (closer to the steering shaft) is ball. The axial movement of the shaft is prevented by a ball bearing - its inner ring is held on the shaft by a retaining ring 28, and the outer ring is pressed in the steering gear housing to the end of the bearing seat by a nut 31 on the drive gear shaft. In the recess of the nut there is a sealing ring 30, and between the nut and the lock ring there is a protective washer 29. A toothed lock washer prevents the nut from being unscrewed. The nut is covered with a protective cover (boot) 16, mounted on the drive gear shaft. There are marks on the boot and the steering gear housing for setting the rack to the middle position (when adjusting the wheel toe).
The rack is pressed against the teeth of the drive gear by a spring 22 through a metal-ceramic stop 21, sealed in the crankcase with a rubber ring 20. The spring, in turn, is pressed by an adjusting nut 23 (internal octagon at “17”) with a locking ring 24, which creates resistance to its unscrewing. To compensate for the thermal expansion of parts, a gap of 0.12 mm is set between the nut and the rack stop when assembling the steering mechanism (the maximum permissible gap during operation is 0.2 mm), after which the crankcase threads are cored (pressed) at two points (without damaging the nut) and paint marks are applied to fix the position of the nut relative to the crankcase.
The gap between the gear and rack is adjusted after disassembling the steering mechanism or if a knocking noise occurs during operation.
If the mechanism was disassembled, then first install the rack stop with the sealing ring until it touches the rack, then insert the retaining ring, spring and tighten the nut. We tighten the nut to a torque of 1.12-1.37 kgf•m, then release it two notches (24°), which ensures a gap of 0.12 mm between the nut and the rack stop. We check the ease of movement of the rack, the absence of knocks and jamming. The moment of resistance to rotation of the gear of a serviceable steering mechanism throughout the entire range of travel should be in the range of 5.1-20.1 kgf•m at a rotation speed of 30 min -1.
On the left side, a protective cap 17 is placed on the steering gear housing; on the right side, a pipe with a longitudinal groove is pressed in, covered with a protective corrugated cover 4. Through this groove and holes in the protective cover, spacer bushings for the rubber-to-metal hinges of the inner tie rod ends pass, moving along the groove during operation. steering mechanism. The rods are attached to the rack with bolts 13, passing through the connecting plate and spacer bushings of the rubber-metal hinges. The spontaneous loosening of the bolts is prevented by a locking plate, the edges of which are bent onto the bolt heads.
To lubricate the drive gear, rack and gear bearings, FIOL-1 is used (approximately 20-30 g for the entire mechanism), and the cavity above the drive gear bearing nut (under the boot) is filled with UNIOL-1 lubricant.
The steering shaft consists of two parts connected by a universal joint. The lower part of the shaft is connected to the drive gear 26 by a flange with internal splines and a clamping screw through an elastic coupling. The upper part of the shaft rotates in the bracket pipe on two ball bearings with elastic bushings on the inner seat ring.
The steering shaft bracket is attached at four points to the welded bracket of the body: the front part - with bolts with shear heads through two fixing plates, the rear - on welded bolts with nuts with spring washers or self-locking nuts without washers.
The steering shaft bracket and its pipe are hingedly connected to each other by two plates through plastic and metal bushings, tightened with four bolts. Thus, the pipe can move both in the vertical plane and in the longitudinal direction relative to the bracket, allowing you to adjust the position of the steering wheel. Movement is limited by the length of the slots in the plates. To fix the pipe relative to the bracket, use the steering column position adjustment lever. It is connected to the adjusting sleeve with a splined hub and secured to it with a retaining ring. The bushing is screwed onto a coupling bolt that passes through the slots in the guide plates of the pipe and bracket. A spacer sleeve is installed on the bolt. The bolt head is secured against turning by a special protrusion. When the lever is turned down, the bushing turns away and the tightening force of the plates weakens, which allows you to manually change the position of the steering column. Springs are installed between the plates and the bracket, pulling the bracket pipe to the upper position when the connection is loosened. After installing the steering column in the required position, the lever is turned up and the connection is tightened, fixing the column.
How it's done
The sequence of actions is as follows:
- Place the car on a level surface and immobilize it;
- It is better to jack up the car on the left side;
- Using open-end wrenches, unscrew the bolts securing the steering rods to the rack, having first bent the fixing plate;
- In the cabin, under the steering column, unscrew the bolt securing it to the steering gear shaft;
- Unscrew the 4 nuts securing the mechanism, and then remove the fastening clamps;
Unscrew the rack bolts.
- We pull the mechanism onto the engine so that the gear shaft comes out, and then remove it through the technological hole in the left fender liner;
- With the mechanism removed, remove the retaining ring and rack bushing. Using a screwdriver, loosen and remove the clamps securing the protective cover, as well as the clamp of the protective cap on the right side of the mechanism. Then the cover and cap are removed;
- We unscrew the adjusting nut, which adjusts the gap;
- Rotating the gear shaft to the right, move the rack to the left and remove it. Then press out the rack bushing;
- If the gear is also being changed, then remove the boot from the gear housing, remove the sealing and retaining rings, the bearing, the gear itself and the roller bearing;
- We perform assembly in complete reverse order. At the same time, we change all worn-out elements, as well as consumables - boots, bushings, etc., and be sure to lubricate everything. After assembly, all that remains is to put the mechanism in place and attach the steering gear and rods to it. This is the entire sequence of restoration work with the mechanism with your own hands;
After all work, the toe angle must be adjusted.
The work on restoring the steering mechanism is not particularly difficult, but some of the operations can cause a few inconveniences, but in general it is quite possible to do everything yourself. The longevity of the operation of this mechanism in the future will depend on which manufacturer of the repair kit you have chosen.
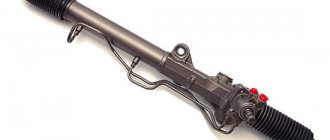
Steering rack device
The VAZ 2114 car has a mechanical steering rack without power assistance. It is secured with two clamps and bolts that attract the rack body to the car body.
The rods are attached directly to the rack using hardened bolts with fine threads. The steering gear shaft rotates on two bearings.
The first is needle type. Serves as a lower reference point and at the same time a guide.
The second is a radial ball bearing. Serves as an upper support point and secures the steering shaft in the upper neck of the steering rack housing. The output shank has splines and a wedge groove. Here the shaft connects to the steering column.
A plastic sleeve is placed in the rack body. It is the second reference point when moving the rack. There are several sealing, locking and protective elements.
How to determine a faulty steering rack? Video:
We correctly tighten the steering rack on a VAZ-2114 with our own hands: tips and the process itself
No one will deny the fact that proper steering in any car guarantees not only the safety of the driver and passengers, but also trouble-free operation in principle. Regardless of the type of steering gear, be it worm gear, power rack or pinion steering, they all require periodic maintenance. VAZ-2114 and all second-generation Samaras received a fairly reliable and easy-to-repair and adjust steering mechanism. It does not have a hydraulic booster, which makes its maintenance and adjustment easier.
Why tighten the rack on a VAZ-2114
Diagnostics of the steering rack and steering mechanism
Before tightening the steering rack on a VAZ-2114, it is worth considering the prerequisites that will tell you that it’s time to repair or tighten it.
In principle, AvtoVAZ guarantees a fairly long service life of the steering mechanism, namely ten years . However, we must understand that we are talking about ideal operating conditions. This assumes smooth asphalt roads, constant availability of high-quality lubrication in the rack housing and a gentle driving style.
Under normal operating conditions, this period is practically unattainable. Unimportant roads, poor quality of spare parts and often harsh operating conditions of the car lead to the fact that the mechanism makes itself felt much earlier.
The first symptoms of a faulty steering mechanism on a VAZ-2114
The first symptoms of a rack malfunction or the need for tightening are clear:
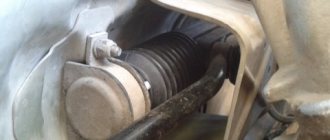
- Knocking noise under the hood in the area of the engine shield, especially when driving over uneven surfaces.
On a VAZ-2114, a knocking sound when driving through uneven sections of the road may occur due to a loose nut on the bolt that compresses the cardan clamp
The latter can be considered a glaring signal of malfunction and can lead to serious troubles while driving.
In this case, most likely, tightening the situation will not correct the situation, however, it is too early to draw conclusions, you can try to adjust it. This can be done in two ways - both on the car and with the rack removed.
Complete disassembly of the steering rack and replacement of the repair kit
In the second case, the adjustment is made after replacing the repair kit and completely repairing the mechanism. We will try to make do with little expense and simply adjust the gap in the gear-rack engagement , thereby eliminating backlash and knocking.
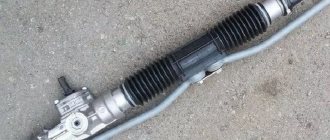
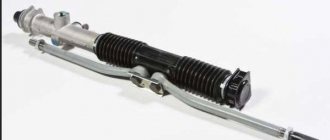
The design of the steering rack on the VAZ-2114
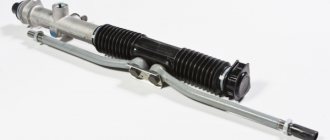
Original steering rack made by AvtoVAZ
Before proceeding directly to the verification process, you need to know the design features of the steering rack. Let's look at what elements it consists of:
Steering rack device
1 – protective cap; 2 – steering gear housing; 3 – rack; 4 – drive gear; 5 – inner tie rod end; 6 – spacer sleeve; 7 – tie rod mounting bolt; 8 – connecting plate; 9 – support sleeve; 10 – steering gear support; 11 – rack support sleeve; 12 – protective cover; 13 – clamp; 14 – rack restrictive ring; 15 – sealing ring of the rack stop; 16 – nut; 17 – rack stop; 18 – roller bearing; 19 – ball bearing; 20 – retaining ring; 21 – nut sealing ring; 22 – gear bearing fastening nut; 23 – boot; 24 – lock washer
We tighten the VAZ-2114 rack with our own hands
Most often, all work on tightening the rack comes down to only selecting the play in the engagement and adjusting the play of the steering wheel . In the event that the wear of the mechanism parts (bushings, the rack itself, the gear, oil seals and anthers) is critical, repair and installation of a repair kit cannot be avoided. However, the easiest way to check this is to tighten the rack directly on the car.
To adjust the rack, you will need a special wrench, which is inserted into the adjusting nut in the steering mechanism housing. You can make this key yourself, but it is sold in any store, it costs a penny, and it never hurts to have it in your arsenal of tools. In addition, it will significantly facilitate the work not only when adjusting, but also when disassembling the rack if necessary.
The VAZ-2114 rack is adjusted as follows:
- It is advisable to install the car either on an overpass or on a lift. You can adjust the rack from under the hood, but you have to work almost by touch.
We install the car on lifts or overpass
Checking the play on the steering rack and steering rods
Tighten the adjusting nut with a special wrench
Video about adjusting the steering rack
Having chosen the play, we do not hide the tool, but do a test drive, during which we evaluate the operation of the steering mechanism. If the steering wheel rotates freely and there is no play, the adjustment can be considered complete. If the steering wheel turns too tight, it is better to loosen the adjusting nut a little by turning it a few degrees counterclockwise.
Many people already know that the VAZ 2111 injection engines have the following disease: “Axial runout of the camshaft.” This disease does not progress and does not cause damage to other timing components, but it manifests itself in the form of an unpleasant camshaft knock. It just so happened that the developers of the 2111 engine missed this point. Where carburetor engines used to have a fuel pump and distributor, injection engines have a regular plug into which the camshaft rests. The camshaft axial play set by the manufacturer should not exceed 0.15-0.20mm.
Over time, as the camshaft pastel wears out, the axial play increases, and a distinct knock begins to be heard from under the valve cover. Of course, you can continue to drive with this knock and not worry, but not every car enthusiast will be pleased. I am sure that almost any auto repair shop will tell you: “Either ignore this knock, or change the entire head! ". But there is one simple and absolutely free way to eliminate this annoying knock by placing a washer between the camshaft and its side cover! Below is a detailed description and photo report of the work done.
Checking the camshaft axial play. Remove the timing belt cover and start the engine. Then, with the engine running, press the handle of a screwdriver into the camshaft gear bolt. If the knock disappears when pressed, the reason is: Axial runout of the camshaft.
Preparing for work. Now you need to clear the space around the side camshaft cover. The air filter was in my way, so I unscrewed it and moved it to the side. Remove the camshaft cover. To begin with, using a powerful old-fashioned key of 17, we set the camshaft gear to the mark.
This is necessary so that the “pin” that is on the camshaft does not interfere with removing the cover. Then, using a 10mm wrench, unscrew the cover (2 nuts and one bolt with a rubber ring). In the photo you can see only 2, the third from the back: Carefully remove the cover. We make a washer.
For the material for the washer, I took a piece of galvanized steel approximately 0.5 mm thick and secured it to a piece of MDF panel with four self-tapping screws (so as not to tear). I drew 2 circles with a marker (inner diameter 25mm, outer 35mm) and hollowed out the inner diameter with a chisel. I cut out the outer diameter with metal scissors, and I ended up with this curve, the washer blank was all covered in burrs: I processed the inner diameter of the washer with a round file, and sharpened the sharp corners on the outer one: Install the washer. We put the washer on the camshaft (it should fit freely, if not, then adjust the dimensions). Put the cover back and tighten it.
Attention! Be sure to check if the camshaft is jammed. To do this, berm the key to 17 and try to rotate the camshaft. It should turn with the same force as before installing the washer. If the camshaft becomes very difficult to turn, or is completely jammed, then remove the cover again, take out the washer and grind it to thickness: Finish the work. After the washer is adjusted, the cap is tightened and the camshaft rotates freely - start the engine and enjoy the silence of its operation!
Adjustment methods
The steering rack can be adjusted in two ways.
Adjustment method
Peculiarities
If the rack is removed and adjusted, we are most often talking about repairing or replacing the unit with a new one. It is recommended to carry out such settings only in these situations
This method of adjustment is relevant if it is necessary to tighten the rack slightly, remove play, and get rid of knocking noises. Here it is quite possible to do without dismantling work, that is, to set up the mechanism directly on the car
We will answer your questions
Good afternoon. Yes, we can repair it within one day.
No, this shouldn't happen. Regarding self-repair of such important mechanisms, we are always against it. Not only because they are interested in providing services, but also because then we will have to correct your mistakes during independent repairs, and this is much more difficult. When there is a knock in the rack, in order to determine the cause, you must initially completely disassemble it. Only knowing how the mechanism should be designed can you notice its malfunction. Not everyone, even the most experienced driver, is sufficiently knowledgeable about the internal structure of the rack.
We have not yet learned how to conduct remote diagnostics. This can indicate either the situation you first voiced or signal a serious breakdown. In a car service center, in case of temporary wear, you may be offered a rack restoration procedure. In this case, the mechanism is disassembled, and all obsolete parts are replaced with completely new ones. If repairs are necessary, the technician will disassemble the rack and decide what and how to change or repair.
Since you come into contact with its work directly while driving a car, it will not be too difficult to detect a breakdown. If not during the next diagnostic, then while driving the car, you will notice noises or knocking, play in the rack. This serves as a direct signal to visit a car service center.
No, depending on the design of the mechanism, the racks can be electrical, hydraulic or mechanical. In each individual case, the master must understand the mechanism and carry out the repair procedure in accordance with its structure.
Yes, this is a very important component of the car. Scientifically, it is called hydraulic power steering, and its purpose is already clear from the term itself. The rack helps you turn the steering wheel
It is also an important part of the hydraulic system. Now the second part of the answer: do you think that you will be able to drive your car normally if you cannot turn and brake normally? The question of the importance of a working steering rack should not even arise