Print this article Font size 16
For some reason, many car owners believe that independently adjusting the steering rack on a VAZ 2110 is an impossible and impossible task. This opinion is erroneous, since it is not so difficult to do such work with your own hands. You don't have to be a professional.
If characteristic knocking of the steering rack was noticed on the “tens”, it is recommended to tighten it. Today we will tell you about two effective methods. Which one to choose is up to you to decide.
maveric689 › Blog › Adjusting the steering rack of the VAZ-2112
There is an opinion among VAZ-2112 owners that the steering rack is very difficult to adjust, and sometimes only needs to be replaced. We absolutely tell you that this is not so! Easily! Thanks to the design of the car, any car enthusiast can easily remove and adjust or adjust the steering rack on the spot, because you just need to carefully read our instructions. Causes of steering rack malfunction If while driving, often on uneven roads, you find that all the vibrations are transmitted quite strongly to the steering wheel, then the steering rack most likely requires adjustment. How to carry out this work in two different ways is written below. Tightening the steering rack
Before you begin tightening the steering rack, you need to prepare a special wrench that is shaped like an octagon with a diameter of “17”.
If you have such a key, tightening the rack can be done without difficulty. And for the best access to the rail, it would not be amiss to have an inspection hole or a lift. Step-by-step work order
1. First of all, lift the hood and pay attention to the free space under the brake master cylinder. 2. Next, take a flat-blade screwdriver, as well as a flashlight or carrying lamp for the best visual access.
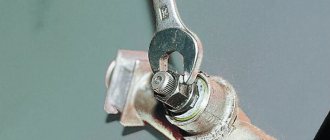
Everything is ready for work 3. We get to the steering rack nut from the rear of the subframe and follow the steering rack body to the part where it intersects with the steering shaft. This adjusting nut is located nearby.
The arrow indicates the location of the adjusting nut.
4. Please note that most inexperienced car enthusiasts confuse a nut with a plug. A distinctive feature of the nut is the thick layer of dirt that is located on its body and its octagonal shape. 5. Since the nut is closed from the factory with a special plug, adjustment will be almost impossible without dismantling it. And in order to remove it from the seat, use a flat screwdriver, prying it off the edge of the base. 6. Once it is removed, take the key you prepared earlier and insert it into the base of the nut.
Although visibility is minimal, it is possible to make a replacement. 7. Next, slowly move clockwise, turning the key 15-20 degrees, tighten it until the backlash disappears. Please note that you should not tighten it all the way!
Diagnostics of rack tightening
You can diagnose the degree of tightening in the following way. Turn the steering rack first in one direction, then in the other direction with sharp movements. And if during such manipulations no extraneous sounds arise, this will mean that the rail is tightened and in good condition. After carrying out such work, you can reassemble everything in the reverse order, first of all this concerns the engine crankcase protection.
Tightening the steering rack on a removed mechanism
Before you start working, you need to prepare the tool:
*Flat blade screwdriver. *Hammer. *Key or heads for “10”, “13”, “15”, “17”, “19”, “27”. *Pliers. *Special key for tightening the steering rack.
When the tool is assembled, you can start working.
Step-by-step work order
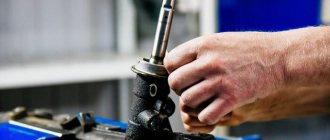
1. First of all, unscrew the nut, which is located inside the car and secures the propeller shaft on the lower hinge to the gear shaft on the steering mechanism. In this case, you will need a “13” key and if it turns during dismantling, you need to fix it with a second key or pliers. 2. Go under the hood and there, using a socket or a “10” wrench, unscrew the nut securing the boot to the steering rack. 3. Then we go under the car and unscrew the two nuts securing the steering rack boot.
If the bolts do not come off, treat them with WD-40.
4. Dismantle this unscrewed boot. 5. The next step is to remove the front wheels and lift the front of the car. To do this, first of all we tear off all the bolts while the car is still standing, and only then unscrew them one by one from their places of fixation. This must be done to make it easier to access the steering rods.
How to tighten the steering rack on a Priora: tips and instructions, nuances with ESD and power steering, videos on the work
Lada Priora is a Russian-made car that is highly popular among our compatriots due to its low price and attractive appearance. However, even despite this, the Lada Priora has one vulnerability associated with the poor quality of the road surface - the steering rack or, in the language of specialists, the “power steering/power steering gearbox”. Fortunately, you can tighten it with your own hands.
When does the steering rack need to be tightened on a Priora?
The steering rack is a vulnerable point for Lada Priora
The first sign indicating the need to adjust the rack is the appearance of a knocking sound when driving over small uneven surfaces. The knocking will be felt especially clearly when driving on country roads. In this case, the driver will feel shocks and vibrations on the steering wheel, which will also be transmitted to the entire car body.
In addition, if the steering wheel adjustment nut is loosened when driving on the highway, the car will “float” a little, and additional steering will be required from the driver, which will also immediately become noticeable.
Experts also say that a tightening is necessary if the driver begins to notice the appearance of a clearly audible crunching sound in the area of the steering column, as well as an increase in the amplitude of the steering wheel rotation.
When tightening doesn’t help and the mechanism needs to be changed
It’s worth thinking about replacing the rack when tightening it does not in any way affect the car’s behavior on the road, and also does not help get rid of the unpleasant knocking noise. A failed steering rack will cause significant play in the steering wheel. Moreover, it may begin to jam (this happens extremely rarely, but similar cases are known). If the rack begins to jam, then it is better to stop using the car, as this can lead to the most dire consequences.
You cannot do without a replacement even if after tightening it you managed to get rid of knocks and vibrations, but they reappeared later.
What is needed for work and how to tighten the steering
To tighten the steering rack you will need special wrenches
To perform the tightening you will need the following tools:
- Slotted screwdriver (in simple terms, a “flat” screwdriver);
- Wrench 13;
- A special 17mm wrench designed to adjust the steering rack.
To make the work more comfortable and faster, it is recommended to drive the car into a special inspection hole or overpass, and also use an assistant, whose role even a child can handle.
The lower rack fastening nut is not easy to unscrew
To get to the rail, you should perform a number of simple steps:
- Disconnect the battery terminals and dismantle it;
- Using a 13mm wrench, unscrew the bolt securing the battery stand, and then remove it;
- Directly under the steering rack, using a slotted screwdriver, you need to pull out the small plug of the adjustment system.
How to adjust the steering rack on a VAZ-2110
When driving a domestic VAZ-2110, owners often encounter unpleasant knocking noises in the steering unit.
Mostly this type of sound occurs when the driver is driving on crushed stone, dirt or broken road surfaces. The source of the knock is usually located under the steering wheel, and the feedback of this action is clearly heard. It is worth noting that the steering rack is subject to significant vibration influences when moving on Russian roads. In a situation where the car owner notices characteristic clicks in the engine compartment (rattling, rattling), the steering rack will have to be slightly tightened using a special head. To get to the necessary nut, it is by no means necessary to fix the 2010 VAZ model on an inspection ditch/pit, or to look for a lift.
Repair, price
A lift is a fairly simple and quick way, but often it is only a partial, temporary solution to the problem. After all, the appearance of play can be caused by various reasons - the boot may be damaged, gaskets may leak and who knows what else, that is, there is a high probability that the steering rack is running dry. In this case, there is a risk that a short time after tightening it may simply jam. Therefore, troubleshooting the rack will be very useful, at least an external inspection, it will make sure that the anthers and corrugated casing are not damaged.
If you suspect the need for repairs, consider whether you can handle it yourself. Get ready for the fact that you will have to spend the whole day in interesting positions, and you will also need an assistant to perform some operations. Do you know how to install the rack so that the steering wheel is level? If not, you risk having to do the installation again.
An alternative is a service station. They will charge you around 3,500 rubles for repairs, 200 rubles and another 200 will be spent on anthers and so on.
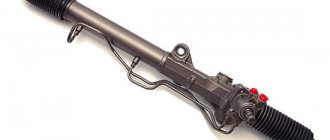
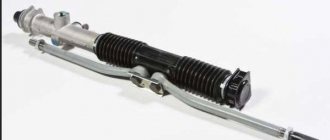
The design and function of the steering rack in control
The lath looks like a steel blank.
On one side there are teeth that engage the drive gear. It is thanks to the latter that the steering wheel moves through the shaft and its cardan. In the “ten”, the rack is located in a column fixed on a partition in the middle of the engine compartment and passenger compartment. At the top there is fastening for 2 rods. They are combined with the shock absorber struts using tips and their fingers. Note. When the steering wheel is turned, its shaft rotates, transmitting forces through the cardan to the drive gear. The latter, together with the rods, moves the rack in the required direction. This simple method is used to control the car.
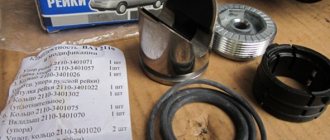
To ensure normal operation of the steering rack, other parts are included in the mechanism:
Thus, a damaged steering rack has the following symptoms:
If the steering control in a VAZ-2110 breaks down, there is no need to immediately contact a service station or purchase the entire unit. It is quite possible, if you have some skills, to adjust the rack in your garage. You will gain experience, raise your self-esteem and, of course, save money.
Source
How the control system works in Kalina
In the model of the domestic automobile industry we are considering today, the steering rack, if disassembled from a technical point of view, is a mechanism that structurally looks like a gear, which in turn is installed on a shaft and is associated with special rods and a rack. Thanks to these elements, the car turns when moving the steering wheel in a certain direction allows the front wheels to move in the same direction.
Modern cars have 3 variations of the rack and pinion mechanism:
- Electric steering mechanism;
- Hydraulic modern mechanism;
- Mechanical mechanism.
So, the car control system is an electric drive. This is what helps reduce the load on the driver. In this case, the increase in turning force is carried out due to a special electric motor built into the column, so to speak. This device is used exclusively on premium and, accordingly, luxury cars. For example, in our Lada Kalina, the electric mechanism can be obtained as an additional option for an additional payment for the TOP configuration.
The next option is a hydraulic mechanism. Viburnums of the first and second generation are equipped with this mechanism. Owners of such cars receive sharpness and lightness of the steering wheel. And not only Russian cars, but also many modern foreign models are equipped with the popular and most convenient hydraulic drive.
The mechanical mechanism is the simplest in its design and is also found on many machines. In this case, as you understand, the rods will be turned only through the use of the driver’s physical force. It is clear that such a car is extremely difficult to drive.
In addition to the above mechanisms, there is also a mixed version - electrohydromechanical. It combines all the best qualities of an electric and hydraulic amplifier. You can find it on the Kalina Sport model.
Let us note that each of the systems we have listed has its own advantages, and to some extent disadvantages, but they all break down with the same frequency. If a breakdown of a mechanical control rack will lead to insignificant costs for repair work, then electrical and hydraulic breakdowns will force you to spend a fair amount of money on repairs. It follows that it would be nice to know how to tighten the steering rack on the car we are considering with your own hands.
Tightening the rack with removal
Get started:
If you are going to remove the steering, but not dismantle the rods, follow these instructions:
If you want to remove the steering rods, unscrew the rod end from the swing arm of the shock absorber struts. To do this you will have to do the following:
Steering of Lada Granta
It is designed to control the car while driving. Structurally, it consists of the following main elements:
The work of the mechanical part is that the driver acts on the steering wheel, the impulse through the steering mechanism and rack transmits force to the front wheels through the levers, and the car turns in the desired direction. A characteristic feature of a passenger car steering wheel is its smaller diameter (compared to a truck). The design of the mechanism also differs. The steering of the Lada Granta is complemented by an electric booster. The steering wheel can be adjusted in height. Unfortunately, there are no settings for departure.
The steering mechanism of the Lada Granta is rack-and-pinion type, the simplest and most inexpensive option.
The drive is mechanical, structurally consisting of levers, rods and hinges. For more efficient and convenient control, the Lada Granta is equipped with an electric amplifier. This is a complex mechanism that provides force through the use of electricity. An electric power steering, or simply EPS, is used to improve dynamic characteristics and controllability. And, according to some data, it allows you to save fuel by increasing the vehicle’s maneuverability.
The process of adjusting the steering rack on a VAZ 2110
Each individual car has its own specific performance, so there is no specific tightening torque. Try not to overtighten the rack, as this will make the process of turning the steering wheel much more difficult.
After tightening our today's hero, tighten the stop nut by bending the crankcase thread.
It is imperative to check the gap between the stop nut and the rack stop. Its maximum value can be no more than 0.2 mm.
A little theory: front suspension design
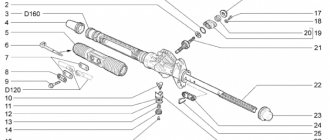
Before attempting to fix any problem, there is a tendency to look at the blueprints or repair manual. It is known that the VAZ-2192 parts catalog contains the following object:
This is what the steering rack looks like in the drawing
Whether the knock will remain in the steering rack of Kalina-2 depends on the following: how accurately element “14” is adjusted. The adjusting nut, marked “14”, looks almost invisible here. But first impressions are deceiving. In the catalog, by the way, the element is called “Stop Nut”.
It is important to know that the thrust nut has external threads. And it spins clockwise. And the words “tighten the rack” mean screwing in the specified nut, and nothing more.
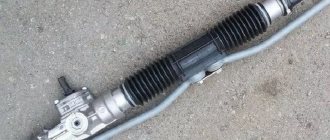
Now let's move on to practice and see what the node in question looks like in reality:
If you remove the rail, it looks like this
The nut has a non-standard notch, and it can only be rotated with a special tool. By the way, the recess will be closed with a cap. In the catalog it is designated by the number “15”, and now, let’s look at the appearance of the special key:
Rack adjustment key
The thrust nut is turned at small angles. We are talking about values of 10-15 degrees. What happens if you overdo it with tightening the rack? The knocking noise will disappear, but the steering wheel will turn with difficulty. Therefore, if necessary, the nut can be pulled back.
Adjusting the steering rack without removing it
For this method, arm yourself with a special wrench, which is made in the form of an octagon, 17 mm in size.
The steering wheel should be tightened to “tens” only in cases where knocking noises are observed during operation of the steering mechanism. It’s not worth it to just do work without a real need.
Video
We figured out how to adjust the steering rack on a VAZ 2110 with and without removal. Which option is more attractive to you - decide for yourself. By removing the rail, you can additionally perform some other work, check the condition of the units, components, replace something, tighten it.
Obviously, it is more than possible to carry out the adjustment yourself. The only caveat is the search for a specialized adjustment key specifically for the VAZ 2110 car. Without it, you cannot do anything; there are no analogues among the available tools. It is not expensive, so there is no need to worry. But also to squeeze.
Source
Instructions for adjusting the rack
- Drive onto an overpass/pit or use a lift.
- Remove the engine protection, then use a flathead screwdriver. Don't forget to provide the car with good lighting.
- Find the rear component of the subframe, which is located behind the steering rack. At this point, the shaft and rack should alternate. There is also an adjusting nut there. The latter is similar to the plug of the adjusting nut, so it is important not to confuse it. This is a common mistake among beginners.
- If the steering gear was previously untouched, the nut will have a green plug. It functions as a stopper and is installed at the factory.
- Remove the plug with a flat screwdriver. It may break, but there is nothing terrible here.
- Take the adjusting key, having first removed the stopper, and tighten it in a clockwise direction. You cannot press it all the way. The degree of clamping directly affects the strength of knocks during movement.
- Turn the wrench 10 degrees and check the rack for play. It is worth pressing again if it is present. Rotating more than 15 degrees at a time is not recommended.
- Check the clamping level. You need to take the rail, turning it with a sharp movement in one direction and then the other. The rack is tightened efficiently, if no extraneous noise is observed.
- There is no point in putting the stopper in place. If you keep it safe, it is of no use.
While removing the rack of your VAZ-2110 car, you can perform other work, for example, examine the condition of the units and components. Something may need to be tightened or replaced.
We tighten the steering rack on a VAZ-2110 with our own hands (+ adjustment)
The steering mechanism of dozens has undergone several ongoing improvements throughout the entire production period of the car, but in general, the steering system is not far removed in design from the VAZ 2108-09 design. Perhaps that is why almost everyone who operates a ten repairs and adjusts the steering rack with their own hands. There is nothing complicated about this and now we will see it.
About the rake
The steering mechanism on Lada cars, starting with model 2108, has a steering rack. It is designed to move steering rods along a horizontal plane, which helps turn the car's wheels.
The design of the slats is quite simple and reliable, with the exception of one small drawback - a plastic bushing.
This bushing is made by the manufacturer from low-quality plastic, which soon leads to play in the rasp in it and the appearance of an unpleasant knock when moving on paving stones.
There is a rail between the engine and the passenger compartment, perpendicular to the exhaust manifold and attached with two brackets to the engine shield.
The design of the steering rack on the VAZ-2110
First, let's decide what we will regulate. The design of the rack is extremely simple. The hydraulic booster is not provided, so even with dismantling (which is not at all necessary), all the work will take an hour or an hour and a half.
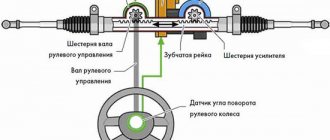
Scheme and design.
The steering mechanism of the VAZ-2110 is a rack and pinion gearbox that converts the rotation of the steering shaft 27 into the movement of the rack 16 itself. Steering rods 5 and 7 are attached to the rack with bolts 6, which turn the racks with the steering knuckle. The contact point between the drive gear 21 and the rack 16 is most subject to load and, accordingly, wear .
When adjustment is necessary
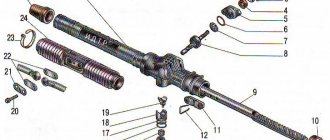
Clearances and adjustment
In these cases, it makes sense to try to adjust the gap between the rack and pinion in order to delay a major overhaul of the entire mechanism. And we will adjust the gap by pressing the adjusting nut 33 through the spring 32 and the rack stop 31, the rack to the gear.
To do this, we will need a special octagonal wrench for 17, which is sold at any auto store. You will also need several screwdrivers and a standard set of tools if we do not remove the rail from the car. Let's start making adjustments.
A key for tightening the steering rack on a VAZ-2110 car.
Tips for use
A complete replacement and repair is a series of actions, for the implementation of which you need to have not only special knowledge, but also a considerable amount of free time, so if the car owner does not have either the first or the second, it is preferable to go to the nearest service station.
It is better to entrust steering rack repair to service station specialists
At the same time, in order not to become their regular guest, you should know some secrets for operating the steering rack, which can significantly extend its service life.
- We strongly do not recommend “jumping” your car on curbs, or driving at high speed on rails, since each such trip causes cracks to appear on the rack itself, as well as deformation of the shaft that is part of the steering mechanism.
- It is not recommended to frequently turn the steering wheel all the way. Of course, in this case it will be very difficult to demonstrate your maneuvering capabilities, but this will significantly increase the life of one of the most important parts of the machine.
- Carefully monitor the condition of the protective anthers, which must maintain their tightness. Replacing anthers is several times cheaper than replacing the entire rack.
- It is also worth monitoring the level and condition of the hydraulic fluid, since its decrease or change in color is associated with problems in the vehicle’s hydraulic system, which can result in rack failure.
From time to time you need to undergo a full maintenance, which will allow you to eliminate faults in advance, which can cause irreversible consequences, injury to yourself, your loved ones and other road users. And also, if problems are detected in the operation of the car, it is better not to take risks and go to the nearest car service center as quickly as possible.
We tighten the rail ourselves
We will carry out the work from under the car, so it is advisable to use an inspection hole or overpass. You can tighten the nut from under the hood, but this is extremely inconvenient and will take more time, we checked.
We install the car and secure it with the handbrake; just in case, we put wheel chocks under the rear wheels. Next we do this:
We extend the carrier so that it can be seen better.
This is the same nut.
This is what the plastic plug looks like.
You will have to try a little to get the wrench into the nut.
How to independently adjust the steering rack on Kalina
For self-adjustment you will need only 15-20 minutes. All you need to have with you: a 13th wrench, a special wrench and a 10th socket with a wrench. The procedure at first glance seems quite simple, but you will still have to remove some nodes. So, nothing can be done if you do not remove the battery from the LADA Kalina car. You also need to remove the special platform on which the battery is installed.
After this, you get access to the desired mechanism. And feel free to start solving the problem. The only thing is that it will not be very convenient for you to make adjustments, because you have to crawl under the very bottom of the rail, where the plug is installed, in order to remove it.
After this, place the special key on the nut located inside the mechanism. It is this nut that needs to be either loosened or tightened. To begin with, it will be enough to turn the key half a turn. Remember that all manipulations are done carefully, without effort, so as not to overtighten anything. Next, you can test it by driving the car a little to find out if you have done everything to the level required.
When everything is ready, you need to put everything back in reverse order.
Communities › Lada 2110, 2111, 2112, 112, Bogdan › Blog › steering rack tightening
Last year I installed a new steering rack. Today I wanted to tighten it up a little, so I started tapping. So, I couldn’t do this, it doesn’t spin back and forth, not at all. I broke the key and couldn’t get the nut out of place. I haven’t tried to tighten this rack since installation, what could be the matter, you know, the review of this nut is limited, you can’t see what’s wrong with it, I thought maybe it was cored somehow from the factory? although I asked a friend from the service, he says he has never seen them kerneled, and in theory it should work, but it didn’t work out for me. Question to respected experts in the studio, what could be the matter?
Tightening process, video
There are several ways to tighten. One of them is the method of removing the slats. The removed rail is clamped in a vice and then, using a special wrench, the nut is tightened 10-15 degrees by turning it counterclockwise.
This is followed by a check for backlash and, if necessary, the procedure is repeated, since the backlash can be more or less. It is not advisable to overtighten, it will be difficult to rotate the steering wheel. The advantage of this method is the ease of adjustment, but the disadvantage is that you have to remove and then put the steering rack back in place, and this requires time, certain knowledge and skills.
The second method is simpler, it does not require removing the steering rack, you just need to remove the battery and the platform under it with four bolts, but it is much easier and faster than removing and installing the steering rack. This way we gain access to the steering rack and steering rods.
We take hold of the rod with our hand and begin to shake it with force. A characteristic knock will immediately indicate the presence of play. The stop nut is located on the rack behind the left link from the bottom; you need to feel it with your finger. Now the task is to get the wrench into the nut and then turn it counterclockwise. We check for play and, if necessary, tighten it further.
But in the video there is another tightening option, even without removing the battery: