The handbrake in any car, including Renault Logan, plays a fundamental role in ensuring safety. This unit allows the body to be statically held on an inclined plane. To activate the parking brake system, the driver will need to cock the lever located in the cabin.
In practice, it has been noticed that there is a category of owners who do not pay enough attention to this unit, and therefore, failures begin to occur in its functionality. It would be wrong to think that an activated gear in the transmission can effectively hold a Renault Logan. A faulty handbrake not only creates the risk of the car rolling away spontaneously, but also violates regulatory requirements for the condition of a car intended for use in road traffic. Therefore, the question is always relevant: how to tighten the handbrake.
The popular budget segment model Renault Logan was produced from 2005 to 2015. There were no widespread complaints about the ineffective parking brake system.
Few owners regularly monitor the condition of the handbrake. The assembly cable is subject to constant stretching, which is why it requires periodic tightening, and not many people know how to tighten the handbrake. If this procedure is not resorted to in a timely manner, the effectiveness of the system is lost. Inexperienced Renault Logan owners can also damage the mechanism when they start driving with the handbrake activated. In this article we will tell you when and how to tighten the handbrake. The video will also help you in this matter.
How to change the handbrake cable
Each unit and component has its own service life, after which the installation of a new spare part is required. The situation is similar with the parts included in the handbrake system, in particular the handbrake cable. Below we describe in detail how you can repair the parking brake on a Renault Logan sedan if it cannot be adjusted. But it should be remembered that the rear wheel pads begin to unclench under the action of 2 cables. Moreover, each has its own separate drive. Replacing the handbrake cable:
- First, the cables are loosened by unscrewing the adjusting nut, as indicated earlier at the beginning of this publication.
- Then the car is placed on a jack so that it is possible to spin the rear wheels and remove the brake drums.
- The rear brake pads are removed from each wheel by first snapping off the retaining springs that tighten the pads.
- Afterwards, the end of the cable is removed from the lever that activates the pads. This procedure can only be performed by first squeezing the spring using pliers.
- When the above operations are performed with pliers, the fastening element of the protective frame is compressed and the cable is removed from the hole in the brake assembly shield.
- The protection shells of the right and left cables are additionally held in place by special fasteners located on the beam lever - press them out.
- After slightly pulling the drive cables into the interior of the Renault Logan, you need to remove their ends from the holes of the equalizer.
- Now perform the operations under the bottom of the Renault Logan car and pull the cables through the channels at the base of the body.
The procedure for removing defective parking brake cables is completed. To install new cables, you should use this algorithm, but in the reverse order. Similar actions are performed when the handbrake cable needs to be replaced, both by car service specialists and by an independent approach. In addition, you may need to install a new cable in front of the handbrake, but this already applies to repairing the lever mechanism and this is a separate story, and you need to buy original spare parts, each of them has its own article number.
If nothing works out
The gap between the drum and the pads is adjusted automatically. But the value of the “ideal gap” can be changed! It is not possible to adjust the handbrake when this value is too small.
Currently reading: Bleeding the brake system of Renault Logan | New Logan
Remove the wheel, unscrew the nut - and you're done.
To set the gap, you need to remove the rear brake drum (how to do this without a puller here).
We will increase the “ideal gap”. To do this, the lever is removed from the ratchet (see figure), and the ratchet itself is turned upward.
The regulator can be rotated with a screwdriver
The reader may have noticed a discrepancy: the gap is increasing, which means the bar is “shortening”. And that means the ratchet had to be rotated to the right! Don't worry - this one uses left-handed threads.
Close the drums and apply the brake 10-15 times. The rear brake clearance will be adjusted and the handbrake adjustment can then be checked.
In theory, tightening the Renault Logan handbrake is not related to adjusting the brake mechanisms. But sometimes you still have to open the reels. This is done when it is impossible in principle to fulfill two conditions at once (no “sticking” and reliable fixation).
How many clicks should there be?
According to the experts, when adjusting Logan's handbrake, the number of clicks should be six. But this recommendation is just the tip of the iceberg. While working, keep control over the results of the work performed. If the Renault handbrake is set correctly, the car should be held at an angle when standing on an overpass and not roll away. The angle of such a structure is enough to check the handbrake (it is 25 degrees).
The algorithm of actions looks like this:
- Pull the cable until the sixth click.
- Check out the results.
- If you need to reduce the number of clicks to five, do so. But keep in mind that even when the Renault handbrake is released, the wheels may become stuck.
How to tighten the handbrake on a Renault Logan: step by step
The entire process of adjusting the handbrake is carried out according to a simple algorithm:
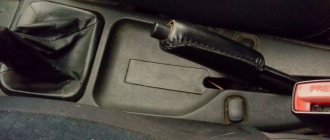
- Remove the plug from the facing part of the tunnel.
- Use a T20 Torx wrench to tighten the screw.
Lift the facing part up, and then move it forward and remove it completely.
Find the nut (it has a pyramid shape) and bend it back.
- Check that the Renault wheels are locked. To do this, first install the wheel chocks. If there are none, jack up the car.
- Pull the handbrake down.
- Now you need to tighten the knot. To do this, take a ten key and make ½ turn of the nut.
- Count the number of clicks (it should be 4-6). Here, consider the recommendations mentioned above.
- If the adjustment does not produce results, make another ½ turn. Tighten the nut until the expected result is achieved.
In Renault Logan cars, the process of adjusting the distance between the pads and the drum is automatic. But this does not mean that this parameter cannot be changed. In practice, due to the short distance, the handbrake cannot always be adjusted. In such a situation, adjust the gap. To solve this problem, dismantle the drum on the rear wheel, move the lever away from the ratchet, and lift the latter up. Please note that this is a left-hand thread.
Then put the covers on the drums and press the Renault brake 12-15 times. In this case, the gap in the rear brake mechanism must be changed. Next, check that the brake is adjusted correctly.
To avoid problems in the future, it is important not only to tighten the handbrake cable, but also to periodically inspect the system. Here's the algorithm:
- Check the brake fluid level.
- Check and change the pads on the front wheels.
- Check and change the drum on the rear wheels.
- Check and replace the front discs.
The mentioned works are carried out if necessary.
The car developers from Renault claim that the handbrake does not require adjustment due to the lack of cable stretching. If you decide that such work needs to be done, consider the following risks:
- When adjusting ratchets, it is not recommended to replace them. Please note that the gap on the left and right sides must be identical, and this is difficult to implement.
- If the nut is overtightened, adjustment cannot be done without unscrewing it. And this is associated with problems, because you will have to melt the plastic washer with preheating of the assembly. It is difficult to implement this without the involvement of craftsmen and in a garage.
It is possible to tighten the handbrake cable. But do this work carefully and strictly follow the instructions. If problems arise, watch the training video or contact a specialist. If you need to replace the cable, choose original spare parts (article number - 6001547168) or analogues (shown in the table below).
From time to time there is a need to tighten up. This is due to the fact that with frequent use and gradual wear of the pads, the tense brake cable weakens. Today you will learn how to fix a problem with the handbrake in a couple of minutes, without resorting to the help of a car mechanic and without spending a penny on it.
What does Renault advise?
It may be necessary to tighten the handbrake on a Renault Logan in one case: if the rear pads were replaced and the adjustment was broken.
The drive cables do not stretch during operation, and there is no need to adjust their tension. This is what the Renault company itself thinks.
By making adjustments and not having the proper qualifications, you can get the following result:
- Firstly, it is better not to change the ratchet settings at all - the gap should be the same on the right and left. And this will be difficult to achieve;
- If the adjusting nut is overtightened, it will have to be unscrewed. But in order to unscrew it, you need to melt the plastic washer, which requires heating the entire assembly.
The last option is not implemented in garage conditions.
Dismantling and replacement
It is difficult to confuse the cable from the handbrake with anything else under the bottom of your VAZ 2114, which greatly simplifies the repair and replacement procedure.
Dismantling works
We provide detailed instructions for replacement, and additionally recommend watching the video.
- We advise you to get the car in order in terms of cleanliness in advance. This will make it easier for you to find all the nuts and fasteners.
- Additionally, treat the nuts with the almighty WD40. This will make it much easier for you to unscrew the sometimes sticking and rusting nuts.
- Place the handbrake lever all the way down.
- Start with the adjusting nut and locknut that you used recently to try to tighten a loose cable. In this situation, you should loosen the nuts and remove them from the handbrake rod.
- Remove the washers and cable equalizer. Although this can be done after you jack up the car. But be sure to do it before removing the wheels.
- Raise the rear of the car with a jack, unscrew the wheel bolts and remove them.
- Tap the brake drum locking pins. This will allow them to be removed from the brake pads.
- Remove the block.
- You now need to disconnect the ends of the two cables from the equalizer. The fasteners can be removed from their places with the simplest pliers, so don’t bother.
- The shifted spacer lever has hooks from which the cable loop can be removed.
- The cable sheath must be removed from the entire suspension of the rear of the car. To do this, the mounting bolts are first unscrewed.
- Pull the cable out of the holes through the brake flaps.
- We got rid of the old cable, so all that remains is to replace the old one with a new element. The procedure is performed exactly in reverse order.
- Thread the new cables through the washers and hook the loops. You can additionally make bosses - this is a special clamp that allows you to fix the cable even more tightly.
- Reassemble the entire disassembled wheel structure.
- Route the cable along the suspension through the sheath and secure the bolts.
- Pull the handbrake in the cabin.
- Check the correct tension and operation of the new hand brake, or rather the cable.
Article on the topic: Repairing the fuel pump on a VAZ 2109 (carburetor)
It is not uncommon for the parking brake to cause an unpleasant squeaking noise from the rear. By changing the cable, you can get rid of this problem at the same time. To do this, rubber seals are installed under the cable fasteners on the body frames.
Adjusting the handbrake yourself
This involves performing the following steps.
- We dismantle the decorative plug present on the lining of the tunnel in the cabin.
- Armed with a Torx-20 wrench, we unscrew the entire list of fastening components.
- Now the lining can be removed. We find an adjusting nut.
- Rotate the nut in the desired direction approximately half a turn. We use a size 10 wrench.
- We check the changed tension level by activating the system lever. We count the clicks and make sure that the car is secured against rolling.
- In this way, we achieve the previously indicated number of clicks of the mechanism when the lever is activated, after which the Renault Logan car begins to be securely held using the parking brake. The handbrake adjustment is completed.
Features of adjusting the hand brake system on Renault Duster
The handbrake on Renault Duster is self-adjusting. 8-9 clicks when lifting the handle is the norm!
- To adjust, press the brake pedal firmly several times.
- Then raise and lower the handbrake several times.
If this does not help, then you need to tighten the handbrake cable, more on that below!
Tighten the handbrake (step by step process)
Before directly adjusting the cable, it is necessary to do some preparatory work:
- First, we dismantle the middle plastic panel, which is located between the driver and front passenger seats.
Removing the central tunnel of Renault Duster
- Next we lift the rear of the car.
- And press the brake pedal with your foot a couple of times and hold it.
- We adjust the handbrake cable using a 10-point knob, rotating it clockwise.
The cable should be adjusted by rotating the nut clockwise.
- We cock the handbrake handle to the up position, thereby the free play should be 6-8 clicks. If the values are too low, the cable should be loosened by unscrewing the nut counterclockwise.
About the number of clicks when pulling up
Renault Logan handbrake tightening is carried out with control of the result. The car, if the handbrake is applied, must be held on an overpass set at an angle of 25 degrees. It's probably better to do the job like this:
- Tighten the cable so that the lever stroke is 6 clicks;
- We check the result;
- If necessary, we reduce the number of clicks to 5, but now even the released handbrake can “grab” the rear wheels (check).
A very rare exception: the number of clicks has been reduced to 4, and the rear wheels can rotate when the handbrake is released!
To tighten the handbrake less often, many people try to tighten the cable so that the handle reaches 4 clicks. But then there are complaints that the rear wheels “get stuck”.
How to tighten the handbrake yourself
If during inspection of the cable you notice damage to it (cracks, breaks, other noticeable defects), such a drive mechanism must be completely replaced. But most often, the insufficient effectiveness of braking with the parking brake is caused by a loose cable. Any experienced driver is well acquainted with the technology of how to tighten the handbrake cable, but for those who are faced with this task for the first time, objective difficulties should not arise.
Note that it is not difficult to check the adjustment results, but it is better that you have an assistant. If the CT lever is tightened by 5-6 clicks, this is normal. If there are more teeth, it is obvious that it is weakened. If you can only tighten the handle 2-4 clicks, this is over-tensioning of the cable, which is also fraught with big troubles. So, when carrying out this procedure, focus on the optimal number of ratchet teeth.
The essence of adjusting the cable tension, regardless of the design features of the ST, is to change the size of the gap between the brake discs and the pads. The adjustment itself is carried out by changing the length of the working part of the cable (shortening or lengthening it relative to the clamping point).
Here is a typical sequence of actions when performing this procedure independently:
- We provide free access to the bottom of the vehicle;
- tighten the handbrake 2-3 clicks;
- we find the locknut of the adjusting mechanism, loosen it using the hole in the brake system drum;
- We begin to tighten the adjusting screw, periodically checking the tension of the cable from the passenger compartment;
- if the screw travel is not enough to tension the cable as expected, it must be completely replaced (this operation is much more complicated, so the help of a specialist may be needed);
- if the handbrake lever is tightened with the required force, we have achieved our goal, but we still need to carry out an additional check, trying to turn the suspended wheel by hand. If this is possible only at the limit of effort, then everything is fine and you can tighten the locknut;
- after this, we completely release the parking brake lever and again check the rotation of the suspended wheel with the muscular strength of our hands - it should not slow down (if this is the case, we have “tightened” the handbrake, and we need to adjust the handbrake again - loosen it a little);
- we lower the car to the ground (if a lift or jack was used) and check the performance of the ST in real conditions - for example, on a steep hill or while braking while driving.
Preparing for work
Let’s make a reservation right away: the procedure for tightening the brake cable on a Renault Sandero does not take much time and requires a minimum of tools. The most important thing is to carefully remove the plastic parts and casings without accidentally damaging them. To carry out this simple procedure, we will need:
- Key for 10;
- Flat screwdriver;
- Torx screwdriver type T20.
The wrench should be an open-end wrench, since during operation there will be very little room for “maneuver” and it is necessary that the tool used be as compact as possible, which is clearly visible in the video. It is advisable to first wrap the screwdriver with tape or tape.
This tool is needed to pry up already fragile plastic parts, so it is important that the sharp metal edges do not scratch or break this soft material
Particular attention should be paid to cleaning from dirt and dust: if during disassembly foreign particles accidentally get inside the mechanism, this can lead to its failure and improper operation
Beginning of tightening the handbrake Logan 1
Before tightening the Renault Logan 1st generation handbrake, you will have to find the adjusting nut by partially disassembling the interior. Getting started:
- We dismantle the protective cover on the tunnel lining.
- We see a self-tapping screw that can be unscrewed using a Torx T20 key.
- We remove the entire lining by lifting it up and pushing it forward with a pushing motion.
- We bend the pyramid-shaped casing, under which the Renault Logan handbrake adjustment mount is hidden, back.
You don’t have to disassemble the interior if you have a 10mm tubular wrench with an extension of at least 2cm.
Main symptoms of a malfunction
How to tighten the handbrake on a Chevrolet or any other car? Determining the malfunction of this element is quite simple. You should drive your front part onto a slope. According to the rules, the parking brake should hold the car at an angle of 17 degrees.
It is also possible to test the handbrake on a completely flat surface. So, you should tighten the lever all the way and engage the gear. Smoothly releasing the clutch, try to move away. If it is a working handbrake, you will feel that the car is chained to the ground. It is almost impossible to move it from its place. But if you calmly make a movement with the handbrake tightened, it means the cable has weakened. The way out of the situation is to tighten the parking brake.
Such diagnostics should be performed once a year or every 30 thousand kilometers. Timely checking of the brake system elements will help avoid many emergency situations.
Let's sum it up
After the parking brake adjustment is completed, we proceed to check the system in action. For this purpose, we find an inclined section of the road where we place the car, securing it with the Renault Logan parking brake. In this case, the transmission gear shift lever must be in the neutral position.
Find out more about the new Logan
- Adjusting the parking brake (handbrake) Renault Logan 1.4 | New Logan
- Adjusting the hand brake Renault Logan
- How to tighten and adjust the handbrake on a Renault Logan – Taxi Bolt
- Renault Logan how to tighten the handbrake
- How to tighten the handbrake on a Renault Logan: video, adjustment
- Adjusting the parking brake (handbrake) Renault Logan 1.4 |
- All the main signs of a clutch failure and their causes. — New Logan
- Adjusting and replacing the Renault Logan clutch | New Logan
Purpose of the hand brake
A standard and necessary handbrake for most cars should ensure the immobility of the car on horizontal and inclined surfaces, with a slope of at least 23%.
Experience shows that parking a car using solely the capabilities of the gearbox is unsafe. This leads to property damage, personal injury and sometimes death. Therefore, a working handbrake is the key to your peace of mind and well-being.
Another argument for keeping the handbrake in good working order is the ability, in extreme situations, to supplement pedal braking with handbrake braking. With its help, extreme sports enthusiasts learned to perform the so-called “police turn.”
Main stage
If dismantling the tunnel and tightening the cable is being done for the first time, you need to keep in mind that the plastic will be difficult to remove. This means that you will have to apply some force, but not too much, so as not to damage anything.
Work begins with removing the central tunnel. From the end, at the feet of the rear passengers, you need to find a rectangular protective cover. You can remove it by first prying it off with a flat screwdriver. Under the cover there is an asterisk bolt, which can be easily unscrewed using the screwdriver prepared in the previous step.
By unscrewing the bolt, you can remove the tunnel itself. This is done in two stages. To begin with, it must be moved back, parallel to the floor. In this case, the brake lever itself remains in place, and the shift will be made relative to it. With the second movement, the plastic casing rises up and is set aside.
Directly below the lever, on its lower side, there is a barely noticeable protrusion made of black soft plastic. Using a flat-head screwdriver, you need to remove the cap to get to the brake cable tension nut.
By screwing it in with an open-end wrench, you can ensure that the cable stops sagging and will operate faster. Without moving on to assembly, you need to check every time when adjusting the bolt whether the handbrake operates correctly. There is also no need to overdo it: excessive tension on the cable will lead to premature wear of the mechanisms and too much force required to activate it.
Assembly is carried out in the reverse order of the described procedure. The main thing is not to tighten the mounting bolts too much, so as not to damage the plastic and break it.
see also
Comments 23
Just thank you! Now I know!
The nuts are already tightened all the way, but they don’t hold. Check the brake pads and cables? 12 clicks up to awesome and still slowly slides down
The socket head is 10 long.
If you have a tubular key, then you don’t even have to remove the tunnel lining.
How interesting, what about pressing the brake to tighten the rear pads?
Even though it’s done smartly, you don’t have to crawl under the car, unlike front-wheel drive VAZs
they have self-tightening mechanisms (in the wheel) so the logan does not need tightening, and if it doesn’t work, it means something is loose, and the fact that you pulled the cable is not correct
give a link to explain why this is not correct
There is a book on repairs, buy it and read it, everything is written there with photos, and search the Internet yourself for a lot of information!
they have self-tightening mechanisms (in the wheel) so the logan does not need tightening, and if it doesn’t work, it means something is loose, and the fact that you pulled the cable is not correct
How do you know if you can't weaken it? Everything there spins counterclockwise, I checked. Otherwise, how will you release the cable tension when removing the brake drum?
Step-by-step instruction
1. In the cabin, use a flat-head screwdriver to open the hatch on the rear console.
2. In the hatch, unscrew the bolt securing the console under Torx T20.
3. Raise the handbrake up and pull the console off the latches towards the trunk lid.
4. Remove the console by threading it through the handbrake handle. Shift into gear if the manual transmission lever is in the way.
5. We gained access to the cables and the adjusting nut.
6. Loosen the adjusting nut with a deep head of ten. Loosen to the maximum, but do not tighten the nut all the way.
7. Lower the handbrake and remove the cables. They are held in place by a plastic latch; we open it with a flat-head screwdriver.
8. The cables are still held in place by latches. We squeeze the clamps on the sides with our fingers and bring the cable to the rear of the car.
9. Next you need a pit and a jack.
10. Loosen the wheel bolts and jack up the car.
11. Remove the wheel and knock off the cap using a hammer and flat-head screwdriver.
12. Using a 30mm socket, unscrew the brake drum mounting nut. If you don't have a nut driver, install the wheel, place the car on the ground and remove the nut.
13. After unscrewing the nut, remove the brake drum.
If your drum is not very worn, it can be easily dismantled. You just need to press it with a screwdriver and it will come out.
If the drum is pressed by the shoes, then you need to use a puller.
14. Using wire cutters, remove the cable from its engagement with the blocks. Pull the spring to the left and disengage the cable.
15. Squeeze the clamp ears on the sides and remove the cable from the steel protection.
The latches are exactly the same as in the salon.
16. Unbend the metal bracket on the beam and bring the cable down.
17. Remove the cable from the two latches on the tank.
First, make sure that the car is stable on the jack and that you have placed a support in case it falls from it.
18. Unscrew the nut of the heat-protective casing and bend it to gain access to another cable holder.
19. Remove the cable from the holder under the heat-protective casing.
20. We remove the cable from the last holder and nothing holds it anymore.
The operation of the cable on the right side is almost the same. There is no need to remove the casing, but you need to disconnect the handbrake cable from the fuel pipes (there are simple plastic holders there).
21. We take new cables and place them in their fastening places. We insert them immediately until they click where they go into the interior, and then along all the other holders. Also, do not forget to insert the cables into the metal brackets on the beam and bend them back.
22. We pass and snap the cable into the metal protection.
23. We engage the cable with the block.
24. Install the brake drums and tighten the hub nuts.
The tightening torque of the hub nuts is large, so you can put a pipe on the knob. To tighten the wheel nuts, you need to put the car on its wheels.
25. We hook the cables in the cabin and remove the idle speed when raising the handbrake. We remove the idle speed by tightening the adjustment nut.
This is interesting: Where is the Renault Logan washer reservoir reservoir located, how to remove the reservoir
Adjustment
The process of setting the parking brake on Logan, unlike domestic cars, is much simpler. This is done from inside the car; first of all, the trim near the central tunnel is removed in order to gain access to the regulator. The cap is removed and the rear trim screw is unscrewed, then it is pulled out a little in front and removed. The pyramid-shaped plug is pulled back to hide the nut.
The following adjustments are made:
- We hang the rear axle on a jack or make sure that the wheels are locked using special shoes
- Lower the handbrake
- Take a 10 mm wrench or a spanner and start turning the nut, this is done half a turn
- We check that the number of clicks is from 4 to 6, depending on what is needed
To check how correctly the Renault Logan handbrake cable is tightened, the car is driven onto an overpass or a 25% slope, after that we place the car on the handbrake and check whether it holds or rolls back; if the manual locking is ineffective, then most likely the cable has stretched or been damaged, and it needs to be changed.
Handbrake diagnostics
Checking the functionality of the parking brake should be carried out once a month (some automakers focus on the mileage indicator - every 20-30 thousand kilometers). If you feel that the effectiveness of securing the car with the handbrake has decreased, there is no need to wait for the recommended period for servicing the handbrake.
In this case, there are two common methods for diagnosing the condition of the handbrake:
- The first method requires placing the vehicle on a fairly steep slope (with a gradient of 15 degrees or more) and tightening the lever to the last ratchet notch. If the car is kept from spontaneous movement under the influence of gravity, everything is in order. If not, it is obvious that it has lost the braking efficiency that is required of it, and you need to immediately eliminate the cause of the incomplete operation of the handbrake with subsequent adjustment or repair of the mechanism;
- the second method does not require a slide. The check can and should be carried out on a horizontal surface. To do this, we tighten the lever towards ourselves until it stops, start the engine, engage a lower gear (strictly speaking, first) and begin to slowly and evenly release the clutch pedal. With a fully functional handbrake, the car will twitch a little, but stall. Otherwise, it will start moving, perhaps at a lower speed than usual. And then you will also have to tighten the handbrake cable.
A noticeable decrease in the effectiveness of securing the wheels with the handbrake can be caused by the following reasons:
- weakening of the tension of the brake cable (typical of long-term operation of the vehicle without servicing the vehicle, as well as abuse of the parking brake when driving the vehicle);
- brake linings are worn beyond normal limits;
- The gap between the pads and the drum has been increased.
As you can see, the responsibility for insufficient braking efficiency does not always lie with the handbrake itself.
We list the cases in which its adjustment is required:
- after each pad replacement;
- if work related to adjusting the brake pads was performed;
- when performing a disc/drum replacement operation;
- if the free play of the CT lever has increased so much that it captures all the teeth, up to the tenth;
- after replacing the cable and/or other components of the handbrake drive.
In principle, the operation of adjusting the cable tension is not difficult, and if you have neither the time nor the desire to contact a car service, you can do it yourself, even if you do not have the skills to perform such work.
True, there are also objective difficulties here. They are connected with the fact that such an operation must be carried out in compliance with safety measures, since full access to the bottom of the car is required. Before making adjustments, it would be a good idea to look at the user manual to study the design features of the parking brake in its drive part.
Parking brake functions
The very name of this mechanism speaks about its purpose - blocking the wheels in order to ensure their fixation regarding the direction of forward movement of the vehicle, including when the vehicle is parked on surfaces with a gradient slope.
We list the main functions of the handbrake:
- ensuring vehicle immobility while parked on horizontal and inclined surfaces;
- assistance to the main braking system of the vehicle during emergency braking;
- performing maneuvers while the vehicle is moving (if you have the appropriate skills);
- replacement of the main brake when it breaks.
Of course, abuse of the handbrake is unacceptable (meaning its use as a replacement or addition to the main braking mechanism). Still, its main task is to secure the car while it is parked. Note that a tightly stretched cable is not always a good thing. If you try to brake while the car is moving with the handbrake, it will most likely go into a skid.
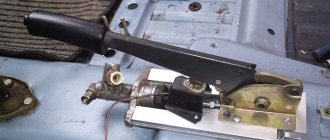
Let's look at the design of the parking brake and the principle of its operation. ST consists of three relatively independent blocks:
- mechanical drive;
- control unit;
- executive device.
The drive is a metal cable that stretches from the handbrake handle to the actuators. It is the cable that transmits the force from tightening the lever to the brake pads. In this case, the adjustment of the hand brake, or rather, the degree of its tension, is carried out using a rocker arm, which is also responsible for dividing the forces on each of the wheels.
The actuating device is the same brake pads, which are also activated when the brake pedal is pressed. This was done to simplify the braking system, for which reliability is one of the primary factors. And it is much easier to maintain a car with a partially combined brake mechanism.
The parking brake is activated using a lever installed in the cabin in the area of the central tunnel. It is equipped with a ratchet, which tensions the cable to the required amount. When you tighten the working handbrake, a separate light on the instrument panel will light up, indicating that the car is braking. On some car models, when trying to start driving with the parking brake on, the driver will be warned by an audible signal, which virtually eliminates the possibility of stretching the cable due to the car owner's forgetfulness.
Features of adjusting the Renault Logan hand brake
All adjustment of the handbrake cable tension comes down to rotating the self-locking nut. Clockwise rotation tightens the cable, which reduces the number of lever clicks. We rotate the nut counterclockwise - the cable loosens. The result of adjusting the cable should be effective operation of the handbrake, i.e. confidently fix the car on a slope of up to 30% with 5 – 6 clicks of the lever.
After three to four adjustments, as a rule, it becomes necessary to replace the handbrake cable. At this point, it is stretched and further operation is impossible.
A self-locking nut is used to securely fix the adjustment results. It does not unwind and holds the cable in the desired position very well. Despite the name, the nut can be turned with a wrench in both directions. But at the next adjustment it will most likely have to be replaced. A forced replacement is made due to wear of the plastic retainer.
Adjustment by five to six clicks is a necessary and sufficient condition for normal operation of the handbrake. If the pads and the entire rear brake mechanism are in satisfactory condition, this position of the lever ensures reliable parking of the car. At the same time, the rear wheels spin easily, the pads do not interfere with movement.
The desire for strong cable tension leads to the fact that the wheels are reliably braked and this can be considered a positive thing. But, at the same time, there is a real risk that when you remove the handbrake, the pads will not move away from the brake drums. The wheels will remain semi-locked. This will lead to increased fuel consumption, premature wear of the pads and overheating of the brake drums.
The result of adjusting the cable tension should be free rotation of the rear wheels when the handbrake lever is lowered and their reliable fixation when pulled out five to six clicks.
Adjustment nut that locks itself
The self-locking nut is the only element that regulates the handbrake. Tightening the Renault Logan handbrake is done by rotating the nut to the right, and if you turn it to the left, the cable should loosen. But if the nut locks itself, it can be rotated to the right, and that’s all. This means that it will not be possible to loosen the cable tension during adjustment.
Adjusting nut near the handle
You can increase the tension, but you can’t weaken it!
In theory, the adjustment is done like this: make a half turn to the right - control the result, then make another half turn. The resulting number of handle clicks should be 6. But this is not all the tricks and subtleties.
Selected recommendations
The car developers from Renault claim that the handbrake does not require adjustment due to the lack of cable stretching. If you decide that such work needs to be done, consider the following risks:
- When adjusting ratchets, it is not recommended to replace them. Please note that the gap on the left and right sides must be identical, and this is difficult to implement.
- If the nut is overtightened, adjustment cannot be done without unscrewing it. And this is associated with problems, because you will have to melt the plastic washer with preheating of the assembly. It is difficult to implement this without the involvement of craftsmen and in a garage.
It is possible to tighten the handbrake cable. But do this work carefully and strictly follow the instructions. If problems arise, watch the training video or contact a specialist. If you need to replace the cable, choose original spare parts (article number - 6001547168) or analogues (shown in the table below).
The handbrake in any car, including Renault Logan, plays a fundamental role in ensuring safety. This unit allows the body to be statically held on an inclined plane. To activate the parking brake system, the driver will need to cock the lever located in the cabin.
In practice, it has been noticed that there is a category of owners who do not pay enough attention to this unit, and therefore, failures begin to occur in its functionality. It would be wrong to think that an activated gear in the transmission can effectively hold a Renault Logan. A faulty handbrake not only creates the risk of the car rolling away spontaneously, but also violates regulatory requirements for the condition of a car intended for use in road traffic. Therefore, the question is always relevant: how to tighten the handbrake.
The popular budget segment model Renault Logan was produced from 2005 to 2015. There were no widespread complaints about the ineffective parking brake system.
Few owners regularly monitor the condition of the handbrake. The assembly cable is subject to constant stretching, which is why it requires periodic tightening, and not many people know how to tighten the handbrake. If this procedure is not resorted to in a timely manner, the effectiveness of the system is lost. Inexperienced Renault Logan owners can also damage the mechanism when they start driving with the handbrake activated. In this article we will tell you when and how to tighten the handbrake. The video will also help you in this matter.
When is a cable tightening required?
In addition to cases of stretching of this drive element, adjustment should also be made after performing some repair manipulations in the brake system. Among them:
- replacing wheel brake pads;
- changing the cable in the handbrake drive system.
When the owner of Renault Logan discovered a decrease in the effectiveness of the parking brake, it was time to adjust the drive. This condition of the node can be detected using a lever. If, when it is activated by 4-6 clicks of the ratchet mechanism, there is no effective holding of the car on an inclined road surface, then this indicates that the cable is stretching.
You should not constantly lean towards a facelift procedure. Experts recommend replacing the cable after the fourth time of adjusting the tension.