One of the elements of the VAZ 2107 car, which received a number of improvements in this model compared to the previous ones, is the steering column. How is its device different? In the VAZ 2107, the steering column shaft consists of two parts connected by a cross. Thanks to this design, driver safety is significantly increased, since in the event of a collision the shaft simply bends at the hinge joint and does not cause serious harm to the person. Also, the shaft in the VAZ 2107 has bearings, so turning the steering wheel requires much less effort.
The steering column of the VAZ 2107 consists of a shaft with an articulated joint and a gearbox with a worm gear. Column repair is a very rare occurrence. If you ensure timely maintenance of this unit, it may never be needed. Steering column maintenance work includes lubricating the steering shaft joint, tightening the steering wheel nut, changing the oil and adjusting the gearbox. Let's look at possible problems associated with the steering column and methods for eliminating them.
Replacing the steering column or gearbox
Hello again. Thanks everyone for the advice on the steering column.
After reading the information about the repair, I realized that it was not worth the money.
The best option was to purchase a used column in good condition, because... Knowing about the current quality, many will understand me. During the survey, it turned out that Private838
has a normal steering column, which is what I wanted to take.
My grandfather also found out about the problem, and it turned out that a friend of his from the garage had a five-piece gearbox in superb condition. Actually, I got it for myself for seven. For installation I used a steering wheel end puller. The most stressful thing was to unscrew the 3 bolts that secure the gearbox to the body, which was very inconvenient for me personally. In the process, we had to additionally remove the adsorber, the control center, unscrew the locker, remove the wheel and unscrew the cardan from the column shaft
.
the puller is in use, the steering rods are in excellent condition
this is where the oil was flowing, but it was still normal in the gearbox
Oil was also leaking through the side cover.
After comparing the old and new ones, it turned out that my gearbox was a little tight to spin behind the bipod, but with the new one everything was fine. The adjusting screw in my column was recessed flush. The new one stuck out about 4 mm.
old and new
you can see how much the regs are screwed in. screws
place where the cardan is disconnected from the shaft
Then I put everything back in place. In order not to calculate the position of the steering wheel, which was not deployed correctly, I simply removed it and put it in place. I left the old oil in the column because it was yellow. I just topped up a few cubes of Lukoil mineral water.
everything is collected
syringe and oil
Result. After adjusting the steering wheel and driving around, I realized that the controls had changed beyond recognition. If earlier on bumps the steering wheel sat gently in your hands, now it began to be knocked out. On a flat road he stands straight and does not move. Previously, he was wobbling in all directions. In general, I'm pleased.
Among the tips for improving the service life of the speaker, I can say:
1. It does not need to be tightened when adjusting; there should not be much play. 2. Do not turn the steering wheel in a place where it is difficult to turn (asphalt and other surfaces where there is more friction).
Good luck to everyone, may the quality of spare parts be with you!
The steering wheel is loose - change the steering column bearings yourself
Hello everyone, dear car enthusiasts, I recently began to notice on my old “bug” that the steering wheel was wobbling up and down a lot, plus the shaft itself was a little loose in the bearings. The main reason for the play was found in cracks in the mounting bracket, however, at the same time I decided to replace the old bearings, which had already been used for 250 thousand km. As always, I ordered everything from a trusted store.
I ordered only one bearing, since I decided to install a ball bearing on the second one. The original one comes from the factory with a needle-shaped one in a rubberized shell - in the photo on the right.
Approximate sizes are below if anyone is interested. The needles are in a plastic separator, lubricated with blue grease.
It is made quite well, differs from the old one only in the smaller number of needles, but this is not critical here, since there is no such load on it.
So, to replace the bearings we need to remove the steering shaft along with the bracket. Bend back the rolled edges and knock out the shaft along with the old bearings.
There was practically no wear on the shaft, the new bearing fits in without problems, we simply hammer it into the pipe with a suitable mandrel until flanging and also fix it in the pipe, bending the edges.
But, since the structurally native bearings sit quite loosely on the shaft, I already installed a suitable ball bearing as the second one in order to completely get rid of the play. And we put everything back together.
After assembly, the steering wheel turns without problems, no noise or play as there were before. Below you can see the entire bearing replacement process:
In general, I recommend this bearing for purchase. Good luck with the renovation!
Source
Installation and repair of the steering column on a VAZ 2107
One of the elements of the VAZ 2107 car, which received a number of improvements in this model compared to the previous ones, is the steering column.
How is its device different? In the VAZ 2107, the steering column shaft consists of two parts connected by a cross. Thanks to this design, driver safety is significantly increased, since in the event of a collision the shaft simply bends at the hinge joint and does not cause serious harm to the person. Also, the shaft in the VAZ 2107 has bearings, so turning the steering wheel requires much less effort. The steering column of the VAZ 2107 consists of a shaft with an articulated joint and a gearbox with a worm gear. Column repair is a very rare occurrence. If you ensure timely maintenance of this unit, it may never be needed. Steering column maintenance work includes lubricating the steering shaft joint, tightening the steering wheel nut, changing the oil and adjusting the gearbox. Let's look at possible problems associated with the steering column and methods for eliminating them.
Steering problems
The steering mechanism, like any other vehicle component, wears out and requires repair over time. To simplify the troubleshooting, there are certain signs that allow you to find out the nature of the breakdown and fix it in a short time.
Oil leak
On a classic, the problem of a “wet” steering gear is quite common. There can be many reasons for this:
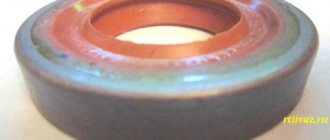
- oil seal wear;
- leakage from under the gasket;
- loosening of the fasteners that secure the mechanism cover;
- Corrosion of the input shaft.
If the oil seal and gaskets can be replaced and the bolts tightened, then if the shaft is damaged, the part will have to be ground.
Tight steering wheel
Sometimes it happens that to turn the steering wheel it is necessary to apply noticeably more effort than usual. Several reasons can lead to this malfunction:
- incorrect wheel alignment;
- failure of one of the elements in the steering mechanism;
- the gap between the worm and the roller is broken;
- The pendulum axis fasteners are too tight.
Steering play
One of the reasons for free play in the steering mechanism is wear on the shaft crosspieces. In addition to them, play appears in the gearbox itself. If the unit has a high mileage, then it is advisable to disassemble it, inspect the condition of all the elements, replace parts with high wear, and then carry out adjustments.
Knock and vibration
If you feel feedback on the steering wheel while driving, there can be many reasons for this phenomenon. Driving a vehicle in such a technical condition leads to rapid fatigue and reduces the level of safety. Therefore, the steering mechanism needs diagnostics.
Table: causes of vibrations and knocking on the steering wheel and ways to eliminate them
| Cause of steering failure | Troubleshooting method |
| Increased clearance in front wheel hub bearings | Adjust the front wheel hub clearance |
| Loosening the tie rod ball pin nuts | Tighten the tie rod ball stud nuts |
| Increased clearance between the pendulum arm axis and the bushings | Replace the swingarm bushings or bracket assembly |
| The adjusting nut of the pendulum arm axis is loose | Adjust the tightness of the swingarm nut |
| The clearance in the engagement of the roller with the worm or in the worm bearings is broken | Adjust the gap |
| Increased clearance in steering rod ball joints | Replace tie rod ends or tie rods |
| Loosening the bolts securing the steering gear housing or the pendulum arm bracket | Tighten the bolt nuts |
| Loosening the swing arm nuts | Tighten the nuts |
STEERING WHEEL PLAY
The appearance of steering play can be caused by two reasons. First, the nut securing the steering wheel to the shaft is loosened. If the nut is not tightened promptly, the splines on the handlebar and shaft will become damaged over time and one of these parts may need to be replaced. The second reason may be wear of the worm gear. To eliminate this malfunction, a special device is provided - an adjusting bolt with a lock nut.
In order to adjust the worm gear, the nut is released, the screw is turned using a screwdriver until the backlash is eliminated, after which the nut is tightened to prevent spontaneous unscrewing. If it is impossible to eliminate the backlash by adjustment, it means that the gearbox needs to be repaired and the worm pair replaced.
To prevent premature wear of gearbox parts, periodic monitoring of the oil level and its replacement is recommended. Level control is carried out as follows:
- Using a 8 key, unscrew the filler plug;
- Use a screwdriver or other object to check the oil level. It should be level with the bottom edge of the filler hole.
- If necessary, add oil using a special supercharger until it begins to flow out of the hole.
To change the oil, unscrew the screws securing the gearbox cover, having previously placed a container under it to collect used oil. Since complete removal of the cap is not required, it is moved to the side and the oil is drained. This operation is best performed on a hot engine. Warm oil has greater fluidity and drains faster. After all the oil has drained out, the cap is screwed into place and new oil is poured into the gearbox using the method described above.
everything useful is here
Replacing the steering shaft
Remove the negative terminal from the battery. Remove the steering wheel, steering shaft mounting bracket covers, steering column switches, disconnect the ignition switch connector
Using a 13mm wrench, unscrew the nuts from the coupling bolts of the intermediate shaft universal joint forks and remove the bolts.
Using a 10mm wrench, unscrew the two shear screws securing the steering shaft bracket.
If the bolts have their heads cut off, use a chisel to loosen the remaining round heads and finally unscrew them with pliers. Locking washers are installed under the screws. Using a 13mm wrench, unscrew the two nuts securing the steering wheel bracket... ...and remove the bracket. We remove the upper shaft from the splined connection with the intermediate shaft. Remove the intermediate shaft from the splines of the gearbox worm shaft. Flare the curved edges of the bracket pipe on the steering wheel side, insert the key into the ignition switch and turn off the lock. With light blows we knock the shaft together with the bearing out of the pipe.
The second bearing can be knocked out using a suitable piece of pipe. The needle bearings are installed in shock-absorbing plastic cages. If the shaft or its bearings are worn or damaged, replace them.
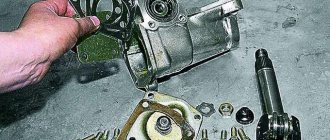
REMOVAL OF THE GEARBOX
The design of the gearbox does not allow it to be repaired without removing it from the vehicle. In order to remove it, you must:
- Disconnect the tie rod ends from the gearbox. First, they are uncoiled, then the nuts are unscrewed with a 22 wrench and the tips are pressed out using a special puller.
- Unscrew the clamp securing the steering shaft to the gearbox.
- Remove the three bolts that secure the gearbox to the car body.
The gearbox design should not cause any particular difficulties when repairing it. You just have to take into account that the worn elements, called the worm pair, are both replaced at the same time. After this, adjustments must be made.
Steering mechanism VAZ 2107
VAZ cars, which are classic models, are distinguished by pleasant reliability. This also applies to the steering mechanism.
It is quite complex, but its design allows you to maneuver and ensure reliable vehicle control even in the most difficult road conditions.
The modernization process led to the installation of a composite shaft and a safety column. Due to the size of the steering wheel, the driver makes the necessary maneuvers without any problems. From lock to lock, it takes 3.5 turns to turn the steering wheel completely. The force from the steering column is transmitted to the drive via a composite shaft.
The current steering mechanism on the VAZ 2107, a product of the Volga Automobile Company, is quite informative and does not allow the driver to get tired during long trips. There are certain difficulties when turning in a parking lot, but as soon as the car begins to move, the resistance weakens and turning the steering wheel becomes easier.
There is one more nuance - when the steering mechanism is working properly, there is a slight play. But its limit value complies with the traffic rules. This is due to the fact that there are steering rods on the VAZ 2107 and an impressive number of elements in the gearbox.
In general, the steering of the 7 can be considered reliable.
↑ Checking the ball joints of the steering rods
- First of all, check the movement of the rod tips along the axis of the fingers. To do this, using the lever and support, move the tip parallel to the axis of the finger.
- The axial movement of the tip relative to the finger should be 1–1.5 mm. This movement indicates that the pin insert is not jammed in the rod tip socket and moves along with the pin, compressing the spring. Replace the hinge with a jammed insert.
- While rocking the steering wheel in both directions, check by touch that there is no free play in the steering rod joints. If you feel free play in the ball joint, replace the tie rod end or tie rod assembly.
- Check the condition of the protective caps of the steering rod ball joints.
- If the protective caps are in good condition and ensure cleanliness inside the hinges, then the service life of the latter is practically unlimited. When moisture, dust, etc. gets into the hinge, premature wear of its parts occurs.
The cap must be replaced if it has cracks, ruptures, and also if lubricant penetrates out when squeezing it with your fingers.
Mechanism design
To repair the steering column on a VAZ 2107, you first need to understand its structure, as well as the principle of operation.
The seven is in many ways similar to the “penny”. Therefore, the device and design received minor changes. The structure includes:
- A mechanism that transmits the driver’s force to the executive components;
- A steering drive that turns at an angle specified by the driver.
In turn, the steering mechanism consists of:
- Composite shaft with cardan transmission;
- Steering wheel (steering column together with a steering wheel with a diameter of 520 mm);
- Worm gearbox of the VAZ 2107 steering mechanism.
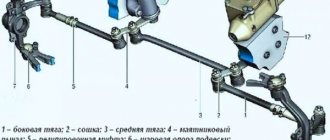
The control system has the following components:
- Bipod;
- Pendulum arm;
- Swivel arms;
- Steering rods for VAZ 2107 (one middle, two side).
The outer rods include two parts, which allows you to change their size by adjusting the toe angle.
Tie rod/end set for VAZ 2107
The operating principle of the steering mechanism looks like this:
- The driver begins to rotate the steering wheel, the wheel size of which ensures that this task can be performed quite simply;
- By means of a composite shaft, a worm gear is activated, which reduces the speed;
- The steering mechanism is lubricated with special oil (TAD 17) poured into the gearbox;
- The worm gears rotate, which causes the double ridge roller to move;
- This, in turn, causes the secondary shaft to rotate;
- The tray mounted on the secondary shaft makes a turn and pulls the rod system behind it;
- These components influence the levers that synchronously rotate the wheels to the required angle specified by the driver.
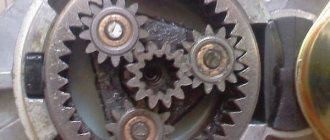
Parts of the steering gear housing: 1 - housing; 2 - bipod; 3 — lower crankcase cover; 4 — adjusting shims; 5 — outer ring of the worm shaft bearing; 6 — separator with balls; 7 — bipod shaft; 8 - adjusting screw; 9 — adjusting plate; 10 — lock washer; 11 - worm shaft; 12 — upper crankcase cover; 13 - sealing gasket; 14 — bipod shaft sleeve; 15 — worm shaft seal; 16 — bipod shaft seal.
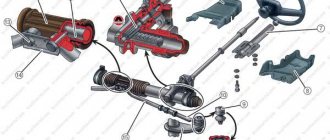
Steering column parts: 1 — steering gear housing; 2 - shaft seal; 3 - intermediate shaft; 4 - upper shaft; 5 — fixing plate of the front part of the bracket; 6 — bracket for fastening the steering shaft; 7 - upper part of the facing casing; 8 — bearing sleeve; 9 — bearing; 10 — steering wheel; 11 — lower part of the facing casing; 12 — bracket fastening parts
Trouble-shooting
As the vehicle is used, individual components of the steering mechanism gradually wear out. For comfortable and safe driving, as well as to prevent uneven tire wear, any defects in the steering mechanism must be corrected in a timely manner.
Steering gearbox
To identify problems with the steering column, the unit will need to be removed from the car. To do this, you need to prepare the following list of tools:
- a set of keys;
- knob;
- heads;
- steering rod puller.
Dismantling is carried out in the following sequence:
- We drive the car onto an overpass or lift.
- We unscrew the fastening of the cardan to the column shaft.
- We unscrew the nuts that secure the tie rod pins to the bipod, and then use a puller to squeeze out the pins.
Let's disassemble the mechanism for troubleshooting parts:
- Using a 30mm wrench, unscrew the nut holding the bipod.
Inspect the roller and worm for wear or damage. The gap between the bushings and the bipod axle should be no more than 0.1 mm. The rotation of the bearings should be easy and without jamming. Any defects on the internal parts of the bearing are considered unacceptable, as are cracks on the mechanism body. Damaged parts are replaced with serviceable ones. Before assembling the mechanism, lubricate all elements of the gearbox with transmission oil and perform the assembly:
- We hammer the bearing ring into its seat.
Video: disassembling and reassembling the steering column on a “classic”
Backlash adjustment
To carry out adjustment work with the unit in question you will need:
- key to 19;
- wide flat screwdriver.
The procedure boils down to the following steps:
- We set the steering wheel to a position in which the front wheels will stand straight.
- Using a 19mm wrench, unscrew the nut on top of the gearbox.
With a correctly adjusted steering column, play should be minimal, and the steering wheel should rotate without snagging or excessive effort.
Video: eliminating play in the steering gear
Steering shaft
If, when the steering wheel rotates, there is a large play on the hinges of the intermediate shaft or axial movement of the shaft on the bearings, the mechanism needs to be disassembled and repaired. The work is carried out as follows:
- We remove the “-” terminal from the battery, as well as the steering wheel, plastic casing, steering column switches, and connector from the ignition switch.
- Unscrew the cardan mount and remove the bolts.
Pendulum
The pendulum arm itself rarely fails, but the bearings or bushings located inside sometimes have to be replaced. To work, you will need a set of wrenches and a steering rod puller. We dismantle the mechanism in the following order:
- We remove the right front wheel from the car, unscrew the fasteners and use a puller to press out the pins of the steering linkage rods.
- Unscrew the pendulum mount to the right side member.
Replacing bushings
Repair consists of the following steps:
- Unscrew and unscrew the pendulum axle nut.
Trapezoid
A complete replacement of the steering linkage is necessary in the case when all the joints have large wear. We prepare the following set of tools:
- ring wrenches size 13 and 22 mm;
- pliers;
- hammer;
- puller;
- a ruler at least 20 cm long or a tape measure;
- devices for removing the wheel - jack, wheel wrench, wheel chock;
- rags, fabric gloves.
Steering rods on a VAZ 2107 are removed as follows:
- We jack up the front of the car and remove the wheels.
- Unscrew the ball pin and unscrew the nut.
When the work on replacing the trapezoid is completed, it is necessary to check the wheel alignment angles at the service center.
Tie Rod Ends
The extreme rods of the steering linkage fail more often than other hinges. Therefore, if there is a need to replace them, it is not necessary to completely remove all the rods. The tips are changed as follows:
- Repeat steps 1–3 for removing the trapezoid.
- Using a ruler, measure the length of the old part at the centers of the plugs.
Repair and maintenance
Over the years of operation it has been proven that the steering on VAZ 2107 vehicles has impressive reliability. However, this does not take away the fact that the machine requires periodic inspection and repair.
- When performing maintenance, it is important to check for increased play as well as increased wear on the ball joints. To do this, you need to turn the steering wheel from one side to the other. If the wheels do not respond when the steering wheel is turned 5 degrees from its original position, this indicates severe wear. Here you will need to repair the steering column on a VAZ 2107.
- To avoid the need for urgent and rather expensive repairs of the steering gear on a VAZ 2107, it is necessary to change the oil in the worm gear housing. This is done at intervals of 60 thousand kilometers. Leaks may occur through the seals, so they are carefully checked 2-3 times a year. This is one of the weak points of the system.
- The swing arm should be inspected by slowly rotating the steering wheel from side to side. If the parts move in a vertical plane, then surgical intervention is required.
If any malfunctions are detected, the breakdowns should be repaired immediately.
To do this, the drive and steering mechanism are dismantled completely or partially. Everything depends directly on the nature of the breakdown.
Check which parts have defects and what has failed. Inspection is required for each component of the mechanism. If parts are worn out, there is no point in trying to repair them. There is only one way out - a complete replacement of worn-out components of the steering system on a car from a Volga company.
If problems arise with the steering, it is advisable to contact a professional service station.
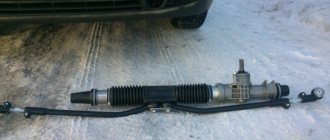
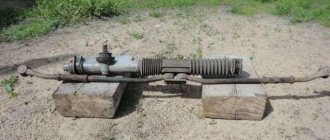
Photo of the VAZ 2107 steering gearbox
You can replace the gearbox yourself, but the process is complicated and requires at least minimal experience and skills.
The VAZ "Seven" is a true classic of the domestic automotive industry. Unlike modern LADAs, they are more reliable and durable, which is proven by the huge presence of these cars on our roads.
Of course, the VAZ 2107 has long been outdated, it does not have a hydraulic booster, and you have to apply sufficient force to turn and maneuver. But for connoisseurs this is not a problem.
How much does a steering column cost for a VAZ 2107
The cost of a VAZ 2107 steering column in Russia varies from 1,450 to 4,449 rubles .
The steering column of the VAZ 2101-2107 family is a mechanism for transmitting natural force from the steering wheel to the wheels through rotational actions. Inside the column, the steering shaft contacts another gear, forming a worm pair, which, in turn, transmits force to the steering linkage. Inside the case, which is made of silumin (does not oxidize when in contact with liquids), there is an oil bath. The efficiency of the mechanism is also achieved thanks to the following components (included in the repair kit):
- Adjustment screw.
- Worm bearing.
- Stuffing box.
- Bipod shaft bushing.
- Bipod shaft seal.
- Adjusting shim.
- Bipod shaft roller thrust washer.
It is best to buy an original steering column, which differs from analogues not only in the cost of 1,100-1,430 rubles. , but also design features. We are talking about fastenings to the body. These are tear-off fasteners or shear bolts, which, in the event of an accident, will protect the driver from injury from the steering column. In addition, the original speakers 21050-3400010-00 for Lada 2101-07 and a dry weight of 5 kg have reinforced threads on the shaft, which do not deform during shocks from the suspension and other operational features.
What affects the cost?
The cost of a steering column is influenced by the following factors:
- Manufacturer.
- Country of origin (Eurasian compliance standards).
- Type of component.
- Type of equipment.
- State.
- Brand.
- Type of spare part.
- Type of modification (without hydraulic booster).
- Model.
- Serial compatibility.
In addition to such key parameters, the cost is also affected by the type of packaging and internal placement of the product. Original steering columns, which have a clear centering position with a noticeable effort to overcome it, regardless of the direction of rotation, are always equipped with an output shaft mounting bipod. The latter prevents its rotation and axial displacements in the bearing and oil seal. Also, the original AvtoVAZ packaging is different:
- Complete with technical data sheet and warranty card (separate sealed bag).
- Security seal with laser engraving on the top and bottom.
- Since February 2016, compliance with Eurasian standards is indicated on the side of the box, instead of specifications.
Also included in the price is the oil used to fill the steering column. During transportation, the adjusting bolt and gasket are in a free state, which requires compliance with the orientation of the product in space.
Types and prices
The original steering column for passenger cars of the VAZ 2101-07 family has catalog number 21050-3400010-00 . Its cost varies from 2,172 to 4,449 rubles . In order for the classification of goods to be as complete as possible on the part of the buyer, the price can be divided by series and compatibility. The latter looks like this:
- VAZ 2102, 1973-1985 – 2,797-4,449 rubles.
- VAZ 2103, 1972-1984 – 2,797-4,449 rubles.
- VAZ 2106, 1975-2006 – 2,430-4,300 rubles.
- VAZ 2101, 1970-1988 – 2,172-4,301 rubles.
- VAZ 2106, 1975-2005 – 2,430-4,250 rubles.
- VAZ 2104, 1984 – 3,934 rubles.
- VAZ 2105, 1981 – 4,012 rubles.
- VAZ 2107, 1982-2012 – 2,640-4,449 rubles.
- VAZ Niva (2121), 1976 – 2,970-4,440 rubles.
- VAZ 2121, 1994-2006 – 2,970-4,440 rubles.
- VAZ 21213, 2001-2006 – 2,700-4,449 rubles.
If we take into account the gradation by series, the pricing policy is as follows:
- 2101, 1970-1988 – 1,450-4,449 rubles.
- 2106, 1975-2005 – 2,797-4,449 rubles.
- 2107, 1982-2012 – 2,400-4,449 rubles.
Prices are given for original AvtoVAZ products and their copies in similar packaging, configuration, as well as manufacturer’s warranty. Each of the items contains oil in the crankcase of the lubrication system.