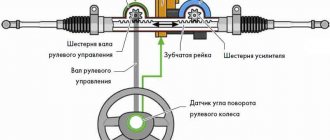
External tuning is of course great, but until the internal work is done, it’s still not worth starting. Today we’ll talk about such an important thing as the power steering on the VAZ 2115. The device is a combination of several components. This is a special pump and actuator. As a rule, the last element is combined with the VAZ 2115 steering rack.
Manufacturers do not install power steering, but its installation is still provided. The equipment itself will cost a tidy sum, but here the car enthusiast decides for himself: is tuning a VAZ 2115 worth that kind of money? After purchasing a new device, you need to go to a service center and order the installation of power steering. However, you can do all the work yourself.
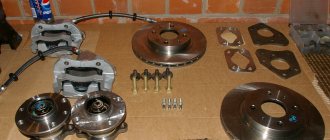
Power steering for 2115 - review
I bought a power steering kit from 2110 - it included almost all the related spare parts.
In addition to the generator bracket, you need a Granta with a tensioner. Later I bought it. The original generator fits there without any problems.
We remove the old rack and steering column. For convenience, I dismantled the receiver and VUT. It can be easily pulled out through the side holes of the tie rods.
To connect the new rail to the seats, you will have to cut a hole into the interior, otherwise there is no other way. I got it like this, then I’ll cover it with a duster.
Now about the nuances, I will also talk about this in the video. It is necessary to file the pump bracket, as it will rest against the engine support.
I installed the original steering rods, pressing in the 2110 steel blocks, since the original ones have a protrusion and have a smaller mounting hole.
About the steering column, I simply dismantled the old one and installed one from 2110, without any extensions or filing of the steering shaft. Everything fits bolt to bolt.
I routed the lines, replaced the return line with a resistant hose for gasoline oil, since the original 2110 pipes do not fit structurally.
The high pressure hose ran down the bottom, next to the gearbox. The fastener came out very well, just the perfect place. We fix it to the ignition coil bolt, next to the starter.
Location of the power steering reservoir - I decided to place it near the right pillar, probably the best place. I haven't decided on the mounting yet.
Source
Bleeding the brake system
VAZ 2109 bleeding the brakes for one
It is advisable to carry out pumping together, although it is possible without an assistant. One is located in the cabin of the vehicle, the second in the inspection hole. When working under the car, you must wear rubber gloves to prevent brake fluid from getting on your hands.
Note: Because the liquid is toxic and may burn the bare part of the hand.
Tools and materials
To bleed the brake system you will need:
- socket wrench No. 8, No. 10;
- glass bottle filled 1/4 by volume with brake fluid;
- a rubber tube of suitable diameter to the drain valve on the brake cylinders and calipers;
- latex gloves.
Note: key numbers depend on the size of the installed bleeder valve; rubber tubes are sold in pharmacies.
Start of the process
VAZ 21093 bleeding the brakes
At the bottom of the machine you need:
- remove the rubber cap from the drain valve;
- insert a spanner onto its head;
- place one end of the rubber tube on the valve;
- Place the other end in a bottle of brake fluid.
The second person pumps the brake pedal several times (from four to five presses):
- Holds it with his foot.
- Gives the command: “Open.”
The person below:
- turns the key at ¾ turns;
- Watches the liquid coming out; bubbles will be visible in the bottle. After the fluid stops flowing out, tighten the drain valve.
- Say: “Ready.”
- The pedal must be released.
- Check the level in the brake reservoir, if necessary, bring it to the required level.
- This process must be repeated several times until no more air bubbles are released in the bottle.
Note: do not forget to check the fluid level in the brake reservoir.
After bleeding, remove the rubber tube, wipe the drain valve with a rag, and put on the rubber cap. The hydraulic brake system of the VAZ-2109 has a cross-function design, that is, diagonally across the car body, so this must be taken into account when carrying out this work. After bleeding the front one wheel, move diagonally to do this work to the rear brake cylinder.
Attention! All brake cylinders of the vehicle should be bled. After completing the pumping work, it is necessary to check the operation of the hydraulic braking system
Checking completed work
According to the technical conditions for operating a vehicle when braking, it travels a distance of 12.2 meters. It is necessary to check with a dry asphalt base:
- Choose a section of the road that is not congested with traffic.
- Accelerate the car to a speed of 40 km/h.
- Depress the brake pedal, locking the wheels.
- Keep your foot on the pedal until the machine comes to a complete stop.
- Use a tape measure to measure the braking distance. It must meet the recommended parameters.
- To be sure, you need to drive this distance back again.
- Measure the braking distance again. If it meets the maximum standards, further operation of the vehicle is permitted.
If conditions are unsatisfactory, the hydraulic system is rechecked. Operating a car with poor brake performance often leads to accidents on the roads. You need to use a high-quality manual for bleeding the brakes on a VAZ 2109. You need to bleed the VAZ-2109 system yourself after a detailed study of the video and photo materials. It is also recommended to review the instructions and read the literature necessary to perform this work. It is necessary to carry out independent operations with the hydraulic brake system, only with a partner who is familiar with the work and has experience. The price for such an operation at a service station is high, so it is better to do everything yourself.
EGUR in VAZ 2114. Power steering
Good afternoon. YES, exactly EGUR,
and not gur or eur.
EGUR - electric hydraulic power steering. The day came when the original rail fell apart and began to beat and eat in the yards. And as they say, “ Everything that doesn’t break, everything needs tuning
.” Since 80% of my trips are in the city, parking lots and courtyards, I wanted to update the rack and make it easier to turn the steering wheel in the courtyards. The first option that I considered was a new rack and electric power steering. But I wanted to reduce the number of steering revolutions. Regular power steering is not available to me because there is an air conditioning compressor. 2. Tuned short rack and e-ur, but it turns out to be very expensive and also a collective farm cardan.
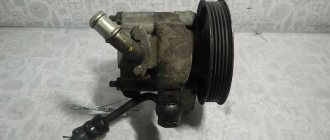
The third option came quite by accident when I saw an electric power steering pump. The most common and quite reliable is trw 1 or trw 2 from Opel. By the way, the prices for them are different everywhere from 2.5k to 10k...
The power steering rack from 2112/Prior has a speed of 2.7. The shorter rack is only a very tuned version of the rack, which will most likely fall apart very quickly. Also, the rack with power steering is its own damper. And as far as I know, the original racks for the 2112/Prior are made using FZ components (should be very reliable).
3. power steering rack, power steering electric pump from Opel. (this is my option)
I found the rail along with the mustache and hoses for 2500 rubles. 500 rub. I took the steering column with the cardan from 2112 Pump trw 2 for 4500 along with the mount and hoses. New steering tips 2110, 1000 rub. 1200 rub. spent splicing hydraulic hoses from Priors and Opels.
An electric pump has several advantages. 1. removes the load from the engine 2. turns off when there is no liquid 3. when driving straight or at low load, puts almost no load on the generator.
Reading about installing the power steering in chisels, I realized that it was enough to cut a hole in the engine shield, but it didn’t seem that way. I had to slightly trim the technological hole in order to insert the rail; no matter how hard I twisted it, it didn’t want to get in.
I cut a hole in the engine shield with a jigsaw and a metal file
There was still the question of placement of the pump; it is quite massive. You can stick it in place of the absorber, but I didn’t want to remove/move the absorber.
The option is under the left front fender, there is a lot of unused space there. Having thrown off the bumper, I began to try it on.
The approximate location should be like this, the pump is slightly tilted so that you have access to the lid if you need to add liquid. If you remove the collar, you can easily unscrew the lid
But the fender liner will have to be modified because the fender liner no longer stands up and its absence is not acceptable
for me.
The connection of the pump is very simple, essentially 4 wires.
THICK
red power + connected to the battery through a 60A fuse (somewhere it says that you need through 80A) (I bought a box from Gazelle Business for 150 rubles.)
THICK
Brown - ground on the body (I hung it on the ground on the battery). Thin wires: White and blue - generator output to the charging lamp. I threw it directly to the generator for the Black test - +12V (when turned on) from the ignition switch. Brown and white - K-LINE to the diagnostic socket - not used.
I poured the liquid for the dough with the first one I found in the store, and already replaced it.
I measured the hoses with a regular hose and took them to the RVD service in Tula. I spliced the second part of the VAZ and Opel hydraulic hose. The guys from RVD-service offered me a solution with a rotary coupling, which was very useful to me. It cost 1200 rubles.
Source
Installation instructions
When installing an electric power steering, it is necessary to take into account that it will be necessary to replace the steering column of the VAZ 2114 with an “electrically driven column”. To do this, let's start with the wiring. You will need to deal with the pads. There will be no need for any “twists”. There is a terminal in the block that we need to remove and insert into the block in the harness.
We insert the free terminal of the harness exactly into the place where the standard wire was. You don't need a special harness for this. Connect two 4 square wires to the battery. Don't forget to connect a 50A fuse. The “weak point” will connect to the tachometer, speed sensor, ground, K-line and wiring to the warning lamp. Don't forget to check the presence of speedometer and tachometer signals.
- Remove the casing with switches and ignition switch.
- Unscrew the bolt on the rail and remove it. We need to determine how much larger the “native” part is than our new one.
- We install the shaft on the EUR. After this we attach the shaft itself in its place.
- Setting up the wiring. We stretch two cables to the battery from the passenger compartment, preferably through the left wing. To conduct wiring you can:
- First remove the washer fluid reservoir.
- Take a solid wire and drag it through, trying to get to the hood.
- As soon as it appears near the hood, we attach our wires to it.
- We pull it out together with our wire.
- We connect the EUR electronics. There is a red connector under the instrument panel with an orange wire in it. It is to this that you need to connect the electric amplifier.
- Similar procedures must be done with the gray wire.
- We connect the power ends. In the battery we connect the pink one is a plus, and the black one is a minus.
Installing an EUR on a VAZ 2114 or power steering?
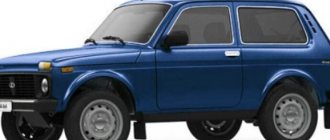
2001 was the year of the appearance of a new project from the domestic automaker AvtoVAZ. The model had two names - Samara-2 or VAZ 2114. In fact, it was an improved version of the well-known nine.
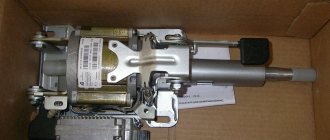
EUR kit
The modernization turned out to be very serious, affecting literally all components of the car. The steering system was no exception. Unlike many other models produced by AvtoVAZ, the 2114 offered a choice of two power steering units - hydraulic power steering and electric power steering .
Scheme
On most passenger cars, this procedure must be done in a Z-shape. That is, they first remove air from the rearmost wheel (most often the right one), and then treat the front brake mechanisms. The last wheel to be pumped is the one closest to the brake cylinder.
If the master brake cylinder is replaced, the VAZ-2110 must be pumped. In general, during any repairs to this system, it is necessary to remove air from the lines.
Types and advantages of power steering
The steering of the VAZ 2114 has undergone significant changes when compared with its predecessors in the form of the first generation Samara. Driving has become really better.
Installation kit
Customers had the opportunity to choose between electric power steering and power steering, that is, electric power steering and power steering. But how do these systems differ from each other, which one should you prefer and why? Let's try to figure this out.
Electric booster
Electric power steering operates using pulses of electrical current. This is a rather complex system in which each individual part has its own important role. Because of this, when at least one unit fails, the operation of the entire device is disrupted, it can completely stop working.
Electromechanical amplifier circuit
The task of the car owner whose car has an EUR installed is to constantly monitor the condition of the unit. A special controller is responsible for the operation of current pulses. With its help, the driver can independently set the degree of gain.
The EUR performs several tasks.
Power steering
The hydraulic booster includes a large number of elements that require not only constant monitoring, but also careful handling.
The operating principle of the power steering is based on the interaction of the steering with the oil fluid, which is contained in a special container. This is where the name of the type of amplifier comes from, since the work is based on the force of the working fluid.
Despite the rather complex technology, power steering is effective, safe, provides comfortable control, and allows you to control the behavior of the car even if the front wheels break down.
Alas, the hydraulic booster is not without its drawbacks. The main one is frequent breakdowns. They arise mainly due to leakage of working fluid.
The functions of the power steering are as follows:
The principle of operation of a brake caliper and why it is needed at all
Welcome! A brake caliper is essentially a very necessary thing, since practically no car can do without it, because the brake caliper does the most basic work during braking, but not all people know how it works and what will happen if it doesn’t installed on the car, that’s what we’ll look at today.
Note! At the end, in addition to this article, there is an interesting video clip that shows the entire principle of operation of the brake system!
What is a caliper for and what is its operating principle?
In short, it is needed so that the car slows down when you press the brake pedal and if it is not there, as was said earlier, the car will not stop at all, since the main work of braking is performed by this particular caliper.
Well, if we talk in more detail and, in addition to all this, delve into the principle of its operation, then this very principle of its operation is as follows: when you press the brake pedal, pressure occurs in the brake system, namely the piston which is located in the master brake cylinder ( This cylinder is indicated by the number 3), moves from the beginning of this cylinder to the end, thereby still collecting a little brake fluid that is in the brake reservoir (indicated by the number 5), squeezing the brake fluid forward, it goes through the hoses and thereby squeezes out the pistons that are in the caliper itself, and these pistons press on the brake pads and the car stops.
Let's look at it in more detail, for this let's first look at what this main brake cylinder is, and it represents a structure inside which there is that same piston as well as a rod that presses on it, so when you have to stop the car, you press accordingly on the brake pedal, after pressing the rod will also mix forward, thereby the piston that sits on this rod will mix, and after mixing, all the brake fluid will be pushed forward, as it were, and it will go all the way to the working cylinders themselves, which we will talk about a little lower.
Note! Let us tell you right away so that you understand one thing, this brake fluid is not compressible, so if something does not press on it, it will also press on other parts of the brake system and at the same time it will not compress!
Now the fluid will press from one end, onto all working cylinders to which hoses are connected (Hoses that are connected to the working cylinders are indicated by numbers 2 and 4 in the photo above, which shows a diagram of the brakes of a VAZ 2110 car), so after the brake fluid is the working cylinder is filled, the piston which is located in this cylinder will be squeezed out and thereby put pressure on the brake pad, and the brake pad at this moment will compress the brake disc and therefore friction will occur which stops the car.
And in conclusion, let’s note why a car needs a brake reservoir, namely, thanks to the brake reservoir, which contains the fluid itself and maintains the normal level of this fluid in the system, to understand more, look at the photo located just below:
Where is the brake caliper located?
On many cars it is different, sometimes this caliper is located in the front part of the car, and sometimes in the front and rear at the same time, and on some cars (Mainly on old ones) there were usually no brake calipers at all, and instead of them ordinary drum brakes were used , and these brakes heat up very quickly and therefore the effectiveness of their braking after constantly pressing the brake pedal (Especially in hot weather) greatly decreased and thus the number of accidents was not small.
Note! On domestically produced cars (VAZ), in most cases, the brake caliper is located only at the front of the car, and the rear wheels are equipped with conventional brake drums! (By the way, if you are interested and want to know how brake pads for disc and drum brakes work, then read an interesting article entitled: “What are brake pads and how not to run into a fake?”, everything is described in detail there)
Links! How to replace the front brake caliper - on a classic? How to replace the caliper on a VAZ 2108-VAZ 21099?
Additional video clip: You can learn more about how the brake system works in an interesting video clip located just below:
https://youtube.com/watch?v=Av-jj8NNrv8
Vaz-Russia.ru
Disadvantages of power steering and electric power steering
Many car owners prefer installing electric power steering on the VAZ 2114 as a replacement for the standard power steering. However, is such a decision justified from a practical point of view?
Connection
To answer this question, it is necessary to consider not only the positive aspects of this or that amplifier, which we have already done, but also point out their main disadvantages.
What is better for the VAZ 2114? Let's try to figure this out.
With this short list the list of shortcomings can be completed. But it is worth paying attention to some nuances.
How to do it?
To make the procedure easier, it is recommended to drive the car onto a lift. But since in most cases this is not possible, we unscrew the wheels in order. This will give us convenient access to the fittings. The latter must be cleaned of adhering dirt. Its presence in the system is extremely undesirable. Before bleeding the brakes on a VAZ-2110, you need to top up the fluid level in the plastic tank. It is located near the brake cylinder.
Possible problems
Some drivers note that in a VAZ 2114 with a hydraulic booster, the control system becomes as if weightless. This can be confusing. When the gain is lost, the steering wheel has to be turned more often.
A fairly common problem caused by the fact that the hydraulic booster operates directly from the power unit. In order to correct the situation, the hydrach is connected not directly to the engine, but using a gain regulator. Another option is to use an amplifier with an electric drive function. Today, such a device is not difficult to find, and it costs relatively little.
Wiring
As for replacing the hydraulic booster with an electric booster, this is a more than possible option for improving the car. It is considered one of the simplest but most effective types of technical tuning. However, it is strongly not recommended to perform such operations yourself.
Choose specialized car services that specialize in technical modifications and tuning of the car. AvtoVAZ cars, which include the VAZ 2114, are beautiful because they are literally created for tuning. Many young drivers choose the “fourteenth” model as their first car. This is due to the wide possibilities for modification with minimal investment. This car lends itself perfectly to external tuning, and the current spare parts market makes it possible to improve the internal filling. This includes replacing the power steering with electric power steering.
Self-leveling
To perform the operation discussed in this article, you must use a compressor. A device is required that can maintain the pressure in the system at least 2 atmospheres. The pedal is not activated in this situation.
The work is done like this:
- select a cap suitable for replacing the one that is screwed onto the fuel tank of your VAZ-2115 (suitable for canisters in which motor oil is sold);
- drill a hole with a diameter of 14 mm in it;
- insert the fitting from the tubeless wheel into the hole;
- the joints must be treated with sealant;
- fill the tank with liquid to the maximum mark;
- Unscrew the cap from the brake cylinder fitting;
- put on the tube and place the other end in the bottle;
- Connect the compressor to the tank and activate.
When the air stops coming out, tighten the fitting and move to the other wheel.
At the last stage of the procedure, it is necessary to add brake fluid to the reservoir intended for it to the maximum and screw the cap tightly.
Next, all that remains is to check how the system works after removing the air.
Types and advantages of power steering
The steering of the VAZ 2114 has undergone significant changes when compared with its predecessors in the form of the first generation Samara. Driving has become really better.
Installation kit
Customers had the opportunity to choose between electric power steering and power steering, that is, electric power steering and power steering. But how do these systems differ from each other, which one should you prefer and why? Let's try to figure this out.
Electric booster
Diagram of an electromechanical amplifier
The task of the car owner, whose car has an EUR installed, is to constantly monitor the condition of the unit. A special controller is responsible for the operation of current pulses. With its help, the driver can independently set the degree of gain.
The EUR performs several tasks.
Power steering
The hydraulic booster includes a large number of elements that require not only constant monitoring, but also careful handling.
Despite the rather complex technology, power steering is effective, safe, provides comfortable control, and allows you to control the behavior of the car even if the front wheels break down.
Alas, the hydraulic booster is not without its drawbacks. The main one is frequent breakdowns. They arise mainly due to leakage of working fluid.
The functions of the power steering are as follows:
Brake repair VAZ 2109: pumping the brake system
Why do you need to bleed your brake system?
This procedure is carried out to restore its functionality and effectiveness. Air is removed from the vehicle lines by pumping. This procedure is carried out after carrying out any measures with the brake system:
- Repair work;
- replacing brake fluid (TF);
- replacing rubber tubes:
- replacing pads.
During repair work and brake replacement, air may enter the system. Its presence in vehicle lines is very dangerous - the brake pedal simply does not respond to pressure and it is impossible to stop the car. Therefore, its removal is necessary.
When working with brake fluid, you must be careful, as it and its vapors are very toxic. It is advisable to work with gloves
If brake fluid gets on your skin, it should be washed off immediately with warm soapy water. Do not allow the fluid to come into contact with wires or plastic parts and trim while pouring fluid into the reservoir.
Basic pumping rules and preparatory activities
The brake system of the VAZ 2109 consists of two independent circuits. If one of them fails, the other operates, this increases traffic safety. If work was carried out on only one of the cylinders or other elements of the brake system, then pump the corresponding circuit on which the repair was carried out. If brake hoses, brake fluid were changed, or the master cylinder was removed, it is necessary to bleed both circuits.
Bleeding is carried out in a strictly defined order; if it is not followed, the procedure will be useless and problems with the pedal will remain. You can pump only one circuit. If both are pumped, then start the process from the rear right wheel. Next they move to the left wheel in front. Next, they return to the rear wheel pair and bleed the rear left wheel, and finish on the front right one. The procedure for pumping the vehicle is described in the “nine” manual.
Before performing work, you need to check the vehicle for leaks. To do this, the car is driven onto a lifting device or pit for inspection. Clean the joints of pipes and lines from dirt without using sharp objects or blows. You need to clean it with a rag, making vertical and circular movements. First one side, then the other.
After pumping the pedal several times, you need to lock it in the pressed state, go down under the car and check all connections and conditions of the hose. They must be kept dry. If leaks are found in the connections, they must be eliminated by tightening the connections. You need to tighten it carefully, without unnecessary effort. Check the attachment of the pipes to the body. If necessary, replace with new ones.
Make a visual inspection of rubber parts. If there are cracks or tears in the shell, they must be replaced. They could become unusable due to mechanical damage or due to contact with working fluids. According to the manufacturer’s technical standards, hoses should be changed after 5 years of operation or 150 thousand kilometers. The check should also be carried out in the engine compartment.
For pumping to be effective, you need to properly prepare for it. The following steps should be followed:
Check what level the coolant is in the expansion tank. If its level is below the maximum, then add liquid to the required level.
- Prepare an empty container, you can take a plastic bottle. Pour some brake fluid into it.
- Prepare a rubber or vinyl transparent hose. Its internal diameter must correspond to the diameter of the release valve on the working cylinders and calipers. If you cannot find the hose, you can remove it from the windshield washer for the duration of the procedure.
- The tools you will need are ring wrenches for “8” and “10”.
- If the rear pair of wheels is in a suspended state, then you need to insert a screwdriver between the plate and the pressure regulator to block it. After work, the screwdriver must be removed.
Disadvantages of power steering and electric power steering
Connection
To answer this question, it is necessary to consider not only the positive aspects of this or that amplifier, which we have already done, but also point out their main disadvantages.
What is better for the VAZ 2114? Let's try to figure this out.
With this short list the list of shortcomings can be completed. But it is worth paying attention to some nuances.
Brake cylinder installation
After the old GTZ VAZ 2114 is removed and a new one is purchased from a car shop, a complete audit of the latter should be carried out. The first thing you should pay attention to is the presence of plugs on all its holes. If the cylinder was sold without them, then there is a possibility of moisture getting inside its body, which, in turn, can cause hidden pockets of corrosion that will lead to rapid failure.
The second thing to do is inspect the outer surface of the case. It should not have chips, nicks or other damage. If an external inspection shows that the new brake cylinder is suitable for installation, it should be washed thoroughly and then wiped dry with a clean rag.
Installation of a new GTZ VAZ 2114
It is strictly prohibited to wash the gas turbine engine with kerosene, gasoline or other petroleum products, as they can lead to the destruction of sealing elements made of rubber. Ethyl or isopropyl alcohol should be used for this purpose.
Installation of a new brake cylinder is carried out in the following order:
- Install the brake master cylinder into its seat on the vacuum booster housing and secure it with fastening nuts.
- Place an empty container under the cylinder body, then fill the expansion tank with new brake fluid to the maximum mark.
- With the help of an assistant, check the performance of the cylinder as follows: the assistant should smoothly press (“rock”) the brake pedal, and the driver should monitor the appearance of the fuel fluid from the holes of the gas turbine engine. If the cylinder is working correctly, the liquid will first appear from the two front holes, and after a while - from the two rear holes.
- Bring the brake pipes to the cylinder holes and secure them (in order not to mix up the pipes in places, it is recommended to make marks with a marker or colored electrical tape when dismantling them).
- Smoothly tighten the fittings with a special wrench, without applying excessive force, so as not to strip the threads.
Possible problems
Some drivers note that in a VAZ 2114 with a hydraulic booster, the control system becomes as if weightless. This can be confusing. When the gain is lost, the steering wheel has to be turned more often.
Wiring
As for replacing the hydraulic booster with an electric booster, this is a more than possible option for improving the car. It is considered one of the simplest but most effective types of technical tuning. However, it is strongly not recommended to perform such operations yourself.
Required tools:
- oil for power steering. About the brand, it is better to consult a dealer at a service station or look at the technical documentation. Commonly used are Dextron II, Castrol TQ DIII;
- container for used power steering fluid ;
- a set of keys;
- a syringe without a needle and a tube from under the system (for pumping liquid out of the tank);
- oil receiver
Replacing power steering fluid. How to replace power steering fluid in a VAZ 2115 with your own hands
Power steering in VAZ 2114
The VAZ 2114 car is one of the most used and purchased today. This is a modification of the same “nine” that became widespread right from the release of the first series from the factory assembly line. The same car received a lot of new products at its disposal: from an injection engine and a soft suspension to softly comfortable seats.
There is also power steering, it is designed to help the driver control the car and reduce fatigue when traveling long distances.
VAZ 2114
What is brake bleeding and when is it necessary?
When bleeding the brake system, air is removed from all its lines. VAZ 2109 cars have a dual-circuit hydraulic system, with diagonal placement of circuits. When operating such brakes, a low compression ratio of fluids is used. When pressure is applied to the brake pedal, force is transmitted to the brake discs through fluid compressed by the piston in the cylinder.
If air gets into the system, bubbles form in the fluid, air jams form in the pipes and pipelines, which disrupts the operation of the brakes. Air is much more compressible than liquid, especially brake fluid. Transferring force to the brake discs becomes difficult or impossible.
Signs that brake bleeding is necessary:
- When pressed, the brake pedal is soft and sinks;
- The braking distance has increased (under other constant conditions);
- When braking, the car “twists”, turns, and skids.
During operation, air gradually enters the brake system, since absolute sealing is generally difficult to achieve. When impacted, under the influence of aggressive chemical agents, over time, parts, components and pipelines of the system are destroyed, and the tightness is broken. Then, through the cracks that have arisen, air is sucked in during the operation of the brake.
Conclusion:
- before pumping it is necessary to inspect the entire system;
- identify possible areas of depressurization (by the presence of brake fluid leaks, obvious cracks);
- repair and replace problematic parts.
In the VAZ 2109, the vehicle is divided into 2 circuits, which increases safety; if one circuit fails, braking will occur due to the second. The separation is sealed, and the connection occurs at the cylinder; if air enters it, it will end up in both circuits. When the brake fluid level drops (any leak), air will enter the cylinder automatically.
Designations on the diagram of the VAZ 2109 brake system: 1. Front wheel brake mechanism; 2. circuit pipeline left front-right rear brake; 3. master brake cylinder; 4. circuit pipeline right front-left rear brake; 5. brake master cylinder reservoir; 6. vacuum brake booster; 7. rear wheel brake mechanism; 8. elastic lever for driving the brake pressure regulator; 9. brake pressure regulator; 10. brake pressure regulator drive lever; 11. brake pedal (A - flexible hose of the front brake; B - flexible hose of the rear brake)
In addition, after any repair or other intervention in the brake system, it also needs bleeding. This could be changing the pads, brake fluid, vacuum booster, or cylinder. If you changed parts and components on only one circuit, you can limit yourself to pumping it alone. Everything else requires pumping both circuits. Failure to comply leads to accidents with new, newly installed brakes.
Types of devices
Power steering is a device with which the working fluid creates pressure on the steering rack. Due to this, the driver needs to apply much less force to the steering wheel to move it. There are several types of such equipment, let's look at the main disadvantages of all other models of amplifiers and it will become clear why the power steering was installed on the VAZ 2114, and, in general, on most modern cars. In addition to this, there are such options in the world:
The first option is next after the hydraulic one in terms of its prevalence. Its action is based on the use of magnetic forces to rotate the steering axis. But there is also a noticeable disadvantage here - the energy consumption of the battery, which immediately begins to affect the fuel consumption of the car.
The pneumatic one is very complex; there are a lot of elements: a cylinder, a compressor, pipelines and pipes, a reinforcing mechanism, etc. This entire design is very unreliable and the slightest malfunction in the operation of at least one component leads to the absence of an effect as such. The mechanical amplifier looks like a set of different gears in the body and its effect is achieved due to a changed rotation ratio, here there is minimal gain.
Power steering VAZ 2114
That is why today you can most often find power steering on a car; it was precisely because of its reliability, simplicity and efficiency that it was chosen for installation on the VAZ 2114. The most dangerous breakdown that can happen is a leak of working fluid. Next, we will look at how to correctly understand and determine the location of the leak in the system and how to correctly replace the working fluid in a VAZ 2114.
How to check and bleed the brake master cylinder? Step-by-step methods »
Not all drivers, even experienced ones, know how to check and bleed the master brake cylinder. But its impeccable work has a positive effect on the functioning of the entire braking system of your car. Because good brakes are one of the most important conditions for safe driving. By observing the behavior of a car when braking, you can learn a lot. A timely diagnosis of the brake master cylinder and the entire brake system can save you from unexpected flaws on long and short journeys. What visual clues should you pay attention to before checking?
, the car should not be driven in any direction. This is especially dangerous on slippery roads in winter. Then the car may also spin in place due to this problem. Also, you need to check the integrity of the pipes and hoses supplying the brake fluid. The clamps should be well tightened, the hoses themselves should not be frayed, and should be well seated. These previews especially do not concern new cars, as they say, used ones in good condition. So, this good condition must be maintained further.
How to check and bleed the brake master cylinder yourself
. According to the above, the entire fascinating process consists of two parts: testing and pumping. Let's start in order.
What needs to be done before the check has already been discussed a little higher. It is advisable to carry out the entire process in the garage, and not in the open air. We will need the following tools: a set of wrenches, screwdrivers, a rubber bulb for pumping out brake fluid and blowing it off; it is better to wear protective gloves on your hands.
Open the hood of the car. We find a tank with brake fluid, it is clearly visible. Remove the level sensor from it. And we pump out the liquid with a pear (a large enema purchased at a pharmacy works well). It is a very toxic chemical product in its composition. This is where gloves come in handy. Be careful not to get the mixture into your eyes or skin. If this happens, immediately run home - rinse with plenty of running water, as doctors advise.
Yes, if this liquid gets on the varnish coating of the case, you need to wash it off immediately. To do this, just keep a 1.5 liter bottle of water on hand.
– take a 10mm wrench and unscrew the fasteners of the brake pipes leading to the master cylinder. We pull them up and to the sides, gaining access to the body of the main part.
Disconnect the head cylinder itself from the vacuum booster. Usually, a 17mm wrench with a socket head is useful for these purposes. Having disconnected it, we take out the part and proceed to inspection.
For these purposes, we carefully disassemble the spare part
. We check the mirror for cracks, scratches, and other defects. Please pay attention to whether the spring is elastic and whether the piston is clean. We also inspect the rubber seals. To avoid deformation, use an elastic band (if available - 20 seconds) or a rubber bulb.
You can, of course, use a special stand for inspections, if one is nearby (or specifically for this purpose, visit a service station that has one). Technically, the check is carried out as follows. We open and close the main brake valves alternately.
Change of oil
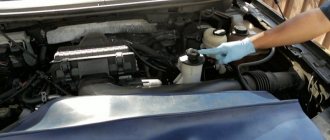
So, opening the hood we can see the first and most noticeable element, which includes the power steering. In general, the remaining elements fit into the steering gear housing and are no longer distributed throughout the engine compartment and car body. We will also immediately need some kind of container into which we will drain the already used liquid. Anything can fit, even a bucket, even a canister. We do not recommend that you throw away the drained oil; it will be quite useful in some minor repairs just for lubrication. Under no circumstances should you add it to the already new oil of your VAZ 2114: the oil must be homogeneous. You also need to let the car engine cool down so that everything cools down and if the oil gets on your hands, it doesn’t burn your skin.
Now we need to drain the oil from the expansion tank. To do this, you need to uncork the lid and carefully pull out the hose that sticks out at the bottom of the tank.
In its place, you immediately need to insert the hose that is lowered into the container that we prepared in advance to drain the already used liquid. Now, under the influence of gravity, the oil will slowly ooze into our container.
The next step is to start the engine, and you immediately need to start turning the steering wheel from side to side so that the pump begins to pump oil through the system through the tank, and little of it will be poured into the container. This procedure must be done until the power steering stops working and the steering wheel stops moving. Thus, it turned out that there was no fluid left in the steering system of the VAZ 2114.
Now you need to immediately proceed to pouring new oil. We must turn off the engine and return to its place the hose that was originally at the bottom of the tank. Fill two-thirds of the oil tank level and start the engine. Now you need to turn the steering wheel again from side to side so that the power steering is pumped with oil and the air is released from the system.
You also need to leave the tank lid open to allow air to escape. As the liquid leaves the tank, we will need to add oil. You will have to turn the steering wheel until the oil stops leaving, after which you need to tightly seal the tank.
That's all, this is exactly how the working fluid is replaced in the amplifier of a VAZ 2114 car. As you can see, there is nothing complicated about it, you can easily do it yourself and even without help. The oil must be selected carefully so that it is ideally suited to the design of this car.
The grenade replacement process in detail
To begin with, before starting the replacement procedure itself, you need to decide on the tools. So, what will you need when replacing the internal grenade:
- knobs and heads 13-17;
- keys 17, 30 and 19;
- jack;
- lamp;
- pliers;
- CV joint lubrication;
- wheel wrench;
- directly the spare part itself.
Go!
Now that everything is assembled, you can begin the replacement procedure:
- We remove the lower engine protection.
- Drain the oil from the gearbox.
- Using a wheel wrench, remove the wheel.
- Using a 30 mm socket, unscrew the nut securing the outer CV joint.
- We jack up the car.
- Disconnect the ball joint from the hub.
- We pull out the CV joint from the hub.
- Under the hood, using a pry bar, we pull out the inner CV joint from the gearbox.
- Now, you can pull the shaft drive out, complete with grants.
- For convenience, we clamp it in a vice.
- Using pliers, remove the boot clamp.
- We remove the boot.
- We take out the grenade.
- Installation is carried out in the reverse order, with all consumables replaced. It is necessary to place CV joint lubricant in the boot.
Grenade selection
The choice of the inner CV joint should be taken seriously and carefully, since it is one of the main drive parts of the car. As practice shows, this part quite often fails on cars of the VAZ 2113-2115 family. Therefore, it is worth carefully selecting a spare part not only by price, but also by quality.
Original
2108-2215056 - original catalog number of the internal grenade for the VAZ-2114. The average cost is 2000 rubles . Fitting the fasteners is easy and does not require any modifications.
Analogs
In addition to original spare parts, you can find quite a lot of analogues on the automotive market, which are in no way inferior to the original in quality and price. All of them are certified and recommended for installation on this vehicle. So, let's look at what analogues can be installed on the VAZ-2114:
Some VAZ-2114 owners recommend tripoid grenades for installation.
VESKO-TRANS.RU
AutoNews / Reviews / Tests
How to Bleed Brakes on a VAZ 2112 Video
As it is also called, together with a partner they brake a VAZ 2110
Almost all car owners are faced with the need to pump their brakes, regardless of the brand of car they drive. But let's talk about how to turn off the brakes
, read the rules, pumping order.
When it is necessary?
If our customer has nothing left to do, the brake components are working properly, the brake water paths are tight, then they do not require bleeding. But if there is a TJ leak due to the "overpass" being damaged and its level falling, it will be useful to repair the brakes and the stable pump.
This is a particularly necessary procedure, because airing the accounting system leads to the fact that at the moment when everything still needs to be done for our client, seconds are decided, the brakes do not work. Nothing will pump right now, no one.
Therefore, we will immediately take such a step if we find that the brake pedal has increased its travel; it becomes “soft,” as car owners say. brake. "cotton".
Hydraulic brake circuit
There are already other prerequisites for pumping:
- For you, you had to interfere with the accounting system;
- Cracks appeared in the hoses, TJ leakage;
- The brake fluid turned out to be bad and requires a complete replacement;
- You've changed your brake discs (sometimes you need to do this);
- The water content of liquid fuel has increased (it is hygroscopic, i.e. it absorbs and retains water), so it must be changed as needed.
What can't be done?
You must add TZ for all brake repair work. Remember: you can only add “native” liquid. exactly the brand that is already filled in your VAZ 2110.
Brake water from different manufacturers
It is impossible to combine different brands under any circumstances, because the result is unpredictable! If not, this is the only way out. completely change TJ in the system.
a priority
There is a strict sequence for bleeding the brakes
on a VAZ 2110. It’s better not to violate it. To do this you need to drive right rear first and then front left. Later. rear left, and the last one. front right.
We work with a partner
The best thing. It's more convenient, safer, to turn off the brakes together. When more than 80% of VAZ 2110 owners create this operation.
First of all, make sure that TJ is not leaking anywhere, and everything else is tight. Then add water until it reaches the Maha rice.
Now let's start bleeding the brakes:
- The wheel where you will pump the mechanism needs to be hung; how to rotate the wheels correctly has already been said;
- The rear brake has a special pressure regulator. It must be unlocked by inserting a screwdriver between the piston and the plate;
- Locate the release valve on the appropriate brake mechanism. Wipe it down, remove the cap and put the rubber hose on your head;
- Pour some of the same brake water that is in the system into a previously prepared three-liter jar (otherwise into another transparent container), lower the end of the hose so that the hole is immersed in the liquid;
- The driving assistant presses the brake pedal sharply about 4 or 5 times at full speed. Holds the pedal when pressed for the last time;
- At this time, you open the valve halfway, saying ¾, and watch the TG run down the hose. There need air bubbles there. When the leak stops, close the valve completely;
- Only then can your assistant release the pedal;
- Then again the assistant “presses” the brake and holds the pedal down, and you repeat the manipulation of the valve;
- The brake mechanism is considered fully inflated when no more air bubbles are emitted. This is natural, it will take 3-4 steps;
- Now remove the hose, wipe the fitting, attach the protective cap to it;
- Repeat the same procedure with all brake mechanisms. Remember to use the diagonal principle correctly;
- Pull out the screwdriver in which the pressure regulator is blocked.
How to bleed the brakes on video 2112.
Certainly
If there is no assistant, it is possible, although not so convenient, to brake the VAZ 2110 without assistance.
Naturally, the special device is the aerator, which they purchase, as they call it, without the help of others.
For this you will find:
- brake reservoir cap (“classic”). without sensor, normally dark;
- auto nipples;
- Drill 14mm (use round ratchet).
Make a hole in the lid, insert the nipple tightly without gap. It's all on the device. It is necessary to connect the wheel valve (spare wheel or removed from the connected vehicle) to the tank valve.
Working with a partner
It’s best – it’s more convenient, more reliable – to bleed the brakes together. By the way, this is exactly how more than 80% of VAZ 2110 owners perform this operation.
First of all, make sure that there are no leaks of the fuel fluid anywhere, and everything is sealed. Then add fluid so that it is at the level of the “Max” line.
Now start bleeding the brakes:
- The wheel on which you will bleed the mechanism needs to be hung, but how to properly alternate the wheels has already been said;
- The rear brakes have a special pressure regulator. It must be unlocked by inserting a screwdriver between the piston and the plate;
- Locate the air bleed valve on the appropriate brake mechanism. Wipe it, remove the cap and put a rubber hose on the head;
- Pour a little of the same brake fluid that is in the system into a previously prepared three-liter jar (or other transparent container), lower the end of the hose so that the hole is immersed in the liquid;
- Your assistant, who is behind the wheel, suddenly presses the brake pedal at full speed about 4 or 5 times. When pressing the last time, hold the pedal with your foot at the extreme pressure;
- At this time, you open the valve halfway or ¾ and observe the fuel fluid that flows out of the hose. There should be air bubbles in it. When the flow stops, close the valve completely;
- Only after this can your assistant release the pedal;
- Then the assistant again “pumps” the brake and keeps the pedal pressed, and you repeat the manipulations with the valve;
- The brake mechanism is considered to be properly pumped when air bubbles are no longer released. That is, 3 - 4 stages may be needed;
- Now remove the hose, wipe the fitting, attach the protective cap to it;
- Repeat these same steps with each brake mechanism. Remember to use the diagonal principle correctly;
- Remove the screwdriver that was used to block the pressure regulator.