Purpose
The damper position sensor takes an active part in the formation of the fuel mixture, and therefore, if certain problems arise with its condition, fuel consumption increases significantly. To be more precise, it determines the opening angle of the damper, as a result of which it will be possible to draw certain conclusions about the volume of air in the system.
Opening data is sent to the control unit, after which it is transmitted to the main indicator panel. The readings obtained play an important role in the operation of the fuel mixture formation system.
Device
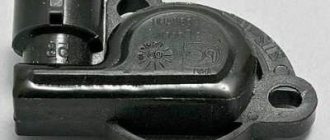
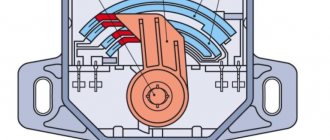
This component of the system is a fairly simple electrical resistor, which changes the resistance when the axis is rotated.
The sensor is located on the damper shaft and, when it opens, performs the function of turning together with the damper. Due to the fact that the design is quite primitive and unreliable, the sensor often fails, resulting in certain problems with the formation of the fuel mixture. So, in most cases, the problem is the rubbing of the tracks, but the possibility of other problems with the condition of the resistor cannot be ruled out.
Accurate diagnosis of element condition
When the TPS begins to function incorrectly or fails completely, the fuel supply process is disrupted during sudden acceleration of the car.
Therefore, the first sign of sensor failure is jerks and dips when attempting dynamic acceleration.
Secondary symptoms look like this:
- when coasting downhill and the gear is engaged, the engine may stall and start again, causing jerking;
- the engine may stall either when you sharply press the gas pedal or when you release it;
- fuel consumption increases.
The listed signs are of a general nature. Therefore, a more accurate check is needed to verify that the TPS is faulty or, conversely, to exclude it from the list of parts responsible for changing the behavior of the car.
An accurate check of the element’s condition is carried out with a special device - a multimeter, equipped with needle-shaped contacts. First of all, you should make sure that the “Check Engine” sign is not lit on the dashboard, which indicates a breakdown in another place, and that the damper sensor has nothing to do with it. The further procedure is as follows:
- Switch the multimeter to resistance measurement mode and, with the ignition off, detect the negative wire.
- Turn on the ignition, set the switch to voltage measurement mode and check it at the output of the sensor. The value should not exceed 0.7 V.
- Manually open the damper slowly. The voltage should also increase smoothly and, when fully opened, remain at a level of at least 4 V.
- Turn off the ignition and connect the contacts to the input and output wires, take measurements in ohmmeter mode. Turn the valve smoothly and make sure that the chain resistance decreases without jerking.
If the voltage readings do not correspond or are absent altogether, then the main reason lies in a faulty TPS. When the voltage and resistance of the resistor “jumps” when the damper axis is turned, this indicates wear of the resistive coating. Both defects clearly lead to the replacement of the part; it is impossible to repair it.
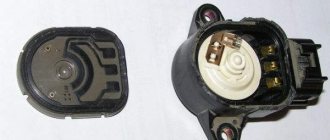
Location
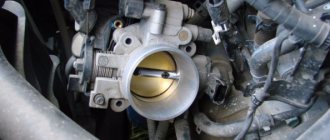
The location of the sensor is quite accessible - on the base of the throttle body, which is located above the cold speed sensor. It is worth noting that in most cases this resistor is fixed with two screws that can be unscrewed with a Phillips screwdriver, and there is also a certain foam washer and boot.
Symptoms of a problem
When the first signs of a malfunction appear, you should contact the service to fix the problem. The most obvious of them are:
- When starting the vehicle at speeds from 500 to 2.5 thousand per minute, a certain knocking sound appears
- The idle speed seems to float and does not have a constant value
- The internal combustion engine stalls on its own, which can result in dangerous emergency situations on the road.
If such problems are detected in the operation of the vehicle, it is recommended to contact the service as soon as possible to check the condition of the sensors. It is worth noting that replacement takes a minimum amount of time.
Examination
Checking the operation of the resistor can be carried out exclusively using a multimeter or a special device like ELM-327, however, the first option is the simplest and most common.
Checking the power circuit condition
First of all, it is recommended to check the condition of the power circuit, since this is where breakdowns and malfunctions are most often observed.
To do this, it will be necessary to put the device into a state of changing the constant voltage with a limit of 20 Volts, then remove the connector from the sensor and turn on the ignition on the car. After this, all that remains is to connect the tongs to the device and obtain certain information on the voltage status (it must be at least 5 Volts).
Checking the functionality of the sensors
Here it is already assumed that data is obtained by rotating the central part of the sensor. To do this, you will need to put the device into a state of resistance change, and then connect it to the sensor terminals.
When rotating the internal part, it will be possible to obtain certain readings, which should change quite smoothly, without any jumps. If so, then the performance status is good.
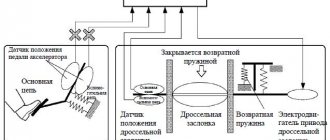
Mechanism of action of the equipment
The TPS works like a potentiometer.
- Each output of the mechanism has its own channel - a 5V electrical signal goes to one contact, the other is connected to ground, the third is connected to the controller. When the gate is turned, the voltage from the current collector slider to a specific output changes.
- With the ignition on, you can check it with a special device by installing probes on the input contacts of the unit. When the throttle shield is closed, the readings will be in the range of 0.5 - 0.7 V. When open - up to 4V.
- The VAZ 2114 throttle valve is in contact with the idle air control mechanism. When the shutter is closed, the IAC comes into operation, and the engine is filled with additional air, bypassing the TPS.
You can check the performance of the valve sensor by measuring the resistance - with an ohmmeter. If the mechanism is working properly, the indicators should be zero.
Throttle sensor malfunctions
Malfunctions of the throttle sensor lead to unstable operation of the car engine. That the TPS is not working correctly can be understood by the following signs: unstable idle, decreased car dynamics, increased fuel consumption and other similar troubles. The main sign that the throttle position sensor is faulty is jumping speed. And the main reason for this is wear on the contact tracks of the throttle valve sensor. However, there are a number of others.
Checking the throttle position sensor is quite simple, and even a novice car enthusiast can do it. To do this, you only need an electronic multimeter capable of measuring DC voltage. If a sensor fails, repairing it is most often impossible, and the device is simply replaced with a new one.
Replacement
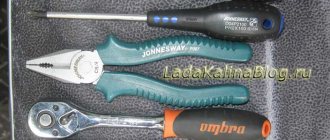
If the check shows that the TPS is faulty, then it needs to be replaced. This does not require many tools, all you need is skillful hands and a Phillips screwdriver.
The sensor should be replaced by turning off the engine and disconnecting the minus from the battery. Then you need to disconnect the sensor connector, which has a lock. Then unscrew the two screws that secure the sensor to the throttle assembly. After this manipulation, the sensor is easily removed from the throttle valve axis.
Video - replacing the throttle position sensor on a VAZ2110, 2114, 2115:
Installation of a new device should be done in reverse order. In this case, you need to make sure that the throttle valve itself is closed. Usually, when a new TPS is purchased, an O-ring is included in its package. It is installed between the sensor and the throttle pipe. Remember to remove the old ring before installing the new sensor.
Once in place, tighten it with the machine screws until the O-ring is completely compressed. Now all that remains is to connect the connector and secure it with the latch.
After this, disconnect for 5 minutes. This is done to reset the old sensor parameters in the ECU, which in most cases are retained.
Signs of a malfunctioning throttle position sensor
Before moving on to describing the symptoms of a TPS failure, it makes sense to briefly dwell on the question of what the throttle position sensor affects. It is necessary to understand that the main function of this sensor is to determine the angle at which the damper is rotated. The ignition timing, fuel consumption, engine power, and dynamic characteristics of the car depend on this. Information from the sensor enters the electronic engine control unit, and based on it, the computer sends commands about the amount of fuel supplied and the ignition timing, which contributes to the formation of an optimal air-fuel mixture.
Accordingly, malfunctions of the throttle position sensor are expressed in the following external signs:
- Unstable, “floating” idle speed.
- The engine stalls while changing gears, or after changing from any gear to neutral speed.
- The engine may stall randomly when idling.
- While driving there are “dips” and jerks, in particular during acceleration.
- The engine power is noticeably reduced, and the dynamic characteristics of the car drop. This is very noticeable in terms of acceleration dynamics, problems when driving the car uphill, and/or when it is heavily loaded or towing a trailer.
- The Check Engine light on the dashboard activates (lights up). When scanning errors from the ECU memory, the diagnostic tool shows error p0120 or another related to the throttle position sensor and its malfunction.
- In some cases, there is increased fuel consumption by the car.
How to check
If some signs of a malfunction of the TPS are detected, but it is completely unclear what they indicate, then you can independently check its performance.
Typically, when there is a problem with the TPS, the Check Engine light on the dashboard lights up. Therefore, first you should start the engine and if the indicator does not light up, you need to crawl under the hood to the sensor itself.
To check its functionality, it is not necessary to remove it; everything can be done on site. To do this, you need to connect two wires of the multimeter to terminals B and C of the sensor. The corresponding marking is available.
After this, you can start smoothly, slowly turning the throttle using the drive sector. If the sensor is working properly, the device readings should also change smoothly without sudden jumps. Typically from 2 to 8 kOhm. Resistance measurements should be made with the engine turned off.
Video - checking TPS:
Now you should measure the voltage. To do this, first connect the negative of the multimeter to the engine ground. After this, you need to start the engine and connect the positive contact of the device to terminal A of the sensor, also following the markings. The voltage is measured, which should be within 5 V. If the device readings are different (less than 5 V), then this indicates a malfunction of the power circuit or the electronic engine control unit itself.
If during the test all the instrument readings were normal, then there is nothing to worry about. Otherwise, the TPS needs urgent replacement.
Causes of TPS malfunction
There are two types of throttle position sensors - contact (film-resistive) and non-contact (magnetoresistive). Most often, it is the contact sensors that fail. Their work is based on the movement of a special slider along resistive tracks. Over time, they wear out, which is why the sensor begins to provide incorrect information to the ECU. So, the reasons for the failure of a film-resistive sensor may be:
- Loss of contact on the slider. This can be caused either simply by physical wear or by a broken tip. The resistive layer may simply wear out, causing the electrical contact to also disappear.
- The linear voltage at the sensor output does not increase. This situation may be caused by the fact that the base coating has worn off almost to the base in the place where the slider begins to move.
- Wear of the slider drive gears.
- Broken sensor wires. These can be both power and signal wires.
- A short circuit has occurred in the electrical and/or signal circuit of the throttle position sensor.
As for magnetoresistive sensors , they do not have a coating of resistive tracks, so their breakdowns are mainly reduced to broken wires or a short circuit in their circuit . And the testing methods for one and the other type of sensor are similar.
In any case, repairing a failed sensor is hardly possible, so after performing the diagnostics, you simply need to replace it with a new one. In this case, it is advisable to use a non-contact throttle position sensor, since such a unit has a much longer service life, although it is more expensive.
Basic information about TPS
Among the variety of devices, two types of TPS can be distinguished:
- resistive
- contactless.
On domestic cars, resistive type sensors are widely used, which are durable and simple to install. They use up their resources with interest, and the very low price explains the preferences of car owners in their direction. The design of the device is exactly the same as that of a conventional variable resistor. The TPS axis is connected to the damper and moves with it. This changes the resistance between input and output. Thanks to this, the supply voltage (5 V), passing through a resistor, changes - this is controlled by the car’s ECU.
Resistive devices have one big disadvantage: the resistive layer itself wears out over time. This happens in the extreme position corresponding to idle speed. As a result, engine operation becomes unstable, the speed “jumps”, and sometimes the engine stops altogether. Non-contact TPS do not have this drawback, since they operate on the Hall effect.
How to Determine a Malfunctioning Throttle Sensor
Checking the TPS itself is simple, and all you need is an electronic multimeter capable of measuring DC voltage. So, to check the TPS malfunction, you need to follow the algorithm below:
- Turn on the car's ignition.
- Disconnect the chip from the sensor contacts and use a multimeter to make sure that the sensor is receiving power. If there is power, continue checking. Otherwise, it is necessary to “ring” the supply wires in order to find the break point or another reason why the voltage to the sensor is not suitable.
- Set the negative probe of the multimeter to ground, and the positive probe to the output contact of the sensor, from which information goes to the electronic control unit.
- When the throttle is closed (corresponds to the accelerator pedal being fully depressed), the voltage at the sensor output contact should not exceed 0.7 Volts. If you open the throttle completely (fully depress the accelerator pedal), then the corresponding value should be at least 4 Volts.
- Next, you need to manually open the damper (rotate the sector) and at the same time monitor the multimeter readings. They should rise smoothly. If the corresponding value rises abruptly, this indicates that there are worn spots in the resistive tracks, and such a sensor must be replaced with a new one.
Owners of domestic VAZs are often faced with the problem of TPS malfunction due to the poor quality of the wires (in particular, their insulation) with which these cars are standardly equipped from the factory. Therefore, it is recommended to replace them with higher quality ones, for example, produced by PES/SKK CJSC.
And, of course, it is necessary to perform a check using the OBDII diagnostic tool. A popular scanner that works with most cars is Scan Tool Pro Black Edition . It will help you find out exactly the error number and see the operating parameters of the throttle valve, and will also determine whether the car still has problems, possibly in other systems.
The most common error associated with the throttle position sensor is code P0120 and stands for “Throttle position/pedal position sensor/switch “A” circuit malfunction.” Another possible error p2135 is called “Mismatch of readings from sensors No. 1 and No. 2 of the throttle position.” The following codes may also indicate incorrect operation of the remote control or its sensor: P0120, P0122, P0123, P0220, P0223, P0222. After replacing the sensor with a new one, it is necessary to erase the error information from the ECU memory.
In the diagnostic application, the scanner will make it possible to see the data coming from the sensor in real time. When moving the damper, you need to look at the readings in volts and the percentage of its opening. If the damper is in good condition, the sensor should produce smooth values (without any jumps) from 03 to 4.7V or 0 - 100% with the damper fully closed or open. It is most convenient to view the operation of the TPS in graphical form. Sharp dips will indicate wear of the resistive layer on the sensor tracks.
Conclusion
A malfunctioning throttle position sensor is not a critical failure, but it needs to be diagnosed and corrected as quickly as possible. Otherwise, the engine will operate under significant loads, which will lead to a reduction in its overall service life. Most often, the TPS fails simply due to simple wear and tear and cannot be restored. Therefore, you just need to replace it with a new one.
Source
Cleaning methods
There are two ways to clean the throttle valve for a VAZ 2114 car:
- Superficial;
- Deep.
Each of them deserves separate consideration.
Surface cleaning
The easiest way that does not require virtually any knowledge in the field of car repair and disassembly. There is no need to disassemble the damper itself, because this option is preferred by almost all beginners who are just beginning to learn the joys of self-repair.
The procedure for superficial cleaning of the throttle valve is as follows:
- Remove the corrugation from the throttle valve;
- Treat interior surfaces with your chosen cleaning product. Better than WD40;
- Go over the knot with a brush. Just don’t use metal ones;
- Wipe off any accumulated dirt with a dry cloth;
- Carry out similar activities on the reverse side of the damper;
- Reinstall all removed items.
Let’s say right away that this method cannot be called effective. It’s not called superficial for nothing. This tells us that all the internal components of the unit will still remain dirty. Therefore, the symptoms are unlikely to disappear.
Deep flushing
In most cases, you will not be able to fix the problem without deep cleaning. Plus, it is still recommended to check the throttle position sensor on the VAZ 2114, since the reason for the violation of the proportions of the air-fuel mixture may lie in it.
From a set of materials and tools you will need:
- The almighty WD40;
- Crosshead screwdriver;
- Dry rags;
- Throttle valve gasket (for 1.5 liter engine);
- Receiver O-ring (for a 1.6-liter engine);
- Spanners;
- Two M13 bolts;
- Ear cotton swabs.
A fairly inexpensive set, each item from which will be useful to you. Therefore, it is better to immediately collect everything you need and get to work.
- Remove the entire throttle assembly. To do this, remove the corrugation from the filter, turn off the antifreeze pipe (here you will need M13 bolts to close the pipes). There is no need to drain the antifreeze, as many recommend. Just try to disconnect the pipes as quickly as possible and plug the holes with bolts.
- Now the adsorber pipe is removed.
- You have completed the most difficult stage, so it will be easier further. Remove the assembly fasteners, disconnect the cable from the gas pedal. This will allow you to remove the throttle body.
- After removing the unit, disassemble it into parts. The first are two sensors - TPS and IAC. They must be thoroughly cleaned using the products indicated in the previous section. If you don't have WD40, use alternative solutions.
- Rinse the damper thoroughly from all sides, blow out the holes, which will allow all internal components to dry properly.
- Now all you have to do is assemble the assembly in reverse order. This is not difficult to do if there are no problems with disassembly.
- Don't forget the gaskets or rings. There is no point in cleaning them from dirt, so immediately replace the old ones with new ones. Do not confuse which element is suitable for which VAZ 2114 engine size. Many people manage to put the ring where the gasket should be, or vice versa.
Throttle valve malfunctions
Malfunctions of the throttle valve can be externally determined by the following signs of engine operation - problems with starting, decreased power, deterioration of dynamic characteristics, unstable idling, increased fuel consumption. The causes of malfunctions may be contamination of the damper, air leaks in the system, incorrect operation of the throttle position sensor, and others. As a rule, repairing the damper is not difficult, and even a novice car enthusiast can do it. To do this, it is cleaned, the TPS is replaced, or the leakage of external air is eliminated.
When cleaning is necessary
In addition to mileage, there are additional signs that will indicate the need to clean or replace the throttle valve:
- The decrease in speed from high to low when releasing the gas pedal occurs jerkily. The revolutions may immediately drop by 300-400.
- In winter, the engine has difficulty starting, and the smell of gasoline can be felt in enclosed spaces.
- During startup, not all cylinders are immediately put into operation; a “triple” effect appears. While the car is moving, slight twitching is felt, especially when accelerating.
Contamination of the damper occurs due to the ingress of combustion product residues - oils, fuel, soot - onto it. As a result, a coking process occurs, which leads to jamming of parts and loss of smooth movement. Due to the narrowing of the gap, the amount of air that enters the cylinder also decreases. This, in turn, leads to a loss of engine power.
Signs of a bad throttle valve
The throttle assembly regulates the air supply to the intake manifold, which subsequently creates an air-fuel mixture with parameters that are optimal for the engines. Accordingly, if the throttle valve is faulty, the technology for creating this mixture changes, which negatively affects the behavior of the car. Specifically, signs of a bad throttle position include:
- problematic engine starting, especially “cold”, that is, on an unheated engine, as well as its unstable operation;
- the engine speed value constantly fluctuates, and in a variety of modes - at idle, under load, in the average range of values;
- loss of dynamic characteristics of the car, poor acceleration, loss of power when driving uphill and/or with a load;
- “dips” when pressing the accelerator pedal, periodic loss of power;
- increased fuel consumption;
- a “garland” on the dashboard, that is, the Check Engine indicator light comes on and then goes out, and this repeats periodically;
- the engine suddenly stalls, after restarting it works normally, but the situation soon repeats;
- frequent occurrence of engine detonation;
- a specific gasoline smell appears in the exhaust system, associated with incomplete combustion of fuel;
- in some cases, self-ignition of the air-fuel mixture occurs;
- You can sometimes hear soft popping noises in the intake manifold and/or muffler.
Causes of throttle valve malfunction
There are a number of typical reasons that lead to malfunctions of the throttle assembly and the problems described above. Let us list in order what malfunctions of the throttle valve can occur.
Idle speed control
The idle air control valve (or IAC for short) is designed to supply air to the intake manifold of the engine when it is idling, that is, when the throttle valve is closed. If the regulator fails partially or completely, the engine will experience unstable operation at idle until it stops completely. Since it and the throttle assembly work in tandem.
Throttle sensor malfunctions
Another common cause of throttle failure is problems with the throttle position sensor (TPS). The function of the sensor is to fix the position of the throttle valve in its seat and transmit the corresponding information to the ECU. The control unit, in turn, selects a certain operating mode, the amount of supplied air, fuel and adjusts the ignition timing.
If the throttle position sensor malfunctions, this unit transmits incorrect information to the computer or does not transmit it at all. Accordingly, the electronic unit, based on incorrect information, selects incorrect engine operating modes or switches it to operation in emergency mode. Typically, when a sensor fails, the Check Engine light on the dashboard lights up.
Throttle Actuator
There are two types of throttle valve actuator - mechanical (using a cable) and electronic (based on information from a sensor). A mechanical drive was installed on cars of older models, and is now becoming less common. Its operation is based on the use of a steel cable connecting the accelerator pedal and the lever on the throttle rotation axis. The cable can stretch or break, although this is quite rare.
Electronic throttle control is widely used in modern cars Commands for the throttle position are received by the electronic control unit based on information received from the damper actuator sensor and the throttle sensor. If one or another sensor fails, the control unit is forced into emergency mode. In this case, the damper drive is turned off, an error is generated in the ECU memory, and the Check Engine warning lamp lights up on the dashboard. The problems described above arise in the behavior of the machine:
- the car reacts poorly to pressing the accelerator pedal (or does not react at all);
- engine speed does not rise above 1500 rpm;
- the dynamic characteristics of the machine are reduced;
- Unstable idle speed, until the engine stops completely.
In rare cases, the damper drive motor fails. In this case, the damper is located in one position, which fixes the control unit, putting the machine in emergency mode.
System depressurization
Often the cause of unstable operation of a car engine is depressurization in the intake tract. In particular, air can be sucked in in the following places:
- the places where the damper is pressed against the body, as well as its axis;
- cold start jet;
- connecting corrugated tube behind the throttle position sensor;
- joint (inlet) of the crankcase gas cleaner pipe and the corrugation;
- injector seals;
- conclusions for gasoline fumes;
- vacuum brake booster tube;
- throttle body seals.
Air leaks lead to incorrect formation of the air-fuel mixture and errors in the operation of the intake tract. In addition, the air leaking in this way is not cleaned in the air filter, so it may contain a lot of dust or other harmful small elements.
Damper contaminated
The throttle body in a car engine has a direct connection with the crankcase ventilation system. For this reason, tar and oil deposits and other debris accumulate on its body and axle over time. Typical signs of throttle valve contamination occur. This is reflected in the fact that the valve does not move smoothly; it often sticks and jams. As a result, the engine is unstable and corresponding errors are generated in the electronic control unit.
To get rid of such troubles, you need to regularly check the condition of the throttle valve, and if necessary, clean it with special means, for example, carburetor cleaners or their equivalents.
How to clean the throttle body
Before cleaning the throttle valve, it is worth studying the five main mistakes that car owners make in this procedure. Recommendations on how to properly clean carbon deposits from the electronics. More details
The damper adaptation has failed
In rare cases, throttle adaptation may be reset. This may also lead to the above problems. The reasons for failed adaptation may be:
- disconnecting and further connecting the battery on the car;
- dismantling (disconnection) and subsequent installation (connection) of the electronic control unit;
- the throttle valve has been removed, for example for cleaning;
- The accelerator pedal has been removed and reinstalled.
Also, the cause of a failed adaptation may be moisture getting into the chip, a break or damage to the signal and/or power wire. You need to understand that there is an electronic potentiometer inside the throttle valve. Inside it there are tracks coated with graphite. Over time, during the operation of the unit, they wear out and can wear out to such an extent that they will not transmit correct information about the position of the damper.
Step-by-step instruction
All repairs are divided into two stages - disassembly and cleaning. The cleaning time depends on the degree of contamination of the damper and the general wear of the engine. There is no need to use great physical force here; each stage can be done alone without outside help.
What you need for washing
Repairs must be carried out after the engine has cooled down. To remove the throttle assembly, you will need two screwdrivers, as well as a 13mm socket wrench. Almost every car enthusiast has these tools. Any cleaning agent is suitable for working with the damper itself, the main thing is that it removes oil and soot well. For better cleaning, we recommend using cotton swabs; they will help you reach the most difficult to reach places.
Cotton swabs will help to better clean the damper from dirt
When disassembling the mechanism, it may turn out that some consumables are no longer suitable for further use. Therefore, it is better to purchase a throttle valve gasket or a receiver O-ring in advance, depending on the engine size.
Removing the throttle assembly and cleaning it
The throttle assembly must be removed in the following sequence:
- Having opened the hood, remove the plastic cover that covers the top of the engine.
- Remove the rubber vent hose. If there is a large amount of dirt, remove it with a regular rag. Remove the ventilation hose using a screwdriver
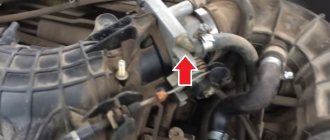
- Before removing the mechanism itself, we will need to relieve the pressure from the cooling system. To do this, remove the hoses with antifreeze liquid, having previously wrung out several clamps.Remove the hoses with antifreeze liquid, having previously wrung out the clamps
- To protect the holes from dust during repairs, it is better to immediately cover them with small plugs.
- To gain access to the valve itself, you will need to remove another hose that ventilates the fuel tank.
- Now you can remove the damper by first unscrewing the two fastening bolts and disconnecting the cable that connects the part to the accelerator pedal. We remove the damper by first unscrewing the two bolts
For further work, you need to decide which cleaning method you will use. For minor contamination, choose the simpler and faster surface cleaner. If the mechanism is covered with a large layer of dirt, and some elements are coked, then a complete cleaning is suitable. Surface cleaning does not require further disassembly of the mechanism. It is enough to remove oil deposits from internal and external surfaces with a rag and cotton swabs. We recommend using gasoline or thinner as cleaning agents.
When completely flushed, we will need to replace the gasket or o-ring. To disassemble the tool, take a small screwdriver and a 13mm wrench to unscrew two more bolts. After cleaning, mechanics recommend blowing out all the holes with a stream of compressed air - this will remove excess moisture and small dust particles.
What does the throttle valve look like before and after cleaning?
When disassembling the throttle assembly, we recommend paying special attention to the idle speed sensor. The efficiency of fuel use and the smooth movement of the vehicle depend on its correct operation.
To clean it, it is better to use WD 40 and thin cotton swabs. We remove dirt from the case and thoroughly clean the contacts of the device.
Throttle valve repair
Repair measures for the throttle assembly depend on the reasons why the problems arose. Most often, the scope of repair work consists of all or part of the following measures:
- in case of complete or partial failure of the throttle sensors, they must be replaced, since they are not repairable;
- cleaning and flushing the idle speed regulator, as well as the throttle valve itself, from oil and tar deposits;
- restoring the tightness by eliminating air leaks (usually the corresponding gaskets and/or connecting corrugated tube are replaced).
Adaptation of the throttle valve “Vasya the diagnostician”
On VAG cars, the damper adaptation process can be performed using the popular diagnostic program “Vag-Com” or “Vasya Diagnostician”. However, before proceeding directly to adaptation, you need to perform the following preliminary steps:
- first remove (preferably several times) all errors from the engine ECU BEFORE starting the basic settings in the “Vasya Diagnostic” program;
- the car battery voltage should not be less than 11.5 Volts;
- the throttle valve should be in the idle position, that is, it does not need to be pressed with your foot;
- the throttle must be pre-cleaned (using cleaning products);
- The coolant temperature must be at least 80 degrees Celsius (in some cases it can be lower, but not much).
The adaptation process itself is performed according to the following algorithm:
- Connect the computer with the “Vasya Diagnost” program installed using the appropriate cable to the service connector of the car’s electronic unit.
- Turn on the car ignition.
- Go to section 1 “Engine” in the program, then 8 “Basic settings”, select channel 060, select and press the “Start adaptation” button.
As a result of the described actions, two options are possible: the adaptation process will begin, as a result of which the corresponding message “Adaptation OK” will be displayed. After this, you need to go to the error block and, if there are any, programmatically delete information about them.
But if, as a result of launching adaptation, the program displays an error message, then you need to proceed according to the following algorithm:
- Exit “Basic settings” and go to the error block in the program. Remove errors twice in a row, even if there are none.
- Turn off the car ignition and remove the key from the lock.
- Wait 5...10 seconds, then reinsert the key into the lock and turn on the ignition.
- Repeat the adaptation steps above.
If, even after the described actions, the program displays an error message, this indicates a malfunction of the nodes involved in the operation. In particular, the throttle valve itself or its individual elements may be faulty, problems with the connected cable, or an inappropriate adaptation program (you can often find hacked versions of Vasya that do not work correctly).
If you need to train the Nissan throttle valve, then there is a slightly different adaptation algorithm that does not require the use of any program. Accordingly, other cars, such as Opel, Subaru, Renault, have their own throttle learning principles.
In some cases, after cleaning the throttle valve, fuel consumption may increase, and engine operation at idle speed will be accompanied by a change in speed. This is due to the fact that the electronic control unit will continue to give commands in accordance with the parameters that were before cleaning the throttle. To avoid such a situation, it is necessary to calibrate the damper. This is done using a special device that resets past operating parameters.
Mechanical adaptation
Using the specified “Vag-Com” program, you can programmatically adapt only cars produced by the German concern VAG. Other cars have their own algorithms for adapting the throttle valve. Let's consider an example of adaptation on the popular Chevrolet Lacetti car. So, the adaptation algorithm will be as follows:
- turn on the ignition for 5 seconds;
- turn off the ignition for 10 seconds;
- turn on the ignition for 5 seconds;
- start the engine in neutral (manual transmission) or Park (automatic transmission);
- warm up to 85 degrees Celsius (without accelerating);
- turn on the air conditioner for 10 seconds (if available);
- turn off the air conditioner for 10 seconds (if equipped);
- for automatic transmission: use the parking brake, press the brake pedal and move the automatic transmission to position D (drive);
- turn on the air conditioner for 10 seconds (if equipped);
- turn off the air conditioner for 10 seconds (if equipped);
- turn off the ignition.
On other machines, the manipulations will be similar and will not take much time and effort.
How to determine air leaks
Depressurization of the system, that is, the occurrence of air leaks, can lead to incorrect operation of the engine. In order to find the locations of the indicated leaks, you must perform the following steps:
- Use diesel fuel to flush the injector installation areas.
- With the engine running, disconnect the mass air flow sensor (MAF) from the air filter housing and cover it with your hand or other object. After this, the corrugation should shrink a little in volume. If there is no choke, the engine will begin to “sneeze” and eventually stall. If this does not happen, there is an air leak in the system, and additional diagnostics are needed.
- You can try closing the throttle valve by hand. If there is no suction, the engine will begin to choke and stall. If it continues to work normally, there is an air leak.
Some car owners pump excess air pressure into the intake tract with a value of up to 1.5 atmospheres. Next, using a soap solution, you can find places where the system is depressurized.
Correction of a factory miscalculation
It is quite common for a throttle assembly to come out of the factory with something that cannot even be called a defect, but can still be attributed to design errors. In theory, air should flow into the space behind the throttle, for which a channel of approximately 2.5 mm is specially made.
But the whole problem is that this channel was pressed against the wall of the receiver, thus blocking the possibility of air flow. A slight modification of the throttle assembly can help in this case.
Bored channel for air flow in the throttle
To do this, just take a file and use it to make a small groove in the indicated place. 2 - 3 mm will be enough. But before doing this, it is necessary to remove the throttle.
On a VAZ 2110, the throttle assembly is removed in the following sequence:
- Disconnect the connectors of the sensor that regulates the position of the throttle valve, its drive cable and the XX regulator;
- We partially drain the coolant;
- Next is the removal of the air hose located on the body of the mass air flow sensor. Why do you just need to loosen the clamp;
- We also loosen the clamps: where the throttle pipe is attached to the air hose; where the hose of the 2nd crankcase exhaust circuit is attached to the cylinder head cover pipe. We remove the connected hoses - the air and 2nd crankcase ventilation circuits;
- Having loosened the clamp, remove the hose of the 1st crankcase gas exhaust circuit from the throttle assembly fitting;
- Having loosened the clamps, we remove the hoses supplying and discharging coolant;
- You will need a wrench with a 13mm head, with which you need to unscrew the nuts securing the throttle assembly to the receiver on a VAZ 2110;
- It is now possible to remove the throttle assembly from the studs;
- It remains to remove the sealing gasket and, if your VAZ 2110 has a system that traps gasoline vapors, disconnect the hose for purging the adsorber.
Even if the purpose of removing the throttle was to modify it, still do not forget that for stable operation it also needs periodic cleaning
There is, frankly, nothing complicated in this procedure, but it will help the engine perform better, which is quite important
For cleaning you will need:
- short and long screwdrivers;
- toothbrush (soft, or just old);
- cotton buds;
- cleaning agent;
- rubber or cotton gloves.
For cleaning to give the desired result, it must be carried out very carefully. First, you can go through all the cavities with a toothbrush, at the same time cleaning the idle speed control (it must also be removed). Further, more delicate, cleaning is done with cotton swabs
Pay special attention to the area where the throttle valve is located and the place where the XX regulator fits.
Please note that cleaning the crankcase ventilation duct with conventional means is not possible, but it can be easily done using the foot pump available in each trunk. The diameter of the fitting is similar to the wheel one, you just need to add cleaning agent and pump your foot several times.
If you have problems mentioned at the beginning that started recently, cleaning should fix them. If there were problems from the beginning, do not forget about improvements. Sometimes only replacing the throttle assembly helps.
Prevention of use
The throttle valve itself is designed for the entire life of the vehicle, that is, it does not have a replacement frequency. Therefore, it is replaced when the unit fails due to mechanical failure, failure of the entire engine, or other critical reasons. More often than not, the throttle position sensor mentioned above fails. Accordingly, it must be replaced.
For normal engine operation, the throttle valve must be periodically cleaned and reconfigured. This can be done either when the above signs of breakdown appear, or simply periodically so as not to bring it to such a state. Depending on the quality of the fuel used and the operating conditions of the vehicle, it is recommended to clean the throttle valve when changing the engine oil, that is, every 15...20 thousand kilometers.
Source
DPKV
This sensor tells the ECU the current position of the crankshaft. It is inductive, that is, when the above node rotates, it produces certain impulses, the frequency of which allows the computer to make the necessary calculation. If the signal is lost, the power unit stops. That is, its malfunction will not even allow you to get to a car service center. Otherwise, it breaks very rarely.
In this situation, the ECU will show an error code - 0335. However, this does not always mean that it is the DPKV that has become unusable. Sometimes the same combination appears if the mass air flow sensor is not working properly.