The kingpin is a rod that forms a hinged connection between the steering knuckle and the ball joint of the steering knuckle of the front axle of all-wheel drive UAZ vehicles. Kingpins are part of a mechanism that allows the steered wheels to deflect without losing the flow of torque.
UAZ pivots perform the following functions:
- act as axes around which the steering knuckle can swing;
- act as connecting components that combine the steering knuckle and ball joint into a single system;
- take on the role of a load-bearing component that provides rigidity to the pivot assembly, as well as receiving moments of force from the steering knuckle and transmitting them to the bridge beam while the vehicle is moving.
Types of king pins for UAZ cars
Various types of kingpins were installed on UAZ cars over the years:
- T-shaped cylindrical with rotation in a bronze (plastic) bushing (Timken type bridge);
- compound with rotation in a ball;
- compound bearings with rotation on a tapered bearing;
- cylindrical-conical with spherical support and rotation in a bronze spherical liner (Spicer type bridge).
Since the UAZ “Bukhanka” has been produced for many decades, during this time the types of king pins installed on the model have also changed. The classic solution for the UAZ-452 is a T-shaped kingpin with rotation in a bronze bushing. Modern UAZ-3741 are produced in modifications of Spicer-type axles and bearing pins. Therefore, in the future, attention will be paid to both types of “loaf” kingpins.
Pros and cons of kingpin on bearings
Tightening the UAZ Patriot pivots
Product advantages:
- Frequent adjustments or tightening are not required;
- if over-tightened, the wheel easily deviates to the sides;
- The kit includes parts for rebuilding the steering knuckle joint.
Read: how to tighten the king pin on a UAZ Patriot
The kit includes parts for rebuilding the hinge.
Disadvantages of the unit noted by car owners:
- the installation procedure is more labor-intensive (compared to standard elements);
- shock loads and vibrations destroy the rings and raceways of the tapered bearing;
- if moisture gets in, the support rusts and fails;
- in case of insufficient tension, accelerated wear of the rubbing surfaces occurs;
- If the bearing fails, the fist may become jammed.
Installation of UAZ "Loaves" pivot pins
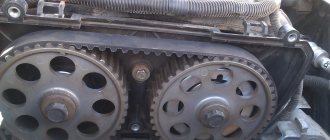
The design of T-shaped kingpins is a combination of two cylinders of different diameters, machined from a single blank. At the end of the upper cylinder of a larger diameter, two channels are machined for installing a locking pin and a grease nipple. At the end of the lower part of a smaller diameter, an annular channel is machined for lubricant distribution. The king pin also has a through channel for lubrication of the entire part.
The wide part of the pin is pressed into the steering knuckle body and secured with a steel plate; its rotation during movement is prevented by a pin. The narrow part of the king pin is installed in a bronze (plastic) bushing pressed into the ball joint. The size of the bushing allows for unhindered rotation of the king pin. Metal spacers are placed between the ball joint housing and the wide part of the kingpin to center the entire assembly.
The principle of operation of the T-shaped kingpin is as follows: when performing a maneuver, the steering knuckle deviates from the middle position, both kingpins rotate in bronze bushings pressed into the ball joint housings. During rotation, lubricant from the pin channel enters the ring-shaped groove of the lower part of the part and is distributed in the space between the bushing and the pin, which reduces friction of the parts and reduces their wear.
The design in the form of a kingpin with a bearing is quite complex. Such a kingpin consists of three parts: the lower half, onto which the tapered bearing is pressed, as well as the bearing race, which is pressed into the steering knuckle housing. The bearing race has channels: a central one for installing a grease fitting and a side one for installing a pin.
The kingpin design with tapered bearings provides increased resistance to axial loads. The operation of a king pin with bearings is simple: when the wheel is turned, both halves of the part rotate on the bearing, which can significantly reduce friction forces, and therefore reduce wear on the unit.
About syringing
This is the name for the procedure for lubrication of mechanism bushings. It is produced through grease nipples using a specialized syringe. A waterproof lubricant (for example, Litol-24) is placed inside the latter.
How often should the pins be injected? This procedure is performed every 20 thousand kilometers or once a year. This simple preventative measure will extend the life of the bushings and ensure easier steering rotation. This is noticeable already from the first meters of the road.
Selection of king pins
Formally, on both types of bridges found on the UAZ “Bukhanki”, any type of king pins can be installed, including composite or cylindrical-conical ones. However, the main choice is between T-shaped and bearing king pins. The final decision depends primarily on the operating conditions. The bearing pin provides better controllability, vehicle stability to axial loads, does not require frequent checking and tightening, and has a long service life.
However, if the “loaf” has to be used in off-road conditions, then it is better to stick with time-tested T-shaped kingpins. This design is more reliable and resistant to adverse conditions, is not afraid of water ingress, is easier to install and does not require additional manipulations during installation.
Varieties suitable for Patriot
For an SUV, there are three main types of kingpin joints:
- The factory version is a spherical support with plastic liners. The manufacturer produces UAZ with lightweight and cheap components, guaranteeing the reliability of the suspension under moderate operating conditions. Requires periodic adjustment of the gaps; repairs are made as the liners wear out.
- Reinforced hinges with bronze liners are a modification for those who like to “wiggle” on potholes and gullies. They are produced in the form of a repair kit by small manufacturers of automobile spare parts (Vaxoil, Niagara, Avtogidraulika, Factor, Sollers, IP Kuznetsov, etc.), and are intended for heavy road loads. Experienced jeepers are immediately eager to change plastic to bronze so that there are no problems with king pins on country trips.
- The bearing pivot unit is a recent variety that is gaining increasing popularity among UAZ owners. It does not require constant adjustment, and with high-quality components and proper replacement, they are quite durable. The disadvantages are the complexity of installation and the impossibility of field repair.
Replacement of kingpins on a Patriot is carried out in case of play in the front suspension or as a preventive measure before a difficult trip. One of the results of installing a bearing mechanism is a noticeable improvement in the controllability of the machine. Altai manufacturer Vaxoil offers a king pin with a specified caster angle of +5 or +8, which also makes driving easier.
The main stages of replacing king pins on a UAZ Patriot
Let's consider only individual operations related specifically to replacing the pivot assembly with your own hands. The remaining preliminary procedures are quite clear and do not require careful analysis.
- it is necessary to unscrew the tie rod fastenings to the steering knuckle and release the axle shaft from the hub;
- unscrew the bolts securing the king pins using a special nozzle
Unscrew the fastening nut
unscrew the fastening nut. This special key is usually included in the delivery of new Vaxoil kingpins or sold separately;
the rotary mechanism ball seal is removed and the fist and ball joint are pulled out; old grease is cleaned out, used gaskets are replaced with new ones, threaded connections and fastening hardware are inspected. Worn nuts and bolts should be replaced as necessary to ensure their reliable performance in the future; Replacing a plastic liner with a bronze one is simple - the old one is removed, the new one is installed in its place; when installing the bearing pin, the old spherical cups are cut off, the surface of the stock is cleaned, and new bushings are fixed by welding, which must be perfectly aligned to avoid distortions;
Additional recommendations
The installed kingpins on bronze liners require subsequent adjustment after 500 km of gentle running-in due to natural shrinkage. The manufacturer Vaxoil-service gives its kit a three-year guarantee or 100 thousand kilometers with high-quality installation. Other manufacturers make similar commitments.
Bearing units are less demanding in terms of subsequent maintenance. The reliability of their operation is verified during the first thousand kilometers.
UAZ Patriot is a car that requires constant attention from the owner. Be careful and courteous with your iron friend!
Dismantling
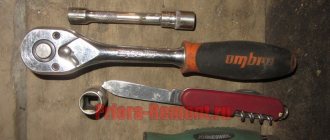
To dismantle the old kingpin and install a new one, you will need the following tools and materials:
- repair kit for the kingpin assembly with a special key for unscrewing and tightening the adjusting nut of the kingpin;
- gaskets for the flange of the hub assembly (2 pieces);
- lubricant for highly loaded components;
- a pair of jacks, wheel chocks and a safety car stand or lift;
- wheel wrench;
- installation;
- set of open-end wrenches;
- set of flange heads;
- a ruler or, preferably, a caliper;
- hammer and screwdriver;
- grease gun
Before installing the kingpin, it is necessary to dismantle the old part. Ideally, it is better to do all manipulations on a lift, since working under a car suspended on jacks is dangerous.
To dismantle it is necessary to perform the following steps.
- Raise the front axle to gain access to the front axle.
- Drain the transmission oil from the axle.
- Remove the brake shield, pads and caliper, cross-bar nut and steering wheel end. It is also necessary to unscrew the oil nipple.
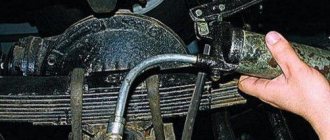
- To dismantle the old kingpin, you need to unscrew the five bolts securing the steering knuckle to the axle housing with a 14 (13) wrench.
- You need to insert a screwdriver into the hole between the flanges and move the flanges apart (to insert, you can hammer the screwdriver in).
- Next, you need to pull out the swivel assembly along with the axle shaft and place it vertically. You can use the removed wheel as a stand, or tighten the swivel assembly in a bench vise.
Next, you need to proceed to the direct dismantling of the kingpin from the rotary assembly.
- Using a 24mm wrench, you need to unscrew the nut securing the king pin and remove the trim. The mounting hole must be cleaned of dirt and dust.
- Using a caliper, measure the distance from the top edge of the threaded part to the adjusting nut. The indicator needs to be written down - it will be useful when installing a new king pin later.
- Using the special wrench included in the repair kit, you need to unscrew the clamping sleeve. If the nut does not budge, then you need to tap the free end of the kingpin with a hammer or treat the fastening area with a special aerosol.
- Next, you need to unscrew the nuts on the front knuckle oil seal and remove it, separating the CV joint.
- Then you need to remove the used kingpins, remove the remaining liners with a screwdriver and spray the seats of the liners with an aerosol, cleaning them from dirt and rust.
Preparing for painting
The surface of the machine must be prepared. It must be smooth, sanded for painting, clean, and free of grease.
If necessary, you need to putty all the uneven areas, sand them and prime them. Coloring them will not hide them, but will only emphasize them.
Soil can also be used from spray cans. It is applied in 2-3 layers. This is a one-component primer (without a hardener) and takes quite a long time to dry. After the solvent evaporates, a fairly thin layer remains, so it is not able to fill large scratches. The part for such a primer is prepared with abrasive P180 - P220. When applying several layers, drying time between them is required for about 10 minutes. The dried primer and old coating are prepared with P600-P800 sanding paper. All adjacent elements of the machine that are not subject to painting are covered with camouflage materials.
Installation of king pins
The sequence of installing new kingpins on the “loaf” is as follows.
- The liners are installed on the seat so that the antennae of the liners and the grooves in the seat coincide.
- To force the liner into place, you can place an old king pin on top and give it a few light blows with a hammer.
- The new kingpins are inserted into place and secured with an adjusting nut. The distance to which the nut is tightened must completely coincide with the values previously measured using a caliper.
- Then you should proceed to adjusting the position of the kingpin. It is very important, since the kingpin is a unit not only for the chassis, but also for the steering of the car. The adjustment is made using a caliper; they need to measure the distance from the edge of the casting, where the kingpin is screwed, to the spherical surface of the steering knuckle; the distance is similarly measured on the other side - from the kingpin to the spherical surface. The distance on both sides of the fist should be the same. If the values differ, the distance is adjusted by tightening the adjusting nut on one side or loosening the nut on the other.
- After adjusting the nuts, tighten them all the way and then loosen them 1/6 of a turn.
- Next, grease nipples are screwed in, into which grease is poured using a grease gun. It is necessary to pour in until the lubricant begins to come out of the cracks.
The rotary assembly is assembled in the reverse order. The rotary unit with the axle shaft is installed on the axle housing, the CV joint is mounted, the steering tip, transverse steering nut, brake caliper, pads and brake shield are installed. Then the wheel is installed.
Is it possible to change the mechanism without disassembling?
The answer is yes. Below we consider the process of replacing kingpins on UAZ 469, 3115, 3163, 3160, 2206, 7203, etc. To replace the kingpin without disassembling, the car must be placed in an inspection hole. Loosen the wheel bolts and jack up the car. Hang up the SUV, drain the oil and remove the caliper and brake shield so that they do not interfere. Further:
- Screw the M10 bolt into the kingpin. This will help pull out the cap and remove the component. If all else fails, take a metal plate 4-5 mm thick and drill a hole in it for an M10 bolt;
- Let's make a second try. But now we insert the bolt through the plate. Place several nuts under it and tighten;
- The kingpin should appear outward;
- Next you need to press out the bushing and remove the washer.
To press it out, you will have to “spoil” the lock with a sharpened nail. Slide it under the bushing and press it in a circle. If things go wrong, use pliers. After removal, clean and degrease the inside of the bushing.
LITOL 24 is used as a lubricant. Now you need to install a new unit. He hammers it in. To avoid damage, use a wooden spacer. The pressing is not done completely to avoid distortions, otherwise the part will go tight and you will hear a characteristic sound. In this case, you will have to repeat everything again. Adjustments are made using shims 0.5 mm thick. For a kingpin bearing, initially install 5 shims, for an assembly with bronze liners - 4. Tighten the bolts and go for a test ride. If the wheel gets hot, loosen the kingpin by reducing the number of shims.
If you have any questions, leave them in the comments below the article. We or our visitors will be happy to answer them
Adjustment
After installation, it is necessary to check the tightening torques of the adjusting nuts of the king pins. The suspended wheel must be swung in a horizontal plane. If you feel beating, you need to tighten the adjusting nuts. Both nuts must be tightened simultaneously by the same number of turns.
Next, you need to check the wheel in the mode in which it operates when turning. If the rotation of the wheel in the horizontal plane is carried out with little effort, then the adjustment of the installed king pins has been carried out correctly. If rotation is difficult, then the nuts are overtightened. The overtightened adjusting nuts are also loosened synchronously by an equal number of turns.
After adjusting the kingpins, it is necessary to install the transverse link. Then you can remove the car from the lift or remove the safety stands.
Lubrication and adjustment of the installed kingpins should be repeated after 500-600 kilometers. It is also better to repeat the procedure after driving on severe off-road conditions, during which the vehicle’s chassis operates in enhanced modes.
Don't make mistakes
The maximum effect from such painting can be obtained only if the intensity and scale of each detail of the picture are correctly selected, the nature of which is determined depending on the specific machine. Do-it-yourself spray painting of a car (VAZ, for example) will not look the same as on a BMW or any other foreign car. There is simply no universal solution here. You need to independently design a drawing that can highlight the character of the car and the owner. But this does not mean that in the absence of universal solutions one should forget about the rules. There are a certain number of nuances that everyone should know.
It is mandatory to use colors with shades of green, sand or brown. In any other case, the concept will be violated and the car will lose its warlike appearance.
Painting a car yourself with a khaki spray can means stains. The dimensions and contours of each of them are set manually, always taking into account the features of the body parts on which they will be applied. The uniqueness of the car will also increase - it will look very impressive if every spot is original.
How to determine the country of manufacture by VIN code?
Many car owners do not know that a car’s VN code can reveal many interesting things, including the country of origin of the vehicle.
Below we will consider two options.
For Skoda Felicia. To determine the country of origin of the car, you need to look at the 11th character of the code:
- The assembly line in Mladá Boleslav is 0-4.
- Kvasins - 5.
- Vrchlabi - 7-8.
- Kvassins - 9.
- Ukraine - V.
- Russia (Kaluga) - K.
- Mlada Boleslav - N.
- Poznan (Poland) - X.
Next comes the vehicle serial number (six digits).
See below for a complete description of the VIN code.
For Skoda Octavia the situation is as follows. From the first group, consisting of three characters, you can determine the manufacturer's code.
So, T - Europe, M - Czech Republic and B - Skoda Auto.
Next, as in the previous case, we are interested in the 11th character of the VIN code. Here the situation is as follows:
- Mlada Boleslav - from 0 to 4.
- Kvasins - 5.
- Verkhlabie -7, and since 1999 - 8.
- Sarajevo - 9 (since 2002).
- Poznan - X.
Next comes the car's serial number.
See the full decoding of the Skoda Octavia VIN code below.
For example, let's decipher the VIN code TMBBK41Z2BB151503.
How to remove old hinges
Regardless of the type of hinge, the basic dismantling operations are the same. To replace or adjust the kingpins, you will need a level area. In addition, you will need:
- jack and safety stand;
- a set of socket and open-end wrenches;
- Screwdriver Set;
- set of sockets and ratchet;
- torque wrench;
- a powerful wrench and extension made from a piece of pipe;
- clean rags;
- wheel chocks;
- low stool;
- assistant or assistant.
It is important! If you are going to change or adjust the king pin, you should carefully read the safety rules and always follow them:
- never leave the car on a jack, always use a safety stand, which is sold in any car store, or a wide, flat block of wood;
- Be sure to support the wheels with wheel chocks;
- never carry out any work under the car alone - if something goes wrong, an assistant will be able to call for help or help you independently;
- do not drink alcohol, do not use narcotic or psychotropic substances before repairing your car.
Step by step guide
We have divided the entire process into separate operations that must be performed sequentially. This will help not only in disassembling the steering knuckle, but also in reassembling it after installing new or adjusting old hinges:
- Place the car on a level surface and apply the handbrake.
- Support the rear wheels with wheel chocks, then loosen the front wheel bolts and jack up that side.
- Place a safety stand under the car and remove the wheel.
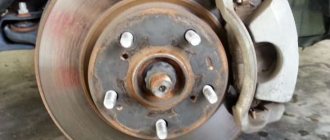
- Unscrew the two bolts and remove the plate holding the pads, then pull out the pads.
- Unscrew the two bolts and remove the caliper bracket.
- Unscrew the two bolts, then remove and hang the brake caliper so that the hose is not strained or pinched.
- Unscrew the screws securing the brake disc and carefully hitting the back side with a piece of wood, knock it off the hub.
- Unscrew and unscrew the steering tip nut and remove the pin using a puller.
Removing ball joints
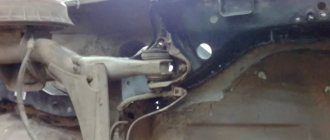
Unscrew the grease fitting or the bolt installed in its place and the 4 nuts securing the bipod to the steering knuckle. Using a hammer, lightly tap the bipod in the area of your fist to move it out of place. Remove the 4 cone washers, then remove the bipod and the shims underneath it. To remove the hinge parts, you will need a special puller, which can be made from a U-shaped profile 5 mm thick. The profile width is slightly larger than the diameter of the outer part of the kingpin. In the center of the puller, drill a hole whose diameter is 1–2 mm larger than the diameter of the hole for the grease fitting. Then take a 5-7 cm long bolt with a suitable thread and nut.
Screw a nut onto the bolt, then place the puller over the outer part of the hinge and screw the bolt into the plug through it until it stops. Tighten the nut until the bolt is completely pulled out of the outer part. If there is no such puller, you can try to pull out the hinge by screwing a bolt with large washers into it and squeezing the washers out with two pry bars, but this method is less effective. Then remove the ball and pull the ball joint out of the steering knuckle, then pull out the inner part of the joint in the same way. Thoroughly clean the places where the pins are installed to remove any remaining old grease.
Dismantling other types of hinges
The remaining types of kingpins are removed in the same way:
- Unscrew the upper kingpin nut, then hit the kingpin pin through a soft metal spacer to make it easier to unscrew the clamping sleeve.
- Using a special key (it is found in many sets of new king pins, and can also be bought at any auto store), unscrew the clamping sleeve.
- They pull out the finger.
- Unscrew the bolts of the rear plate of the steering knuckle and pull out the ball joint.
- Use a screwdriver to pry up and pull out the bearing shell or plastic/bronze cup.
- Thoroughly clean the liner and pin areas of old grease.
Installation of new kingpins
New ball joints are pressed in using a puller for replacing cylinder head guide bushings or a puller for replacing wheel bearings. You can use other pullers that will ensure that the upper and lower parts of the joint are fed strictly parallel to the channel in the ball joint and steering knuckle. Having installed the king pin in the ball joint, fill the space under the ball with Litol or a higher quality lubricant.
The rest of the hinges are installed like this:
- Insert new cups or liners into the ball joint, aligning the protrusions on them with the slots in the support, then slightly recess them by inserting the pivot pin into them and lightly hitting it with a hammer (it is advisable to use a spacer made of soft metal so as not to damage the threads).
- Fill the liner with lubricant.
- Insert the ball joint into the steering knuckle.
- The upper and lower fingers are inserted.
- Tighten the clamping bushings evenly on both sides. Tightening torque 70–100 Nm. After tightening the bushings, the ball joint should rotate with a force of 10–15 Nm.
It is important! Regardless of the type of joint, when installing and tightening, it is necessary to ensure the same distance from the ball joint to the steering knuckle at the top and bottom. Measure the gap using a caliper. The maximum gap difference is 0.2 mm.
Having installed the kingpin and secured the ball joint in the steering knuckle, lubricate the surface of the support with Litol or a better lubricant and install the oil seal, securing it with a metal ring and bolts. Then reassemble everything in the reverse order to what was used during disassembly. Don't forget to adjust the camber and toe.
Required Tools
Before starting repair work, the car is thoroughly washed to remove dirt, because... the ingress of dust and small debris into moving mechanisms or lubricant will lead to rapid wear of the installed parts.
To tighten the kingpins on a UAZ Patriot you will need the following tools:
- standard set of special linings;
- set of open-end wrenches;
- heads of different diameters;
- hammer;
- jack – 2 pcs;
- torque wrench;
- a wrench with an attachment for adjusting the pivot units.
A set of keys.
A special key can be found in repair kits for kingpins and bearings. If it is not there, you will have to buy it separately. A kingpin wrench is similar to a splined pad with lugs that fit into slots on a lug nut. To ensure accurate tightening, use a torque wrench.