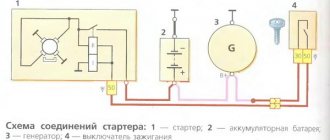
Regulator device
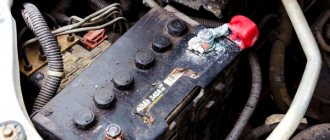
The main source of current in a car is the battery. Consumers are powered from it: lighting and alarm devices, electronic devices, air conditioning and others.
While the car is moving, the battery is charged from the generator if it is working properly. Otherwise, the battery will quickly discharge, and deep discharge will lead to failure of the device.
The number of volts produced by the generator is highly dependent on the engine speed. At low speeds it is lower, and at high speeds it can reach an unacceptable value. Normal voltage is 13.4 V. The regulator maintains it within specified limits.
Replacing the voltage regulator on a Priora
How to repair a voltage regulator? On modern cars - no way. It is simply irreparable and a failed part is simply replaced with a new one. Theoretically, even an electronic non-contact voltage regulator can be repaired - but few people do this - there is no point.
So, how is the voltage regulator replaced on a Priora? First, you should turn off the ignition and disconnect the negative terminal from the battery for reasons of electrical equipment and your safety.
Be careful not to mix up the wires going to the voltage regulator of the Priora generator - otherwise you can ruin both the relay-regulator and the generator itself.
On a Lada Priora car, the voltage regulator is installed separately from the generator. To remove the relay-regulator, you need to unscrew the nuts that secure the device to the body. Before this, you need to mark with electrical tape, tape or a marker the relative positions of the wires leading to the contacts of the regulator, and the contacts themselves.
Now you can install a new voltage regulator on the Priora to replace the old one. It is imperative to check the contacts where the relay-regulator is connected to the generator, as well as the tension of the generator belt. That's it, connect the battery, tighten the terminals and check the operation. And, of course, we make sure that on the Lada Priora the on-board voltage does not jump, but is even.
If the relay-regulator is installed in the same housing with the generator, then the algorithm is slightly different. After removing the negative terminal from the battery, disconnect the wires going to the generator (there is no need to remove it itself).
We open the plugs or unscrew the fastenings of the relay-regulator, depending on the design of the unit. We remove the plastic casing of the generator and find the relay regulator. We unscrew the fastening nuts and disconnect the screw fastening to the tire. Let's extract it. All that remains is to install a new relay-regulator - we perform this procedure in the reverse order of removal.
To check the operation of a new device, in this case, you need to fully charge the battery, connect it as expected, and start the engine at about 2500-3000 rpm. Using a universal tester or a special voltmeter, you need to measure the voltage at the battery terminals.
If you replaced the relay regulator correctly, the number on the display will be equal to that indicated in the vehicle’s operating instructions. If not, the relay regulator should be replaced again. It is forbidden to check the serviceability of the relay-regulator by short-circuiting its terminals - this can lead to the “death” of the rectifier unit.
Checking with a tester
The easiest way to check the generator voltage regulator with a multimeter on the Priora is to measure the voltage on the battery.
To do this, you need to perform the following sequence of actions:
- set the multimeter to measure DC voltage with a limit of at least 20 V;
- start the engine;
- at idle speed (1000-1500 rpm) the tester should show 13.2-14 V;
- when the number of revolutions increases to 2000-2500, the voltage should increase to 14.2 V;
- at maximum speed the tester should show no more than 14.5 V.
If the voltage differs greatly from the specified one, drops below 13.5 V or rises above 14.5 V, we can conclude that the unit is faulty.
We assemble a simple circuit: connect the light bulb to the brushes, the negative terminal of the power source to the ground terminal, the positive terminal to terminal “B” of the regulator. When 12.7 V is supplied, the light should light. When raised to 14-14.5 V, the control should go out. If the light goes out earlier or does not go out at all, the control device is faulty.
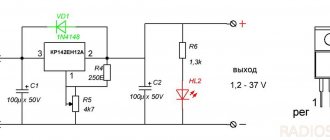
Scheme for Priora
The amount of electrical voltage generated by the generator depends on two physical characteristics: the speed of rotation of the rotor and the magnitude of the magnetic field created by the stator. The regulator changes the second value.
In older designs, a resistance was connected in series with the stator winding. The main disadvantage of this method is the additional load on the on-board network.
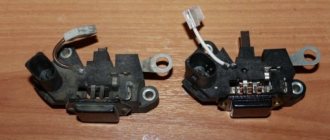
Generator relay. Photo source: https://avtoarsenal54.ru/raznoe/generator-ot-kaliny-na-prioru.html
The Priora 115A generator voltage regulator relay periodically cuts off the current supply to the generator excitation winding. The higher the engine speed, the more often the shutdown occurs, and the amount of generated voltage decreases.
Main symptoms of a malfunction
There are two main “symptoms” of a relay failure. This is an undercharge or overcharge of the battery. Also, a malfunction of a part can be determined by the dim glow of the headlights or by a change in their brightness when the engine speed increases.
If undercharged, the car will start with great difficulty. However, the manifestation of this “symptom” may not be related to the generator. Therefore, first of all, you should make sure that the battery is in good condition.
If the battery is overcharged, there is no doubt that the problem lies precisely in the damaged relay. There are other possible causes of overcharging, but they are extremely rare. Overcharging may cause the battery to boil over. This can be determined by the decrease in the amount of electrolyte in the jars and the appearance of a white coating on the battery.
If you suspect that the battery is overcharged or undercharged, you should diagnose the generator.
Selection of components
The original generator, installed on a car with a 16-valve engine at the factory, is marked with article number 5102.377. Its cost, as a rule, fluctuates around six to seven thousand.
Carefully check the generator itself and its packaging before purchasing so as not to encounter a counterfeit. It is important that the part is free of unevenness, chips and paint runs, as well as extraneous markings.
To avoid overpayments, you can purchase a similar original spare part. The following devices are suitable for installation on Lada Priora:
- VAZ (power 120/115a);
- KZATE (115a);
- BATE (90a);
- BOSCH (120a).
The price of analogues can be either higher or lower than that of the original. As a rule, it is in the region of 3500-6000 rubles. We choose a generator device with a large power reserve so that it lasts longer.
Keep in mind that installing less powerful generators is unacceptable, especially if you connect several different devices to the vehicle’s on-board network (when connecting a large number of electronics, it is generally recommended to increase the current). Before purchasing, we carefully check for damage to the case and the integrity of the unit.
Types of devices on Priora
The regulator installed on the Priora does not cope with its functions at peak loads. If the car has an air conditioner, then in the summer the electrical voltage often sags and the battery does not charge. Therefore, many drivers decide to replace the standard device.
Three-level
A replacement option is to install a three-level voltage regulator on the BATE Priora generator. The device allows you to select one of three operating modes:
- The minimum one, which provides a generator voltage of 13.4 V, like the standard one. The mode is suitable for the warm season.
- The second mode allows you to output 14.3 V and is used in cases where conventional electrical voltage is not enough.
- The maximum mode is suitable for use in winter. It allows the generator to produce 14.8 V.
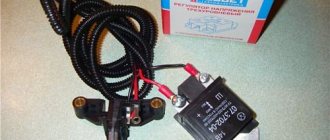
For the BATE 90 A generator installed on the Priora, a three-level regulator is available that can replace the standard one without additional alteration or adjustment.
Remote
Installing a three-level regulator in its original location is not always effective. It is located in close proximity to the engine and gets very hot, which affects performance.
This problem can be solved by installing an external voltage regulator for the Priora generator. This is a three-level device, in which, unlike the standard one, the brush and working units are made separately and connected by conductors.
The brush block is installed in its usual place, and the regulator is fixed in any convenient accessible place to the vehicle's ground.
Thermally optimized
Any regulator lowers the charging voltage as the temperature rises. This is necessary to prevent the electrolyte from boiling in the battery. But the trouble is that the unit and the battery are located in different places under the hood. The device gets very hot and reduces the voltage, regardless of the temperature of the battery.
Replacing the voltage regulator on a Priora. Photo source: https://www.drive2.com/l/9306556/
The thermally optimized model does not have this drawback. It includes a temperature sensor, which is installed on the positive terminal of the battery. It maintains the required charging voltage depending on the temperature of the electrolyte, and not the unit itself.
What signs will indicate that the generator brushes are faulty?
The following external signs will help you understand that the generator brushes have become unusable on a Priora with power steering or air conditioning:
- length of the element being inspected;
- if upon inspection it is discovered that the length of the brushes is less than 5 mm, they must be replaced;
- Replacement also be required if the appearance of the brushes indicates uneven wear, that is, one element is heavily worn out, and the second is brand new. Uneven wear of these elements will certainly negatively affect the operation of the generator, so experts recommend replacing them without fail.
The cost of new components for the Priora does not exceed 150 rubles; of course, you can also find cheaper brushes for the generator, but it is unlikely that such elements will serve faithfully for a long period of time, and such savings will lead to a repeated procedure for replacing these components.
Standard generator on Priora - article number and price, where it is
The installation location may vary for different car brands and models. You should look for it in the engine compartment, near the rubber cushion on which the engine is mounted. 90A article 3282.3771, is a source of energy in the electronic equipment system of 2170-72 Priora cars.
Generator for Priora produced by BATE price from 4120 rubles
- Weight 5.5 kg
- LxHxW 200x170x200 mm
- Rectified current 90 A
- Power 0.98 kW
- Voltage 14 V 100 A
It has article number 5132.3771 and is a source of energy in the electronic equipment system of 2170-72 Priora cars.
Generator for Lada Priora with air conditioning manufactured by Pramo price from 4200 rub.
- Maximum rectifier current 100 A
- Weight 5.3 kg
- Voltage 14 V
- Power 233 W/kg
- Internal cooling
- Stator diameter 125 mm
- 115 A
It has article number 9402.3701-14 and is a source of energy in the electronic equipment system of 2170-72 Priora cars.
Article number - 2170-3701010-10 has a KZATE generator for the Lada Priora car, its price starts from 5300 rubles, and Bosch - 2170 3701010 13
Device manufactured by LKD - price from 4400 RUR
- Maximum rectifier current 115 A
- Weight 5.2 kg
- Nominal voltage 14 V
- Power 1610 W
- Stator diameter 125 mm
- Length 188 mm
- 115 A
It has article number 9402-14 and is a source of energy in the electronic equipment system of 2170-72 Priora cars.
120 A Has article number 9402-3701-14P, is a source of energy in the electronic equipment system of 2170-72 Priora cars.
- Maximum rectifier current 120 A
- Weight 6 kg
- Nominal voltage 14 V
Manufacturer ATE-1 cost from 4000 rub.
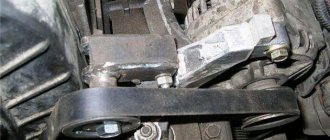
The generator tension roller 2170 serves to tension the belt. One of the important tips for beginners: if you unscrew any bolt when changing a part, lubricate it with graphite grease, this will greatly facilitate repairs in the future.
What was the result?
Of course, it is impossible to say unequivocally that the factory generator is very bad. It fails only in the case of active use, for example, music, headlights and air conditioning. The 3-level pH is suitable for precisely such motorists. After installing this device, you can select 3 modes:
- 13.4 V – like a standard generator;
- 14.3 V – medium mode;
- 14.8 V – suitable for use in the cold season.
It is also worth noting that although the three-level regulator is much better, it is not an ideal replacement for the factory one. The fact is that both the first and second LVs have one significant drawback - they cannot regulate the voltage depending on the ambient temperature.
Do not forget that a new voltage regulator must be looked for solely by the markings of the old one. For example, for marking 4302.3771, TRN with mark 67.3702-02 is suitable.
Checking the work
How to use modes:
- Switch position “min” - for operation at high ambient temperatures (above 20ºС), as well as during operation in particularly difficult conditions (traffic in traffic jams, long climbs in the mountains, etc.);
- The middle position of the switch is for operation at ambient temperatures from 0ºС to 20ºС;
- The “max” switch position is for operation at low ambient temperatures (below 0ºC), as well as for recharging a discharged battery.
Average load (PTF, dimensions, music and heater fan at first speed)
:
Maximum load, maximum number of consumers activated
:
Will you be installing a three-level voltage regulator on your car? Take part in the survey and leave your feedback in the comments.
Let us remind you that another reason for low voltage on the on-board network may be a bad ground.
How to change the device without removing the generator
Replacing the voltage regulator on a Priora can be done without removing the generator.
Difficulties may arise due to poor access to the generator on cars with air conditioning. It is necessary to remove the air filter and the fastenings of the air conditioning pipes, you can also dismantle the right headlight.
Replacement sequence:
- remove the negative terminal of the battery;
- disconnect the main positive terminal of the generator;
- remove the generator cover by unscrewing 3 bolts;
- unscrew the 2 mounting screws and remove the regulator.
We install the new device by performing the operations in reverse order.
Advantages of using a three-level relay and features of its installation
In practice, three-level regulators designed for the 9th and older VAZ models have become widespread. This is due to the fact that replacing the standard relay with a three-level one provides the following advantages:
- stabilization of alarm operation in severe frosts;
- increasing the brightness of headlights and interior lighting lamps;
- a sharp increase in the efficiency of the heater;
- increasing the speed of power windows.
Kits for VAZ “ten” and 14th models are quite common; there are also devices for “Volga” and “Gazelle”. Their use on these vehicles gives a similar effect.
A three-level relay-regulator is purchased in the form of a ready-to-install kit, which includes detailed illustrated instructions. The main elements of the kit are a contact group, a relay itself with a slide-type switch for selecting the stabilization voltage, and connecting wires.
Before starting replacement work, it is advisable to charge the battery and then disconnect its negative terminal.
The contact group of the new device is mounted directly on the seats of the previously dismantled old one; installation does not require the use of adapters and other auxiliary elements. The connecting wire is pulled through the generator cover (you may need to cut a hole in it to the required size), and the relay itself is attached to a free mounting stud with the terminals facing down. When installing, additionally check for reliable ground contact. After installing and assembling the generator, we check it.
No recharging of Lada Priora battery (VAZ 2170, 2171, 2172)
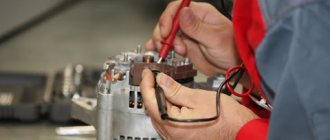
Checking electrical equipment
| 1. Check if the alternator drive belt is broken. If a break occurs, replace the belt and adjust its tension (see “Replacing the alternator belt”). |
| 2. If the belt is intact, check and, if necessary, adjust its tension (see “Generator belt tension”). |
| 3. If the belt tension is normal, check to see if fuse F1 in the fuse and relay mounting block has blown. The location of the fuses and their ratings are indicated in this manual (see “Electrical faults”), in the vehicle repair manual, in the electrical diagram, on the housing of the mounting block and on the fuses themselves. If the fuse is blown, replace it, start the engine and check to see if the low battery light goes out. If the light goes out, you can continue driving. |
5....to the starter...
| 4. If the battery discharge lamp does not go out, check the wires connected to the positive terminal of the battery... |
| 6. ...and to the generator. Wires may be broken, broken inside the insulation, or have oxidized or unreliable contacts. Correct the problem and start the engine. If charging current appears, you can continue driving. |
| If, after taking the measures, the charging lamp continues to light up while the engine is running, then the possible cause of the malfunction lies in the generator itself. There may be several reasons, and it is better to eliminate them in a car service center or garage, and you just have to hope that the energy reserve in the battery is enough to get to them. |
| Recommendation |
| In order to reduce current consumption when driving a car with a faulty generator, if possible, turn off the radio, unnecessary lights, heater fan, window defroster, etc. |
| You will need: flat-blade and Phillips-blade screwdrivers, a 12" wrench (two), a DC voltmeter, a megohmmeter. |
| 1. Remove the rubber boot and connect the “+” wire to the “B+” terminal of the generator, and the “–” wire to the generator housing. |
| 2. Start the engine and turn on the car's headlights. |
| 3. After 15 minutes of engine operation at medium speed, measure the voltage; it should be in the range of 14.4–15.1 V. If undercharging or overcharging is observed (the voltage does not fall within the specified limits), replace the voltage regulator. |
Description Identification numbers Keys Dashboard Instruments Trip computer Heating and ventilation Ventilation control Lock control Control of power windows Using seat belts Airbags Child seat Adjusting seats Adjusting the steering column Using mirrors How to shift gears What to carry Starting the engine Malfunctions when starting the engine Checking the ignition Checking the fuel supply Injection faults Lost idle If the engine runs unevenly Inspect the spark plugs Jerks while driving Does not accelerate Stalls while driving Loss of oil pressure Engine overheats No battery recharging Engine knocks Suspension knocks Gearbox knocks Causes of knocks and noises Steering wheel vibration Brake problems Replacing a wheel
priora-vaz.ru
What does it look like and where is it installed?
Now let's find out where the VAZ-2107 charging relay (carburetor) is located. Initially, this device was placed away from the generator on the arch under the hood (on the left side). On newer “sevens” equipped with an injection system, the voltage regulator was combined with a brush assembly.
The first voltage regulators were based on electromagnetic relays; they worked quite slowly and required constant intervention. The problem is that mechanical elements wear out very quickly. In addition, it was constantly necessary to adjust the gaps in the relay. Modern semiconductor devices operate silently, quickly, without electromagnetic relays. One silicon crystal can perform the functions of several mechanical relays.
( 2 ratings, average 4.5 out of 5 )