Replacing the brake pressure regulator
The replacement of the sorcerer on VAZ-2110 cars and other vehicles equipped with an RTD is carried out on an overpass. You need a 13 mm spanner, a powerful screwdriver and a special 10 mm wrench designed for unscrewing brake pipes. Before starting work, the assembly must be cleaned of dirt and rust, doused with WD-40 or another penetrating compound, and then wait half an hour.
Related article: Main signs of a malfunctioning throttle sensor
Work begins by unscrewing the bolt securing the bracket to the spring. Afterwards, the brake pipes are dismantled, the position of which is recommended to be pre-marked.
Be sure to read
Do-it-yourself tube flaring
You can also unscrew the tube fittings with a regular wrench. However, using a special tool makes the job easier and reduces the likelihood of “licking” the edges. After the fittings, unscrew the two bolts securing the sorcerer to the body and remove the part.
It is necessary to install the new VAZ-2110 sorcerer in strict reverse order. After installing it and before adjusting the RTD, you should bleed the rear brake circuits. Next, the above-described procedure for setting up the sorcerer is performed.
Examination
The operation of the VAZ-2109, 2110 and other AvtoVAZ models is checked on the move, in closed areas. To do this, accelerate the car to a speed of 40 km/h and sharply press the brake. The rear wheels should lock 1/2 second later than the front wheels.
The wheels are monitored by an assistant located outside the car. If wheel locking occurs noticeably later or does not occur at all, and also if the rear axle is locked simultaneously with the front, the sorcerer adjustment procedure is repeated.
To increase the response time of the rear brakes, the gap between the adjuster and the bracket is increased; to shorten it, it is reduced accordingly.
Device Description
The design and principle of operation of this element are quite simple. At the moment when the rear part of the car body rises and the distance between the axle and the body increases, a special lever is activated, which is connected in a “sorcerer”. This lever lowers the piston, which closes the brake fluid channel, and accordingly the pressure on the rear pads decreases. The wheels do not stop rotating and, accordingly, do not skid.
The idea itself is quite clever, but, as often happens, in practice it raises doubts. After all, if when braking the brake pedal is pressed with great force, then the front wheels go into skid and the car still begins to skid. Quite often, when observing a traffic accident, you will notice that the cars with the “sorcerer” are turned backwards. Is this related to this miracle detail, which in its essence should prevent this skidding?
Possible malfunctions of the regulator
In general, there are few malfunctions that can occur in the sorcerer. These include:
- Valve jamming;
- Misalignment of position;
- Brake fluid leaks.
A deregulated sorcerer can be adjusted. You can determine the need for adjustment by the behavior of the car when you press the brake. If the regulator is set incorrectly, the car starts to toss to the side.
If the valve jams or fluid leaks, the mechanism must be replaced. Theoretically, it can be repaired. However, the process of such repairs is complex and expensive, which makes it unprofitable.
How to tighten the handbrake on a Prior? The auto industry breaks down as always - Fix the Car!
If the handbrake on a VAZ-2112 becomes difficult to hold, then you should not change it immediately, since the cable can be adjusted. If the mileage on the car is high, the rear pads on the car may wear out. This may reduce the effectiveness of the handbrake and the entire braking system. In this case, the handbrake cable will need to be tightened.
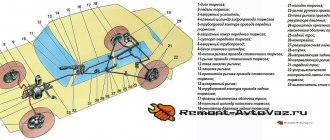
Handbrake diagram for VAZ-2112
For clarity, here is a diagram of a hand brake
1 - button that fixes the handbrake lever; 2 — hand brake lever; 3 — protective cover; 4 — handbrake rod; 5 — cable equalizer; 6 — adjusting nut; 7 - lock nut; 8 - cable; 9 — protective sheath of the cable.
In this scheme we need element number 6. It is he, and only him!
What is required for adjustment?
In order to adjust the handbrake you need a platform or lift. If there are no such devices, then you can simply hang the rear wheels on the “goats”. They can be installed under the car using a jack. It’s also worth taking two “13” keys and pliers.
Start:
- The car is installed on an overpass or “goats”. Hanging out your butt
- The lever position is set to the lowest possible position. We put the handbrake at the very bottom. Do not pay attention to the scuffs of the console; we conducted an experiment with non-standard armrests. The iron fastenings of the armrest are visible. The photo shows the editorial car
- Use a wrench to loosen the locknut. Adjusting nut
- The second wrench holds the adjusting nut.
- The adjusting nut should be tightened until the cable is tensioned. It must be remembered that the rod should be held with pliers when tensioning the cable. Tighten the adjusting nut
- After this, you should make sure that the full stroke of the handbrake lever is no more than 4 and no less than 2 clicks.
- When the stroke check is completed, the locknut is tightened. The adjustment is held with another key.
- If necessary, change the mechanism to a new one. Everything is rusty, we changed the adjustment mechanism
- After releasing the adjusted lever down, you should spin the rear wheels. When the lever is in its lowest position, the wheels should spin freely.
THIS IS INTERESTING: How to set the ignition of a VAZ 21099
If you cannot tighten the cable, then it should be replaced with a new one.
Adjusting the handbrake after tensioning
After adjusting the brakes, you need to check them again. To do this, the car should be placed on a road with a slope of at least 23%. The car should be in neutral gear in this area and with the handbrake pulled up. If the handbrake brakes hold the car in this area, then the handbrake is adjusted correctly.
What to do when adjustment does not work
There are also cases when the above actions are not enough to adjust the handbrake. This can happen, for example, when the handbrake cable is broken. This happens on the VAZ-2112, although rarely. In such situations, the cable must be replaced. The cable also needs to be replaced when:
- The tips are loose.
- The cable itself begins to stretch, which will lead to its breakage during operation. HAIKU! The old cable is very worn out! For comparison, old and new handbrake cables
- Physical wear (scuffs and cracks) of the handbrake cables. Heavy wear on the handbrake cable
- It is quite difficult for the cable to move in the casing even after lubrication.
This replacement procedure does not require contacting a service station. Although this will require some time and skills from the driver, such work can be done independently.
It should also be remembered that when replacing the cable, certain conditions must be observed. To do this, the driver will need an assistant who will pull the cable.
Why do you tighten the handbrake?
The cable acts here as a drive. If the driver pulls the handbrake lever, then at the same time he uses the cable, which spreads the pads in the rear wheel.
If the handbrake is faulty, you just need to tighten the cable or replace it with a new one. On a VAZ-2112 it’s quite easy to do this with your own hands.
Need for adjustment
You can determine that the parking brake needs adjustment when checking. It is recommended to do it every 30,000 kilometers. This procedure should be done even if the handbrake seems to be working well.
The device must also be checked in cases where it does not work. For example, a car moves when the brake lever is applied.
Replacing the sorcerer with a tee
It is no secret that the reliability of the brake force regulator leaves much to be desired, causes many complaints from car owners, and many dream of getting rid of it. The most risky and confident drivers install a tee. You see him in the picture. This device is simpler than the sorcerer, less likely to leak. However, the distribution of braking forces does not occur, and the braking of the rear and front wheels occurs simultaneously.
Pros and cons of installing a tee
| Pros of installing a tee | Disadvantages of installing a tee |
| The brakes become more rigid and at the same time obedient | In winter conditions, the risk of skidding increases if the rear wheels are locked with brake pads before the front ones. |
| Service life increases | Braking becomes dangerous, especially in winter |
| The cost of a tee is less, the prices of a sorcerer | If the front hose ruptures, which happens quite often when a tee is installed, the brakes completely fail. Even the parking brake is a poor help in this case. |
You, of course, can use this scheme and “upgrade” the brake system in your car, but it will be much safer to monitor the condition of this system and, in particular, the sorcerer, and carry out preventive cleaning of this device more often. Then it will last longer.
There is an opinion that the tee is installed not instead of the sorcerer, but after it, and then this device will protect the force regulator.
Setting up the brake force regulator: “The Sorcerer” carries the hero
Many people have heard that there is a “sorcerer” in the braking systems of VAZ cars, but not everyone knows about the importance of this device. We evaluate its impact on braking efficiency
“The sorcerer”, or, according to the catalogue, the pressure regulator in the brake drive, it was not for nothing that people received such an apt nickname: no one really knows how it works, but, they say, being faulty, it can present an unpleasant surprise - make the car dance in an emergency. braking.
This is where the insidiousness of the “sorcerer” lies: during normal operation, without braking to the floor, its work or inaction is practically not felt, but when its help is especially needed, it may not come.
The pistons have soured, the rod or drive lever has broken off, or you installed a new one instead of a faulty regulator, but for the time being you don’t know that the unit is defective or out of adjustment... How dangerous is this?
Let’s check in our experiment how “witchcraft” affects the effectiveness of the brakes at partial and full load of the Chevrolet Niva and Kalina and what the owner should be wary of if he does not monitor the condition of the regulator. We can simulate a malfunction, from excessive activity to complete inaction, with adjustments.
Let us remind you that the regulator’s task is to reduce the braking force on the rear axle, reducing the likelihood of skidding when braking to skid.
The regulator, mounted on the body and connected by an elastic lever to the axle beam, limits the pressure in the rear brake mechanisms depending on the position of the rear of the body relative to the road, that is, on the vehicle load.
“Sorcerer” is the predecessor of ABS, which helps to some extent prevent the rear wheels from locking when braking and thereby reduce the likelihood of skidding.
“Sorcerer” is the predecessor of ABS, which helps to some extent prevent the rear wheels from locking when braking and thereby reduce the likelihood of skidding.
By the way, before testing tires on cars without ABS, each time we slightly adjust the regulator taking into account the road condition (snow, ice, asphalt), ensuring that the rear wheels lock a little later than the front ones. Let's not break tradition. Our Shniva found the gap between the cheeks of the regulator to be 16 mm, which was adjusted using a stop screw.
Several brakings, and the braking distance from 80 km/h for a car with a partial load is determined: 34.4 m. With a full load... 33.6! Almost a meter shorter! At the same time, the driver noted a heavier pedal and rapid heating of the brakes, which required cooling before each measurement. Let’s remember these parameters and make adjustments to the “sorcerer” adjustment. First, let's reduce the gap to 8 mm. Now the regulator significantly limits the pressure in the rear brakes, transferring almost all the hard work to the front ones.
Integrated Active Safety Systems (ISAB)
Currently, domestic integrated active safety systems (ISAB) have been developed, forming a complex of ABS and PBS.
Unlike ABS, the traction control system installed in ISAE ensures the required wheel movement not in braking mode (as when ABS is operating), but in traction mode. The fact is that when the car moves, including when maneuvering on a road with different adhesion properties of the surface areas interacting with the drive wheel, different slipping occurs. This can lead to a loss of motion stability, for example, when accelerating a car, when excessive traction may be supplied to the wheels, unbalanced by the traction capabilities of the “wheel-road” pair. The action of PBS, unlike ABS, is based on the fact that in the event of slipping of the vehicle’s drive wheel, the system provides a reduction in traction force on this wheel. This prevents wheel slipping and increases vehicle stability. As a rule, the operation of the PBS is based on reducing the fuel supply to the engine, i.e. comes down to reducing the traction force on the slipping wheel(s).
checking and adjusting brakes on VAZ 2110 VAZ 2111 VAZ 2112 cars
Checking pipelines and connections To prevent sudden failure of the brake system of the VAZ 2110, VAZ 2111, VAZ 2112, carefully check the condition of all pipelines and connections, paying attention to the following: metal pipelines should not have nicks, scratches, burrs, active foci of corrosion and should be located away from from sharp edges that can damage them; brake hoses must not have any cracks on the outer shell or signs of chafing visible to the naked eye; they should not be exposed to mineral oils and lubricants that dissolve rubber; by pressing the brake pedal firmly, check to see if any swelling appears on the hoses, indicating their destruction; all pipeline fastening brackets must be intact and well secured; loosening or destruction of brackets leads to vibration of pipelines, causing their breakdowns; Do not allow fluid to leak from the connections of the master cylinder with the tank and pipelines; if necessary, replace the tank bushings and tighten the nuts without subjecting the pipelines to deformation. When tightening the pipeline nuts, use the wrench 67.7812.9525. Eliminate any detected faults by replacing damaged parts with new ones.
Flexible hoses, regardless of their condition, should be replaced with new ones after 125 thousand kilometers or after five years of operation of a VAZ 2110, VAZ 2111, VAZ 2112 to prevent sudden ruptures due to aging.
Checking the functionality of the vacuum booster VAZ 2110, VAZ 2111, VAZ 2112
Press the brake pedal 5-6 times with the engine off to create equal pressure close to atmospheric in cavities A and B (see Fig. 6-2). At the same time, by the force applied to the pedal, make sure that the valve body is not jammed. Keep the brake pedal depressed and start the engine. If the vacuum booster of the VAZ 2110, VAZ 2111, VAZ 2112 is in good working order, the brake pedal should “move forward” after starting the engine. If the brake pedal does not “go forward”, check the fastening of the hose tip, the condition and fastening of the tip flange in the booster, the hose to the tip and the fitting of the engine intake pipe, since loosening the fastening or their damage sharply reduces the vacuum in cavity A and the efficiency of the booster.
rice.
6-2. Vacuum booster: 1 - vacuum booster housing; 2 — amplifier housing cup; 3 - rod; 4 — adjusting bolt; 5 — rod seal; 6 — sealing ring of the main cylinder flange 7 — diaphragm return spring; 8 — amplifier pin; 9 — tip mounting flange; 10 - valve; 11 — hose tip; 12 - diaphragm; 13 — amplifier housing cover; 14 — sealing cover; 15 - piston; 16 — protective cover of the valve body; 17 — air filter; 18 — pusher; 19 — pusher return spring; 20 — valve spring; 21 - valve; 22 — valve body bushing; 23 — rod buffer; 24 — valve body; A - vacuum chamber; B - atmospheric chamber; C, D - channels Adjusting the brake drive of VAZ 2110, VAZ 2111, VAZ 2112
The free play of the brake pedal when the engine is not running should be 3-5 mm. The adjustment is carried out by moving the brake light switch 7 (Fig. 6-11) with nut 6 released. Install the switch so that its buffer rests against the pedal stop, and the free play of the pedal is 3-5 mm. In this position of the switch, tighten nut 6.
rice. 6-11. Brake drive: 1 — master cylinder; 2 - tank; 3 - vacuum booster; 4 — brake pedal bracket; 5 — brake light switch buffer; 6 — brake light mounting nut; 7 — brake light switch; 8 - brake pedal WARNING Adjust the free play of the brake pedal when the engine of the VAZ 2110, VAZ 2111, VAZ 2112 is not running. If the brake light switch is too close to the pedal, it does not return to its original position. In this case, valve 21 (see Fig. 6-2), pressing against body 24, separates cavities A and B, which opens air access to chamber B, and the wheels are incompletely released when the pedal is released.
If moving the brake light switch cannot eliminate the incomplete release of the brake mechanisms, then disconnect the brake master cylinder from the vacuum booster and check the protrusion of the adjusting bolt 4 relative to the mounting plane of the master cylinder flange (size 1.25-0.2 mm). This size can be set by holding the end of the rod with a special wrench, and with another wrench, tightening or unscrewing bolt 4.
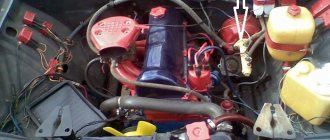
Adjusting the sorcerer viburnum station wagon
The need to adjust the pressure regulator arises after replacing it, as well as after replacing the rear suspension springs or if the brake mechanisms of the rear wheels do not work correctly.
To complete the work you will need an assistant, as well as:
— inspection ditch or overpass;
— a drill or a piece of wire with a diameter of 2 mm;
- a flat section of the road, free from traffic.
1. We install the unloaded vehicle on an inspection ditch or overpass.
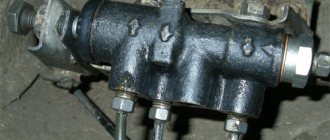
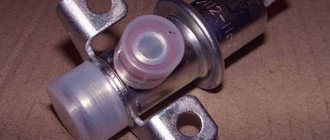
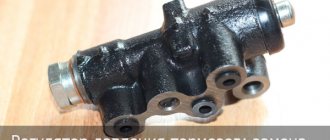
How does a sorcerer work?
The regulator itself consists of a cylinder, valve, spring and rod. The latter is connected to the rear beam, which ensures the operation of the VAZ-2109 sorcerer. Also, brake fluid circuits pass through the rear brake pressure regulator. For mounting them on the device, Renault provides 4 threaded entries. » alt=»» How does the sorcerer regulator work on a VAZ? During emergency braking, the front of the car is pressed to the ground, and the rear is raised. This causes the regulator rod to move, which blocks the flow of fluid to the rear cylinders. A spring located under the valve prevents it from closing completely. Therefore, the rear mechanisms still work, but later and weaker than the front ones.
On my 2113, I completely removed the handbrake, unscrewed and threw out the lever in the cabin, removed the always soured and rotten cables due to cracks in the external insulation, removed the spacer strips, spacer levers, fingers under the drums... I left only the brake cylinders, pads with springs, drums, holes for the cables I plugged it with short bolts, washers and nuts so that no dirt would fly into the drum... I also threw out the rusty and soured sorcerer regulator and connected the rear brake pipes directly to the GTZ using brake pipe connectors... The rear brakes became super and there are never any hemorrhoids with them... The only thing I had to replace was the three-turn pad pressure springs with two-turn pad springs from the classics so that the pad pressure would be stronger and they wouldn’t rattle when driving... Before that, as it turned out, judging by the unworn pads, I drove for 5 years practically without rear brakes, the damn regulator is a sorcerer
rusted and soured, and because of it the rear practically did not slow down, now everything is super... I always park the car on the uphill in 1st gear, on the downhill in reverse gear, in 8 years the car has never rocked...
Guys, help me after replacing the handbrake cable, the working cylinder, the pads. The rear brakes are not pumping... At first the brake fluid seemed to run a little, then it stopped on both sides.
Guys. Why are the brakes weak on Prior? Do you need to press very hard and it stops too weakly?
the grant skids when braking. without ABS. why? when braking, the right rear one is activated first
Should the gap be adjusted while the sorcerer is removed or after installing it? If after installation, what position should the rear axle be in? Hanging out or loaded? That is, when adjusting, the car should be on a lift or on a pit?
GOOD DAY TO YOU. PLEASE TELL ME, AND IF I PUMP BY ANOTHER SCHEME ZP ZL PP LP THEN THE RESULT WILL BE BOTH? I'VE ALWAYS BEEN TOLD THIS SCHEME.
GOOD DAY TO YOU. PLEASE TELL ME WHAT CAN THE BRAKE PEDAL FAIL? THE SYSTEM IS BLEEDED, THE REAR CYLINDERS AND PIPES ARE NEW, THE FLUID IS FILLED TO THE MAXIMUM, BUT THE FLOW IS STILL SLOWLY FALLING DOWN. IT FEEL LIKE THERE IS AIR IN THE SYSTEM, ALTHOUGH THE SYSTEM IS BLEEDED.
Removing the brake force regulator (sorcerer) VAZ 2113
Do you need to adjust the sorcerer on suspended rear wheels? or under load?
If you seat the rear (cut off the spring), will the gap increase or decrease?
I did as you wrote. everything worked out. All the same, I had to insert a screwdriver and press the valve a little, in short, everything was fine. Thank you!
I'm probably already tired of my questions? Here’s the problem, the rear right circuit won’t bleed, I release the valve, the pedal stays stuck and won’t release. They suggested (the tubes were clogged), I checked everything was fine. maybe it's the sorcerer?
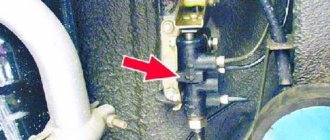
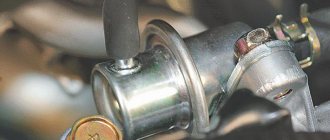
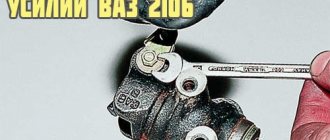
- To begin, use a metal brush to clean the threaded connections and fittings of the brake pipes that are screwed to the sorcerer. After cleaning, use WD and let the fittings dry out.
- Remove the retaining bracket and remove the sorcerer drive lever from the rear beam (5).
Next we must rip off the fittings using a brake pipe wrench (7).
Mark the brake lines for proper installation on the new sorcerer.
Unscrew the fittings and plug them with rubber plugs (8).
Unscrew the nuts securing the brake pressure regulator bracket (9).
Unscrew the regulator from the bracket (10).
Connect the tubes to it and tighten the tube fittings.
Attach the rear brake pressure regulator drive lever to the rear beam, check that the retaining bracket presses the lever (11 and 12).
"Wizard" OR ABS?
And yet, such a regulator on a modern car is a legend of deep antiquity. It cannot compete with ABS, especially if the driver is an average driver who does not know extreme driving techniques. The curb weights of Kalina and Priora are almost the same - the difference is less than a percent. Using the same tires that were on the Kalina, the Priora with ABS showed the best results under any load. Moreover, no dosing of force on the brake pedal was required, you just press with all your heart, and the electronics do the rest.
Test results:
Brake force regulator - description and replacement
What is the "Sorcerer" for? This is a rather mysterious detail and no one has found a clear answer to this question. Perhaps this is why he was colloquially called a “sorcerer”, because he works magically. At its core, this part performs a similar function to the anti-lock braking system, preventing the wheels of the rear axle from locking during emergency braking. Its operation directly depends on the position of the rear axle relative to the car body: when braking sharply, the car nose-dives, and the rear part of the body rises, after which the “witchcraft” begins - the brake force regulator partially blocks the flow of fluid, and the rear wheels do not lock.
Of course, in ideal conditions (dry asphalt, straight road, working brake system and chassis), the brake force regulator does its job perfectly. But such conditions do not always occur.
Device Description
The design and principle of operation of this element are quite simple. At the moment when the rear part of the car body rises and the distance between the axle and the body increases, a special lever is activated, which is connected in a “sorcerer”. This lever lowers the piston, which closes the brake fluid channel, and accordingly the pressure on the rear pads decreases. The wheels do not stop rotating and, accordingly, do not skid.
The idea itself is quite clever, but, as often happens, in practice it raises doubts. After all, if when braking the brake pedal is pressed with great force, then the front wheels go into skid and the car still begins to skid. Quite often, when observing a traffic accident, you will notice that the cars with the “sorcerer” are turned backwards. Is this related to this miracle detail, which in its essence should prevent this skidding?
Signs of a malfunctioning brake force regulator
“Sorcerer”, as an element of the braking system, has a number of signs of malfunction that manifest themselves during emergency braking. Let's look at the first symptoms that call for checking the regulator:
- When braking hard, the car pulls to the side.
- Reduced braking efficiency (feels).
- “Bouncing” and jerking of the car when braking.
In such cases, it is necessary to check not only the “sorcerer”, but also other components of the brake system and chassis. But, since we are talking about the brake force regulator on a VAZ, we will consider this particular mechanism
After placing the car on a lift, pay attention to the regulator. The most common sign of its malfunction is the presence of brake fluid leaks.
In case of any malfunction, the best solution is to replace the sorcerer. But, if you still decide to repair the brake force regulator, then below we have prepared brief instructions for this action.
Sorcerer repair
In order to repair the brake force regulator, you need to perform a number of actions:
- Dismantling. We remove the entire assembly, using wrenches 10 and 13. The brake pipes are unscrewed, the brake fluid is drained and plugs are installed in the pipes. Next, the “sorcerer” body is removed, which is attached to the bottom with two nuts.
- Diagnostics and replacement of “sorcerer” parts. Carefully examine the surface of the “Sorcerer”. If necessary, replace faulty parts (sealing rubber bands) using a repair kit. A soured piston cannot be repaired and requires a complete replacement of the unit.
- Installation of the sorcerer. Reassemble and adjust the part in reverse order and bleed the brake system. Add brake fluid.
Repairing this unit is a rather dubious decision. Therefore, we strongly recommend that in case of any malfunction, you perform such an action as replacing the brake force regulator.
Adjusting the braking forces of Lada Vesta
The operating principle of the system that regulates and distributes brake fluid pressure on Lada Vesta cars is fundamentally different from previous models, and there is no “witchcraft” in it. The Lada Vesta brake pressure regulator is directly connected to the ABS system and is electronically regulated depending on the speed of each wheel.
The ABS control unit transmits signals from speed sensors and analyzes the situation. The system “understands” any skidding and allows you to distribute the braking force with maximum efficiency. The pressure is controlled by the valves in the ABS hydraulic block, and there is no need for any magic. In addition, the electronics itself detects all malfunctions and reports them to the driver using a special lamp on the dashboard.
olade.ru
Adjusting the “sorcerer” on “Logan”
The brake force regulator on the Logan is located on the bottom between the front and rear axles.
To self-adjust, you need to clean the “sorcerer” and replace the lubricant in it. Then make half a turn with the adjusting nut. Then you can go for the test. If the rear pair of wheels does not brake, then tighten the nut again.
If the vehicle being tested does not have ABS, then even if you tighten the nut all the way, you may not achieve the result. Sometimes replacing the sorcerer can help, but this does not always save the situation. The fact is that in 9 out of 10 Logans without ABS, the regulator does not work at all. The reasons are a weak spring. And the owner has two options - change the springs to stiffer ones or install a rubber gasket to increase the pressure on the “sorcerer” mechanism.
Checking and adjusting the free play of the brake pedal on VAZ 2108, 2109, 21099
The free play of the brake pedal of VAZ 2108, 21081, 21083, 2109, 21091, 21093, 21099 cars is 3-5 mm. In the braking system of VAZ 2108, 2109, 21099 cars, the free play of the brake pedal is the travel of the pedal from its top position until the brake mechanisms begin to operate. The upper position of the pedal is limited by the brake light switch (the pedal rests against its moving contact with its stop).
Checking the free play of the brake pedal of VAZ 2108, 2109, 21099 cars
We check the free play of the brake pedal with the engine turned off.
— We measure the distance from the floor to the released brake pedal
To do this, place a tape measure or ruler against the floor of the car and measure the distance to the upper surface of the platform with the pedal fully released.
— We measure the distance from the floor to the pressed brake pedal
Without removing the tape measure or ruler, lightly press the brake pedal with your hand and lower it down until you feel resistance to movement. Using a ruler or tape measure, we determine how many millimeters the pedal platform has dropped. This will be the free play of the brake pedal.
If it does not fit within the required limit of 3-5 mm (more or less than this value), we adjust the free play of the brake pedal.
Adjusting the free play of the brake pedal of VAZ 2108, 2109, 21099 cars
To adjust the free play of the brake pedal, you must move the rear brake light switch, which serves as a stop for the brake pedal. See photo at the beginning of the article.
— Loosen the locknut of the brake light switch
We use an open-end wrench at “19”.
— Move the brake light switch
To move, rotate the nut securing the brake light switch. We use the same key on “19”. To reduce the free play of the brake pedal, screw it (clockwise) onto the switch. To enlarge, on the contrary, turn it away (counterclockwise).
— Fix the brake light switch
Fix the switch in the required position by tightening the locknut.
— Check the free play of the pedal and the operation of the brake lights
After adjusting the brake pedal free play, check its value again. If it again does not correspond to the norm, we carry out the adjustment again.
In addition, we check that the brake lamps in the rear lights turn on in a timely manner. The switch must be in such a position in relation to the brake pedal that the brake lights turn on in a timely manner when it is pressed and do not burn with a constant light when it is released.
Notes and additions
— Why is free play of the brake pedal necessary on VAZ 2108, 2109, 21099 cars? It prevents spontaneous braking of the wheel brake mechanisms when the brake pedal is released.
"Chevrolet Niva"
In the normal position of the regulator, as the vehicle's weight increases, its braking distance decreases - this affects the more complete use of the traction weight by the rear wheels.
The best braking is at full load, when the regulator minimally limits the pressure in the rear brakes.
But at partial load this is fraught with skidding. The high center of gravity and short wheelbase of the Shnivy contribute to a significant redistribution of mass during braking, therefore, at partial load, the contribution of the rear axle to braking is small.
"LADA KALINA"
We set the regulator so that the rear is slightly late in locking the wheels. With this setting and partial load, the car needed only 27 m to stop. Fully loaded - 29.5 m. There are slight difficulties in preventing the front wheels from skidding. We reduce the gap in the regulator to zero - the half-empty Kalina stops after 31.8 m. The braking distance increases by 4.8 m, accompanied by a sharp blocking of the front wheels. The loaded one slows down after 35.2 m, the deterioration is even greater - 5.7 m! The pedal effort is increased and the brakes become noticeably hot.
Now we move the adjuster so that the rear brakes work as efficiently as possible. At partial load, the rear wheels suddenly lock and the car drifts off course—you have to release the pedal. On the verge of blocking it is very difficult to brake. The result is 30 m, which is 3 m worse than the “norm”. Full load gave a result of 26.9 m, which is 2.6 m better than the base (29.5 m). There are no comments regarding deceleration control. At the basic position of the regulator, the braking distance increases with increasing load. At partial load the spread of results is 4.8 m, so the base position is most effective. When you deviate from it in any direction, the braking distance increases.
- On a fully loaded vehicle, depending on the position of the regulator, the spread of the braking distance is 8.3 m.
- The best results, as on the Niva, come with increasing pressure in the rear brakes.
- However, on a slippery road, even in smooth turns, early locking of the rear wheels is possible, leading to a skid.
- And at partial load, with the regulator position different from the base one, the braking distance only increases.
ABS
The coefficient of adhesion between wheels and the road depends on the degree of their sliding, which varies from 0 (pure rolling of the wheel) to 100% (complete slipping or sliding when the wheels are locked). The maximum values of the coefficient of adhesion of the order of 10... 30% (depending on the road surface) will be when the wheels slip. Consequently, with this coefficient and degree of wheel slip, the greatest efficiency and safety of braking can be ensured. This is exactly what ABS provides.
All modern ABS are self-adjusting automatic systems. They include:
- wheel speed sensors
- electronic decision block
- pressure modulators
When ABS is operating, the signal from the wheel angular speed sensors is fed to an electronic decision unit, in which, in accordance with a given program, control signals are generated and sent to the modulator.
Rice. Diagram of the pneumatic ABS modulator (a) and its characteristics (b): 1, 5, 6 - valves; 2, 3 - electromagnets; 4 - piston; A—D—cavities; p—pressure; t — time
The figure shows a diagram of the pneumatic ABS modulator and its characteristics (change in braking force over time). ABS operation is accompanied by a multi-cycle process of automatically releasing and braking the vehicle's wheels. In each cycle there are phases of automatic release of the brakes, “holding” and braking (dashed lines in Fig. b) of the wheels. There are ABS in which a two-phase cycle is carried out (there is no “holding” phase). ABS operation ensures the required angular speed of the wheel and its sliding, corresponding to maximum traction characteristics.