VAZ-2115 dashboard diagram
The controls of the VAZ-2115 passenger car are located in accordance with the UNECE norms and regulations. For greater ease of use of handles, buttons, switches and control devices located on the dashboard, they have graphic symbols indicating their functional purpose.
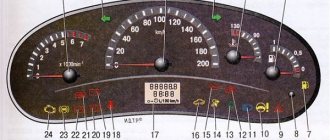
Rice. 1.1 Instrument panel of the VAZ-2115 (diagram).
The dashboard diagram (Fig. 1.1) includes controls:
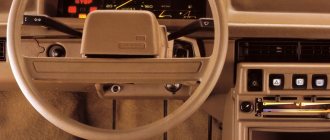
1 – lever-switch for headlight or turn signal modes.
2 – nozzle for blowing the front door glass.
3 – instrument cluster.
4 – steering wheel.
5 – button to turn off sound signals.
6 – button to turn off the alarm. Pressing the button causes the warning light and direction indicators to flash.
Photo 1. Hazard switch off button
7 – ignition switch combined with an anti-theft device. Never turn off the ignition or remove the key from the lock while driving, otherwise the steering will be blocked and the vehicle will lose control. The ignition key can have three positions:
- 0 – “disabled”. Consumers are disconnected, the key can be easily removed. When the key is removed, the closing mechanism of the anti-theft system is activated. To guarantee the steering shaft block, turn the steering wheel left or right until it clicks. To turn off the anti-theft device, you need to insert the key into the ignition and, turning the steering wheel left and right, turn the key to position “I”;
- I – “ignition”. The ignition is on, the key is not removed, the steering is unlocked;
- II – “starter”. The key cannot be removed, the steering is unlocked. The position is achieved by turning the key to overcome the elastic force of the spring. The key is not locked in this position; it must be held by hand for the starter to operate. The ignition switch is also equipped with a starter activation unit while the engine is running.
To repeat turning on the starter after a failed start attempt, you need to move the ignition key from position “I” to position “0”, and then again to position “II”.
8 – switch lever for windshield washer and windshield wipers.
9 – immobilizer sensor, transmits a special code from the code key through the immobilizer to the engine control unit.
10 – set of signal lights for the on-board control system. The complex contains (Fig. 1.2): 1 – oil level drop signal; 2 – low level signal in the windshield washer tank; 3 – low coolant level signal; 4 – door open signal; 5 – signal of malfunction of the brake light and side lights; 6 – signal of wear of the linings on the brake pads; 7 – the signal indicates that the seat belts are not fastened.
11 – external lighting switch.
12 – block of keys for turning off fog lights, fog lights, heated rear window.
13 – trip computer, installed on some vehicles, designed to display one of the parameters: current fuel consumption (or average total fuel consumption), average speed, distance traveled, current time, time on the road.
14 – plug.
15 – control lamp for anti-lock braking system (ABS). Installed in place of the plug, if equipped with an anti-lock braking system.
16 – airbag control lamp. If the pillow itself is present, it is installed in place of the plug.
17 – central nozzles of the ventilation and heating systems of the cabin.
18 – cover of the glove box (upper). To use the upper glove compartment while the lower glove compartment lid is open, press the upper lid lock lever. The lock lever is located in the niche of the lower glove compartment on top.
19 – side nozzle of the ventilation and heating systems of the cabin.
20 – glove box cover (lower). To open it, you need to press the lock handle to the handle. If the external lighting is turned on, a special illumination of the inside of the box will automatically work.
21 – magazine shelf.
22 – control panel for interior ventilation and heating systems.
23 – socket for audio equipment. It is planned to install audio equipment that meets international standards in size and mounting principle.
24 – ashtray.
Watch a video of testing the dashboard of a VAZ-2115 passenger car here:
How to remove the dashboard of a VAZ-2115
If you decide to remove the instrument panel and carry out independent tuning or DIY repairs, you will need:
1. — Disconnect the ground wire from the battery.
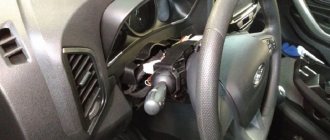
2. — Remove the fastening screws to remove the steering shaft casing.
3. — After disconnecting the wires, remove the ignition switch.
4. — Remove the handles from the heater control levers
5. — Remove the headlight hydraulic adjustment handle.
Rice. 2.1 Instrument panel and its elements: 1 – instrument panel; 2 – dashboard trim; 3 – bracket; 4 – plug; 5 – ashtray; 6 – right cross member; 7 – right console screen; 8 – instrument panel; 9 – central bracket; 10 – left console screen; 11 – left cross member.
6. Remove the screws and disconnect the right 7 and left 10 screens from the instrument panel panel 8 (see Fig. 2.1).
7. Unscrew the screws securing the instrument cluster.
8. Unscrew the screws connecting the right cross member 6 to the dashboard panel 8.
9. Remove plug 4 and unscrew the screw securing the instrument panel panel 8.
10. Remove the instrument panel 8 as an assembly with switches for instrument lighting, fog lights, rear window heating, hazard warning lights and the cigarette lighter.
11. Disconnect all electrical wires.
12. To remove panel 1 assembled with trim 2, remove the screws securing the instrument panel to bracket 3 and left cross member 11.
13. If necessary, you can remove the screws and remove the dashboard trim, as well as the interior ventilation nozzles and air ducts.
Installation of the dashboard is carried out in the reverse order.
How to check for errors on the device
The manufacturer has provided the ability for the driver to independently read faults without the presence of additional equipment.
To perform a self-diagnosis, you will need to follow a procedure.
- Sit in the driver's seat, insert the ignition key and press and hold the daily mileage reset button.
- Next, turn the ignition key in the lock, but do not start the engine.
- Release the reset button. Now the on-board computer self-diagnosis process will begin. This is accompanied by the inclusion of all lights and devices.
- Quickly press the mileage reset button again - this will display the version of the software used on the screen under the speedometer.
- If you press the button again, error codes will be displayed on the same screen.
How much does a shield cost?
In 2022, you can find a tidy device from 1000 rubles. If you need to purchase a complete module with all the plastic and instruments, the purchase will cost approximately 8-10 thousand.
The standard dashboard of the Lada 2115 is informative and has a discreet design. The module is easy to read and intuitive even for novice drivers.
Specialization : Graduated from the State Automobile University, worked for 20 years at GAZ-56, now I drive a Zhiguli.
Source
Why do light bulbs fail?
How to remove the instrument panel on a VAZ 2114
The main reason for the relatively quick burnout is rather difficult operating conditions. Reduce resource:
- voltage fluctuations;
- vibration;
- overheating (in a closed space of the instrument panel this is normal).
In addition, filaments have a short service life of only 1500 hours.
In addition, lamps may stop working due to:
- wiring damage;
- destruction of board tracks;
- contact oxidation;
- blown fuses due to short circuit, etc.
For this reason, before replacing a light bulb in a Lada 2114, it is advisable to find out why it stopped working. Until the root cause is identified, the situation cannot be corrected.
What can you do with the dashboard?
Tuning of the instrument panel has been carried out over the past few years. During this time, a huge number of methods for modifying the panel have appeared, some are used quite often, others are rarely implemented.
You can change the instrument panel as follows:
- Change the backlight color.
- Install the backlight control.
- Change the design of the scale and arrows.
- Install a ready-made dashboard.
Let's consider the above tuning methods in detail.
Designations of light bulbs, indicators, icons and buttons on the instrument panel of VAZ 2114, 2115
Why does the instrument panel of the VAZ 2114 not work? a massive problem in our auto industry
First, let's look at the descriptions and meaning of the panel icons and buttons, regardless of whether the car is equipped with an injector or a carburetor.
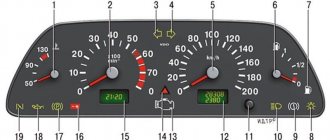
1 - Control sensor that measures the temperature of the coolant in the engine cooling system. During normal operation of the power unit, the antifreeze temperature should not exceed 90 degrees. But minimal deviations are sometimes acceptable. If you notice that the engine begins to overheat frequently, be sure to contact a car service center for help. Sometimes the sensor itself may give incorrect results.
2 - A device such as a tachometer processes information that comes from the crankshaft and displays it on the panel. The tachometer readings indicate the number of engine revolutions.
3.4 - Turn indicators. If the indicators flash simultaneously, but slowly, this may indicate a possible problem with the bulbs themselves or in the electrical wiring network.
5 — The most basic element of any instrument panel is the speedometer. Thanks to it, the driver can determine the speed of movement. A slight error in the indicators is allowed, but it should not exceed the indicator by more than 5 kilometers. If such readings differ significantly from the real ones, then most likely the problem is in the speedometer.
6 — Fuel level sensor in the fuel tank. When the level in the tank drops to 6-7 liters, a red light comes on, indicating that the car needs to be refueled.
7 - Low fuel level indicator.
8 — Symbol indicating the light is turned on. It is triggered when the low beam and parking lights are turned on.
9 — The brake light indicates that the vehicle’s brake system is not working correctly. Most often it lights up if there is not enough brake fluid in the car.
10 - A blue light indicates that the high beam headlights are on.
11 — Button for resetting the daily mileage. The total mileage of the car is shown at the top, and the daily mileage at the bottom.
12 - on-board computer display with mileage indicators.
13 — Alarm activation symbol (light). When the emergency light is turned on, the light begins to flash red.
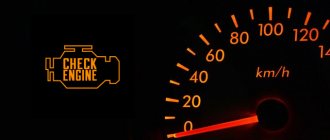
14 — “Check” symbol. It is triggered in case of possible problems with the car’s power unit. There can be many reasons for this, from problems with mixing the combustible mixture with air, to breakdowns of various engine power components. In any case, you need to contact the service for computer diagnostics or repairs.
15 — External air temperature sensor and time indicators. The daily mileage reset button allows you to scroll from the temperature readings to the time readings when scrolling.
16 - Battery charge sensor. Most often it lights up when the battery is almost completely discharged. If the indicator light is very weak or, on the contrary, bright, then the problem may be in the generator.
17 - Handbrake activation icon. It lights up both when the engine is on and vice versa.
18 — Icon showing engine fluid pressure. Usually its appearance indicates an insufficient amount of lubricating mixture. In such a case, be sure to check the oil level. Sometimes the problem can be caused by the oil pump not working properly.
19 - If the engine is equipped with an injector, then there is a reserve icon on the dashboard. Well, if the engine is carburetor, then this is a suction indicator.
- Dimensions switch
- dipped headlights
- Front fog light button
- Rear fog lights
- Heated rear window
Removal and modification guide
Instrument panel VAZ 2114: description of symbols
If indicators appear while driving, this does not always indicate a malfunction of the components. Perhaps the problem is simply a malfunction of the sensor responsible for the operation of the unit. Or the problem may be a broken wiring or bad connector contacts. Therefore, there is no need to panic right away. The video below shows the result of tuning the “tens” control panel. The author of the video, proVAZ-2110, planned to make the tuning in such a way that the color of the speedometer and other sensors would be white, but he did not take into account that the plastic on the dashboard was originally yellow. Accordingly, the author of the video was not pleased with the end result.
https://youtube.com/watch?v=S8vaatJ0Ugk
Often car enthusiasts decide to do this to improve the appearance of the car's interior. To do this, you can simply remove the panel trim and simply remove the regular bulbs. By installing LEDs instead. Such a control panel will enhance the brightness of the indicators. If necessary, you can install a more modern europanel, which will transform the interior of the “tens”. If you just want to tune the control panel, you can install a new trim on it.
To do this you will need:
- First, turn off the power to the vehicle's on-board network. To do this, disconnect the negative cable from the battery.
- Next, it is dismantled; for this, all the necessary bolts are unscrewed.
- The next step is to remove the control panel fastenings to the trim. Having done this, you can remove the control panel itself from the socket. After these steps, you can dismantle the glass mask.
- Then all the pads that lead to the panel are turned off.
- Now install a new trim on 2110. If necessary, install LEDs instead of conventional light bulbs. Further assembly is carried out in reverse order.
You should always be careful when working with electricity. If you damage even one wire when removing or installing the dashboard, this can lead to dire consequences, including non-functioning devices on the dashboard. For example, owners of “ten” cars are often faced with the problem of the speedometer not working, which is usually associated with the wiring. Therefore, always be careful when working with the dashboard. In addition, after disassembling the instrument panel, or rather removing the arrows, there is a possibility of displaying distorted readings.
Loading …
Changing the backlight color
You can change the backlight color yourself.
Such tuning can be characterized as follows:
- The standard instrument panel is being dismantled. This work only involves unscrewing a few screws, unsnapping the clamps and disconnecting the chips. After this, you can completely remove the panel for ease of use.
- After that she sorts it out. Disassembly is also quite simple.
- The design has a light source, which in this case will be replaced. Replacement is quite simple, the main thing is to choose the most suitable diode. In some cases you will have to use a soldering iron.
- We replace the diodes with those that have the color we need.
- We reassemble and install the instrument panel. It is quite important to check the instrument readings after completion of work.
Overall the process is quite simple to perform. Therefore, many decide to slightly update the interior of their car in this way.
The meaning and location of the main instruments on the VAZ panel
The combinations of all instruments on the most popular brand (VAZ-2110) are located directly on the left side of the panel itself. This part of the dashboard is often called a “dashboard” by drivers. The instrument panel also contains switches of various functions and types and a set of indicator lights. They are responsible for controlling the operation of lighting equipment, heaters and other important units.
Standard instrument panel on a VAZ-2110 car
First of all, when examining the dashboard, the eye falls on the variety of dial gauges and indicators under them, which are equipped with a small electronic digital window and a set of signal lights with various functions. The main elements here are:
- Sample induction speedometer;
- Tachometer model;
- Pointer type indicator for adjusting the coolant temperature;
- A device for determining the fuel level in the tank.
Let's look at each of the devices in more detail.
Tip: if light bulbs, indicators and dial gauges do not work, then the problem lies in the wiring. Be sure to check the fuse box on the VAZ-2110.
Symbols in the induction speedometer
Models of induction speedometers receive speed readings from sensors that are located directly in the gearbox structure. It displays the actual speed of the car - the scale ranges from 0 to 200 km/h.
The division value is an indication of 10 km/h. However, the driver must remember that any induction speedometer on the VAZ-2110 will have an acceptable error rate of up to 3-5 km/h.
The lower and central part of the speedometer is equipped with a small window with an electronic display option, which, through 2 lines, transmits the total mileage for the entire period of operation of the vehicle and the current mileage value.
Tachometer symbols
The tachometer is located on the left side of the dashboard. Using this device, the driver receives the current crankshaft speed values. Information enters the tachometer through the on-board computer, which in turn receives these values from sensors on the crankshaft. Often, if the car jerks when you sharply press the gas. The tachometer will show low speed values or will be completely faulty.
On the scale, all divisions are divided into 5 units, and the digitization of values is made into 10 units. The maximum values are limited to 80 units. In order to understand what number of revolutions the car is currently showing, you need to multiply the number on the tachometer by 100. The sector is in the range from 55 to 60 units. shaded in red - this is a signal to the driver that the car will be approaching a critical number of revolutions.
Advice:
When the crankshaft speed approaches the red sector, a sudden stop and engine failure may occur.
The lower middle part of the device, using an electronic display, displays the real temperature of the air surrounding the car and the time.
Designations on the coolant temperature dial gauge
On the left side of the tachometer there is a universal dial indicator that regulates the temperature in the coolant. The device receives signals about current indicators from the corresponding coolant temperature indicator, which is located next to the cylinder head and thermostat structure.
Here, the division value is considered to be 20 degrees, and the general digitization indicators start at a value of 50 units. and end with a division of 130 degrees. The dangerous zone of the device operation is highlighted in red, which starts at a value of 105 degrees. If the instrument needle begins to fall into this zone, the VAZ-2110 engine must be immediately turned off and the car stopped.
If the engine overheats, not only the main set of power unit units may fail, but also the fan switch sensor, as on the VAZ-2107.
Designations in the fuel gauge in the tank
To the right of the speedometer there is an indicator showing the level and general availability of gasoline in the fuel tank of your vehicle. It works using a sensor in the tank, and sends data through the on-board computer to the scale. The indicators of the dial gauge have the following designations:
- 0 - your tank is completely empty (the machine will be able to work for another 15-20 minutes).
- ½ - there is still half a tank of gasoline in the car.
- 1 - the car is filled with a full tank.
Car diagnostics
The appearance of a lit “Check Engine” lamp on the instrument cluster signals the driver that a problem has arisen in the vehicle’s electrical system. You need to understand that checking the vehicle yourself and at a service station can give different results. Special equipment available to professionals will allow more accurate detection of faults.
Self-diagnosis
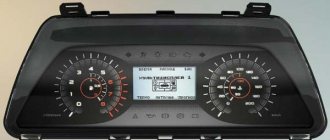
On a VAZ 2115, the owner can do independent diagnostics and find out what errors are stored in the memory of the engine control unit. The procedure is carried out by calling up fault codes on the dashboard or using a diagnostic adapter.
To carry out diagnostics on the electronic instrument panel, you must perform a certain sequence of actions:
- Sit in the driver's seat of the car, insert the key into the ignition and press the daily mileage reset button located on the instrument cluster.
- Turn the lock key to the ignition switch position.
- Release the key, starting the self-diagnosis process. Visually, this will look like turning on the backlight, all signal lamps, possible symbols on the LCD screens and testing the instruments (the arrows will move across the entire scale in both directions).
- Press the key again and release. The second press displays the software version of the instrument cluster on the screen located under the speedometer (inscription like Uer x. x).
- Press the key again, after which the errors in the memory will be displayed on the screen.
Instrument cluster VAZ 2115, the button is located on the right side of the speedometer
We recommend: Lifan X60
The driver can perform self-diagnosis on the electromechanical panel and the “January-4” control unit according to the following sequence:
- Turn off the ignition.
- Open the diagnostic connector cover located on the center console.
- Connect contact B to the negative terminal of the battery (to the body). Contact A, connected to the engine crankcase, is suitable for this.
- Turn on the ignition. The “Check Engine” lamp will flash code 12, which means the diagnosis has begun. The light signals are given as follows - a long flash, then a pause (about 2 seconds), two short flashes, a long pause (about 3 seconds). Signal 12 is sent three times. If there is no signal, the diagnostic system is inactive or faulty. After this, the Check Engine light will flash and list the errors in memory. Each code is repeated three times. If there are no errors in the memory, code 12 will continue to be transmitted.
Electromechanical instrument cluster Pinout of diagnostic connector
To read controller errors, a special K-Line adapter is used, which is connected to the diagnostic connector using a connector. This connector is located on the center console behind a plastic plug (below the cigarette lighter and ashtray). The adapter has a cord with a USB connector at the end that connects to any laptop. A special program for reading and resetting errors must be installed on the device (OpenDiagFree version 1.4 or 1.6).
The procedure for reading errors is quite simple, you need to:
- Check the level of process fluids.
- Open the connector cover and turn on the ignition.
- Connect the adapter or scanner to the diagnostic socket.
- Launch the software on the laptop.
- View available errors in the program dialog box.
- Decrypt the codes using the program interface or decryption table.
- Eliminate the causes of malfunctions and re-diagnostics.
Changing the backlight color
You can change the backlight color yourself.
Such tuning can be characterized as follows:
- The standard instrument panel is being dismantled. This work only involves unscrewing a few screws, unsnapping the clamps and disconnecting the chips. After this, you can completely remove the panel for ease of use.
- After that she sorts it out. Disassembly is also quite simple.
- The design has a light source, which in this case will be replaced. Replacement is quite simple, the main thing is to choose the most suitable diode. In some cases you will have to use a soldering iron.
- We replace the diodes with those that have the color we need.
- We reassemble and install the instrument panel. It is quite important to check the instrument readings after completion of work.
Overall the process is quite simple to perform. Therefore, many decide to slightly update the interior of their car in this way.
Niva 4x4 instrument panel diagrams
Hungarian instrument cluster before 1996 (rear view), each instrument has a separate black plate with a scale:
1 – plug connector block with conventional numbering of plugs; 2 – tachometer; 3 – voltage stabilizer; 4 – instrument cluster lighting lamp; 5 – coolant temperature indicator; 6 – fuel level indicator; 7 – resistor 470 Ohm, 0.25 W; 8 – resistor 36 Ohm, 5 W; 9 – warning lamp of the toxicity reduction system; 10 – control lamp for heated rear window; 11 – fog light indicator lamp; 12 – control lamp for high beam headlights; 13 – indicator lamp for external lighting; 14 – indicator lamp for direction indicators; 15 – voltmeter; 16 – brake fluid level warning lamp; 17 – diode IN4002; 18 – oil pressure warning lamp; 19 – differential lock warning lamp; 20 – fuel reserve warning lamp; 21 – seat belt warning lamp; 22 – parking brake warning lamp.
The Hungarian instrument panel was installed from 1996-1998 (rear view), each instrument has a separate black plate with a scale:
1 – tachometer; 2 – voltage stabilizer; 3 – instrument cluster lighting lamp; 4 – coolant temperature indicator; 5 – fuel level indicator; 6 – warning lamp of the toxicity reduction system; 7 – indicator lamp for heated rear window; 8 – fog light indicator lamp; 9 – control lamp for high beam headlights; 10 – indicator lamp for external lighting; 11 – indicator lamp for direction indicators; 12 – voltmeter; 13 – brake fluid level warning lamp; 14 – oil pressure warning lamp; 15 – differential lock warning lamp; 16 – fuel reserve warning lamp; 17 – seat belt warning lamp; 18 – parking brake warning lamp; D1, D2 – IN4002 diodes; R1 – resistor 470 Ohm, 0.25 W; R2 – resistor 51 Ohm, 5 W.
The Vladimir or Podolsk dashboard has been installed since 1998. The scales of all instruments are printed on one black plate:
Let us remind you that on the website you can find reports on the modification or repair of a domestic SUV.
Key words: 4x4 instrument panel
8
4
Found an error? Select it and press Ctrl+Enter..
Production of Lada Vesta has been stopped, shipment of cars to dealers has been stopped
How to replace ABS (wheel speed) sensors on Lada Vesta
AvtoVAZ recalls 3,994 Lada Granta cars due to problems with brakes
How to install an analogue of an electric handbrake on a car with your own hands
Changing the dial design
Another fairly simple way to tune the instrument panel is to change the dial design.
1. The structure is dismantled and dismantled. 2. Purchase or create your own sticker that will be used to decorate the instrument panel. 3. Peel off the old dial and glue on the new one. 4. We assemble the structure and install it.
How to remove the dashboard of a VAZ-2115
If you decide to remove the instrument panel and carry out DIY or DIY repairs, you will need:
1. — Disconnect the ground wire from the battery.
2. — Remove the fastening screws to remove the steering shaft casing.
3. — After disconnecting the wires, remove the ignition switch.
4. — Remove the handles from the heater control levers
5. — Remove the headlight hydraulic adjustment handle.
Rice. 2.1 Instrument panel and its elements: 1 – instrument panel; 2 – dashboard trim; 3 – bracket; 4 – plug; 5 – ashtray; 6 – right cross member; 7 – right console screen; 8 – instrument panel; 9 – central bracket; 10 – left console screen; 11 – left cross member.
6. Remove the screws and disconnect the right 7 and left 10 screens from the instrument panel panel 8 (see Fig. 2.1).
7. Unscrew the screws securing the instrument cluster.
8. Unscrew the screws connecting the right cross member 6 to the dashboard panel 8.
9. Remove plug 4 and unscrew the screw securing the instrument panel panel 8.
10. Remove the instrument panel 8 as an assembly with switches for instrument lighting, fog lights, rear window heating, hazard warning lights and the cigarette lighter.
11. Disconnect all electrical wires.
12. To remove panel 1 assembled with trim 2, remove the screws securing the instrument panel to bracket 3 and left cross member 11.
13. If necessary, you can remove the screws and remove the dashboard trim, as well as the interior ventilation nozzles and air ducts.
Installation of the dashboard is carried out in the reverse order.
Instrument cluster Key switches On-board control system Trip computer External mirror control unit Control of interior ventilation and heating Fig. 1.2. Controls The location of the controls is shown in Fig. 1.2. 1 – front door glass blower nozzle. 2 – lever for switching direction indicators and headlights. 3 – side…
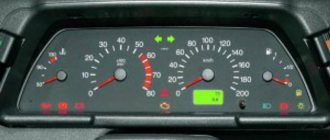
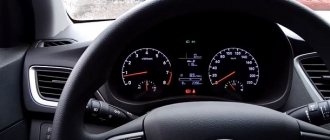
Rice. 1.3. Instrument cluster 1 (Fig. 1.3) – coolant temperature indicator. The transition of the arrow to the red zone of the scale indicates overheating of the engine. In this case, check the operation of the thermostat and electric fan of the cooling system. 2 – tachometer. Indicates the engine speed. The yellow zone of the scale indicates the engine operating mode with high...
1.2.3 Key switches
Switching on and off consumers is done by sequentially pressing the switch key. When the exterior lighting is turned on, the key symbols are illuminated: – side light switch. The side lights are turned on and off by successively pressing the button. When the side lights are turned on, the indicator in the button itself lights up; – headlight switch. By pressing the key...
Rice. 1.4. On-board control system The on-board control system block is shown in Figure 1.4. 1 – indicator of insufficient oil level in the engine crankcase. Lights up orange if the oil level in the engine crankcase has dropped below the “MIN” mark of the indicator. Before adding oil, check whether there is any oil leakage due to loss of tightness of the lubrication system. 2...
Rice. 1.5. Trip computer The trip computer (Fig. 1.5) is installed on some of the cars produced and is designed to measure, accumulate and display one of seven parameters on a digital display: – fuel consumption (current, average, total); – average speed; – distance traveled; – current time; – travel time. When you press the button...
Some of the cars produced are equipped with electrically controlled exterior mirrors. WARNING When the ignition is turned off, the trip computer indicator turns off, but the accumulated information and clock progress are saved. If the battery is disconnected, all accumulated information is lost. If the voltage drops in the on-board network...
Rice. 1.7. Interior ventilation and heating controls: 1 – heater electric fan switch; 2 – lever for supplying air to the driver’s and passengers’ foot area; 3 – heater tap control lever; 4 – air supply lever to the windshield; 5 – nozzle for blowing glass of the front doors; 6 – rear window heating switch; 7 – side nozzle; 8 – central nozzles; 9 – lever…
Changing the dial design
Another fairly simple way to tune the instrument panel is to change the dial design.
1. The structure is dismantled and dismantled. 2. Purchase or create your own sticker that will be used to decorate the instrument panel. 3. Peel off the old dial and glue on the new one. 4. We assemble the structure and install it.
In addition to the dial, you can change the color of the hands. To do this, paint is applied using a spray can.
High instrument panel
According to the diagram presented below, the VAZ 2109 with a high panel has the following components.
| Item number | What is this |
| 1. | Ignition switch |
| 2. | Hazard switch |
| 3. | Windshield wiper and washer control lever |
| 4. | Radio socket |
| 5. | Central nozzles of the interior heating and ventilation system |
| 6. | On-board computer (not available on all trim levels) |
| 7. | Dashboard |
| 8. | Glove compartment lid (glove compartment) |
| 9. | Side nozzles of the interior heating and ventilation system |
| 10. | Speaker (loudspeaker) trim |
| 11. | Shelf |
| 12. | Power window switches (available on certain trim levels) |
| 13. | Cigarette lighter |
| 14. | Control panel for heating and interior ventilation system |
| 15. | Gearbox shift lever |
| 16. | Hand brake lever |
| 17. | Ashtray |
| 18. | Carburetor choke handle |
| 19. | Gas pedal |
| 20. | Brake pedal |
| 21. | Clutch |
| 22. | Horn switch (horn) |
| 23. | Instrument panel light switch |
| 24. | Headlight hydrocorrector |
| 25. | Front seat heating switch (available as standard) |
| 26. | Rear fog light switch |
| 27. | Front fog lamp switch (not available on all trim levels) |
| 28. | Rear defogger switch |
| 29. | Hood lock drive lever |
| 30. | Turn signal and light control lever |
| 31. | Outdoor optics switch |
| 32. | Instrument cluster |
In order to eliminate certain malfunctions, monitor the operating parameters of the engine and vehicle systems, it is necessary to learn how the instrument cluster with a high panel is designed when you first get acquainted with the VAZ 2109.
Which bulbs are suitable for the 2114th model
In general, the current legislation provides for quite serious sanctions against motorists who dare to make any changes to the design of the vehicle at their own discretion. In accordance with the rules, they are obliged to replace components and assemblies only with analogues of those chosen by the manufacturer. Failure to comply with this requirement provides grounds for punishment of the driver.
Thus, more and more owners are installing LED lamps on their 2114 Ladas instead of the standard halogen ones. This choice is easy to justify. In particular, they:
- consume approximately 8-9 times less electricity, which means the load on the on-board power system is reduced;
- last 5-10 times longer;
- give brighter light;
- practically do not heat up.
Finally, the dashboard looks much more attractive, because the light bulbs can be of different colors - blue, red, green, etc.
The problem is that LEDs cost about twice as much, but this disadvantage is more than compensated by their longer lifespan. In addition, LED lamps are becoming cheaper every year.
Tidy 2115: description and purpose of buttons and knobs
If everything is simple with the levers on the steering rack, there is a headlight position switch and a turn signal switch on the left. The buttons are more complicated. On the dashboard, the main keys are placed in a separate “strip”. To understand the essence, we present their decoding from left to right.
- Switch for outside parking lights.
- Activation of low beam headlights.
- Front fog lights.
- Rear PTFs. If not installed, reserve.
- Rear window heating button.
Lada 2115: the oil light on the center panel is on
If an icon in the shape of a watering can appears on the console, this indicates that there are problems in the engine lubrication system. This is caused by a drop in the oil level in the crankcase or a pump malfunction. If the engine is old, the problem may be caused by clogged oil lines.
What does the exclamation mark on the Lada 2115 tidy mean?
On the "tag" the symbol is used in only one form - a red indicator in a circle. The icon indicates a malfunction in the vehicle's brake system. If this symbol lights up while driving, stop and find the cause of the breakdown. Usually it is enough to add fluid to the expansion tank or replace worn pads.
The battery light on the dash is on 2115
A red battery icon indicates that the battery is not charging properly. A complete diagnosis of on-board systems associated with the generator set and its wiring is required.
Instrument cluster VAZ 2115
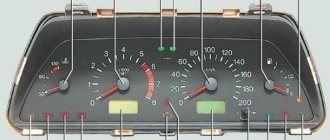
| Rice. 1.3. Instrument cluster |
1 (
rice.
1.3 ) – coolant temperature indicator.
The transition of the arrow to the red zone of the scale indicates overheating of the engine. In this case, check the operation of the thermostat and electric fan of the cooling system.
2 – tachometer.
Indicates the engine speed. The yellow zone of the scale indicates engine operating mode with high crankshaft rotation speed, the red zone of the scale indicates modes that are dangerous for the engine.
3 – control lamp for turning on the direction indicators on the left side.
Lights up with a green blinking light when the left turn is turned on.
4 – control lamp for turning on the direction indicators on the right side.
Lights up with a green blinking light when the right turn is turned on.
5 – speedometer.
6 – fuel level indicator.
7 – fuel reserve warning lamp.
Lights up orange if there is less than 4–6.5 liters of gasoline left in the fuel tank.
8 – control lamp for turning on the side light.
Lights up green when the exterior lights are turned on.
9 – warning lamp for emergency condition of the working brake system.
Lights up red when the fluid level in the brake hydraulic reservoir drops below the “MIN” mark.
10 – control lamp for turning on the high beam headlights.
Lights up blue when the high beam headlights are turned on.
11 – reset button.
12 – mileage indicator.
The top line of the indicator indicates the total mileage of the car, and the bottom line is a daily counter of the distance traveled. Reset the daily counter readings by holding button 11 pressed for more than 5 seconds with the car stopped.
Resetting the daily counter to zero occurs in the same way when removing the terminal from the battery.
13 – warning lamp for turning on the hazard warning lights.
Lights up with a red flashing light when the hazard warning lights are turned on.
14 – “check engine” warning lamp
(Cars manufactured before 2000 displayed the word symbol “CHECK ENGINE”). Connects if the car is equipped with a fuel injection system. A short-term lighting of the lamp when the ignition is turned on indicates a self-test of the system and, if there is no malfunction, it goes out. If any defect is detected in the system, the lamp flashes or stays on.
15 – time and temperature indicator.
Switching between the time display and the ambient temperature display is carried out by briefly pressing button 11.
When the ignition is turned on at an ambient temperature above +2 °C, the clock indication always appears. When the ambient temperature drops below +2 °C, the indicator displays the clock for 3 s, and then switches to temperature display, which is displayed in a flashing mode for the first 10 s.
When the outside air temperature rises above +3 °C and drops again to +2 °C:
– in the case of a clock display, the indicator automatically switches to the temperature display, the readings of which are displayed in a flashing mode for the first 10 s;
– in the case of temperature display, its normal mode is interrupted by a ten-second flashing mode.
The hours and minutes are set in the time display mode by rotating button 11 towards the signs “h” - hours and “m” - minutes.
After removing the terminal from the battery and subsequent restoration of voltage, the time is counted from zero.
16 – battery charge indicator lamp.
Lights up red when the ignition is turned on and goes out after the engine starts. If the lamp lights up brightly or glows at full intensity while the engine is running, it indicates a weak tension (break) in the generator drive belt or a malfunction in the charging circuit, and possibly the generator itself.
17 – indicator lamp for turning on the parking brake.
Lights up red when the parking brake is applied.
18 – warning lamp for insufficient oil pressure.
Lights up red if the pressure in the engine lubrication system is insufficient.
19 – reserve.
Some cars produced are equipped with an instrument cluster without a time and temperature indicator. In this case, the daily trip meter is reset by briefly pressing the reset button.
Video about “Instrument cluster” for VAZ 2115
THE SECRET of replacing the instrument panel bulbs of a VAZ 2115.
instrument panel, tarpeda, backlight control, VAZ 2115
Self-diagnosis of the instrument panel. VAZ 2110, 2111, 2112. VAZ 2114, 2115, LADA.
Why does the VAZ 2114 instrument panel not work? A massive problem in our auto industry
The search for possible reasons why the VAZ 2114 instrument panel does not work periodically worries one or another owner of cars of this model. It’s clear that if you don’t see a single parameter on the dashboard, you can only drive, as they say, by touch. True, there are certain specialists who still managed to somehow crawl to the base without all the evidence, but somehow I don’t want to follow their example.
And is it necessary to create additional troubles and the risk of accidents on the road? So the majority of those to whom this incident happened still get to work (or wherever they were going) by public transport in order to return to solving the problem in the evening on their own or with the help of a familiar mechanic.
Why does the VAZ 2114 instrument panel not work? Offhand, we can name several reasons. However, they may not exhaust the entire list, since the individual characteristics of the car may appear. We will try to talk about this and many other equally interesting things in our article today.
What can you do with the dashboard?
Tuning of the instrument panel has been carried out over the past few years. During this time, a huge number of methods for modifying the panel have appeared, some are used quite often, others are rarely implemented.
You can change the instrument panel as follows:
- Change the backlight color.
- Install the backlight control.
- Change the design of the scale and arrows.
- Install a ready-made dashboard.
Let's consider the above tuning methods in detail.
The most common breakdown
Before digging into the inside of the car, check how securely the ground wire leading to the front panel is secured. A restless passenger in front often simply pulls him out of his place with his feet. To prevent the situation from repeating itself, after fastening it is worth insulating the wire from reach.
Its signs are very characteristic:
- All indicators do not work: speedometer, tachometer, odometer, fuel level recorder, coolant temperature sensor;
- The rest of the equipment - optics, radio, even the panel backlight - turn on normally and do not act up;
- The ignition works properly, the car does not refuse to start;
- Fuse F3 is almost 100% blown. It is located in the mounting block and will have to be changed. But first you need to find out why it was covered, otherwise the new one installed will suffer the same fate. In most cases, a short circuit is to blame for burnout. On well-used VAZ-2114, the fuse often blows after each wash. Instead of carrying a spare one, you need to figure out where moisture is getting into it.
If the fuse is intact, this is not a reason to immediately leave it alone. It would be a good idea to remove it and check the contacts: if the fuse is live, but the terminals are oxidized, the circuit will be interrupted, and the device will stop showing any signs of life.
The next weak link: It is the ignition relay. It is located to the left of the steering column, fixed on a pin, so to speak, upside down. You need to remove it and try to make direct contact with the wires. If there are obvious signs of revival on the instrument panel, it immediately becomes clear that the time has come to change the relay.