Not only the maneuverability of the car, but also your safety depends on the serviceability of the steering. In some situations, losing control of a car moving at speed can lead to irreparable consequences. If you detect the slightest changes in the behavior of the car or extraneous sounds emanating from the elements of the control system, you should immediately stop driving and take measures to identify and eliminate malfunctions. In this article we will talk about the reasons why a knock occurs in the steering rack when turning the steering wheel, and the possible consequences of this phenomenon using the example of a VAZ-2109 car. We will also try to figure out how to diagnose a malfunction of the rack and pinion mechanism and fix it ourselves.
Types of control systems
The steering design of modern cars can be of two types:
Almost all models of classic VAZs are equipped with the first. It is called a worm because the main element of the mechanism here is the so-called worm, which is a kind of continuation of the steering shaft. It is in constant engagement with a roller mounted on the shaft of the bipod, which, in fact, transmits force to the steering rods. This design allows the wheels to be turned at a large angle and perfectly dampens shock and vibration coming from the wheels.
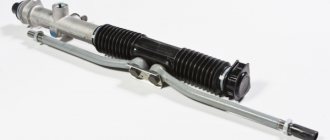
Front-wheel drive VAZs of the Samara and Lada families are equipped with rack and pinion steering mechanisms. Their mechanism has a different design. Everything is a little simpler here. The end of the steering shaft is equipped with a gear, which, pressing against a special rack that has teeth on the upper side, forces it to move in a horizontal direction. This design is simple, compact and highly reliable.
More details about the rack and pinion mechanism
At first glance, the design of the rack and pinion mechanism may seem quite complicated. If we take into account only its main parts, not counting the steering wheel and column, then there will be more than twenty of them. The rack itself looks like it has been ground down to half the shaft.
On its upper part there are longitudinal teeth that engage with the drive gear. The rack is enclosed in an aluminum housing filled with a special lubricant. Its central part has holes for attaching the inner tie rod ends. In this place the crankcase has a cut, covered with a rubber boot. Inside, the rail is held in a certain position thanks to a support sleeve, usually made of fluoroplastic. To adjust its mobility, a special stop is used.
As you can see, in fact, there is nothing complicated about the rack and pinion mechanism. If you understand what all the elements are for and how they work, you can service and repair it yourself without any problems.
Messages 15
1 Topic by pyton 2009-11-16 17:03:31
- python
- User
- Offline
- Registered: 2009-05-10
- Messages: 14
- Reputation: [ 0 | 0 ]
Topic: Steering Rack Adjustment
There is an obscene amount of play near the steering rack when the steering rods swing near the rack (the tips are fine in my opinion). I decided to fix it by tightening the steering rack with a special wrench, I bought it on the market (a polyhedron at one end with a hole and a fork type at the other). In the pit, with the protection removed, the key (polyhedron) does not fit in any way, because... there is not enough space. Is it really necessary to remove the entire rack to make adjustments? And what changes when twisting and unscrewing the polyhedron?
2 Reply from vazovod 2009-11-16 17:11:50
- vazovod
- User
- Offline
- Registered: 2009-11-08
- Messages: 5
- Reputation: [ 0 | 0 ]
Re: Steering Rack Adjustment
There is an obscene amount of play near the steering rack when the steering rods swing near the rack (the tips are fine in my opinion). I decided to fix it by tightening the steering rack with a special wrench, I bought it on the market (a polyhedron at one end with a hole and a fork type at the other). In the pit, with the protection removed, the key (polyhedron) does not fit in any way, because... there is not enough space. Is it really necessary to remove the entire rack to make adjustments? And what changes when twisting and unscrewing the polyhedron?
On the nine, I pulled it right from under the hood, though with difficulty, and in my opinion the key needs to be adjusted. The main thing is not to tighten it too much, otherwise the steering wheel will bite
3 Reply from Dimitry838 2009-11-16 17:31:45
- Dimitri838
- User
- Offline
- Registered: 2009-01-14
- Messages: 689
- Reputation: [ 0 | 0 ]
Re: Steering Rack Adjustment
From under the hood everything is done quite easily, if you tighten it, the steering wheel will not adjust itself and therefore the steering will be tight.
4 Reply from pyton 2009-11-16 17:34:42
- python
- User
- Offline
- Registered: 2009-05-10
- Messages: 14
- Reputation: [ 0 | 0 ]
Re: Steering Rack Adjustment
On the nine, I pulled it right from under the hood, though with difficulty, and in my opinion the key needs to be adjusted. The main thing is not to tighten it too much, otherwise the steering wheel will bite
No matter how I twist it, there is clearly not enough space to insert it into the polygonal nut!
5 Reply from $L!M 2009-11-16 17:41:07
- $L!M
- User
- Offline
- Registered: 2009-01-09
- Messages: 59
- Reputation: [ 0 | 0 ]
Re: Steering Rack Adjustment
There is also a rubber plug in that hole (if it is not lost), it needs to be pulled out.
6 Reply from Lexa62 2009-11-16 19:14:26
- Lexa62
- User
- Offline
- Registered: 2009-01-12
- Messages: 212
- Reputation: [ 0 | 0 ]
Re: Steering Rack Adjustment
piton, you can tighten the nut through the engine compartment, without any problems, maybe you're not twisting it there. It is located in the rack housing on the engine side at an angle to the steering wheel axis. Wow, how I wrapped it up.
And it drags on until it starts to “snack.” I pulled it up to this point, loosened the nut, checked it again - it doesn’t bite - that’s normal. Snapping is when, during sharp rotations of the steering wheel, “obvious interference” with free rotation is felt - well, you can hardly confuse it)))
Knock in the steering rack
On average, the stock steering rack of VAZ cars lasts up to 100 thousand kilometers. Naturally, in normal operation. In some cases, it may fail much earlier. The main symptom of a faulty steering rack is a knocking sound. It appears either when the steering wheel is turned sharply, or when it is turned too much, or when it hits a bump. Knocking in the rack can occur due to:
- loosening the thrust nut;
- loosening the tie rod bolts;
- natural wear of the rack or drive gear;
- malfunction of the support sleeve;
- wear of mechanism parts caused by rupture of the boot.
Next, we will look at each of the reasons in more detail, but first we will figure out how to correctly and accurately diagnose a breakdown.
Signs of breakdown
By means of steering racks, rotational movements from the steering wheel through a rack and pinion mechanism are transmitted to the rotary levers, which turn the front wheels with rods.
If you find one of the symptoms listed below on your car, be sure to conduct a full diagnosis of the condition of the unit, and then repair it.
Signs of a faulty steering rack include:
- A grinding noise is observed in the rack area when the steering wheel is rotated;
- The steering wheel periodically sticks;
- Lubricant begins to leak from the seals;
- The steering wheel has noticeable play.
These symptoms may also indicate problems in other components of the steering mechanism, but first you must check the condition of the rack, disassemble it and decide whether to replace or repair it.
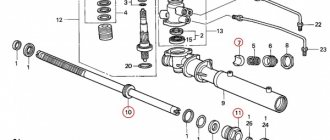
Node diagram
Fault diagnosis
So, if you notice that the steering rack is knocking, you need to determine where exactly this knock is coming from and discard the possibility of malfunctioning elements of the car’s chassis. Let's start with general points. Place the car on a level surface. Leave the cabin, open the hood. Start turning the steering wheel left and right, turning it all the way. If during this process the steering rack knocks, making a characteristic sound when turning the steering wheel sharply, you can be sure that it is definitely it, and not the shock absorbers or CV joints. To be more convincing, ask an assistant to turn the control wheel, and you yourself place your palm on top of its housing. When the wheels turn, you will definitely feel the vibration with your hand during this very knock. These signs are typical for wear of the rack itself, the drive gear, or a malfunction of the support sleeve. Similar symptoms can also appear when the stop nut is loosely tightened.
If the knocking noise does not appear when turning the wheels, pull the steering rods by holding them with your hands. If there is a problem, you will definitely find a corresponding play.
Messages 15
1 Topic by pyton 2009-11-16 17:03:31
- python
- User
- Offline
- Registered: 2009-05-10
- Messages: 14
- Reputation: [ 0 | 0 ]
Topic: Steering Rack Adjustment
There is an obscene amount of play near the steering rack when the steering rods swing near the rack (the tips are fine in my opinion). I decided to fix it by tightening the steering rack with a special wrench, I bought it on the market (a polyhedron at one end with a hole and a fork type at the other). In the pit, with the protection removed, the key (polyhedron) does not fit in any way, because... there is not enough space. Is it really necessary to remove the entire rack to make adjustments? And what changes when twisting and unscrewing the polyhedron?
2 Reply from vazovod 2009-11-16 17:11:50
- vazovod
- User
- Offline
- Registered: 2009-11-08
- Messages: 5
- Reputation: [ 0 | 0 ]
Re: Steering Rack Adjustment
There is an obscene amount of play near the steering rack when the steering rods swing near the rack (the tips are fine in my opinion). I decided to fix it by tightening the steering rack with a special wrench, I bought it on the market (a polyhedron at one end with a hole and a fork type at the other). In the pit, with the protection removed, the key (polyhedron) does not fit in any way, because... there is not enough space. Is it really necessary to remove the entire rack to make adjustments? And what changes when twisting and unscrewing the polyhedron?
On the nine, I pulled it right from under the hood, though with difficulty, and in my opinion the key needs to be adjusted. The main thing is not to tighten it too much, otherwise the steering wheel will bite
3 Reply from Dimitry838 2009-11-16 17:31:45
- Dimitri838
- User
- Offline
- Registered: 2009-01-14
- Messages: 689
- Reputation: [ 0 | 0 ]
Re: Steering Rack Adjustment
From under the hood everything is done quite easily, if you tighten it, the steering wheel will not adjust itself and therefore the steering will be tight.
4 Reply from pyton 2009-11-16 17:34:42
- python
- User
- Offline
- Registered: 2009-05-10
- Messages: 14
- Reputation: [ 0 | 0 ]
Re: Steering Rack Adjustment
On the nine, I pulled it right from under the hood, though with difficulty, and in my opinion the key needs to be adjusted. The main thing is not to tighten it too much, otherwise the steering wheel will bite
No matter how I twist it, there is clearly not enough space to insert it into the polygonal nut!
5 Reply from $L!M 2009-11-16 17:41:07
- $L!M
- User
- Offline
- Registered: 2009-01-09
- Messages: 59
- Reputation: [ 0 | 0 ]
Re: Steering Rack Adjustment
There is also a rubber plug in that hole (if it is not lost), it needs to be pulled out.
6 Reply from Lexa62 2009-11-16 19:14:26
- Lexa62
- User
- Offline
- Registered: 2009-01-12
- Messages: 212
- Reputation: [ 0 | 0 ]
Re: Steering Rack Adjustment
piton, you can tighten the nut through the engine compartment, without any problems, maybe you're not twisting it there. It is located in the rack housing on the engine side at an angle to the steering wheel axis. Wow, how I wrapped it up.
And it drags on until it starts to “snack.” I pulled it up to this point, loosened the nut, checked it again - it doesn’t bite - that’s normal. Snapping is when, during sharp rotations of the steering wheel, “obvious interference” with free rotation is felt - well, you can hardly confuse it)))
7 Reply from pyton 2009-11-17 09:58:31
- python
- User
- Offline
- Registered: 2009-05-10
- Messages: 14
- Reputation: [ 0 | 0 ]
Re: Steering Rack Adjustment
so the rods are loose or the rack itself is loose.
the rack is loose, you can visually see how it swings
8 Reply from pyton 2009-11-17 10:21:04
- python
- User
- Offline
- Registered: 2009-05-10
- Messages: 14
- Reputation: [ 0 | 0 ]
Re: Steering Rack Adjustment
piton, you can tighten the nut through the engine compartment, without any problems, maybe you're not twisting it there. It is located in the rack housing on the engine side at an angle to the steering wheel axis. Wow, how I wrapped it up.
And it drags on until it starts to “snack.” I pulled it up to this point, loosened the nut, checked it again - it doesn’t bite - that’s normal. Snapping is when, during sharp rotations of the steering wheel, “obvious interference” with free rotation is felt - well, you can hardly confuse it)))
Loosening the thrust nut
Often the steering rack knocks due to the loosening of the stop nut, which serves to adjust its movement inside the crankcase. The more it is tightened, the tighter the steering wheel will rotate, and vice versa. In other words, a nut that is loosened more than expected causes play to occur between the rack and the stop. This is what causes the knocking.
It is not difficult to check that the steering rack is knocking precisely for this reason, but for this you will need a special octagonal wrench for 17. You can buy it at any car store. Now you need to find the location of the nut. And it is located on the lower part of the rack housing in the area of the vacuum brake booster. It is usually protected by a plastic or rubber cap that will need to be removed. When this is done, try using a wrench to tighten the nut by turning it counterclockwise. A normal tightening is considered when the nut is screwed in all the way and then loosened by 24 degrees. This ensures a gap between it and the stop equal to 12 mm.
Adjustment
So, the situation is such that tightening the steering rack can still give a positive result. Therefore, you need to find out how to tighten the knot and what is required for this.
You can adjust the rack through the bottom of the car, removing the engine protection, or through the top. In the second case, the work will have to be done by touch. So decide for yourself what is more convenient for you.
- To adjust the steering rack, you will need to tighten the adjusting screw. You can find it in the steering mechanism. To be more specific, in the end cap.
- It is optimal to have an overpass or a pit at your disposal in the garage. If there are no such conditions, you can get by by raising the car with a jack. Only in this situation will it be necessary to additionally secure the car in order to avoid it sliding off the jack and the likely consequences.
- Before lifting the body with a jack, be sure to align the front wheels straight.
- You can measure the backlash using a backlash meter. Moreover, they can be old or electronic. The latter are more relevant and convenient to use, but some people don’t have to choose. What you find is what you will use.
- According to current norms and standards, for the VAZ 2109 the steering wheel play should not exceed 10 degrees.
- Find the adjusting screw and begin to tighten it gradually. The operation is carried out slowly. Periodically check the steering wheel movement and any play or knocking in the steering column.
- Use a special key for adjustment. It is available at any auto parts store.
- The key is inserted into the adjusting screw and turned counterclockwise. Scroll a little and check the result.
- The procedure may take a long time. Still, take your time.
- When you feel that the adjustment has reached the desired level, take a test drive in your car, feel how the steering wheel moves, whether the knocking or play has disappeared, how hard the steering wheel rotates.
- If the steering wheel has become too tight, you will have to slightly loosen the tension on the adjusting screw.
We disassemble the rack
Now we move on to faults that cannot be detected without dismantling the steering mechanism. If you have eliminated the play between the rods and the rack, as well as between it and the stop, but the knocking does not disappear, then you will have to dismantle the entire device.
Repairing VAZ steering racks is not a complicated process. Once you take it apart yourself, you will immediately understand the principle of its operation. First, remove the rubber support located on the right side of the crankcase and remove the rubber boot. On the left side you also need to remove the protective cap and support. Using an octagonal wrench, unscrew the stop nut and knock out the stop.
Using a screwdriver, pry up the rubber boot of the drive gear and remove it. Unscrew the bearing fixing nut with a 24mm wrench. Remove the gear from the crankcase. After this, you can pull out the rail itself.
Repair
The first thing you will need to carry out your own repairs is a repair kit. They are available at almost any auto parts store. However, we strongly recommend that you buy only high-quality kits so that the result of your DIY repair lasts as long as possible.
What you need for work
The proposed kits are incomplete and complete. You will definitely need the following kit components:
- Needle bearing;
- A pair of rubber seals for the bushing;
- Support sleeve made of plastic;
- Set of gaskets;
- Spring;
- Retaining rings;
- Support bearing;
- Drive gear;
- Boot cover;
- Rail;
- Set of ties for the boot.
Repair kit Now that the kit is ready, the tools are available, and there is enough free time, you can get to work.
- First, remove the boot, end caps and stops. As you disassemble elements, even the smallest and insignificant at first glance, be sure to evaluate their current condition. If necessary, all worn-out elements will be replaced with new ones taken from the repair kit.
- Using an octagon, unscrew the screw plugs, which will allow you to remove the springs, retaining rings, and thrust bushings.
- Remove the bearing and check if it has any play. The repair kit includes a new bearing, so if the old component is in satisfactory condition, it is better to replace it immediately. It’s not for nothing that you took on such a complex process to get everything done 50%.
- Remove and inspect the drive gear. Next, you can completely remove the rail itself.
- Be sure to replace the support shaft bushing, not forgetting about the rubber bands. They are also included in the kit.
- Take your time to remove the rubber bands from the sleeve. First, insert the element into the crankcase, after which you can cut off the elastic with scissors or a sharp knife.
- The most difficult step is replacing the needle bearing. To remove it, you will need a special key. But you can do without it. In this case, arm yourself with a 1.5 mm drill bit and a drill. Using a drill, make a hole in such a way as to loosen the end of the bearing. Use a punch to knock out the old bearing from the crankcase.
- Before installing the new needle bearing, be sure to thoroughly clean the steering rack housing of accumulated debris and steel shavings from drilling.
- The hole made cannot be left. To eliminate it, you can mix metal filings with superglue. This mixture will harden quickly and give an excellent result.
- Lubricate literally everything that can be lubricated in the steering rack assembly. Experts advise using Litol 24 or other lubricants of similar quality. It wouldn't hurt to lubricate the CV joints.
- Reassemble the unit by following the reverse sequence of dismantling.
If you don’t have a key to remove the needle, repairing the steering rack yourself allows you to significantly save on replacement, plus gain a lot of experience in performing far from the simplest work related to your VAZ 2109. But you can do it easier, without taking any risks, by contacting a trusted car service center.
Unit in a vice
Checking status
Having completed the repair, you should not think that now the steering rack will serve tens of thousands of kilometers and will no longer cause you trouble. Like many other components, the condition of the rack must be periodically monitored.
What to look for
Your actions
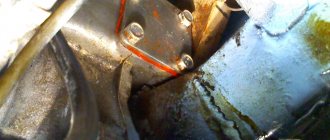
Mounting nuts and bolts
These fasteners are subject to vibration after repair as they are used. Therefore, it is recommended to check and tighten them every 250-300 kilometers.
You can check it a little less often, approximately every 500-1000 kilometers, depending on the operating conditions of your car. Due to different quality, some anthers can last quite a long time, while others will require replacement after 10 thousand kilometers. The choice is yours which parts to use
The rack itself should be constantly monitored
Listen to the behavior of the steering mechanism, pay attention to the above signs of malfunction. As part of a scheduled technical inspection, be sure to include a check of the steering racks in the list of activities.
The repair cannot be called complicated, but it takes a lot of time
Plus, it is extremely important to perform all operations as carefully and efficiently as possible. Otherwise, the result will not last long and you will soon have to interfere with the design of the VAZ 2109 steering unit again
Wear
Pay attention to the condition of the drive gear. Its teeth should not show any signs of mechanical damage.
If they are present, it needs to be changed. The same applies to the rack teeth. Place the gear on it and watch how they engage. If wear is evident, it is better to replace the mechanism. Repairing steering racks, which involves restoring them, is possible, but hardly justified. Even if we manage to do something, it won’t be for long. Over time, the malfunction will definitely manifest itself.
If the mechanism is worn out, there is only one way out - a new steering rack. The price of the assembled spare part is about 3,500 rubles. Agree, it’s not that expensive when it comes to safety.
Support sleeve
Are the rack and pinions ok? Go ahead. We remove the fluoroplastic bushing from the crankcase. It is because of this that the VAZ-2109 steering rack most often knocks, or rather, because of its wear. If it is worn out or deformed, we replace it immediately, since it costs mere pennies. But it is best to buy not just one, but a repair kit, which also includes a stop with a nut and a spring, as well as a set of seals and gaskets. By replacing the bushing and all these small elements, you will get a completely working steering rack.
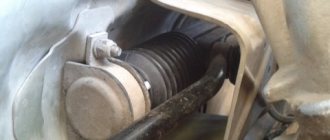
Boot rupture and mechanism wear
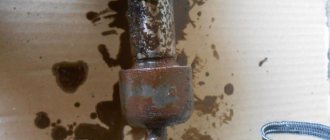
The rubber boot on the crankcase serves to protect the entire steering mechanism from dirt, dust and moisture. In addition, it prevents lubricant from leaking out of the crankcase. You've probably heard the phrase “steering rack is leaking.” So, this lubricant leaks out through the torn boot. Damage to it will inevitably lead to premature failure of the control mechanism. In addition to leaving it without lubrication, moisture and dust will seriously accelerate the wear process. If you discover that the steering rack is leaking in your car, immediately go to the store for a new boot. And don't forget to buy lubricant.
The cause of knocks from below can be faults not only in the suspension, but also in the steering of the car.
The condition of the steering greatly affects both the ease of driving and traffic safety.
The cause of knocks and vibrations on the steering wheel can be the condition of the ball joints of the steering rods and steering mechanism, and the condition of the car's wheels.
To check the steering, place the car on a horizontal platform, open the hood and perform the following operations.
1. Turn the wheels to the right until they stop. In this position, the left wheel tie rod ball joint becomes accessible, which can be seen from under the left wing of the car.
2. Check the integrity of the rubber protective boot of the steering rod joint.
3. Have an assistant rock the steering wheel from side to side and observe the connection between the ball joint and the telescopic strut arm.
There should be no visible play (play) in the ball joint.
Be sure to replace a tie rod end with a damaged joint boot or increased play in the joint with a new one.
When replacing tie rod ends, wheel alignment angles may be disrupted.
4. Check the condition of the right wheel joint in the same way.
5. A rack and pinion steering mechanism is installed on the front panel separating the engine compartment from the passenger compartment.
Ask an assistant to sharply shake the steering wheel left and right and watch the steering mechanism.
If the steering gear housing moves from side to side, it is necessary to tighten its mounting to the body.
Do not use excessive force when tightening the steering housing nuts as this may cause the studs to break and be difficult to replace.
The tightening torque of the steering gear housing mounting nuts is 15–19 Nm.
6. Pay attention to whether there are any gaps at the junction of the steering rods with the steering rack.
If the gaps cannot be eliminated by tightening the tie rod mounting bolts, then the rubber-metal hinges of the inner tie rod ends must be replaced.
7. Carefully inspect the front tires. Strong impacts from the road surface, especially when hitting potholes, can cause the cords in the tire carcass to delaminate and cause the tire to bulge ("bulge") or become misaligned.
A possible cause of vibration and shock in the steering wheel when driving at speeds above 70–80 km/h may be an imbalance of the front wheels.
Contact a car service center or tire shop to check the balancing of the front wheels.
If shocks and vibrations appear on the steering wheel when you press the brake pedal, contact a car service to replace the brake pads, repair or replace the front brake discs.
Knock on the control rack
Now we will talk about the situation when a knock appeared on the control rack, the prerequisites for this phenomenon and methods for eliminating them.
Preparation for repair
Since we are talking about intervention in the steering system, suspension, special attention should be paid to preparation
- If you have a lift or inspection pit, you will be able to perform operations much faster and easier, which is the most important thing.
- Be sure to get a set of sockets and spanners. It is extremely difficult to work without them. In addition to the wrenches, you will need wire cutters, pliers, a hammer, a flat head screwdriver, and a tie rod end remover.
- To remove all fasteners that have been tightened for a long time, a can of WD40 will certainly not hurt. It removes oxidation from nuts and removes rust. In addition to the almighty WD40, buy graphite lubricant or grease. By treating the fasteners with them, you will be able to remove them much easier in the future.
- The presence of rags, a metal brush, fresh gasoline or solvent is welcome.
- Ask your friend to help you with your work. It's much easier to change steering wheels with four hands.
Be sure to remove the negative terminal from the battery in order to de-energize the car. We don't want short circuits or burned out wiring.
Repair kit
Hanging the axle
To safely and independently change the steering rack in your own garage, it is extremely necessary to correctly and securely hang the front axle of the car.
Sometimes this issue is not given due attention, as a result of which the car falls, this leads, at best, to damage to the elements of the car, and at worst, to injuries to the repairer himself.
In order to do everything in accordance with safety standards, you need to:
- Place your VAZ 2109 on a level surface. Typically, garage floors are fairly level;
- Install wheel chocks, shoes, bars or other similar means under the rear wheels. Block each wheel front and rear;
- Pull the handbrake all the way to stop the wheels. Just make sure first that the handbrake works;
- Set the steering wheel in neutral position;
- Slightly loosen the fasteners on the wheels;
- The front of the car needs to be raised. Here it is better to use two reliable jacks at once;
- Near the jacks, additionally place metal stops that are adjustable. If there are no special devices, an ordinary block of wood, boards or some kind of stump will do. The main thing is that when you make contact with the body, when you pull or push it, the car does not tip over;
- Remove the front wheels completely and begin replacing the steering racks.
Optimal working conditions
Dismantling
Before installing a new steering rack, you need to get rid of the old one. For this:
- Get to the place where the rack is attached in the engine compartment. To do this, you will probably have to remove the alarm and gas adsorber, at the same time dismantling the hoses.
- Disconnect the rack from the steering column shaft. Before this, the plastic casing is removed, blocking the path to the spline joints. The rack shaft is released by unscrewing one bolt.
- Next, remove the steering ends from the levers. Here haste can significantly harm you. Gradually brush the threaded connections, tip pin and mounting nut with a metal brush. Then apply WD40 to these areas. Give the product a little time to react. Then you can use pliers and a screwdriver to remove the cotter pin from the connection. Once the solvent has taken effect, the nuts should come off without much effort.
- If the tip is in normal condition, it is recommended to remove this element from the strut lever with a puller. A more barbaric method can lead to damage, so you will have to change the tips.
- Unscrew the rack fasteners using keys. It is better to treat them with WD40 in advance.
- After unscrewing the nuts, pry the steering rack with a flat screwdriver and remove it from the studs.
- Call a partner to work together to remove the element through the opening in the wheel arch.
Rack and pinion control mechanism
A rack and pinion control mechanism is installed in most types of passenger cars.
Rack and pinion control mechanism
It is simpler in design and does not contain enough moving parts, which means it is more reliable.
The main elements of the rack and pinion control mechanism are the gear and the rack.
How does the control mechanism work?
Under impeccable conditions, the entire mechanism will be able to last up to 100 thousand kilometers of the car.
Also, the presence of a rack and pinion control mechanism significantly reduces the price of the car, which is also very important.
But nothing is perfect, and there are problems with the control racks that require both a professional and non-professional approach.
VESKO-TRANS.RU
AutoNews / Reviews / Tests
- Home
- Auto garage
- Tighten the Steering Rack of VAZ 2109
Tighten the Steering Rack of VAZ 2109
We tighten the correct control rack on a VAZ-2114 with our own hands: tips and the process itself
No one will deny the fact that a working steering wheel in any car guarantees not only the safety of the driver and passengers, but also trouble-free operation in principle. Regardless of the type of control drive, be it worm gear, powered or non-assisted rack and pinion gear, they all require recurring maintenance. VAZ-2114 and all second-generation Samaras received a control mechanism that is quite reliable and easy to repair and adjust. It does not have a hydraulic booster, which makes its service and adjustment easier.
Prerequisites for knocking
Knock on the control rack - where does it come from? Let's find the root cause.
Yes, the control rack is a more common system than the outdated worm type.
As previously mentioned above, even in Russian cars it “goes” 80-100 thousand km, without causing any problems for motorists.
But the early knock, as annoying as it may sound, appears from time to time.
The prerequisites are:
- On a VAZ-21099, for example, a knock on the control rack is often caused by insufficiently tightened fastening bolts. No, they were tightened for the sake of it, it was our amazing roads, creating vibrations, that spun them over time. It's not difficult to remove the knocking noise - you just need to tighten all the fasteners.
- On the VAZ-2110 and all cars in the tenth row family, the support bushing on one side of the rack often wears out. Since the support bushings here are made of plastic, their rapid wear does not become a miracle when traveling along our impeccable, so to speak, roads. Convexities contribute to the appearance of free movement of this element, which is why wear occurs at an accelerated pace.
- The situation is much more serious when the covers protecting the control rack are torn. Then dust and dirt have access to its jagged surfaces, which without undue drama looks like a disaster. The rack will not work for a long time without protection, which is why the unfortunate knock occurs.
- Corrosion of a part is generally a fatal problem, since the control rack will have to be completely changed. It is not cheap, but not more expensive than money and, most importantly, life with health.
- Occasionally, but there is a manufacturing defect. Here the rack in most cases knocks already on a brand new car. Fortunately, if the vehicle is considered to be under warranty, then the replacement of a bad component can be achieved through the “establishment” of the manufacturer of the car. Damage at the factory, poor production quality are more common cases of manufacturing defects.
- Lath material. Typically, it is soft and designed for driving on high-quality roads. When driving through our pits and as a result of constant vibration, metal is removed from the surface of the rack evenly layer by layer, micron by micron, and this leads to premature wear of the support sleeve. In this case, the problem can be solved using 2 methods. Either purchase a new rail or order a similar one made from stronger metal. Usually people who do this will advise you on suitable material.
All motorists, without exception, would like to know how to preserve and extend the life of the control rack, because this is not just an expensive, but also an important component, the failure of which often turns into a disaster.
How to extend the life of a control rack
We will give only three pieces of advice:
- Treat your car very carefully, inspect key components more often, and visit diagnostic centers.
- If you find the slightest knock in the rack, immediately go to a car service center, preferably with a tow truck.
- Take a cautious driving style as expected: do not subject the steering to extreme loads, do not operate the steering wheel suddenly without any circumstances.
Do not overload the vehicle with cargo and passengers. Beware of busy driving on rough roads.
So, we have dealt with the common causes of knocking on the control rack and outlined preventive measures.
Read on the topic: Do-it-yourself repair of the VAZ 2110 control rack.
Even with the most careful, delicate driving, it is not possible to keep the car in perfect condition. Our roads, the harsh climate, and the driving style of other road users are all to blame.
If play occurs in the steering unit, it is quite possible to adjust the rack yourself. The process is not complicated, so it is not necessary to contact a service station.
The force on the front wheels of the VAZ 2109 is transmitted through a gear, which, in turn, interacts with a rack. To eliminate any gaps that arise in the engagement, pressure springs are used.
The rack adjustment is carried out in order to eliminate the resulting backlash, as well as to improve the clarity and obedience of the steering.
Node diagram
The steering rack can be adjusted in two ways.
If the rack is removed and adjusted, we are most often talking about repairing or replacing the unit with a new one. It is recommended to carry out such settings only in these situations
Without dismantling the unit
This method of adjustment is relevant if it is necessary to tighten the rack slightly, remove play, and get rid of knocking noises. Here it is quite possible to do without dismantling work, that is, to set up the mechanism directly on the car
Malfunctions
There are several typical steering rack malfunctions that VAZ 2109 owners encounter. In some situations, simple adjustments can be done, while in others, more detailed intervention in the design of the unit and its components will be required.
Steering rack breakdowns are as follows:
- The steering rack fastenings are loose;
- The rack itself or its gears have worn out;
- Pair engagement is not adjusted properly;
- The bushings at the junction of the rack and steering rods have worn out.
It is not always possible to adjust the rack to eliminate its incorrect operation. This occurs due to the fact that an impressive production of components is formed inside. This can only be determined by dismantling. Therefore, if the adjustment does not bring the expected effect, you will have to remove the rack from the car and check what is wrong with it.
Eliminating backlash
Of course, major repairs are not necessary in every case, and replacement of component parts is also not always necessary, because:
- On the VAZ 2109, the steering rack is adjustable, and if you know how to tighten the steering rack mechanism, then you can remove steering knocks without any financial investment at all
- This is possible, of course, if the knocking is caused by operational or factory control play
- To adjust, you should use a trestle or inspection hole, find the adjusting nut under a layer of dirt, then use a special wrench “17” to tighten it
We disassemble the rack
When you have eliminated the play, but the knocking has not disappeared, then the steering rack on the VAZ 2109 must be disassembled and repaired:
- Repairing the rack yourself will not be difficult, of course, if you know in what sequence the operations need to be performed
- First, we remove the steering rack, and if everything is in order with the rods, then it is not necessary to remove them, just unscrew them from the unit and that’s it
- Then we clamp it in a vice or in a special device for repair.
- And then remove the clamps securing the protective cap, boot, right support and spacer ring
- Subsequently, all other parts are removed (photo with diagram below), including complete pressing out of the bearings
- Then the parts should be cleaned of dirt as thoroughly as possible, followed by washing them in kerosene
- And after cleaning all the parts, they should be very carefully inspected for signs of tears or other damage.
- If small scuffs can be easily removed with sandpaper, all heavily worn parts, and especially damaged ones, must be replaced
- The same approach applies to bearing troubleshooting.
- In their particular case, if there is the slightest doubt about the performance of these devices, parts should be replaced immediately
- You should also understand that tightening the steering rack itself, the procedure, in principle, is not a difficult operation to perform with your own hands
- But disassembling the steering wheel, and even more so replacing it, may require special skills from you; in addition, you will need competent instructions
- When you have absolutely no time or desire to carry out such operations yourself, or you do not want to delve into all the intricacies of this process, then the best option for you would be to perform all repair work in a specialized automobile workshop
- You, of course, understand that the price of specialist services will cost more than self-repair
- Moreover, the amount of the invoice that you will receive may vary greatly.
- For example, carrying out troubleshooting is one cost, but a complete repair is a completely different one.
Schematic structure of the steering rack, it clearly shows what is removed and then put back on
- It is worth noting that the steering rack is not the cheapest component of a car, so few people dare to replace the whole thing right away.
- Everyone starts by trying to repair the existing device.
- It happens that it is enough to simply adjust it so that the malfunction disappears, or perform a partial repair by replacing the bearings
- Of course, the diagnostic procedure, as well as subsequent repairs, is impossible without disassembling
- Only by disassembling the steering rack will you get a complete picture of the condition of its parts, which parts require improvement (grinding, for example), and which should definitely be replaced
- Repair in almost any case will be much cheaper than a complete replacement
- And if you repair the rack yourself, you will also save on the cost of auto mechanic services
- To carry out independent repairs, as has been mentioned more than once, you will need a repair kit, specific keys, as well as a set of bearings and grease.
- Not a lot of money is spent on purchasing components
- However, if you have replaced all the bearings, as well as seals and lubrication, and still have problems with the operation of the machine, then you will still need the services of specialists to determine the exact cause of the failure or replace the “serious” (major) components
- The most remarkable thing is that in the conditions of the modern total “deficit” of finance, a complete replacement of the entire unit is resorted to only in extreme cases, when there is nothing left to repair in the old one