Probably, many car enthusiasts have heard such a word as CV joint. When stopping at a service station, you can hear a lot of interesting words, but most drivers are afraid of a CV joint failure like fire. What kind of cunning device is this, and why its repair costs a pretty penny, we’ll find out in today’s article.
It is worth noting that literally fifty years ago, car enthusiasts had no idea about such an invention. CV joint is an abbreviation that stands for constant velocity joint. The principle of operation of the mechanism was used in Ancient Greece. Modern CV joints became widespread in the 50s of the last century.
External and internal grenade (CV joint): differences and features
So, before checking the CV joints, it is necessary to separately take into account a number of features. First, the hinges can be internal or external. So, they rarely fail at the same time. In fact, the outer CV joint breaks more often. However, it cannot be ruled out that the problem is not, for example, the left internal grenade or the right internal hinge.
At the same time, to an inexperienced car enthusiast, both internal and external CV joints may seem the same. In fact, they differ in terms of design, experience different loads, have different operating modes, and the very signs of their malfunctions are somewhat different from each other. Let's figure it out.
- The design of the outer and inner CV joints is somewhat different due to the different operating modes of these hinges. The outer CV joint is connected to the hub, and its main task is the need to transmit torque at any angle of rotation or inclination of the wheel.
- In turn, it is important for the inner joint to compensate for the misalignment of the transmission and the drive shaft, thereby partially relieving the outer CV joint. At the same time, the internal joint ensures complete “integrity” of the shaft, provided there is a large suspension travel. In other words, it is the inner CV joint that allows the drive shaft to become slightly longer or shorter under certain conditions.
- If you compare the hinges visually, the body of the inner CV joint is larger than the outer one. Due to this, the inner race of the CV joint can move along with the shaft and balls inside the housing along the tracks. Also, the inner hinge can be rotated at an angle, although less than the outer hinge. If we consider the outer CV joint, it is rigidly fixed to the shaft and is more responsible for the ability to turn. On some cars, the outer grenade is so firmly attached to the shaft that it must be cut off to remove it.
Let’s also add that a special lubricant for the CV joint is placed in the joint cavity. This lubricant protects the element from moisture and shock loads. Please note that the CV joint cannot be filled with lubricant of unsuitable properties and type. In this case, the constant velocity joint will quickly fail.
Also note that front-wheel drive cars have a transverse engine, that is, the gearbox is shifted to the left. The result is that the left drive shaft will be shorter than the right one. So, the longer right shaft is not always solid. There are options when it is made of two parts, which are connected using a suspension support (suspended bearing).
The fact that on some cars a tripod is used as an internal joint, rather than the usual type of CV joint discussed in the article, deserves special attention. In any case, the operating principle of the tripod is still similar and there are no fundamental differences.
Preparation for repair
Before starting work, you need to prepare the entire set of spare parts:
- Directly CV joint.
- CV boot.
- Two clamps.
- Graphite based lubricant.
- Hub nut.
Only after this can you begin to carry out repairs. First of all, drain the oil from the gearbox. It is advisable to drain everything, it will be easier. In fact, it is enough to pour out 2/3 of the total volume. In this case, when removing the hinge, oil will not spill from the holes. Place chocks under the rear wheels. Then, using a hammer and a suitable drift, unlock the nut, unscrew it, lift the side to be repaired and remove the wheel.
Internal CV joint device
The internal constant velocity joint is designed to transmit torque from the transmission to the outer CV joint. It differs from the external one in size (increasingly) and cost, although it consists of the same parts:
- Bowl-shaped housings with a driven shaft.
- The inner race is a spherical fist with a drive shaft.
- A separator in the form of a ring with holes to hold the balls.
- Metal balls.
The roller type of hinge is characterized by the presence of a support, which, using three rollers, moves along tracks cut into the inside of the body. The balls or rollers are located in the grooves of the housing and are held by a cage, which is connected to the drive shaft by a splined joint. When the angle of the drive and driven shafts changes, the balls move along the grooves, continuously transmitting force.
Removing the drive
To remove the drive from the car, you will need to perform a few more simple steps:
- Remove the cotter pin from the tie rod end by straightening it using pliers.
- Using a 19mm wrench, unscrew the nut. If it doesn't budge, treat it with a penetrating lubricant and try again in a few minutes.
- Install the puller onto the steering knuckle and rotate the main bolt clockwise. Tap with a hammer if necessary. After a few turns, the finger should come out of the fist.
- Remove the two bolts that secure the ball joint to the front wheel hub.
- That's practically all, all that remains is to knock out the front left (inner) CV joint with light taps, and only after that - the outer one.
Service life and maintenance
A grenade in a car is a consumable item. It will have to be changed quite often. Fortunately, the cost of the unit and repairs is usually not the highest.
How much a factory part costs depends on three factors:
- Driving manners;
- Machine models;
- Timely service.
The first factor is critical. Grenades are especially afraid of the trigger falling down when the steering wheel is turned to the extreme position. At such moments the node experiences maximum load.
If you mostly move calmly, then you can look for a resource for your car on thematic forums. There are cars in which a standard product can cost more than one hundred thousand.
Timely maintenance means periodic inspection of the boots, their timely replacement and filling with lubricant. If a crack appears in the rubber, the death of the CV joint will occur in just a couple of weeks. And in rainy weather this can happen even faster. This is due to water, which, when it gets into the assembly, leads to corrosion and leaching of the protective lubricant.
Surely you will be interested to know that in addition to grenades, absolutely all ordinary cars have a TV! Be sure to read our article on this so you can be a knowledgeable car owner.
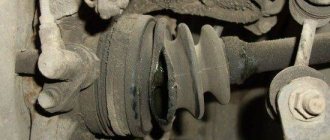
A torn boot is a typical malfunction.
Boots, by the way, are quite inexpensive. The lubricant is also cheap and is called tritely - “CV joint”. When purchasing, do not forget to check that the anthers come with clamps for tightening them.
Advice on how to extend the life of a grenade:
- Do not press the pedal to the floor when turning, especially when starting off
- Change boots and lubricant in a timely manner
The lifespan of external and internal grenades is very different. The first is subject to great effort, since it is forced to turn at significant angles, and therefore makes itself felt more often.
The internal part may well not be bothered for the entire service life of the car.
Removing and installing CV joints on the drive
Now it's time to remove the hinges from the drive. To do this, you can use two methods - the simplest and somewhat more complex. The difference is whether a vice is used or not, and also whether you plan to use the hinges for their intended purpose in the future. If “no” is the answer to all the questions posed above, then you can, taking the entire drive in one hand and a heavy hammer in the other, deliver sharp and strong blows until the hinge comes off. In this way, both the outer and inner CV joints are removed.
To avoid holding the drive in your hand, you can use a vice. The installation should be done more carefully - everything is new, do not spoil it. After all, you can easily damage the thread, and this will affect your safety. Therefore, when you put the hinge on the axle shaft, be sure to use wooden spacers. They eliminate the possibility of the thread being damaged. Please note that you must first install the boots on the axle shaft, and only after that install the CV joints.
Sounds and symptoms of breakdown
There are several signs of a hinge failure:
- Anther rupture. It is enough to go to a service station, where the faulty element will be replaced, and the need to repair the CV joint itself will disappear.
- The sound of a grenade. The sound is very reminiscent of the friction of brake pads worn down to metal.
- Jerks. When the car starts moving, the driver may feel slight shocks. This behavior indicates broken grenade grooves.
- Clicks. They appear at the moment of movement, and their number varies from 2 to 5. When moving, the unpleasant sound disappears, but the next time you try to move, it appears again. This also indicates a malfunction of the grenade.
- Crunch. If the sound appears directly when moving, then this is an alarming signal. The CV joint is not only worn out, it is about to seize. Driving with such damage is dangerous, so it is best to call a tow truck and send the car to a workshop.
If at least one of the listed symptoms of a malfunction appears, then it is better to send the car for diagnostics. Experienced drivers can inspect the joint themselves and identify the source of the problem.
Drive installation
Now the crucial moment has come - installing the assembled drive on the car. There is nothing complicated about this, just repeat all the disassembly steps in reverse order. In general terms it will look like this:
- Insert the inner CV joint (VAZ or another car, it doesn’t matter) into the gearbox. Moreover, it must enter so that the locking ring inside opens and locks the drive. Also make sure that the splines match.
- Now you need to pull the hub together with the stand outward in order to install an external grenade into it.
- Fix the outer CV joint with a nut.
- Use two bolts to tighten the ball joint housing to the wheel hub.
- Reinstall the tie rod end and tighten the nut. Secure it with a cotter pin.
- Install the wheel and lower the side of the car to the ground.
- Tighten the hub nut with a 30mm wrench. Using a hammer and chisel, secure it to the threads.
Inner CV joint: signs of failure are difficult to see
Structurally, there are two grenades per drive wheel, that is, two CV joints - internal and external. The outer one transmits force to the wheel hub from the axle shaft, and the inner CV joint rotates the shaft from the gearbox.
Even though CV joints are one mechanism, the outer CV joint fails earlier because it bears more load and is also smaller. To understand that the outer CV joint has worn out, you need to turn the steering wheel all the way to one side and drive off. At this moment, there will be a maximum angle between the axle shafts and the CV joint will crunch if it is faulty.
But the internal CV joint is checked differently; it begins to make sounds while moving in a straight line. And if you drive into a hole at the same time, the crunch will be very clear. In addition, the first signs of a CV joint failure on a Priora or any other VAZ can be clearly seen if you lift the car on a lift. You can also engage first gear on the lift and press the gas so that the wheels begin to rotate.
When the car is in a suspended state, the internal grenade will be strongly bent and the sound of a worn CV joint will be clearly audible. This is how signs of a malfunction in the CV joint of a VAZ 2114 or VAZ 2115 are revealed. After detecting these signs, you can safely go and buy new grenades and prepare for replacement.
Next in the video there are signs of wear on the inner CV joint - a crunching sound appeared in the wheel:
Types of automobile CV joints
There are 4 types of CV joints based on their design features:
- Crackers. Installed on trucks and buses.
- Tripoid. It is used in internal structures due to its axial movement.
- Paired. Rarely used type of hinges. Complex in design.
- Ball. This is the most common type. Installed in all front-wheel drive passenger cars.
Classification of CV joints:
- internal;
- external.
The inner CV joint is the connecting link between the gearbox and the axle shaft. The outer CV joint is the connecting element between the axle shaft and the wheel hub. They work in pairs and transmit all types of loads. If a tubeless tire punctures while driving, you can pump a special sealant for tubeless tires into it.
Did you know that it is forbidden to use xenon headlights, as they shine too brightly and blind oncoming drivers? But, you can install xenon fog lights.
Why does the CV joint crunch?
Video of replacing the outer left CV joint
Experienced drivers are able to determine the location of a car breakdown by ear. Such skills are acquired over time, but the crunch of a CV joint cannot be confused with anything.
In order to understand the nature of this characteristic noise, you should remember how the CV joint is designed. The task of the CV joint is the transmission of rotation from one axle shaft to another, provided that the angle between them continuously changes.
This property is due to the need not only to rotate the drive wheel, but also to give it the ability to turn and move up and down on a spring.
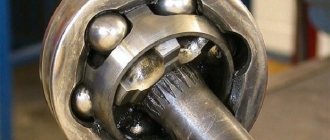
The CV joint consists of the following main elements:
- outer body in the form of a bowl with six semicircular grooves inside and a semi-axis outside;
- the inner race is in the form of a spherical fist and also has six grooves and a splined connection for the axle shaft;
- Between the inner walls of the bowl and the holder there are 6 balls in the separator.
All elements are made so precisely that they have no play when assembled. The cage transmits force through the balls to the body and rotates it, and moving the balls along the grooves makes it possible to change the angle between the axle shafts.
Over time, a hole forms at the point where the balls come into contact with other elements and a backlash appears. The free movement of the balls (rolling) generates a sound that is very similar to crunching.
Considering that CV joints are installed two on each wheel, when alarming symptoms appear, it becomes difficult to find out which CV joint is crunching: inner or outer, right or left.
Universal diagnostic method
Diagnosis of a malfunction of the internal CV joint
We present to you an algorithm for another, universal option, how to find out which “grenade” is crunchy. You need to act in the following sequence:
- Place the car wheels level.
- Raise one of the front wheels using a jack.
- Put the car on the handbrake and neutral gear.
- Start the engine, depress the clutch, engage first gear and slowly release the clutch, that is, “move off” (as a result, the suspended wheel will begin to rotate).
- Slowly press the brake pedal, creating a natural load on the joint. If one of the internal “grenades” is faulty, then at this time you will hear familiar knocking sounds on the left or right side. If the internal CV joints are in order, then the car will simply start to stall.
- Turn the steering wheel all the way to the left. Slowly press the brake pedal. If the internal “grenade” is faulty, it will continue to knock. If the outer left CV joint is also faulty, then sound will also be added from it.
- Turn the steering wheel all the way to the right. Carry out similar procedures. If a knocking noise occurs when the steering wheel is turned to the right, it means that the right outer joint is faulty.
- Be sure to put the gear in neutral, turn off the engine, and wait until the wheel comes to a complete stop before lowering it to the ground.
Debugg
The detection of even small defects in the boot indicates that the joint is filled with dirt and lack of lubrication. The CV joint cannot be operated in this condition, so it is necessary to remove the boot and fill the hinges with new lubricant.
Before applying fresh lubricant, the part is disassembled, thoroughly cleaned, and dirt is completely removed. Then the mechanism parts are washed with gasoline, dried and new lubricant is applied. For the internal hinge, 100–110 grams of lubricant are used; for the external hinge, 70–80 grams are sufficient. The CV joint is installed on the wheel and covered with a boot.
Experts recommend installing new, original boots after lubricating the hinge, since old parts lose elasticity and may crack after a short period of time. Non-original anthers do not fit perfectly at the mounting points, so a new portion of dust and water will quickly fill into the gaps.
You can fix the problem yourself
An important condition for the successful operation of CV joints is the choice of high-quality lubricant. Experts advise giving preference to compositions based on molybdenum disulfide, which minimize friction in the components and effectively protect them from corrosion, and also have a minimal destructive effect on the boot.
It is important! It is contraindicated to use graphite lubricant for CV joints. It cannot protect the part from increased loads, and therefore leads to accelerated wear.
What happens if you don't change the CV joint?
It is possible to operate a car with problems in the CV joint if a slight crunch is heard when turning: it is enough to replace the damaged boots and renew the lubrication of the part. When driving a car with a slightly damaged joint, you must reduce your speed when turning.
If vibration is observed when accelerating and a crunching sound is heard even when driving straight, the CV joint must be replaced urgently. A faulty CV joint can fail completely, causing the wheel to suddenly seize. If this happens at high speed, you can expect the most dire consequences.
It is important! On some vehicle models, significant wear or breakage of the tripod CV joint causes the bearing needles to be thrown into the gearbox housing, from where they are lifted along with the oil and ground by the gears. Repairing such an engine costs almost the same as buying a new car.
Video: what can happen if you don’t change the CV joint boot in time
The CV joint is one of the main chassis parts of a front- and all-wheel drive vehicle, and driving comfort and safety depend on its condition. If there are signs of a joint failure, do not delay diagnostics and repairs - otherwise it is unlikely that it will be possible to “cure” the drive.
What lubricant to use for CV joints
The main tasks of lubricants used in CV joints are protection against friction and prevention of corrosion. Also, the lubricant must be inert with respect to the polymer boots, which prevent moisture and debris from entering the mechanism. Most of the above requirements meet the following types of lubricants:
1. Lithium. These are viscous yellowish compounds, which at low temperatures acquire an even thicker consistency, making it difficult to spread on parts. They are able to significantly reduce friction and loads acting on the hinge elements, protect them from moisture and neutralize accidentally trapped dirt. Their only drawback is the ability to dissolve some types of anthers made from organic polymers. One of the representatives of this type of lubricant is the domestic Litol-24, which is replaced after a run of 100 thousand km.
2. Based on molybdenum disulfide. More universal lubricants that are characterized by increased resistance to corrosion. Their composition has a reduced content of organic acids, thereby reducing aggressiveness towards polymer products. Such lubricants are recommended for use in CV joints of cars of any manufacturer. Their main drawback is sensitivity to moisture ingress when the seal of the boot is broken, due to which the lubricant loses its properties. Domestic manufacturers produce lubricants with molybdenum disulfide under the general name SHRUS-4.
3. Barium grease. It is resistant to moisture getting inside the mechanism, successfully resists corrosion, and is also neutral to any polymers from which the anthers are made. Its main drawback is poor resistance to low temperatures. Lubrication is currently not very common due to its high cost. All domestic compounds manufactured using this technology are labeled under the name ShRB-4.
To protect CV joints, even if recommended by sellers, it is not recommended to use the following compounds:
- Graphite lubricants, since they are designed to work in bearings, and when used in CV joints, its service life will not exceed 25 thousand km.
- Hydrocarbon lubricants, including technical petroleum jelly, are destroyed at temperatures exceeding 45°C and lead to hinge failure in a short time.
- Consistent compositions made on the basis of calcium and sodium, since they are not able to work in units with high mechanical loads, will lead to failure of the hinge after a run of 15-30 thousand km.
- Compositions made on the basis of zinc or iron.
When changing the joint lubricant, follow the operating instructions for the vehicle and the lubricant itself. Its scheduled replacement should be carried out every 100 thousand km, as well as when installing a new CV joint or boot.
What is needed to replace the CV joint?
Are you planning to change the “grenade” (it doesn’t matter - external or internal) yourself? Stock up on the following tools:
- hammer, screwdriver, pliers, jack;
- a set of keys and sockets;
- bench vice;
- with a mount or a long enough pipe.
You will also need new cuffs, boots, a hub nut with a stopper and a lubricant. These consumables are usually provided with the new grenade.
What does a car's front-wheel drive look like and what parts does it consist of?
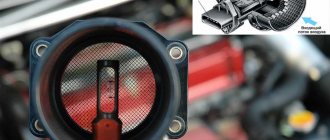
The top photo shows a car's front-wheel drive assembly. At the ends of the drive there are grenades (constant velocity joints - CV joints). On the left is an external grenade, on the right is an internal one. The inner CV joint is stuck into the box, and the outer one into the hub. The function of the drive is to transmit torque to the car wheel.
This is interesting: What relates to the chassis
How to replace a grant
The first question: “should I change it myself or at a service center?”
In principle, for most budget cars (VAZ, Chevrolet, Hyundai, etc.), if you have experience in repairing the vehicle's chassis and tools, replacing the hinge is not that difficult. You can even do without a hole. But you will have to sweat.
Typically, it is precisely these spare parts that make up a kit for replacing a grenade in a store: boot, lubricant, grenade, boot clamps, retaining ring for the axle shaft
For expensive cars, without experience and tools, for cars under warranty or insurance - definitely the way to service.
The second thing that car enthusiasts often encounter is the locksmith’s phrase “if one grenade crackles, then both need to be changed at once.” Moreover, some insist on replacing the external-internal pair. Others persuade you, when one of the outer ones cracks, to replace the second one and leave the inner ones.
The motivation is simple: if one part is broken, then the second one will soon fit. You decide. And although we have already said more than once that the consumables are inexpensive, but with a mass replacement, the repair will cost a pretty penny.
But no one can know when the working joints “crack”. And practice shows that they can travel for more than one thousand kilometers.
Therefore, answering the question “do both grants need to be changed?” We think it's not worth it. Let the details finish in due time and save your budget. Moreover, before the “explosion”, the grenade itself will warn you in advance with light clicking sounds.
Video about replacing a grenade on a VAZ 2108, 2109, 21099
Varieties
To date, manufacturers have developed several types of CV joints:
Cam - include two shaped forks that fit into each other. Between them there is an insert with a disk. They help transmit rotation smoothly at large angles.
Tripoid - elements with a three-pin design and bearings with a spherical cage. There are grooves on the inside of the body that help the parts rotate.
Ball elements - six-ball elements are found in almost any car. The hinge operates at any speed and has high efficiency.
Cardan joints - consists of cardan joints. They are mainly equipped with trucks.
CV joints are also classified into internal and external. Between the gearbox and the axle shaft there is an internal element that plays a connecting role. The external one is similarly designed to connect the axle shaft to the wheel hubs.
Replacing the outer CV joint
An experienced car owner with practical skills will not encounter any problems when taking on the task of replacing the outer CV joint. The list of tools necessary to carry out the “operation” has already been presented above. In addition to tools and supplies, there are a few other things worth doing. Before removing the wheel, drain a little oil from the gearbox - this will make it easier to work with. You will also need a pry bar - it will serve as a lever when removing the drive shaft.
Let's assume that the problem is on the right. Replacing the right CV joint begins with removing the wheel. We unscrew the hub nut, remove the brake disc, caliper, ball joint and steering tip. We take a pry bar or crowbar and remove the splined drive shaft. Using light blows of a hammer (a support, such as a wooden block, will come in handy), we knock out the outer hinge. Next we perform the following steps:
- It is necessary to remove the hub nut and tear off the wheel bolts. We put stops under the rear wheels.
- We jack up the car, hang it up and then remove the wheel.
- Remove the bolts holding the steering knuckle to the ball joint.
- Turn the steering wheel all the way. Pulling back the steering knuckle, we pull out the outer half of the hub along with the old CV joint. If the grenade does not budge, hit it lightly with a hammer.
- We remove the old boot and clamps and throw them in the trash.
- We remove the CV joint with hammer blows, rotating it along the axle shaft.
- We fix the installed new hinges in the hub together with the boot.
Replacing the left CV joint is carried out in the same way. When returning parts to their place, the above procedures should be done in reverse order. When knocking down a CV joint with a hammer, hit it clearly - some models are equipped with an ABS ring, which does not like strong blows to it. Don't forget to add gearbox oil. When installing the wheels back, be extremely careful to avoid falling apart.
Tools and accessories
To carry out the work, you will need a standard set of tools - open-end wrenches, ring wrenches, and socket wrenches. Screwdrivers, jacks, pliers - these are all things that everyone should have in their garage. But special tools are also needed. For example, pullers for steering tips. If you are simultaneously changing the ball joint, it also needs a puller. But if you only intend to replace the inner CV joint (left or right), then these tools will not be required.
It is worth noting that for repairs you need another wrench - 30. It is with its help that you need to unscrew the nut on the hub. It is desirable that this wrench have a large lever, since the nut is tightened with a very large torque. You also need wheel chocks for the rear wheels to prevent the car from moving. Having reliable supports is also necessary. And most importantly - a strong vice.
How to extend the life of grenades
It’s very simple, follow three basic rules and your car’s drive will last a very long time:
- Never leave your place! With a sharp start, the torque is significantly higher than when driving. Due to heavy loads, grenades quickly become unusable;
- Do not accelerate with the steering wheel turned. When the hinge is rotated at a large angle relative to the axis, the load on its elements increases greatly, which contributes to faster wear of the CV joint;
- Check the condition of the anthers on the grenades (if dirt, sand and other foreign bodies get in, the grenade mechanisms quickly wear out).
Advice for car owners
To prevent the CV joint from breaking prematurely, it is necessary to visit a car repair shop from time to time to check the integrity of the protective casing. If there are any defects on the boot, then it is worth replacing it along with the lubricant.
If a crunching sound occurs, you should immediately check the CV joint. If you replace the boot and lubricant in a timely manner, you will not have to pay for expensive repairs later. The faulty part will not cause any serious consequences at first, so you can still drive it. However, a faulty CV joint tends to become blocked when driving. This could lead to a fatal accident.
We must not forget that an aggressive driving style disables the mechanism faster than it should. Calm driving and regular boot diagnostics will make the part work for a long time.
Unfortunately, not everyone can detect a faulty CV joint by ear. Other elements of the chassis can also produce a crunch. To determine the location of the breakdown correctly, it is recommended to contact trusted specialists.
Where is the grenade located in the car?
Let us repeat that this spare part is only available for front-wheel drive cars. Cars with rear drive wheels are driven by another shaft - a cardan. Therefore, the answer to the question of what a grenade is and where it is located in the car is relevant only for the first case.
The grenades are located in the front of the car. Each car contains 4 grenades: two per wheel. This is necessary so that the suspension can normally raise and lower the wheel on bumps and still steer. It is quite easy to identify them visually by their corrugated rubber boots.
Usually the anthers are black, but you can find brown-red or transparent models
The first grant in a pair is inserted into the wheel hub and is called the outer one. She is responsible for moving the wheel up and down and for turning it left and right. This unit experiences the heaviest loads, and therefore is manufactured in a fairly large size.
The second joint is inserted into the transmission and is called the inner joint. Its task is to ensure that the wheel moves slightly up and down on uneven surfaces. The load on it is less, and therefore the size is more modest.
The left joint is stuck into the wheel hub, and the right one into the gearbox output. Between them is the axle shaft
The outer and inner grenades are connected to each other by an axle shaft with longitudinal slots. It is this composite structure, consisting of three parts, that ensures the transmission of torque from the engine to the wheels.
Video about the CV joint, its disassembly and the reasons for the crunching
Video about the structure and principle of operation of the grenade
Design resource
To be honest, the design is very durable. If everything is done according to the rules and from the right materials (not underground “CHINESE”), then the CV joint can last at least 100,000 kilometers, and at most the entire service life of the car. But why do they fail so often? Everything is quite simple here!
1) The most common failure is a break in the boot. The thing is that the boot (rubber or silicone cover) protects the balls and grooves from dirt and dust, which have a very detrimental effect on the design. If the boot is torn, then the “GRANATE” will not serve you for long, literally just a couple of thousand kilometers. Why is this happening? And here everything is simple - dust and dirt act on the balls and longitudinal grooves like an abrasive, they destroy the grooves, making them wider, and at one point the balls simply jam. The CV joint can simply break. Therefore, if this “cover” is torn, we definitely change it.
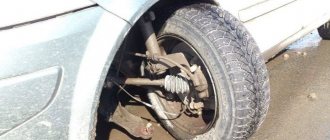
2) These are physical impacts on the suspension. You can run into a curb or fall into a hole, and severely damage the suspension and the GRENADES themselves; they can simply be torn out. Look what happens if you use low-quality Chinese parts.
Identifying a broken CV joint is not that difficult, but there is a separate article , where I described everything point by point, so go ahead and read the useful information.
This is where I will end my article, I think I explained in detail what it is and how it all works, if you liked the article, tell your friends about us on social media. networks. Read our AUTOBLOG.
Similar news
- What is VAG? We study the intricacies of German business
- What is engine torque
- DOHC engine
Add a comment Cancel reply
Where are the car drives and grenades?
Only the “fronts” of cars are equipped with grenade drives.
That is, they are placed where it is required to transmit torque at rotation angles of up to 70 degrees relative to the axis. The top two photos show a typical drive and CV joint placement. As you can see, the lengths of the left and right drive shaft (drive) are different. Since not all drives are perfectly smooth, some of them are equipped with a special weight (as in the photo) to eliminate vibration at high speeds.