Note! To replace this part you will need to use: A screwdriver and a rag, because when you reach for the speedometer cable from the box or disconnect it from the gearbox, you will get dirty and you can wipe your hands with a rag, or initially you can just put gloves on your hands and then no rag no need!
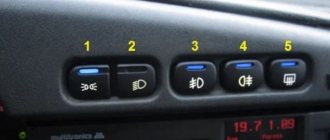
LED for illuminating the instrument panel (left) and buttons (right)
In addition, there are LEDs on sale that have a point glow, when the light of the diode is narrowly directed in only one direction (forward), and LEDs that have a diffuse glow, which is achieved by a special shape of the LED lens. Which one you prefer, choose for yourself. So let's get started.
LED lamps for the dashboard of the VAZ 2110 – AutoTop
Malfunction of the battery charging system: loose or broken alternator belt, faulty alternator, open circuit and other faults.
Expert opinion
It-Technology, Electrical power and electronics specialist
Ask questions to the “Specialist for modernization of energy generation systems”
Replacing the Dashboard Lighting on a VAZ 2110 – Auto news and tips for car repairs During the entire production period, cars of the tenth family were installed, various combinations of instruments, as well as torpedoes differed from each other, we will not disassemble all the panels, but will only touch on the standard torpedo which used on most cars of the tenth family. Ask, I'm in touch!
Repair of "tidy" VAZ 2110
The domestic car 2110 cannot boast of a high-quality panel. In severe frost or summer heat, plastic often begins to crack. In addition, sometimes its corner also comes off. The “tidy” of this machine consists of three parts: a central, upper lining and a lower plastic lining. The corner most often comes off through: unscrewing the screws that attract the top cover, or through the fact that its soft part has moved away from the metal part of the top cover.
In the first option, you need to remove the panel, because otherwise you won’t be able to tighten the top trim. If only the soft part has come off, then there may be several solutions. You can glue it, but it will not stick tightly to the plastic air deflector. Another option is to mask the gap that forms when the corner of the panel peels off.
You can, of course, cover the gap with wire. It is placed inside using a screwdriver. Instead of a wire, you can use a headlight seal. In this case, you can return the corner to its place. Polyurethane foam is used to glue the corner. The casing, thanks to the foam, will stick to the metal body, but first it needs to be cleaned and degreased.
Then we apply foam inside, using a wet rag to remove excess foam. Use paper clips to press the corners. There is no need to remove the foam immediately. You should wait until it dries. After the foam has dried, you need to paint over it with a marker. It may seem like the foam is bursting, but in fact, the corners of the panel will not come out.
Now you can move on to repairing the crack in the panel. To do this, use either a plastic repair agent or tighten the lining with material. As for the first option, it is the simplest, because during repairs you do not need to remove the cover. You can remove the crack using a special epoxy resin.
How to assemble and disassemble the panel
To reset the speedometer or fix the problem that the turn signal light on the dashboard is not blinking, it must be removed.
To this end, you should perform the following actions:
- You can remove the cover, but the board will still be locked.
- You need to take a Phillips screwdriver and use it to remove a few more bolts.
- Now you need to unlatch the latches on the panel. You should start from the bottom. If they were disconnected from the bottom side, then you can push them up. This way the fee will be removed quickly.
- The arrows will have to be removed anyway.
Note: some arrows are easy to remove, but the arrows for the gasoline quantity indicator are much more difficult to remove. To remove the arrows, you need to gently pull them.
The panel is disassembled, now we need to try to solve the problem.
Note: There are very small LEDs on the board that can also burn out. Because of them, the turn signal light may not blink, so they need to be replaced.
This requires working with a soldering iron.
But if the panel was disassembled in order to reset the speedometer readings, then:
Now it is advisable to somehow put the panel back together.
This is made even easier:
Place the board in a plastic case.
Note: It is advisable to have a clean cloth underneath to prevent the surface from being scratched.
- Now you need to screw in the bolts on the panel itself. They do not need to be completely screwed in yet, as the arrows must be put in place first.
- Before putting the hands back in place, they need to be wiped thoroughly, as fingerprints, dirt, etc. will be visible when exposed to light.
Note: the arrows need to be set approximately 3-4 mm below zero
It is also important that there is a small gap between the needles and the speedometer, otherwise they will stick
It is much easier to install, as well as remove, long arrows. To install short arrows, you need to act very carefully, as they are more delicate compared to long ones.
- Before installing the glass, it also needs to be wiped. Now snap onto the latches.
- Secure the board with bolts.
- Lastly, screw in the screws on the cover, and then put all the light bulbs in place.
Working with a panel in a car is probably the simplest thing it can be. Therefore, there is no point in going to a car service center, where the price even for such trivial work will be high.
It’s better to look through a bunch of photos and videos before you decide to do repairs and tuning of the car’s interior with your own hands, so as not to harm the car. Any instructions will help you get the job done quickly and efficiently.
Welcome! Instrument cluster - on many cars, instrument clusters differ from each other, in some not significantly, and in others it is radically changed, but the filling in almost all remains the same, they just differ in appearance and the lights and indicators are the same , but the combination is subject to deformation and can easily be damaged, and therefore, if you take some old cars, on every second car, the combination has already changed, despite this combination is a very important thing, because if something happens to the engine, then combinations You can only determine this, you can find out the speed at which the car is moving, and you can also find out how much fuel is left in the tank without looking into the tank just by looking at the instrument cluster.
Note! To remove and install the combination, you will need: A screwdriver and pliers, if you have a standard torpedo, then you will do the work quite quickly and most likely no difficulties will even arise!
When should you change the instrument cluster? If it stops working, there is no need to panic and go to the auto store for a new combination; first of all, check the fuse that goes to it and, if necessary, replace it with a new one; if it turns out that everything is fine with it, but the combination does not work at all, then we can assume that it has failed if some specific indicator in the combination has failed (Speedometer, for example, does not work), then in this case, perhaps the problem is not in the combination, but in the speed sensor, for example (Read the article: “Replacing the speed sensor with car"), if the fuel gauge does not work, then look at the fuel level sensor, in common parlance “FLS” (Read the article: “Replacing the FLS in a car”) or the wiring, and so on.
Possible reasons
What to do in a situation where the instrument panel backlight on a VAZ-2110 car has disappeared? First of all, you should look for the reason why this malfunction occurred. Sometimes it can be identified immediately, but in some cases this process takes some time. In fact, there may be several reasons, so you will need to check everything methodically.
The most banal and simplest option is that someone turned the rheostat knob, which is responsible for the amount of light flux, all the way to the left.
This, by the way, is often the sin of children who are placed in the front seat. “Young drivers” love to turn all sorts of knobs, press buttons and switch levers. Perhaps the adults overlooked it, and the child “corrected” the dashboard lighting. The problem, as you understand, is solved by simply returning the rheostat knob to its previous position. Therefore, before you start looking for possible reasons for the sudden disappearance of the backlight, check this particular point.
I would like to remind you of one simple rule. In a situation where there may be several possible causes of failure, when searching you need to follow the path of least resistance. In other words, test the simplest assumptions first. You may be lucky and find the problem with minimal time and effort.
If the reason is not in the position of the rheostat handle, you need to proceed to further search for the causes of the breakdown. Possible sources of problems here could be:
- fuse;
- instrument panel circuit board;
- contacts;
- wiring;
- failure of light bulbs due to short circuit.
So, let's look at some of the above reasons in more detail. After the rheostat handle, you should check the integrity of the 5-amp fuse F1. You can also usually turn on the side lights and see if they work on the left side. Everything is explained here simply. The lamps that illuminate the instrument panel, the left side lights, as well as the trunk lighting operate through this fuse. The dimensions located on the right side of the car receive power through F11, that is, they are not of interest to us in this particular case.
You may see the following situation. The left side parking lights, or trunk light, work, but the instrument panel light does not. This means that the problem is not in fuse F1. Therefore, you need to continue searching for the possible cause of the malfunction. In particular, it is necessary to check the contacts of the rheostat that illuminates the dashboard lighting. It is not uncommon for plugs to fall off. Accordingly, the lighting of the shield disappears due to lack of contact.
However, the rheostat itself can also fail. It is quite easy to check this assumption. To do this, you must first remove the rheostat, and then directly connect its contacts. If after this manipulation the instrument panel lights come to life, it means that the problem has been found, and you just need to replace the failed part. If not, then you need to continue searching further.
The most serious problem due to which the instrument panel lighting disappears is damage to the printed circuit board of the dashboard itself. In particular, there are often situations when the track on it that supplies power to the lamps burns out. One point worth noting here. The instrument panel in such a situation cannot be repaired, which means there is only one way out - replacement with a new one.
There are cases when, due to a short circuit, all the lamps illuminating the instrument panel burn out. However, this happens quite rarely. Much more often, one lamp may fail. As you can see, there are several reasons why the instrument panel lighting may disappear. Accordingly, the search will take some time. However, in the vast majority of cases, eliminating the malfunction that has arisen will not be so difficult, and many people can easily do this with their own hands.
Source
Removal and modification
Here's a quick look at the device and control panel icons. If for some reason she refuses, don’t immediately panic. Most often, the reason is the absence of contacts in some place in the wiring. But of course, if you wish, you can completely change or tune the panel.
For example, remove the cover and replace the light bulbs with brighter LEDs. Such a panel works brighter and the signals sent by the car will be more noticeable to the driver. If desired, you can install a more solid europanel, which will transform the interior.
To remove the panel you need:
- Disconnect the “-” wire from the battery;
- Remove the shield by unscrewing the screws;
- Remove the fastenings of the control panel to the trim, remove the instrument cluster from the socket;
- Remove the glass mask;
- Disconnect the wires from the block;
- Make changes to the instrument panel or replace it with a new one. Reassemble everything in reverse order.
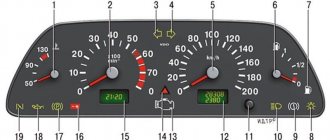
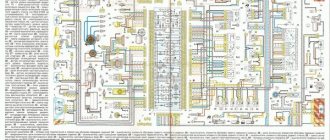
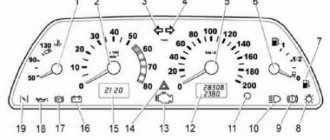
Designations of indicator lamps on the instrument panel of VAZ 2110 - 15.
Many car enthusiasts are faced with this seemingly simple question. What do the indicator lights on the instrument panel mean?
And what do we know, they all light up together only when the ignition is turned on, and when one of them lights up while driving, it becomes a little uneasy.
I didn’t know this myself when I switched to a “two” after the “seven”, half of the 2107 didn’t light up at all, so I didn’t know what it was and what it was for. And a friend of mine, after buying a car in Novorossiysk, even bought a whole book on VAZ , due to ignorance of these light bulbs.
The symbols on the instrument panels on all VAZs are almost the same, just the location is different.
Let's start in order.
1 — Coolant temperature, in degrees Celsius.
2 — Tachometer, engine speed.
5 — Speedometer, vehicle speed in km/h.
6 - Fuel level in the tank. When there are 5-7 liters left, a yellow light comes on - a warning or an icon with a picture of a gas station.
7 - Actually, this is an image of a gas station, signaling the need to refuel.
8 - Indicator lamp for turning on the dimensions.
9 — The brake fluid level is low, it may be leaking somewhere.
10 - Turn on the high beam.
11 - Clock adjustment knob (hours/minutes - switches when pressed), sometimes this knob serves as the function of switching the total mileage/day mileage (on panels with a narrow display).
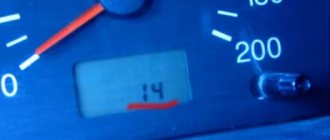
12 — The display showing the total mileage/daily mileage is narrow on some models.
13 - Hazard warning lamp - “hazard light”.
14 - Check Engine, often indicated by this icon - this means a malfunction in the engine, it is recommended to stop the engine.
15 — Display with a clock (can show the outside air temperature if there is a temperature sensor).
16 - Malfunction in the battery charging system: loose or broken generator belt, generator malfunction, open circuit and other problems.
17 - Parking brake indicator.
18 - Insufficient oil pressure in the engine, it is recommended to turn off the engine and find the cause.
19 — Air damper light (on carburetor engines)
I’ll also add about the lamps on the additional panel in the dashboard of the VAZ 2110 - 12.
— The light marked with an arrow is a check for malfunction of the dimensions or brake lights. — Below is a brake pad wear indicator, if it lights up, check the brake pads, maybe it’s time to change them. — Seat belt warning light — this is clear from the picture.
On the other side from above:
— Low engine oil level — Low washer fluid level — Increased coolant temperature
This is how the review turned out. If some kind of lamp lights up and the signal beeps, do not panic. Usually these are small things.
Save this note to yourself on your social network by clicking on one of the buttons below.
What lamps are installed and how many of them?
The VAZ instrument panel is illuminated and the status of the vehicle’s components is indicated using 12 V 1.2 W incandescent lamps, which are installed in a 2W2 socket. The lamp is easily pulled out of the socket - you just need to pull it with your fingers; it can be purchased either separately or with a socket. In total, 20 lamps are used for lighting and indication in the instrument panel for the VAZ 2110, and they are inexpensive - 5-10 rubles. (at the time of writing) depending on brand (without cartridge).
VAZ car lamp installed in a socket and without it
If desired, instead of incandescent lamps, you can install LED ones in the VAZ instrument panel - they are produced for the same voltage with the same standard size and can be either with or without a socket. By the way, in the latest modifications of dozens of VAZs, LED light sources have already been installed.
Disassembly and replacement of devices
To replace (repair) devices, you need to perform the following actions in a strictly established order:
The entire combination of devices should be completely removed.
Unscrew the screws (2 pcs.) that secure the tire. After which the bus itself must be disconnected from the device system board.
Unscrew the screws (7 pcs.) that secure the frame with glass.
You need to remove the frame by disconnecting it from the device system.
Unscrew the 2 screws that secure the device composition board.
Disconnect the left light filter, which is marked with warning lamp symbols.
Disconnect the right light filter, which has warning lamp symbols on it.
Unscrew the screws (2 pieces each) that secure the reddish and snow-white pads. Then remove these pads.
Unscrew the nuts securing the fuel level sensor, cooling water temperature sensor and tachometer. Each device is secured with 3 nuts.
Disconnect the board from the device system housing.
Unscrew the screws securing the device scale to the body (5 pcs.).
Remove the scale with devices from the system body.
Very carefully, prying the arrow of the fuel level indicator with a screwdriver, you need to remove it from the wasp. READ Replacement of the Rear Wheel Bearing of VAZ 2108
READ Replacement of the Rear Wheel Bearing of VAZ 2108
Unscrew the screws (2 pcs.) that secure the fuel level indicator to the scale.
Disconnect the fuel level indicator. Install a new one in its place. When installing the sensor, we will perform all actions in the reverse order of removal.
Change other devices in the same order as described. This is the entire repair of the VAZ 2110 device panel. You see, there is nothing difficult and there is no need to go to a special service, and pay the money.
The assembly of the device system must be carried out in the reverse order of the disassembly procedure. When carrying out this work, you need to take into account that the nuts that secure the tachometer have a different thread.
Similar news
Checking the brake fluid in a Volkswagen Passat
Removing the composition of VAZ 2110 devices
Throttle position sensor: replacement
Electronic circuits Nissan Almera
Warning lamps for cooling water and brake pad wear
Scheme of a VAZ 2110 with a carburetor engine
RENUMAX. will remove scratches on the car body in 5 minutes!
Fix cracks in glass with GLASS PROFI in 10 minutes! Candidate for glass replacement
Nanoceramic coating Ceramic Pro. 100% car body protection
Simple and fast upgrade
In principle, with your own hands you can either completely replace the instrument panel of a VAZ 2110 or tuning the existing one.
One of the quite popular options is replacing light bulbs with LEDs. Moreover, there is no difficulty in this - you need to remove the light bulbs and insert LEDs in their place.
However, there is one small trick: they work well only if the polarity is observed! If the LED does not light up immediately when connected, you need to remove it, turn it 180 degrees, then reinsert it into the socket.
Even such a simple replacement will increase the brightness of the dashboard, but this is not enough, it is hardly worth completing the tuning with your own hands.
Reasons why the PP stopped working
It is its malfunction that often causes the shield to fail. The fact is that many car owners turn on various devices through the cigarette lighter, for example, a special vacuum cleaner, chargers, pumps and other devices. Due to the fact that these gadgets require high current, either the socket itself or fuse F19 often breaks, as a result of which the instrument panel on the VAZ-2110 does not work.
In addition, the cigarette lighter may become damaged if left on for too long. In this case, you can return the instrument panel to functionality by disconnecting the socket block. But it is worth saying that such manipulation will be successful only if fuse F19 is functioning. If it does burn out, it must be replaced.
In fact, there are not so many of them and the most common are:
- The easiest one is poor contact between the panel and the electronic control unit. The problem is solved by replacing the plug or simply cleaning the contacts.
- A breakdown in the instrument panel itself or malfunctions. To solve the problem, all connectors are reconnected, taking into account the correct connection diagram.
- Malfunctions of the tachometer, speedometer, fuel level controller. In this case, the cause is mechanical or electrical. To troubleshoot problems, replace regulators or check the operation of fuses.
- The illumination of the VAZ-1215 software stopped working. In this situation, it is necessary to find out the cause of the problem.
To check, you must turn on the hazard signal or turn signal. If they don't work, it means the fuse has blown. Therefore, we can conclude that a short circuit has occurred. To fix the problem, check the electrical circuit.
DETAILS: Alternator pulley VAZ 2114 - All about Lada VAZ cars
However, it also happens that the fuse is intact and in working condition, but the instrument panel on a VAZ-2115 car stops working. Here the reason is much more difficult to find out. The solution to the problem is to remove the instrument panel and check whether voltage is flowing from this fuse to the terminals of the white and red blocks. The white block supplies power to the speedometer, tachometer, and temperature gauge. And the red one is the fuel gauge.
If, as a result of checking, the terminals show a voltage of 12 V, then this indicates that the PCB does not work as a result of poor contact of the wire that goes to the ground of the car. If the voltage of 12 V is not reflected at the terminals, then it is necessary to disassemble the mounting block and look for the cause of the problem.
Separately illuminated arrows
LEDS IN THE INSTRUMENT PANEL FOR VAZ 2110 2111 2112
Video instructions for replacing the dashboard on a VAZ 2110-2112 with your own hands. This is also considered an example of substitution...
How to remove the instrument panel on a VAZ 2110, 2111, 2112 and replacing light bulbs
Video review - Styling the interior lighting of a VAZ 2110 car with replacing all incandescent lamps with diode lamps on the panel...
LED instrument panel VAZ 2110
If you want the arrows to glow a different color, you can do the following:
Note: In this case, the arrows will glow a different color only when turned on.
How to replace dashboard lights
- The steering wheel lowers to the down position.
- The two upper screws are unscrewed and the decorative trim is pulled out.
- Unscrew the three screws securing the dashboard.
- The cable remains in place, the device is pulled out, all electrical connectors are disconnected.
- The socket is rotated counterclockwise and removed along with the lamp. Baseless light bulbs.
- After replacing the light bulbs in the instrument panel of the VAZ 2110, assembly of the unit is performed in the reverse order.
How to replace the center console light bulbs
When operating the vehicle, the lamps located on the center console of the VAZ 2110 may fail. In this case, replacing the lamps on the instrument panel of the VAZ 2110 is easy to do with your own hands. The cost of the work is low. For this you will need:
- The screwdriver is flat.
- Phillips screwdriver.
- New light bulb.
Work instructions:
- The negative terminals are disconnected from the battery and from the speedometer cable drive to the gearbox.
- The outdoor lighting switch is pulled out. To do this, you need to pry off the element with a flat screwdriver. The connector is disconnected from the switch and pushed inside the dashboard trim.
- Replacing the VAZ 2110 dashboard light bulb to illuminate it is done by squeezing the socket antenna with a screwdriver, which is then removed from the switch. The lamp is pulled out of the socket and replaced with a new one.
- Use a flat screwdriver to pry up the hazard warning switch, which is then pulled out. The connector is disconnected from the switch and pushed into the panel trim.
- Unscrew the two self-tapping screws with a Phillips screwdriver, which secure the dashboard console trim, and the trim is removed. The heating element and ashtray are pulled out of the socket.
- The car radio is pulled out of the socket. The spring brackets securing the panel to the cover are pressed out with a screwdriver, and the shield is pulled towards itself. Use a screwdriver to release two plastic antennae from the lower fixation of the shield to the dashboard. The shield is raised and the third spring bracket for its fastening is pressed out.
Removing the panel on the center console
- The connectors for connecting the cigarette lighter (see VAZ 2110: replacing the cigarette lighter yourself), the backlight for it, and the lamp for the hazard warning switch are disconnected. The instrument panel panel is removed.
- Replacing the VAZ 2110 instrument panel light to illuminate the hazard warning switch on the inside of the instrument panel is done after removing it with its socket. To do this, they are rotated in the holder.
- The antennae of the cartridge holder are compressed and the element is removed from the cigarette lighter. The cigarette lighter blades are compressed, the part is pulled out, the light bulb is removed from the dashboard trim and changed if necessary.
- Use a Phillips screwdriver to unscrew the two screws that secure the instrument cluster to the panel. The instrument cluster is moved to the side. The union nut of the speedometer cable is unscrewed from the speed sensor. The cable is disconnected from the speedometer, then removed and routed through the hole in the front panel.
- The connectors are disconnected and the instrument cluster is removed. To replace the instrument panel bulbs on a VAZ 2110, the socket must be turned counterclockwise and the instrument cluster removed from the device. New lamps are being installed. Assembling and installing the combination is carried out in the reverse order.
- The battery is connected.
- The operation of the light bulbs on the instrument panel is checked.
How to replace light bulbs in buttons
- To replace the backlight bulb of the hazard warning light button, the panel with deflectors is removed, after which the hazard warning light button is pulled out of it.
- The deflectors are directed as high as possible.
- On the left and right below them there are mounting ears. Using a slotted screwdriver, they are pulled down and the panel is pulled towards itself.
- The hazard warning button is pulled out.
- There is a socket with a lamp on the side. You need to turn it counterclockwise with tweezers and pull it out.
- The contacts on the light bulbs are wrapped around the sides of the socket. The light bulbs are the same size as a matchbox.
- In order to replace the lamps in the instrument panel of the VAZ 2110 fog lamp, you need to carefully pry the panel with the button with a screwdriver and pull it towards you.
- The remaining operations are performed similarly to the same actions as replacing the instrument panel bulbs of a VAZ 2110 emergency system.
The light bulb for the headlight adjustment wheel is changed in the same way:
- Pry it up with a screwdriver and pull out the wheel.
- Using a small screwdriver, the socket is rotated along with the lamp and pulled out.
- The light bulb changes.
The VAZ 2110 instrument panel is clearly shown in detail in the video.
How to remove the tidy
On a VAZ 2110, removing the dashboard from the dashboard is not difficult, and the only tools you need are a Phillips screwdriver and pliers or a wrench. With their help, we will remove the positive terminal from the battery before starting work. So, lower the steering wheel and unscrew the 4 screws that secure the decorative trim.
Releasing the decorative trim on the VAZ 2110
After this, we pull the cover towards ourselves, and it can be easily removed, hanging on the wires of the switches. To prevent the cover from getting in the way, the wires from the switches can be disconnected - they are on the connectors.
Disconnecting wires from switches and removing buttons located on the decorative trim
Before disconnecting the connectors, do not forget to label them so as not to mix them up during assembly!
So, now we have a tidy in front of us, which is held in place by two screws located on the sides.
We unscrew them and carefully remove the panel, not forgetting that it is also on the wires. In principle, the wires supplying the instrument console in the VAZ do not need to be disconnected, since their length is sufficient to replace the lamps.
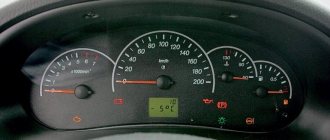
Classic tidy "tens"
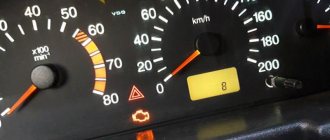
The driver behind the wheel of the tenth VAZ model can monitor the main indicators displayed behind the steering wheel on the panel. There are pointer type control devices:
- speedometer;
- tachometer;
- fuel tank full;
- cooling water temperature values.
Apart from the differentiated values displayed on the scale, the car provides information in the form of glowing or blinking indicators, for example, high beam indicators, turn signals, possible problems with the internal combustion engine, emergency lights, handbrake, etc. If the lamps turn off spontaneously, the driver will be misled , which can lead not only to the failure of one of the components, systems or devices, but also create a terrible (emergency) situation on the road.
It is important to know that the functionality of the display on the 2110 dashboard can be tested independently by holding the reset button and turning the ignition key to the 1st position (then I release it). You can finish the check by pressing the button on the panel again.
Priora panel
Some people prefer the Priora's dashboard. You need to know that you won’t be able to change it with your own hands “in a hurry” - there are differences: in the wiring, in the mounting of the ECU.
It should also be taken into account that the Priora has the same “propensity” for unnecessary squeaks as the “native” one, so you should also think about sound insulation in order to “fit” the Priora panel without unnecessary gaps and cracks. Another drawback of the Priora is the small glove compartment. In addition, you must definitely purchase a mount in the ECU area, specifically from Priora.
Panel from Priora in VAZ 2110
Or maybe you even liked the electronic panel, the installation of which is also possible. However, before you decide, do not forget to calculate how much such a replacement will cost you.
It is quite possible that tuning the lighting you already have, carried out with imagination and invention, will cost you much less. In this case, tuning yourself will become a source of pride for you, and will not only decorate the interior of your VAZ 2110, but also improve the lighting, make it brighter and more comfortable.
Nowadays, the fashion for changing the dashboard backlight is gaining unprecedented momentum. Everywhere you look, there are cars everywhere, sometimes with neon lighting, sometimes with internal LED illumination, but all this can be a very expensive pleasure; it’s a different matter if you replace the dashboard lighting. It is not very expensive, and in general there is little work. This idea was given to me by car advertisements. in which I came across a car with such a dashboard. You can, of course, use ready-made tuning options, that is, buy an overlay for the dashboard, but this will cost a lot. It will be better if you do the tidy tuning yourself. The main thing is to have the right material at hand and be patient. First you will need to disassemble the tidy. For this operation you will need to remove the protective glass, this is not difficult to do, the main thing is to be careful. Next, we begin to remove the arrows. To remove the arrows we need a screwdriver and hard cardboard. Place the cardboard under the arrow and pry it up with a screwdriver, then slowly and carefully lift it to the top. The arrows should come off the rod easily, without problems. Then remove the dashboard backing. In order to remove the backing, we need a stationery knife. We insert a knife between the panel and the backing, and then cut a layer of sealant around the backing. Now you can remove the backing and start working. Next, we disassemble the instrument panel and get started.
First, we need to remove the filter layer from the back of the substrate; this can be done by again using a utility knife. Using a knife, erase the filter layer from the substrate. If anyone doesn’t know, a light filter is a layer of colored paint that is applied to the back of the substrate and gives the numbers on the speedometer and other sensors a colored illumination.
Replacing Light Bulbs in the Dashboard of a VAZ 2109 ~ VESKO-TRANS.RU
Replacing light bulbs in the dashboard of a VAZ 2109 Currently, I notice that all new foreign cars use only LED light sources instead of conventional incandescent lamps in the rear lights as brake lights, side lights, and turn indicators. As it turns out, this is no coincidence. According to research, using LED brake lights instead of conventional incandescent lamps gives the driver behind the vehicle additional moments to maneuver or make emergency braking. During this time, a car moving at a speed of 100 km/h travels 5-6 m. The fact is that an incandescent lamp takes about 0.3 seconds to achieve full brightness, while an LED lights up almost instantly, in about 70 nanoseconds I think the order of these numbers says a lot. Also, LEDs are better than incandescent lamps in terms of specific light output per watt of power and service life. Thus, the time between failures for LEDs is approaching 100,000 hours versus approximately 2000 for incandescent lamps.
They are completely immune to this kind of influence, which gives them a serious advantage when used in cars. Next, we will consider the types of lamps used in the VAZ 2109 car, and what LED lamps suitable for replacing them exist. AKG 12-60/55 (60/55 W) These are halogen lamps, they have two spirals of low and high beam, H4 base. Installed in car headlights.
Lamps with a colored bulb (blue, yellow) change the color of the beam, and under certain conditions, for example in rainy weather, visibility deteriorates. A 12-21-3 (21 W) The most common type of lamps in front-wheel drive VAZs.
VAZ 2109 Replacing backlight bulbs in the instrument panel
If one or more light bulbs
in the instrument panel have stopped functioning, it is necessary to check the integrity... Installed in brake lights, turn signals, rear fog lights, reversing lights. For replacement, there are various LED lamps based on SMD LEDs. A 12-10 (10 W) Used in rear dimensions. As a replacement, you can try lamps with a suitable base on SMD LEDs. A 12-4-1 (4 W) Used in headlights as, as well as for...
There are even LEDs, the color of which is almost indistinguishable from incandescent lamps. When choosing an analogue, you must ensure that the LED lamp fits in its standard place. A 12-1. 2 (1 W) This lamp is used for buttons on the instrument panel. To replace them, there are many LED analogues of various colors. It is better to choose analogues with one SMD LED (larger area and brightness of the glow). You can find out more about this modification of the instrument panel backlight. AS 12-5-1 (5 W) These lamps are installed in the lampshade and rear license plate lights. There are many LED analogues to replace them. To increase brightness, you can install a lamp with 6-9 LEDs in the interior.
A 12-5 (5 W) Used as a lamp for lighting the engine compartment. This is its only use in the VAZ 2109. Any LED lamp with an appropriate base is suitable for replacement. AMN 12-3-1 (3 W) Used only for illuminating the cigarette lighter socket. Any LED bulb with the appropriate base will be suitable for replacement. Lamps in fog lights P If your VAZ 2109 is equipped, then they have halogen lamps with a power of 55 W. There are LED analogues for them too, but you can’t get the same brightness as from halogens. However, they can only be used as...
How to change the backlight using color film
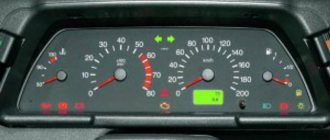
Old dashboard of VAZ 2110
There is no need to change the LED bulbs to change the color of the dashboard lighting.
To do this you can simply:
- Take 12 LEDs and one LED strip.
- Remove the light bulbs from the base and insert the LED in their place.
- you need to take the required amount of LED strip.
Instrument panel diagram
Note: Its length is measured by the panel size.
- The base and LEDs must be returned to their original position.
- Attach the tape to the plastic of the panel (it is necessary to maintain the appropriate temperature).
- Tighten the lock securely.