The transition to disc brakes required new technical solutions from car developers. After all, the drum brake circuit, so convenient in terms of implementing the handbrake function, turned out to be unsuitable. After all, it was necessary to ensure not the expansion of the pads, but, on the contrary, their compression. Therefore, car manufacturers have begun to solve this problem in various ways. Some implemented mechanical compression of the pads, similar to what is used on drum brakes, while others decided to use electrical compression.
How does a rear brake caliper work?
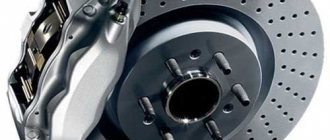
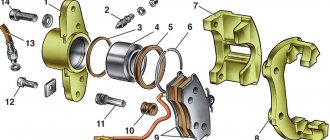
Like the front caliper, the rear caliper consists of a brake cylinder with a piston, a caliper and guides that allow the caliper to move along the caliper. When you press the brake pedal, the pressure in the brake line increases, the piston comes out of the cylinder and presses one pad. Due to the fact that the caliper moves quietly along the caliper using guides, the pressure is evenly distributed on both brake pads and pressed against the brake disc.
The mechanical drive of the hand brake works similarly - the cable activates a lever mounted on the caliper body, which, in turn, squeezes one of the pads. The free movement of the caliper on the caliper distributes the clamping force evenly on both pads, ensuring equal pressure on the brake rotor. The electric drive of the hand brake is also made according to the same scheme. The difference is that in some models the electric motor presses the piston of the caliper cylinder, and in others directly on one of the pads.
Problems
One of the common problems that arises when using rear brake calipers is squeaking pads. Moreover, they can be new and from a trusted manufacturer. The creaking occurs due to the fact that the elements are installed skewed. It only takes a small deviation for new pads to cause a terrible squeak. How is this problem solved? This problem is usually solved by installing anti-creaking metal plates. They are placed in the cavity between the pad and the caliper.
Brake caliper malfunctions
The following types of rear caliper malfunctions occur:
- souring of the cylinder piston, as a result of which the fluid pressure when pressing the brake is not enough to move the piston;
- leakage of the piston seals, as a result of which the pads are pressed weaker than necessary and a loss of brake fluid occurs. If the brake fluid leaks completely and air enters the brake system, the braking efficiency of all wheels will sharply decrease;
- Damage to the brake cylinder piston boot. As a result, dirt gets between the piston and cylinder, which damages the mirror of the cylinder walls and leads to a decrease in braking efficiency and loss of brake fluid;
- damage to the guide anthers, due to which the dirt that gets on them increases the resistance to the movement of the caliper and the pressure between the pads is distributed unevenly. This leads to reduced braking efficiency, as well as uneven and rapid wear of the brake disc;
- loose caliper bracket or crack in the caliper bracket. These are the most dangerous malfunctions, because, firstly, the pads are pressed unevenly against the disc, and secondly, with strong braking, the bracket can break or unscrew from the fist. If this happens, the pads will fall out, the piston will come out of the cylinder and the fluid will pour out, instantly reducing the braking efficiency of the remaining wheels.
Care
In order for the mechanism to serve for a long time and properly, the condition of the caliper should be regularly monitored. Below are some useful tips:
Once every six months, inspect the visual condition of the caliper
Pay special attention to drips. They should not be on the hoses or at the connections.
If there are any, you need to urgently look for the source of the problem. This is usually a frayed or worn hose. It has a two-layer design, but even if the first layer is damaged, such an element must be replaced. Why is this dangerous? Due to leaks, the fluid level in the system constantly drops. This will make it impossible for the piston to work, as it will not have enough pressure. Check how freely the piston moves. If you do not change the brake fluid for a long time, it may turn sour due to rust. At best, you will experience poor braking performance. At worst, you will have to replace the entire cylinder. Keep an eye on the remaining friction material on the pads. Modern manufacturers equip them with mechanical sensors. When the thickness of the pads approaches two millimeters, the metal plate begins to touch the edges of the disc when braking. As a result, the driver hears a characteristic squeak. This indicates that the pads have become unusable. If they are not replaced in time, the metal itself – the pad lining – or even the caliper will rub against the disc. This leads to increased wear of both elements. If significant scuffing occurs, such mechanisms can no longer be used.
Rear caliper diagnostics
Diagnostics consists of two stages:
- Comparison of braking efficiency of all wheels.
- Visual inspection of the caliper.
To compare the braking efficiency of all wheels, carry out diagnostics using a computer stand. If this is not possible, you need to accelerate the car to 30 kilometers per hour on a flat, horizontal paved area, then depress the clutch pedal (on cars with automatic transmission, engage neutral gear) and sharply press the brake all the way. This procedure allows you to determine the condition of brake calipers on any car, regardless of the presence of ABS. If all the calipers are working properly, the car will not skid. If one of the calipers is not working well or is faulty, the car will skid. During a skid, you will feel whether the front or rear of the car is turning, so finding a faulty caliper will not be difficult. After all, the car always skids in the direction opposite to the faulty caliper.
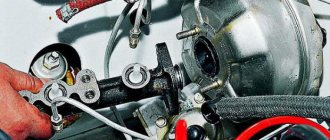
To visually inspect the brake caliper, you need to support the front of the car with wheel chocks, then raise the rear with jacks. After lifting the car with jacks, be sure to install jack stands (they are sold in car dealerships). This will prevent the jacks from tipping over and causing the vehicle to fall. After installing the supports, remove the rear wheels and inspect the caliper. Carefully check the condition of the cylinder boots and guides. If cracks, ruptures and holes are detected, it is necessary to remove the caliper for a more serious assessment of the condition, possible repairs and replacement of the anthers.
Have an assistant press the brake pedal firmly several times to make sure there is no brake fluid leakage. Then ask an assistant to turn the handbrake on and off several times, while inspecting the operation of its drive and rotating the brake disc. This will help determine the condition of the handbrake drive mechanism. If, after pressing and releasing the brake pedal, the wheel does not immediately begin to rotate easily, it is necessary to replace the rubber piston seal. After all, it plays the role of a kind of spring that returns the piston to the cylinder after the fluid pressure is reduced.
note
The usual “graphite” or “Litol” is not suitable as a lubricant for the caliper. The material for calipers must meet high requirements, in particular, be resistant to temperature changes. Conventional lubricant, even in a boot, dries out quickly. Therefore, you only need to purchase a specialized product. Typically, this caliper lubricant is sold in 45 gram bags. They are enough to completely process the mechanism.
How to remove a brake caliper
To remove the brake caliper, lift the rear of the vehicle as described above. Remove the wheel, then disconnect the handbrake drive. On cars with an electric handbrake, various devices and techniques are used to remove the caliper, which are described in detail in the car repair instructions.
Remove the protective caps from the guides, then unscrew them using the appropriate hex key. After this, remove the caliper, it may need a little help with a screwdriver, but in most cases just pulling with both hands is enough.
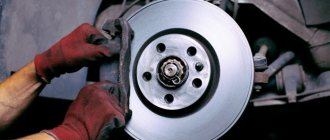
To avoid losing the brake pads, remove them and store them separately. Hang the caliper using rope or wire, attaching it to the body or shock absorber. If necessary, unscrew the bolts securing the bracket and remove it. If you need to completely remove the caliper, unscrew the brake hose end from it. After unscrewing the hose, plug it with a piece of rubber or cellophane to prevent brake fluid from leaking. Some mechanics pinch the brake hose, but this reduces its life and can lead to cracks and weakening of the walls. If the circumstances are unfortunate, such a hose may burst during sudden and strong braking, as a result of which the effectiveness of the brakes on all wheels will drop tens of times. Also cover the caliper inlet hole with a piece of rubber, cellophane or a bolt with a suitable thread.
Where is it located?
Based on the name, it is not difficult to guess that the rear brake caliper of Opel and other cars is located on the rear axle. This element is attached to the hub using bolted connections. There are pads inside it (both on the left and right sides). The Chevrolet Lacetti rear brake caliper is driven by a hydraulic drive. The same scheme is used on other passenger cars.
But as for trucks, here the rear brake caliper (left and right as well) is driven by a pneumatic system. Not long ago, trucks used a combined drive system. So, the rear right and left brake calipers worked first from hydraulics, and then from pneumatics. But now this design is no longer used. If we talk about minibuses and SUVs, hydraulic drive is also used here.
Rear brake caliper repair
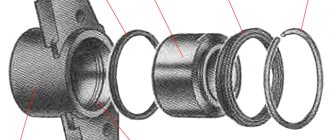
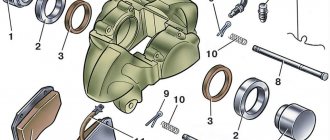
Any rear caliper repair begins with removing the boot. A flathead screwdriver is required for this. After removing the boot, inspect the surface of the piston; if traces of rust are visible on it, it is advisable to replace the entire caliper. Because rust trapped between the cylinder walls and the piston often leads to damage to the wall mirror.
To replace the cuff, you must remove the piston. There are three methods for this, each with its own pros and cons.
- Removing the piston from a car. If you know for sure that you will have to pull out the piston to replace the rubber seals, then this can be done on the car. After removing the caliper from the bracket, have an assistant gently press the brake pedal. The pressure in the brake system will increase and push out the piston. As soon as he comes out, you need to give a signal to the assistant so that he releases the brake. The advantage of this method is that the piston can be easily removed. Disadvantages – you have to work in uncomfortable conditions and a large amount of brake fluid is lost.
- You can use an adjustable wrench to remove the piston from the cylinder. Grasp the top of the piston and, turning it from side to side, pull it out. This method is most often used in cases where the piston needs to be replaced. After all, awkward movement of the key will lead to the formation of scratches on the surface of the piston. The advantage of this method is that the piston can be removed in comfortable conditions by holding the caliper in a vice.
- You can also remove the piston using compressed air. To do this, you need an adapter with a suitable thread. After connecting the adapter to the compressor and caliper, apply air until the piston is completely released. The disadvantages of this piston are that a compressor and a special adapter are required, the piston output is more like a shot, so there is a possibility of damage.
After the piston is removed, it is necessary to carefully inspect the cylinder walls. If the wall mirror has scratches or burrs, the caliper must be replaced. If only the piston is damaged, it can be purchased either as part of repair kits or separately.
A prerequisite for quality caliper repair is cleanliness in the workplace. Dust or dirt getting between the cylinder and the piston will lead to scoring and damage over time. Therefore, repair the caliper only on a clean table, after washing your hands with soap.
The repair consists of replacing the rubber seals (cuffs) and, if necessary, the piston. After removing the old cuff using a screwdriver, thoroughly rinse the caliper cylinder with alcohol. Be sure to remove the plug from the inlet while flushing. After washing, be sure to dry it. After each disassembly, a new cuff must be installed. To do this, lubricate the cylinder walls, including the cuff seat, with brake fluid. Lubricate the outer surface of the piston with brake fluid, insert it evenly into the caliper and press it in by hand. If installed correctly, it will fit quite tightly. If it is installed crookedly, then it will not be possible to press the piston.
Can it be repaired?
I have a large and wonderful article on repairs , be sure to read it, everything is there on the shelves. The calipers break, there is no escape from this, it may simply be that the boot has simply been “missed”, or the working piston has gone sour. In general, if you buy a new one assembled, it is expensive. But this one can be repaired too.
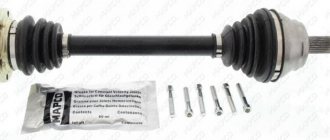
To do this, purchase a repair kit. Essentially these are all new internals that need to be replaced.
There is no point in repairing working pistons (cleaning them of rust or oxide), the surface is often already eaten away, and even if you remove a part on a special machine, the dimensions will no longer fit.
Therefore, the sequence of actions should be like this:
- We purchase a repair kit.
- We remove the caliper from the car and disassemble it.
- We remove all the old rubber bands and clean the body if necessary.
- We install new parts.
- We install it on the car and bleed the brake system.
I would like to note separately the guides; in fact, these are two long bolts along which the moving part of the structure runs. If they wear out or their rubber seal breaks, the caliper’s operation may also be disrupted; it is also advisable to replace them.
Now we are watching a short useful video.
I’ll finish here, read our AUTOBLOG.
( 13 votes, average: 4.69 out of 5)
Similar news
Which brake drums are better, cast iron or aluminum? Read .
How and with what paint to paint the brake drums. So as not to rust.
Rust converter composition. Can I do it myself?
Add a comment Cancel reply
Comments
Good day everyone, I decided to write my review of the 2010 Toyota Avensis. Just want…
Installing a caliper on a car
After inserting the piston, you need to install the caliper on the car. Installation is carried out in the same way as removal, but in reverse order. If the brake hose tip is attached to the caliper using a special bolt, be sure to replace the copper washers. After installing and assembling the caliper, bleed the brakes (do not forget to add brake fluid to the reservoir). To do this, ask your assistant to press and release the brake pedal 4 times, then press it again and hold it until commanded. With the pedal depressed, unscrew the brake bleeder valve and release the air, close the bleeder valve and have an assistant release the pedal. When the brake fluid appears, place the hose on the fitting and lower it into a clear bottle or jar of brake fluid. Bleed the brakes until no more air bubbles come out of the hose. Lastly, install the wheel and lower the car to the ground.
What breakdowns indicate wear or damage?
The brake caliper is in motion, so it often fails. Moving parts are subject to the greatest wear. Common breakdowns affect safety and require elimination:
- The guiding elements jam during operation. To detect a breakdown, you need to check the functionality of moving components and systems. The rubber boots on which the seal depends often wear out. When moisture or dust comes into contact with the lubricant, its original condition deteriorates and its basic properties are lost. It begins to gradually damage internal parts and metal fasteners.
- Souring of guides. This is also a common problem. Vehicle owners can clean the surface of rust themselves. Specialists and technical service technicians advise buying new parts.
- One or more pistons are stuck in a certain position. The main reason is the appearance of corrosion and rust. In this case, you need to check the integrity of the anthers for cracks and damage. They are often not visible during examination, so it is necessary to seek help from specialists.
- Brake fluid is leaking from the structure. Traces of oil appear when the internal elements are heavily worn. In this state, moisture begins to seep in. To solve the problem you need to buy high-quality seals. Many manufacturers offer ready-made repair kits for replacement.
- The fastening of the pads was destroyed, play and loosening appeared. Metal inserts are used for fixation. To save money, you need to change the inserts along with the pads. Thanks to this, costs are minimized.
These are the problems that drivers face while operating the car. Also, the piston system often becomes immobile when jammed, worn or damaged. It is necessary to regularly check the integrity and performance of the guide elements and the hydraulic system.
Symptoms of failure:
- Problematic braking. To stop the vehicle, you need to press hard on the brake pedal. The main symptom is a long braking distance.
- During operation, the elasticity of the pedal disappeared and it became soft. Punching is carried out sharply.
- Braking occurs unevenly. Sometimes drivers notice that the car begins to pull to one side.
- After the driver stops braking, the system seizes.
- Brake pedal knocking.
- When the driver sharply presses the brake pedal, the structure jams or completely blocks.
- During operation, an extraneous sound, knocking, whistling is heard.
If such malfunctions are discovered while driving a car, you must not delay repairs and seek help from specialists. They will be able to accurately determine the malfunction and fix it within a short time.