Buying a car is an exciting event in the life of every car lover. Many people buy domestic equipment from previous years. This is due to the fact that it is easy to change by adding a certain “zest” to the design. The result is a very interesting and original technique. The domestically produced “Seven” has long gone out of fashion, but a competent reconstruction will give this model a bright, modern look. The first thing to start with is tuning the headlights on the VAZ 2107. It is worth noting that the lighting devices of the VAZ 2105 are identical to the “seven”.
Whether to tune VAZ 2107 headlights with your own hands or go to a mechanic, everyone decides for themselves. Modernization may consist of the following elements:
- xenon installation;
- replacing LEDs;
- toning.
Tuning VAZ 2107
VAZ cars, produced several decades ago, can no longer attract anyone with their technical characteristics and appearance. In this regard, new AvtoVAZ models and foreign cars leave the legends of the domestic automotive industry far behind.
However, the owners of Soviet Zhiguli cars do not intend to give up. In recent years, there has been a certain trend in tuning VAZs - and the owners do not skimp on spending on modernizing and improving the exterior of their cars.
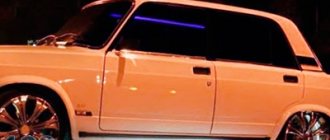
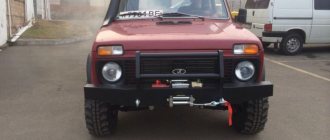
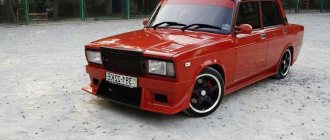
Ultimately, even the VAZ 2107, which, by modern standards, has the most ordinary appearance, can turn into a very stylish car.
Thanks to the replacement of bumpers, improvements to standard lighting and the use of two shades of body color, the VAZ 2107 acquired a unique appearance
More information about tuning the VAZ-2107: https://bumper.guru/klassicheskie-modeli-vaz/tyuning/tyuning-salona-vaz-2107.html
Specifics of tuning the “seven”
Tuning this car involves various procedures aimed at improving the standard equipment. At the same time, attention is paid to both changing the appearance of the machine and its technical characteristics. Typically, VAZ 2107 tuning is carried out in several directions:
- motor;
- body;
- transmission;
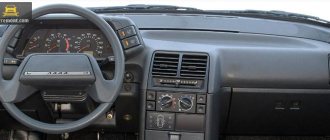
- salon;
- lighting devices.
Any of these areas has many different options for improving standard characteristics. Often, in order to give the car an unusual appearance and at the same time save on tuning, owners modify the headlights. A relatively simple procedure turns the unattractive VAZ into a masterpiece of modern automotive engineering.
Of all the tuning options for the “Seven”, modifying the headlights and rear lights is the fastest and most cost-effective way to transform the car.
COMPONENTS FOR SEVEN MODERNIZATION
With the saturation of the spare parts market, the turn has come for accessories necessary for tuning cars. For the VAZ 2107 model, small companies in our country and abroad have launched the production of various types of lighting equipment. Flashlights are mainly designed to fit a standard size and are easily mounted in place of the standard ones without altering the factory mounts.
For the VAZ 2107, taillights are currently produced that use different devices: mainly the usual incandescent lamps or LEDs. The latest products have a higher cost, but at the same time they have a number of advantages?
- low power consumption;
- short response time;
- high information content of signals.
Even on the brightest day, the position and direction indicators, as well as the reversing light, perform their functions well.
How to do headlight tuning
Tuning lighting devices is the easiest way to give the “Seven” an exclusive appearance. It is with headlights that inexperienced car enthusiasts begin to work, since almost anyone can change the current parameters without compromising traffic safety.
Today, tuning head optics and rear lighting devices has many different options. Sometimes you don’t even need to invent anything: online stores sell different configurations of headlights that can be installed on domestic cars.
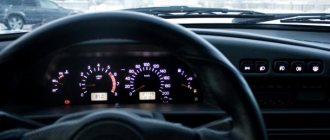
Understeering's shifter
- Place the body level, check the tire pressure - the parameters must meet the requirements specified in the operating manual.
- Remove dirt from the optics - with water or a solvent (if the dirt is persistent, a soap solution will not remove it, an organic composition will help).
- Lubricate the adjusting screws with a liquid with pronounced penetrating properties, treat the fastening points, and test the degree of reliability of fixation of each optical device (the screws are located in niches).
Front lights
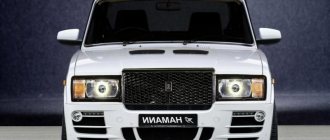
The front part of the car usually attracts more attention, so amateurs begin to tune primarily the headlights.
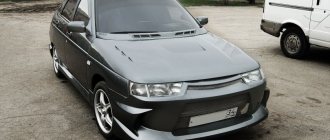
It must be said that modified headlights really greatly change the appearance of the car and give it a unique character - depending on what kind of tuning is intended.
Evil headlights
It’s very easy to give your car a menacing, gloomy and even evil look: just perform tuning like “evil headlights”. This is one of the easiest ways to give the “seven” an unusual appearance.
Depending on the owner’s capabilities, tuning can be done using a variety of materials:
- thin plywood;
- sheet metal;
- tinting film;
- paints.
The car's "angry" squint gives you goosebumps
The essence of this tuning is as follows: cover part of the headlight so that the remaining uncovered headlight resembles evil eyes. If any materials from plywood or metal are selected, then a blank is cut out in advance and glued into the cavity of the headlight. Using film or paint is even easier - just remove the headlight and apply darkening on the inside.
You can adjust the “anger” of the flashlight yourself - just increase the angle of the darkening part.
Tuning headlights from plywood painted black
Angel eyes
In tuning, angel eyes are the luminous rings on the “face” of a car - like a BMW. Today everyone can afford this lighting option - it’s inexpensive and fast. In addition, the body of the VAZ 2107 will somewhat resemble an expensive BMW and thereby increase the status of the owner.
Headlights that are very unusual for the “Seven”
There are several technical solutions for making angel eyes with your own hands. The easiest option is to use LEDs. To work you will need:
- white LEDs 5 mm - 2 pcs.;
- 0.25 W resistor;
- wiring;
- transparent rod made of organic glass or plastic (diameter 8–10 mm);
- auxiliary materials (soldering iron, hair dryer, drill and glass jar).
The work is quite painstaking:
- Take the rod and clamp it in a vice.
- Using a drill, drill holes for the LEDs at both ends of the rod.
- Give the rod the shape of a ring - bend it around the jar and heat it with a hairdryer so that the workpiece remains in this shape.
- Solder wires to the LEDs, connect a resistor to one of the wires.
- Assemble an electrical circuit similar to the circuit of lighting devices that is already available on the “seven”.
- Insert the LEDs into the holes of the workpiece and glue them with superglue.
Video: how to make angel eyes
You can buy ready-made angel eyes at a car store - this will make it much easier to connect new lighting fixtures to the standard equipment of the car.
Using LEDs of different shades, you can achieve an even more impressive effect.
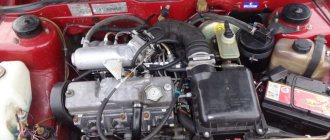
Radiator grille
Crankshaft modifications
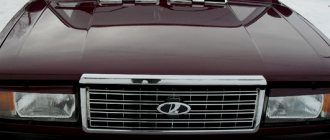
The modernized optics immediately catches the eye, so special attention is paid to tuning the headlights
Expert opinion
It-Technology, Electrical power and electronics specialist
Ask questions to the “Specialist for modernization of energy generation systems”
Tuning the body of a VAZ 2106 Of course, you can put anything and anywhere if you really want, but in this case the game is not worth the candle, and the swap process will be very difficult from a technical point of view. Ask, I'm in touch!
Side lights VAZ 2107
The standard dimensions on the VAZ 2107 do not have bright light. Over the years, due to the wear and tear of the glass, even replacing the light bulbs in the headlights no longer helps. Therefore, it is quite logical that the car owner decides to tune the side lights.
On a VAZ 2107, tuning the dimensions comes down to transferring these lights from the sidelights to a separate lighting element on the body. This way they will be better visible, which will create comfortable and safe conditions for movement on the roads in any weather.
On old VAZs, tuning the side lights is considered a mandatory procedure.
Minor modifications will be required using the following tools:
- electric drill;
- mandrel;
- pliers or pliers;
- Phillips-blade screwdriver;
- side cutters.
Transferring the side lights from the sidelights to the body is impossible without the following materials:
- light bulb socket;
- new sidelights;
- wires for connection;
- terminals;
- new light bulbs (drivers recommend Philips Vision 12 V).
Transfer process
Any tuning requires accuracy and care. And carrying side lights is no exception. Here it is recommended to follow the rule “measure twice, cut once”:
- Measure the diameter of the hole in the car headlight.
- Drill a hole of the same diameter on the new lamp.
- Drilling should be done with drills of different diameters, gradually increasing the diameter so as not to damage the headlight glass.
- Prepare a landing site for the socket with a light bulb (try it on, if the socket does not fit, increase the drilling depth).
No wires or internal components should protrude from under the headlight. - Squeeze the cartridge and insert it into the socket. Using a mandrel, straighten it and fix it securely.
- Insert the light bulb into the socket.
- Connect the wiring to the new lamp and connect the lighting device according to the diagram.
Terminals with wires have different color codes for convenience.
After such tuning, the side lights will shine as brightly as possible without blinding oncoming drivers.
Modification of the stove - installation of a pump from a GAZelle
The material was provided by a user of our forum “Olezhek”, for which many thanks to him. For a long time, the noise of the stove was disturbing and the poor airflow of the left driver's window irritated me. On the advice of members of the forum (from autolada.ru), I completely disassembled the stove and cut out the third engine support for the stove (the one that is directed towards the engine), leaving the motor on bushings (about which later I literally regretted it for a couple of months and had to disassemble it again and replaced it with a bearing one) after this alteration, the blowing into the left air duct became much stronger, with the lid closed, but I think that I still need to cut off one jumper that I didn’t cut off the first time...
Tail lights
Of course, the exterior of any car begins primarily with the frontal part. However, if you are tuning lighting fixtures on a VAZ 2107, then you must not forget about the rear of the car.
Rear lighting devices are made in rectangular headlights
American lights - tuning
The principle of operation of American headlights comes down to the following: this is a type of tuning that, when using the existing equipment on the car, allows you to perform a different connection scheme. So, the operation diagram of American headlights on a VAZ 2107 will look like this:
- When the lights are turned on, both turn signals come on.
- If one turn signal turns on, it begins to blink, and the second one begins to shine with a uniform light.
- When the turn signal is turned off, both light up again.
- When the emergency button is turned on, the turn signals blink in time with the emergency lighting system.
According to this diagram, you can connect standard lighting devices and make American headlights
That is, the main decoration of the car in this tuning option is the non-standard operation of lighting devices.
Find out more about the rules for using the rear lights of the VAZ-2107: https://bumper.guru/klassicheskie-modeli-vaz/elektrooborudovanie/zadnie-fonari-vaz-2107.html
How to make American headlights on a G7
In order for the headlights on the VAZ 2107 to start working “American style”, you will need to prepare the following materials and tools:
- two capacitors of 4700 uF and 25 volts;
- two diodes marked IN5819;
- two five-pin relays;
- two relay connectors;
- terminals for connections;
- soldering iron
Connect existing standard equipment according to the diagram.
Video: 3 ways to make American cars on a VAZ
LED light bulbs
LED lights are inexpensive and immediately improve the car's bodywork. And installation of such equipment is not considered labor-intensive. The cheapest tuning of VAZ 2107 rear lights today is the use of LEDs.
To work you will need to purchase in advance:
- LED lights themselves;
- resistors;
- wiring;
- sealant.
You will definitely need an electric drill and a drill bit to create a socket for installing the LED.
Using different colors of diodes, you can get a headlight of a wide variety of colors
Progress
During the work process, you will need to carefully calculate each subsequent step, since the slightest error in size will be noticeable: the location of each LED must be adjusted to the nearest millimeter.
- On the surface of the rear headlights, make markings for the placement of LEDs (in one line, in two, around the perimeter, etc.).
- Holes must be drilled in the headlights to accommodate the required number of LEDs.
- Place LEDs in the holes.
- According to the connection diagram, connect the negative and positive terminals to each other.
- Next, combine the nearby LEDs into groups of four with resistors. That is, every four LEDs will need to be connected to one resistor.
- Connect the resistors to the standard wiring of the VAZ 2107 lighting equipment.
Video: DIY LED taillights
Some car enthusiasts do not drill headlights, but separate transparent polycarbonate plates and insert them into the headlight housing. In this way, they manage to avoid mistakes, since in case of calculation errors they can always take another plate and drill the holes again.
The LED taillights have an attractive appearance. In addition, their service life is measured in years (depending on the manufacturer), so you don’t have to think about frequently replacing light bulbs.
The shape of the LEDs is limited only by the driver's imagination
Toning
Tinting the rear (and sometimes even the front) lights on the “Seven” is another affordable method of do-it-yourself tuning. The work does not take much time at all, and the external effect of the modifications will make everyone look after your car.
Tinting tuning involves the use of any materials: from varnish to film. For example, glass-tinting varnish can be bought at any auto store in the form of an aerosol in a can. It is important to read all the manufacturer’s instructions in advance, since different companies have different approaches to safety requirements when working with a spray can. Film is not considered a scarce material, but the cheapest way is to order it through online sites.
Headlight tinting is equally suitable for both dark and light cars
Varnish application procedure
It is necessary to work with any tinting materials in a dry and warm room. In summer, work outside is allowed, but in winter it is better to drive the car into the garage.
- Thoroughly wash the surfaces of the rear headlights and dry them.
- Cover the outline of the headlights with masking tape to prevent the material from being applied to the body parts.
- The varnish is sprayed on the surface of the headlights from a distance of about 30 centimeters (according to the manufacturer's instructions).
- After applying the first tinting layer, it is recommended to wait for the varnish to dry. Typically, one coat will have little darkening effect, so a second coat of tint may be necessary.
- Any varnish drips must be removed immediately.
- The hardened varnish on the headlights must be polished - this way all defects are eliminated and the surface acquires a mirror shine.
If necessary, varnish tinting from headlights can be easily removed with acetone.
To achieve the greatest effect, it is recommended to varnish the lantern in 2–3 layers
Film application procedure
Gluing the film on the surface of the rear headlights of the VAZ 2107 also does not involve any difficulties:
- The surfaces of lighting devices must be washed and wiped dry.
- Next, cut out the required size from the film according to the dimensions of each headlight. Leave a centimeter of film on each edge.
- Spray the surface of the lanterns with a solution of water and soap, and remove the protective layer from the film.
- Immediately apply the material to the lantern and smooth out the film.
- After fixing, use scissors to trim off the extra centimeters of film on the device.
It is recommended to choose shades that are not the darkest, as there may be problems with traffic police inspectors.
The tinting film may not be applied to the entire surface of the headlight.
Thus, tuning the headlights on a VAZ 2107 can be easily done with your own hands. It is important not to use xenon and double-row placement of identical lighting devices, as this is prohibited by law and traffic regulations.
Cleaning from dust and condensation
The first thing that may come to mind is to replace the headlights, improve or improve them. But initially it is necessary to perform standard manipulations.
Attention!
It is advisable to do this if the light from them was previously good, but as the vehicle’s mileage increased, it began to dim.
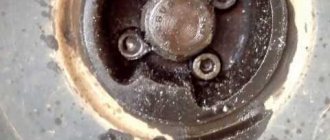
Car owners should check their lighting devices inside for dust or condensation. To do this, you need to check whether it is clean inside or not. If it turns out that the headlights still need to be cleaned, they should be removed carefully and washed with plain water. Before installing the devices back, they need to be thoroughly dried.
Condensation, as well as scratches, can affect the direction of light. If fogging occurs, then there is only one way out - contact the service station employees for repairs or replacement. After this procedure, the difference will be noticeable immediately.
Preparatory stage
Before starting the adjustment, you need to go through a preparatory stage, which involves detecting defects. The latter can worsen the performance of optical devices and the cleaning of the headlights themselves:
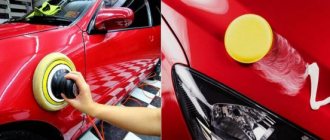
- Initially, you need to thoroughly clean the headlights from various contaminants. To do this, it is recommended to use special detergents designed for cleaning optics.
- After cleaning the headlights with detergents, be sure to rinse the devices under running water and allow them to dry completely.
- Next, you need to check whether there are any defects on the reflectors and headlights. If the slightest cracks or chips are found on the glass, the glass will definitely have to be replaced.
According to experts, headlights will illuminate the road better if you install xenon or halogen lamps in them. Car enthusiasts share the same opinion, having learned from their own experience that without xenon, the fog element illuminates the road much worse.
Buying halogen or xenon lamps for car headlights is quite simple by visiting a market or store.