If the heater in the car does not work, especially in the cold season, there is a possibility of being left without a means of transportation, since in the cold you can simply freeze inside the car. In severe frosts, it is very difficult to clear the windshield of ice to ensure visibility, and with a non-working stove this becomes doubly problematic. You may not even be able to get to a service station.
But most often, if you know the operating principle, circuit and design of the VAZ-2115 stove, you can solve the problem on the spot yourself.
The design and principle of operation of the VAZ 2114/15 stove
The heating system of the VAZ 2114/15 is designed to heat the air entering the passenger compartment. Its design is the same in cars with injection and carburetor engines. The coolant heated by the engine flows from the cooling system into the heater radiator, which is blown by a fan. The flow of warm air created in this way enters the cabin through the air duct system. The intensity and direction of air flow is regulated using deflectors and dampers. The interior heating system of the VAZ 2114/15 can operate in several modes.
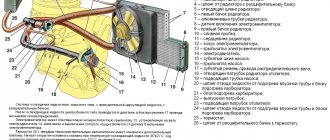
The VAZ 2114/15 stove is designed quite simply: 1 - assembled heater; 2 — protective casing; 3 - seal; 4 — front air duct; 5 — rear air duct; 6 — rear air duct; 7 — right nozzle; 8 — right side air duct; 9 — right side nozzle; 10 — intermediate body; 11 — central nozzle; 12 — draft of the windshield heating flap; 13 — heater control levers; 14 — control handle for the heated windshield damper; 15 — heater control handle; 16 — symbol plate; 17 — control handle for the foot heating damper; 18 — right air duct; 19 — interior heating air duct; 20 — heater control damper rod; 21 — heater valve control rod; 22 — heater valve; 23 - leg heating damper rod
Brand name – LRh – Luzar Radiator heater
Heating radiators (also known as heater radiators, also known as heater radiators) are heat exchangers that use the heat generated by the engine to heat the vehicle interior. They allow you to maintain a comfortable temperature and prevent the car windows from fogging up.
For reference: different names of this node have equal rights of use. For example, “heating radiator” and “stove” come from the function of this heat exchanger, “heater radiator” and “stove radiator” - from the installation .
LUZAR manufactures hundreds of heater radiators for a wide range of cars presented on the Russian market. They can be purchased in partner stores throughout Russia or online.
Many models of heater radiators are supplied to car factories in Russia and Ukraine - both for passenger cars and for trucks and buses.
The production range of manufactured stoves is constantly increasing; New types are being developed for the most popular cars in Russia.
Powerful R&D allows us to conduct research in the field of improving heat exchangers and create new designs that provide increased performance properties of heater radiators. Main areas of research:
- use of different types of tubes
- changing the location of the tubes
- change in the “fillability” of the core
- use of turbulators-swirlers
- use of various aluminum alloys
- testing of solders with different characteristics
- improving the corrosion properties of metal
- ... and many other R&D areas.
Stove design
The VAZ 2114/15 stove consists of the following elements:
- Fan.
- Windshield defroster.
- A distribution flap that directs air flow to the central and side deflectors, to the lower and upper parts of the cabin.
- Control valve.
- Stove radiator.
- Duct that directs air flow to the legs.
- Internal air duct.
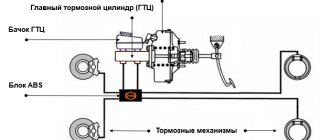
The stove consists of a fan, dampers, radiator and air ducts. Blue and red colors indicate the flow of cold and hot air, respectively.
Features of the heating system at Pyatnashka
On the VAZ 2115, the heating system includes the following elements:
- the VAZ stove itself, which includes a plastic housing, a radiator assembly, and a ventilation device;
- VAZ heater valve, used to block the access of antifreeze to the radiator device and the mechanical drive of the unit;
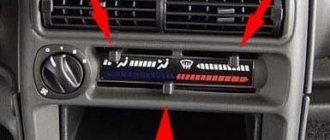
- a control unit used to regulate air flow, located in the center console.
Complete installation of a “tag” heating system
Heater fuse and reasons for its failure
Often the cause of malfunction of most components and systems of a car is a blown fuse. The stove is no exception. Failure of a 30A heating system fuse causes the fan motor to stop and air to stop flowing into the cabin. In this case, find an element marked F7 in the fuse block and replace it. The new fuse should also be rated 30A. If the fan does not work after this, the problem should be looked for elsewhere.
Heater fuse F7 is located in the mounting block under the hood on the driver's side
It is often difficult to determine that it is the fuse that has blown. It can fail due to a short circuit in the electrical wiring, a malfunction of the electric motor, severe clogging of the cabin filter and in a number of other situations. The difficulty lies in the fact that fuse F7 is simultaneously included in the rear window heating electrical circuit and is responsible for the cigarette lighter, glove compartment lighting and headlight washer motor. If it fails, all these components will not work.
Refinement of the pipe
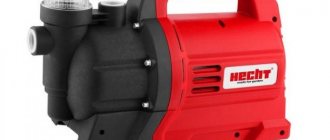
When the air flow from the left deflector is too small, you can force its intensity. To do this, you need to insert a small (about 50 mm) fan into the pipe. A cooler used in computers is suitable for tuning.
First remove the deflector. Make a hole for the cooler and install it. Seal. Put the branch pipe with the fan in place. Restore electrical. An alternative is to connect the cooler directly to the heater contacts. In this case, it will only work when the ignition is on.
Properly carried out modernization will add warmth to the interior and save the owner of the VAZ 2114 from many problems.
Why the stove does not work or does not heat the air
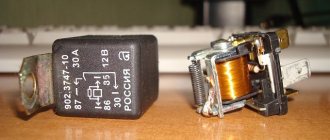
If the stove fails, it either does not work at all, or it works but does not heat the air. In the first case, first check the fan wiring, starting with fuse F7. If the fuse is blown, replace it. Then they check the relay, which may not turn on the first time or only when the engine is warm. In this case, the relay is replaced with a new one.
Then the serviceability of the electric motor is assessed. To do this, power is directly supplied to its contacts from the battery. If the electric motor starts to operate at maximum speed, then it is in good condition. Otherwise, it will need to be repaired or replaced.
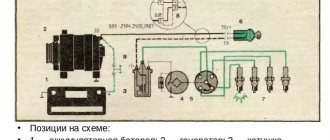
The intensity of the air flow is adjusted using a resistor having two spirals with resistances of 0.82 Ohm and 0.23 Ohm. In the first mode, the current flows through both spirals, in the second - only through a spiral with a resistance of 0.23 Ohms, in the third - bypassing the spirals, that is, without resistance at all. If the resistor is faulty, the fan will only operate in the third mode at maximum speed (handle in the extreme right position). The problem is solved by replacing the resistor, which is located on the driver's side above the accelerator pedal.
If the resistor is faulty, the heater fan will only be able to operate at maximum speed.
If cold air enters the cabin, this may be due to:
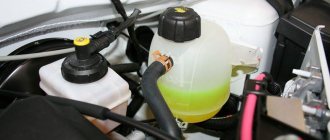
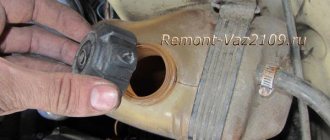
- Airlock. It could have formed when replacing the coolant, when the system was depressurized, or because there was insufficient amount of coolant in the system. To remove the plug, remove the heater radiator pipe, use a watering can to add antifreeze to the maximum and put the hose back in place. After starting the engine, coolant under pressure will displace the remaining air from the system.
- Stove tap jammed. This happens if the tap was not initially opened all the way, and during operation, oxide and scale formed on the inner surface, preventing the normal circulation of the liquid. You can try to open the tap using pliers or immediately replace it with a new one.
- The stove radiator is clogged. When using low-quality coolant, the radiator honeycombs may become clogged. The problem is solved by flushing or replacing the heat exchanger. The feasibility of washing is determined by the scale of contamination.
- Installation of a low-quality radiator. In a defective product, the honeycomb may be incorrectly soldered. The radiator should be replaced.
- Low pressure in the cooling system. If heat transfer increases at higher speeds, the pump needs to be replaced.
- Low coolant level. It is necessary to check the level and add antifreeze if necessary.
- Damage to the heater fan impeller. The impeller is carefully inspected and replaced if mechanical damage is detected.
- Cabin filter dirty. If it is heavily polluted, the power of the electric motor will not be enough to pump warm air into the cabin. The filter is replaced with a new one.
- Damage to the cylinder head gasket. If the cylinder head gasket is blown, white smoke will come out of the exhaust pipe. The problem is solved by replacing the gasket and dismantling the cylinder head.
If the stove is clogged, warm air will stop flowing into the cabin.
How to improve the interior heating of a VAZ 2115
Post by vovaka » Dec 07, 2007, 09:34
There is nothing new in this version; the idea was taken from Mercedes Benz and BMW cars, on which this principle has been used since time immemorial. The modification will make it possible to increase the efficiency of the Heater from 60% - inherent in the design - to 100%. The result will exceed your wildest expectations. The work will take 30 minutes.
1. Install an additional electric pump from the car with the electric motor facing down onto the standard ignition coil mounting studs located on the rear wall of the battery shelf. On carburetor engines, first move the ignition coil to the washer reservoir mounting studs. 2. Drain the engine block. 3. Disconnect the fluid supply hose to the heater from the outlet pipe of the block head and connect it to the horizontal pipe of the electric pump (the length is sufficient) 4. Connect to the vertical pipe of the electric pump a hose connected from two S-shaped hoses 2108 (located in the cabin between the tap and the heater radiator) , or another suitable one. Connect the second end to the block head, in place of the previously removed standard one. 5. Take a relay with normally open contacts (2105,2108-starter, ignition relay) with a mounting bracket. Bridge contacts 30 and 86 with a jumper. 6. Disconnect the white/blue and yellow with a blue stripe wires from the recirculation valve (located on the front panel in the engine compartment, two thin hoses connect to it). White/blue - connect to terminal 85 of the relay, yellow with a blue stripe to terminal 30. Connect terminal 87 to the electric pump wire. 7. Pour and warm up. Control the pump with the recirculation button.
Reflections: Recirculation is designed to warm up the interior faster and serve as a barrier from external combustion. Unfortunately, it does not provide the first plus foggy windows. In your car, with the engine fully warmed up and the heat and speed controls in the extreme right positions, try placing your hand near the heater deflector. Compare the temperature at idle and at 2500 rpm. As they say, feel the difference. The reason is insufficient fluid circulation in the heating system. Reworking this will fix it. (You can leave the recirculation alone and connect the additional pump directly to the power supply of the electric heater fan.) Check: Cooling temperature. liquid 100 deg. The extreme right positions of the regulators. Outside - minus 22 degrees, idle - temp. air from the deflector +35 degrees. On pump - temp. after 5 seconds +75 degrees. In the assembled system, the electric pump will require only 0.250 mA, so there is no need to worry about the button. 700r———-electric pump 40r———- relay 50r———- two hoses 30 min—— work The main advantage of this scheme is the high temperature of the air coming from the deflectors, which does not depend on engine speed. The engine temperature has not changed. Not a single windshield, contrary to the predictions of skeptics, burst.
Or you can go to the specialists in this area in the area of the Start store. They are located behind the building that in front of the old one there will be boxes on the left side of their box _________________
Heater dampers don't work
The distribution of air flows throughout the cabin is carried out by dampers, which, in turn, are controlled using cables. When these cables fail, problems arise with directing the air flow to the windshield or to the foot area. In addition, the damper that blocks the flow of air from the street begins to work incorrectly. In this case, adjustment of the damper drives is required.
Such situations can arise even on a new car. Slightly warm air begins to flow from the lower, upper and side deflectors, and hot air begins to flow from the center console. This is due to the poor build quality. There are gaps between the joints of the air ducts and the dampers, which leads to warm air entering only from the center console and heating the panel from the inside.
The drive cable is always taut. Therefore, over time it bends, breaks off or stretches. In this case, it is necessary to adjust the damper drive, which is performed in the following order:
- In the stove, we look for a bracket with which the cable sheath is held on the heater body.
- A galvanized metal lever located on the left side is pulled back. This position corresponds to the maximum opening of the damper.
- The length of the cable is tightened and adjusted. The long lever on the lever block in the extreme right position should open the damper completely.
- After adjustment, the cable is securely fixed.
Video: stove repair using the example of a VAZ 2114
see also
Comments 213
I solved the problem by setting the thermostat to 87 degrees, the car became very warm, and I unfastened the faucet adjustment, leaving the faucet in the open position, I regulate the temperature only with the GH lever that you fixed.
Good evening. One of these days I will have to install a thermostat on Grants, and I will also have to turn off the tap. What is the situation with adjusting the air temperature? I bought a gearmotor from tens for the hot-cold damper. I want to plug the central air ducts
And after replacing the heater radiator, the airflow in my legs worsened, before it blew heat everywhere, now it blows heat everywhere but not in my legs, as you indicated, I did a cable and nothing
Yes, I'm sick of these 9-stove stoves, G completely warm, I always did everything, and the copper radiator and thermostat from 10 and closed the damper. In short, someone like me is full of crap until I installed the Opel stove with normal pipes and a torpedo And Schaaa I still I installed the heater from the 9 and their torpedoes are squeaky, but not to life
Unfortunately, this cannot always help; the heater radiator - copper or aluminum - plays a very important role. The aluminum is complete crap, (price is about 350-400 rubles) I installed a new one after completely cleaning and gluing the stove, the result was frozen sides and from the middle to the top of the windshield, I had to scratch it with my nails to get home. Afterwards I decided to splurge and bought a copper one (1400 rubles), although I didn’t immediately believe that it would be any good, but I was very mistaken! The difference is huge: 5-6 times the copper one justifies itself. And one more thing about the GC damper. If you turn the stove towards you and pay attention to the gaps of the GC damper at the ends (i.e. on the right and left sides, through the central air duct), then you will see just GAPs there! That's why some people have cold air coming into the side deflectors while the forehead of the leg and the center are warm. And even if you pull the damper with very great force, it will not help you much.
Replacing and connecting the stove
Installing a new heater radiator is done in the reverse order. When installing rubber hoses, it is recommended to treat them with sealant. When connecting electrical connectors, use the markings applied during disassembly.
After assembly, coolant is poured into the system. To prevent an air lock from forming, remove the hose from the throttle assembly after loosening the clamp. Antifreeze should be poured into the expansion tank slowly, observing the disconnected hose. As soon as coolant flows out of it, the hose should be put back on the fitting and tighten the clamp. If everything is done correctly, the operation of the stove will not cause any complaints.
When installing a new heater radiator, it is recommended to pre-treat the pipes with sealant
Video: dismantling the VAZ 2114 stove
Fan motor repair
If the electric motor malfunctions, it should first be removed and then the feasibility of repair should be determined. It is necessary to evaluate the condition of the brushes, armatures, windings, and check the integrity of the wire insulation. The contact area of the brushes on the armature can be cleaned with zero grade sandpaper. You should also pay attention to the bushings and bearings - clean the rubbing parts from dirt and apply lubricant (for example, Litol). All elements with signs of wear must be replaced.
When installing a new heater radiator, it is recommended to pre-treat the pipes with sealant
Heater radiator repair
Usually, if mechanical damage is detected, the stove radiator is replaced with a new one. However, some car owners try to repair cracks and holes using soldering. A copper radiator is quite easy to solder, and it is much easier to restore than an aluminum one. To repair an aluminum heat exchanger, you will need special flux and tinning solder, as well as a powerful soldering iron. The damaged area is first cleaned of dirt and degreased. Then flux and solder are applied to it with a soldering iron. After soldering, it is recommended to check the radiator under pressure to make sure there are no leaks.
Cleaning and flushing the radiator of the VAZ 2114/15 stove
You can increase the efficiency of the stove by cleaning and flushing the radiator. The procedure can be performed without dismantling the radiator or with dismantling it. In the first case, you will need to remove the outlet and inlet pipes from the heater and pour a cleaning solution into it. Citric acid, plumbing cleaners (for example, “Mole”), etc. are used as such a solution. Then the radiator is washed with running water and coolant is added. You can clean the radiator better by removing it from the car. This will allow you to wash it not only from the inside, but also from the outside, removing dirt between the honeycombs. Washing is usually carried out with running water.
If after performing these procedures the stove does not work better, the radiator must be replaced.