The main purpose of a stove heater is to maintain a given temperature in the car interior, as well as to ensure an uninterrupted supply of oxygen inside.
Type of ventilation: supply and exhaust.
Heating circuit of Lada Granta: control is carried out by mechanical regulators that change the air flow speed and the direction of the damper. In order to prevent unpleasant odors from entering the cabin, a cable-type air flow intake switch is pre-installed.
Description of the heating and ventilation system design
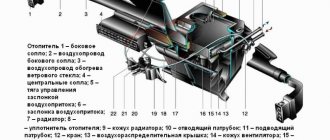
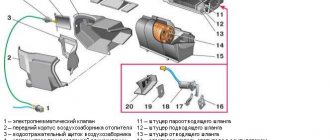
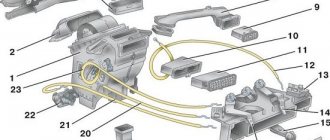
Heater parts
Heater parts: 1 – air duct to the left deflector; 2 – radiator cap; 3 – seal; 4 – heater radiator; 5 – air duct to the glass blower grilles; 6 – heater housing; 7 – air duct to the central deflectors; 8 – air duct to the right deflector; 9 – recirculation damper rod; 10 – heater fan housing; 11 – fan; 12 – additional fan resistor; 13 – air duct; 14 – drafts of the air flow distribution dampers; 15 – control unit; 16 – hole for connecting air ducts to the feet of rear passengers; 17 – temperature regulator damper rod
The car is equipped with a heating and ventilation system, which serves to create the most comfortable conditions for the driver and passengers, regardless of weather conditions. The heating and ventilation system includes: heater, heater fan, air ducts and deflectors. Through the air ducts, air from the heater is supplied to the windshield and side window vents, to the central and side deflectors on the instrument panel, as well as to the air ducts supplying air to the feet of the driver and passengers. The heater and air ducts for supplying air to the deflectors and glass blower grilles are mounted on the back of the instrument panel.
Location of heater and air ducts
Location of the heater and air ducts on the instrument panel: 1 – recirculation damper; 2 – air duct to the right deflector; 3 – recirculation damper rod; 4 – air duct; 5 – air duct to the glass blower grilles; 6 – heater body; 7 – air duct to the left deflector; 8 – instrument panel frame; 9 – temperature regulator damper drive; 10 – radiator cap; 11 – radiator inlet pipe; 12 – radiator outlet pipe; 13 – seal; 14 – additional fan resistor; 15 – heater fan housing; 16 – heater fan
The system is controlled by turning the handles located on the heating and ventilation control unit. The control unit is installed on the instrument panel. The heater housing is installed under the instrument panel in the center; the heater fan housing is located on the right behind the glove box. The heater and fan housings are connected to each other by an air duct. The heater housing contains a heater core and distribution dampers that direct air flow to certain areas.
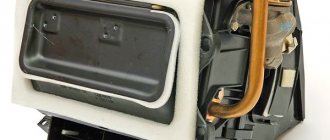
Heater radiator
The heater radiator is connected by hoses to the engine cooling system. Coolant constantly circulates through the radiator. Depending on the position of the damper associated with the temperature regulator, outside air may pass through or bypass the heater core. In intermediate positions of the damper, part of the air passes through the radiator, and the rest bypasses the radiator. In the extreme positions of the damper, all air passes through the radiator or bypasses it. The heater fan housing contains a fan, an additional heater fan resistor, and a recirculation damper.
Heater fan
The fan electric motor is commutator, DC, with excitation from permanent magnets. The manufacturer does not recommend repairing the electric motor; if it fails, it should be replaced.
Additional resistor
The fan motor, depending on the connection of an additional resistor, can rotate at four different speeds. When the electric motor is turned on directly, the fan rotates at maximum speed, and with different connections through a resistor, the fan can rotate at three different speeds. The additional resistor has a built-in fuse. If the fuse fails, the additional resistor must be replaced.
A ventilation and heating system filter (cabin filter) is installed on top of the heater fan housing to clean the air entering the vehicle interior. Don't forget to see how to replace the cabin filter on a Lada Granta.
When the vehicle is moving, air enters the heater through the holes in the windshield trim. To increase the air supply to the cabin while the car is moving, as well as when parked, the heater fan is used. The intensity of air supply is determined by the fan rotation speed. To speed up the heating of the cabin and prevent outside air from entering the cabin (when driving on smoky, dusty sections of the road), an air recirculation system is used. When the air recirculation control lever is moved to the extreme right position, the recirculation system flap blocks the access of outside air to the car interior, and the air in the car interior begins to circulate in a closed loop, without exchange with outside air.
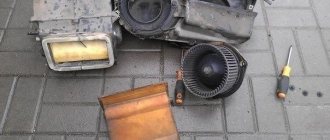
Cabin air outlet valves (with rear bumper removed)
Ventilation valves
Air exits the passenger compartment through valves installed behind the sides of the rear bumper.
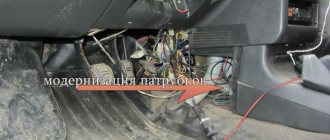
Work on removing and installing the radiator yourself
Let us immediately make a reservation that it is better to carry out such work not alone, but together with an assistant. It is also worth noting that there are no differences between replacing the stove radiator on a Grant with and without air conditioning.
First you need to give yourself access to unhindered implementation of this manipulation. To do this, you will need to move to the space under the hood and disconnect the 2 battery terminals. Then the fasteners holding the battery are unscrewed and it is removed out.
If you are going to add antifreeze after replacing the unit, drain the coolant from the system before starting work. Then move into the car interior and remove the gas pedal; this is necessary for the smooth removal of the overall radiator housing.
Next, you will need to work with the brake pedal, namely, remove the finger of the specified pedal and press it. In addition, to gain access to the radiator, you will need to unscrew the plastic side cover of the dashboard, which is located to the right of the gas pedal.
After gaining access to the node, proceed to sawing - perhaps the most crucial moment in the whole work. The top tube is cut first at the bend, after which it, together with the pipe, is pulled into the free space under the hood. Next, a similar procedure is performed in relation to the lower tube. After sawing is completed, press the brake pedal and pull the radiator into the passenger compartment.
Now you can begin installing the new unit, the tubes of which should first be covered with foam rubber (for their more reliable fixation). Then you will need to install the radiator in its proper place and put the pipes on the pipes located near the engine.
When carrying out this manipulation, you will need outside help - one person will have to be in the car, while the other will be engaged in putting on the pipes from the engine compartment. When carrying out installation and landing, it is recommended to use a sealant, and one additional clamp is installed on each of the tubes.
After the radiator installation is completed, coolant is poured into the system, and the gas and brake pedals, battery and air filter with pipe are returned to their rightful places. Replacement completed successfully.
Interior ventilation and heating system of Lada Granta - Checking, adjustment
The ventilation and heating system for the vehicle interior is a supply and exhaust system, while the temperature of the liquid heated above 90 °C from the engine cooling system is used to heat the interior. When the door windows are closed, air is supplied to the cabin by an electric fan. The intensity of the air supply is regulated by the rotation speed of the electric fan impeller. The fan electric motor has four speed modes (lower speeds are provided by an additional resistor with two windings). Air intake is carried out through an air intake installed under the windshield frame. To clean the air entering the cabin, a filter element made of non-woven synthetic material is installed at the heater air intake. The exhaust is carried out due to the vacuum that occurs near the rear of the body when the car is moving. Exhaust deflectors are built into the body panels under the rear bumper. The interior is heated by a heater installed under the instrument panel. When the engine is running, heated fluid from the cooling system circulates through the heater core, heating the air passing through it. The amount of air passing through and around the radiator is set by the central heater damper, depending on the position of the temperature control knob installed on the instrument panel. The air distribution throughout the cabin can be adjusted by rotating the control knob for the air distribution flaps, as well as by turning the flaps and guide blades of the instrument panel ventilation grilles.
CHECKING THE TECHNICAL CONDITION OF THE VENTILATION AND HEATING SYSTEM 1. Prepare the car for work 2. Start the engine. 3. Turn the air temperature control knob counterclockwise to the extreme position (blue sector). 4. Using the heater fan control knob, we alternately turn on the four speeds of the electric fan. Based on the intensity of the air flow from the nozzles, we check the operation of the electric fan and the change in the rotation speed of its impeller when changing modes (1 is the minimum speed, and 4 is the maximum). If the electric fan does not work in all modes, check the additional resistor and switch. If the electric fan does not work, then check the power supply circuit of the electric fan 5. Turn on the maximum speed of the electric fan. 6. By turning the control knobs for the heater dampers and ventilation grilles, we monitor the change in the direction of air flow. If there is no change in flow distribution, the damper actuator is most likely faulty. 7. Having warmed up the engine to operating temperature, turn the air temperature control knob clockwise to the extreme position (red sector). 8. Make sure that the air coming out of the panel nozzles has become warm. If the air temperature has not changed, the central damper actuator may be faulty. 9. Turn the temperature control knob to the blue sector - cold air should enter the cabin. If the temperature does not drop, it means the central damper drive is faulty.”
Additional Tips
However, it also happens that the problem with heating the interior consists only of some small mistakes. Therefore, before you start disturbing the service center workers, check whether all the dampers on the stove are set in the required position.
There is a possibility that it is simply stuck. And, with a significant push, it will be moved from its place.
Often, car owners do not particularly monitor the condition of their car, which can result in various problems. For example, the stove heats poorly or cold air comes out of it. Why? This means something was overlooked somewhere. But don’t be afraid, you can carry out the repairs yourself. But first you need to find the cause of the breakdown.
Check the refrigerant level
You need to start by checking the antifreeze or antifreeze. Such an inspection should be carried out as often as possible; this can save you from many problems in the future.
Attention.
If a leak is discovered, you need to place a sheet of cardboard under the engine overnight, and in the morning you can determine the problem area. But keep in mind that this method only works if the leakage is severe. Otherwise, a more thorough inspection will be necessary.
Let us remind you that in the previous article we told you how to clean injector nozzles with your own hands. This procedure is especially relevant today, when the quality of fuel leaves much to be desired.
First you need to check where the leakage is possible.
1. Check how intact the expansion tank is.
2. Pay attention to the thermostat connections, which have three hoses carrying fluid.
3. Inspect the coolant inlet and outlet hoses to the passenger compartment opposite the engine.
4. Inspect the cooling radiator.
Attention.
If the leak is small, then you can simply let the engine cool and run your fingers along the bottom of the pipe joints.
1. Tighten the clamps.
2. Replace hoses if cracks are visible.
3. Add antifreeze and check how the stove now works.
Attention.
If your car is not the newest, it is better to use antifreeze as a coolant, since it is less fluid, unlike antifreeze.
Blockage in the system
Often an antifreeze leak is accompanied by a “plug” in the cooling system. Then the coolant enters the radiator irregularly, causing the heater to weaken.
To solve this problem, you need to open the tank, remove the radiator cap, warm up the engine, step on the gas, and raise the speed to 3500 rpm. Then the blades will direct the liquid at a higher speed and the plug will come out.
The problem with a poorly functioning stove may lie in the thermostat. When the engine warms up, there is a damper inside it that opens at a certain temperature. When this happens, fluid flows through the radiator, cooled by the fan. Over time, the damper can deteriorate, causing the engine to overheat and the heater to blow cold air.
The thermostat is located at the bottom left of the engine. Three pipes go to it. When the arrow on the gauge reaches the red mark, touch the thermostat (with a glove). If the hose that comes from it is cold, then the damper is broken.
Attention.
You can revive the thermostat using a handy method: take the key to 17 or 19 and lightly tap on the bottom.
There are many channels in the radiator that can become clogged, resulting in reduced heat transfer. You can purchase a new radiator or clean the old one.
Attention.
It is recommended to clean the circulation regularly every 2-3 years.
The heater tap can easily jam. With the first frost the problem can be identified. In this case, the tap simply does not switch to heating mode. Here, only replacing the tap will save you.
If air does not flow from the drainage system at all, then either the damper cables have fallen off or the motor has burned out.
Video. Why doesn't the stove heat up?
Sometimes it is enough to add coolant.
Heating, air conditioning and ventilation device Grants
| If your LADA Granta has any problems with the heater, ventilation (windows sweat) or air conditioning, then before going to the service, try to find out the reason yourself. And the study should begin with the installation of heating, air conditioning and ventilation. |
The heating (air conditioning) and air ventilation system operates effectively when the windows are closed and is a single complex that provides the most comfortable conditions in the car, regardless of weather conditions and ambient temperature. The system includes:
- A heater that increases the air temperature in any operating mode of the system;
- Air conditioning, which reduces the temperature and humidity;
- Control unit for mixing cold and hot air to achieve the required temperature in the cabin.
The complex provides low-inertia regulation of air temperature, practically independent of vehicle speed. The amount of air entering the cabin is mainly determined by the operating mode of the fan, so it must be turned on even while driving at high speed. Outside air can enter the cabin through the door windows when the windows are down and the air blower, the air intake of which is located in front of the windshield. Air from the air blower enters the vehicle interior through the windshield blower nozzles, side and central nozzles, as well as through the lower nozzles of the heater housing.
How does the stove heat on the grant?
I used to have the opinion that the heater on Russian cars works great in the summer when it’s hot, and the supply of cold air works great in the winter. This impression was formed precisely because of the cold “nine”, where while the car warmed up, it was possible to drive around the whole earth. After I got behind the wheel of a new car, I immediately paid attention to the operation of the stove, and it did not disappoint. Heats up quickly - Super!
This is what one of our users writes, and many grant drivers agree with him.
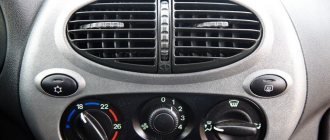
LADA Granta climate system control unit
Fig. 2: LADA Granta climate unit not equipped with air conditioning. 1 — fan operating mode switch; 2 — temperature regulator for air supplied to the cabin; 3 — block of push-button switches; 4 — regulator for the distribution of air flows supplied to the cabin; 5 - control lever for the recirculation system
Fig. 3: LADA Granta climate control unit with air conditioning. 1 — fan operating mode switch; 2 — temperature regulator for air supplied to the cabin; 3 — block of push-button switches; 4 — regulator for the distribution of air flows supplied to the cabin; 5 — recirculation system control lever The control units have the following switches and regulators: 1) Fan operating mode switch. To increase the intensity of air supply to the passenger compartment while driving and to ensure air supply when the vehicle is stationary, use the switch handle to set one of the four operating modes of the air blower fan. 2) Temperature regulator for air supplied to the cabin. To change the temperature of the air entering the cabin, rotate the temperature control knob. The blue part of the scale corresponds to the supply of the most cooled air, the red part to the supply of the most heated air. When the handle is in the middle position, air is supplied to the cabin at ambient temperature. On a car equipped with air conditioning, the system also provides an automatic mode for maintaining the set temperature in the cabin. 3) Block of push-button switches. Depending on the configuration, the unit can be equipped with: 4) A regulator for the distribution of air flows supplied to the cabin. To change the direction of air supply, use the control knob to select one of four options (clockwise):
- air supply to the windshield (through the windshield blower nozzles);
- air supply to the upper part of the cabin (through the side and central nozzles of the instrument panel);
- air supply to the lower part of the cabin (through the lower nozzles of the heater housing);
- air supply to the lower part of the cabin and to the windshield (through the lower nozzles of the heater housing and the windshield blower nozzles).
5) Lever for controlling the recirculation system. To turn on the recirculation mode, move the lever to the extreme right position. When the recirculation mode is turned on, outside air does not enter the cabin, and the air blower fan circulates air inside the cabin. This mode is used to quickly warm up the interior in the cold season, as well as when the surrounding air is dusty and gassy.
It is not recommended to turn on the recirculation mode for a long time while the car is moving, as this usually leads to fogging of the windows.
— rear window defroster switch. When you press the button, the rear window heater turns on and the heater on indicator on the button lights up; NOTE
In a variant, when the heated rear window is turned on, the heated exterior rear view mirrors are also turned on.
— the windshield heated switch is used to quickly remove frost and moisture from it. When you press the button, the windshield heater turns on and the heater on indicator on the button lights up. The system operates only when the engine is running. The system turns off:
- automatically after 6 minutes;
- when you press the switch key again during heating;
- when the voltage in the on-board network drops below the permissible level;
- when engine speed decreases below permissible limits;
- when the ignition is turned off;
- air conditioner switch. To cool the air entering the car interior, press the air conditioning button and the indicator will light up. To turn off the air conditioner, press the button again. NOTE
The air conditioner will not turn on if the air blower fan mode switch is set to position “O” (fan off) or the ambient air temperature is below O 'C. This is not a sign of a malfunction, but is provided for by the design.
The main reasons why the stove does not heat on Grant (video)
As you know, when creating the Lada Grant, engineers and mechanics borrowed ideas for the embodiment of the car not only from the body part of the Lada Kalina, but also from the technical side as well.
For example, Grant’s car with the “Standard” package is equipped with a 1.6-liter Kalina engine with a capacity of 80 horsepower. The “Norma” and “Lux” packages have a modified engine with an increased piston stroke and an output power of 90 hp.
It is worth noting that these statistics are not only in numbers; in fact, the machine performs its performance at full strength. This is a fairly powerful characteristic for the domestic Lada Grant; the engine cooling system plays a vital role here.
Cooling
To cool the interior air, do the following:
- Switch switch 1 (see Fig. 2) of the electric fan operating modes to one of the positions “1”, “2”, “3” or “4”.
- Place the regulator handle 4 opposite the pictogram.
- In the 3 pushbutton switch block, press the air conditioner switch key. The indicator located on the switch button will light green all the time the air conditioner is operating.
When the air passing through the evaporator cools, the water vapor contained in it condenses. The condensate is drained through a drain pipe under the bottom of the car. If the ambient air humidity is high, a puddle of water may form under the car, which is an indirect sign that the air conditioning system is working properly.
Turning on the air conditioner while the engine is running under difficult conditions (long climbs, heavy city traffic, etc.) can lead to engine overheating. Monitor the coolant temperature gauge: if the temperature exceeds the permissible value, turn off the air conditioner. During long trips in city traffic, the efficiency of the air conditioner may decrease due to the intense thermal conditions of the engine. This is not a sign of malfunction; the air conditioner will operate effectively when driving under normal road conditions.
- climate block grants
- air duct grants
- air conditioning grants
- stove grants
Lada Granta is one of the most popular cars in Russia in 2022, along with KIA Rio, VW Polo, Lada Vesta, Hyundai Solaris and Hyundai Creta. This popularity of the car is explained, first of all, by the optimal combination of price and quality: Granta owners note good visibility, an acceptable power unit, ease of maintenance, low cost of spare parts, a spacious trunk, high ground clearance, which is extremely important for Russian realities. Among the components that are indispensable in the cold season is a heater, the main component of which is the radiator. If a situation arises when it is necessary to replace the stove radiator, then in most cases this can be done without outside help. What should the owner of a Lada Granta remember who has decided to replace the heater radiator on his own?
Preventing glass fogging
When the air humidity is high (during heavy rain), the car windows may fog up. To prevent the windshield and front door windows from fogging up, do the following:
- Turn regulator handle 2 to the middle position.
- Place the regulator handle 4 opposite the pictogram.
- Move switch 1 of the electric fan operating modes to position “2”.
- To prevent the rear window from fogging up, press the button in the 3-button switch block.
Heater radiator: responsible for heating the interior
It’s hard to imagine a modern car without a standard set of devices and options, thanks to which driving the vehicle becomes as convenient as possible, and staying in the cabin is comfortable and safe. The functions of maintaining a favorable temperature regime in the car are assigned to the heating, air conditioning and ventilation system, which, depending on the situation, can heat, ventilate or cool the air in the cabin. At the same time, one of the key components of the heating system is the stove, which includes a radiator that acts as a heat exchanger. The air entering the car interior is heated by the radiator, and it is heated by the liquid that cools the engine.
How does the Lada Granta heating system work?
Structurally, the Lada Granta heating system consists of:
- an air duct directing the flow to the left deflector (deflector is a device for enhancing traction);
- heat exchanger covers;
- seal;
- stove radiator;
- air duct to glass;
- stove body;
- central air duct;
- an air duct directing the flow to the right deflector;
- recirculation shutter rods;
- fan shell;
- directly from the fan;
- a resistor that regulates the operation of the fan;
- main air duct;
- distribution valve rods;
- regulating device;
- a device that directs air to the feet of passengers;
- thermostat shutter rods.
Checking at a car dealership
First I checked the inlet and outlet pipes: both were hot. I made an appointment with an official dealer at the car showroom. I arrived, inspected the car, measured the air with instruments. When the engine temperature is 100 degrees. At the outlet of the stove the air came out at 48 degrees.
We checked it on a similar car. His engine temperature was 84 degrees, the outlet temperature was 68. The difference was 20 degrees between mine and the neighboring car. The technicians thought for a long time and decided that the heater radiator was clogged.
At that time, the mileage was 10,500 km, and only 6 months had passed since the purchase. We washed the radiator, but this did not give any results - the Lada Granta's stove heated very poorly. They sent me home.
Replacing the Lada Granta heater radiator
If it's cold in the cabin when the heater is on, it means it's time to repair or replace the heater. Among the most typical reasons why you have to change the heater radiator on a Grant:
- clogging of channels due to the formation of scale or dirt;
- the occurrence of cracks or holes in the heating system.
In some cases, it is possible to get by with repair and restoration measures. For example, before changing the radiator, you can try flushing the system with a special liquid. There are means to get rid of scale inside the heating system, both by draining the antifreeze and the coolant inside. Such products, as a rule, do not harm sealants, gaskets, hoses, etc.
In some cases, it is possible to repair the heater radiator of a Lada Granta car without having to replace it
What is needed to replace a stove radiator?
When starting to replace the radiator, you need to prepare:
- set of clamps;
- sealant;
- antifreeze;
- Phillips screwdriver;
- key to 10;
- insulation (foam rubber);
- file.
Of course, you should purchase a new radiator in advance, and a “original” one, since the heat exchanger of other models will not work.
Video: recommendations for replacing the Lada Granta heater radiator yourself
Sequence of steps when replacing a radiator
Work on dismantling the old radiator can begin from the engine compartment. Here, to create access to the elements of the heating system, it is necessary to remove the battery, the air duct pipe between the throttle assembly and the air filter, as well as the air filter itself.
Then you need to empty the system of coolant by draining it into a previously prepared container. Obviously, if a car owner intends to fill in new antifreeze at the end of the work, the old one does not need to be saved.
Before replacing the heater radiator of a Lada Granta car, you must remove the battery and air filter
The next stage of work is carried out from the interior. To gain access to the heater radiator, you will first have to remove the gas pedal: without this, it is not possible to remove the heat exchanger . Dismantling the pedal, as a rule, does not cause any difficulties: using a 10mm wrench, unscrew the three fastening nuts and disconnect the brake light limit switch and the connector for the electronic gas pedal. In addition, you need to press the brake pedal and lock it in this position.
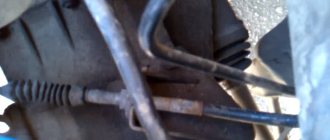
Next, the plastic cover covering the radiator is removed, after which access to the heat exchanger opens. After this comes the most crucial moment - sawing off the radiator pipes: you should saw off after bending so that the cut part can be removed through the hole into the engine compartment. After both pipes are removed, you can remove the radiator from the niche into the car interior.
To dismantle the old radiator, you need to saw off its pipes
The pipes on the new radiator should also be sawed off so that later hoses can be put on them and secured with clamps. The cut edges of the pipes should be processed with a file, the holes in the engine compartment are filled with foam rubber to provide additional fixation to the structure and to preserve heat in the cabin.
Before disassembling the entire panel on the Grant, you need to file down the aluminum tubes on the stove radiator and connect the new radiator with a piece of hose... Doing this is not a problem, but before doing anything, you need to think about how to do it correctly.
Akhmed Fazilov
https://grantaremont.ru/content/pechka
It is more convenient to carry out the work of replacing the heater radiator together: one supplies the pipes from under the hood, the second receives them in the cabin. Sealant should be applied to the pipes of the new radiator and, after connecting to the flexible hose, securely secured with clamps. After this, you need to assemble all the removed parts: gas pedal, battery, air filter, then fill the system with antifreeze. At the end, you should check how the new radiator works: you need to start the engine and let it run for a few minutes, then visually make sure that the antifreeze level has not dropped, there are no leaks, and the heat exchanger has warmed up.
There are no fundamental differences in the procedure for replacing the heater radiator on a Lada Granta with and without air conditioning (unlike replacing the cooling radiator).
Video: personal experience of the Lada Granta owner in replacing the heater radiator
Stable and uninterrupted operation of all vehicle systems can be achieved by constant monitoring of their condition. The serviceability of the Lada Granta heater radiator becomes especially important in winter, therefore, in the process of preparing the car for the cold season, it would be useful to check its readiness for the season, especially if the vehicle is expected to operate at a high intensity in winter conditions. Practice shows that with proper operation, a stove radiator can serve properly for many years, but if it still fails, it is quite possible to replace the heat exchanger yourself.
Replacing a stove radiator without cutting a Lada Granta panel
There was a small antifreeze leak on the engine cooling radiator. On the advice of a friend, I filled the cooling system with sealant for the cooling system. A day later in the morning the stove began to blow cold air. It was a little warmer when the gas was on. After removing the heater radiator pipes, it was found that it was clogged, because... it was impossible to blow it out. The photo shows that the sealant I poured completely clogged the heater radiator.
Reviews
| № | Positive |
| 1. | Vladimir: Six months have passed since we bought the car, and there have been no breakdowns in such a short time. The fan refused to start several times, the reason turned out to be a bad fuse contact. |
| 2. | Vasily: I have been actively using the machine for two years, there are no particular complaints, all units are working as normal. Breakdowns happen, like everyone else, but they are minor and can be easily fixed on your own. |
| 3. | Gennady: after two months of the machine being idle, the stove heater began to supply little air. I disassembled it myself, cleaned it, works properly. My recommendations to car enthusiasts: don’t be afraid to repair them yourself. |
| 4. | Kirill: I think that Granta is put together with high quality, the price is affordable for a family with an average income. Provided timely maintenance, no problems arise. |
| 5. | Ivan: after buying the car, I immediately drained the factory antifreeze and bought good imported antifreeze. Now I don’t know any grief, the stove works like a charm. |
| 6. | Dmitry: there were minor defects, I fixed them myself, but they were insignificant and did not affect the performance of the machine. |
| 7. | Igor: I’m happy with the car, there are no major comments, as for domestic transport it’s very good. |
| Negative | |
| 1. | Victor: Over the two years of active use of the car, I contacted the service station several times under warranty. The fan malfunctioned, then the stove heater. Decided to renovate and sell. Renault Logan is several times better than its domestic counterpart. |
| 2. | Vladlen: I’m dissatisfied with Grant’s purchase, I’ve already regretted wasting money several times. The car is not worth the investment. |
| 3. | Gennady: a year and a half since purchasing the car, constant investments, purchase of consumables, repairs at service stations. |
Conclusion The stove heating system of the Lada Granta is completely copied from the Lada Kalina. There are no complaints about the equipment, everything works properly. In order for the mechanism to serve for a long time, it is necessary to systematically carry out inspection and prevention.
Many motorists save on maintenance, as a result of which the service life is reduced. An important factor is the cloudiness of the antifreeze. The manufacturer recommends replacing it every 75,000 km. Exceeding the interval causes deposits to form at the bottom of the radiator and corrosion begins.
The Lada Granta passenger car, which is considered one of the most affordable in the world, is equipped with a “stove” (or simply a heater) that is standard for VAZ cars. Typically this unit works very well, but problems can still occur. Therefore, if the Lada Granta stove does not heat well, then there must be reasons for this that simply need to be discovered.
We carry out diagnostics
Device diagram and step-by-step instructions for replacing the clutch on a Lada Granta
If it is cold outside and the interior cannot warm up properly, then you need to check the operation of the cooling system, which has a direct effect on heating the interior.
Coolant level
To do this, you need to open the hood and, with the engine not warmed up, check where the coolant is located.
If its level in the tank is between the minimum and maximum marks, then everything is in order. But, when this level decreases, problems with the tightness of the cooling system are possible, and this leads to a decrease in pressure inside the system. If the problem is not corrected, the stove will not be able to warm the air in the cabin effectively enough.
Thermostat
This is a native Luzar thermostat
We are talking about the possible sticking of the thermostat valves in a position where the coolant circulates only in a larger circle. So, during the cold period, the coolant will not warm up to normal temperature, and therefore the interior will not become warmer.
Thermostat location under the hood
You can verify the presence of this particular breakdown by the fact that the car, while stuck in traffic jams, begins to overheat very quickly. In addition, when moving along the highway at a stable speed, the engine loses its temperature too quickly, if we talk about the cold season. However, even if these “symptoms” are not observed in your car, this does not mean that the thermostat is working properly. It is quite possible that its defect lies only in tangible problems with the interior heater.
For even more complex cases, you can check the pipes that connect to the heater radiator. Normally, one should be hot and the other just slightly warm. If the second of the pipes is very cold, this will indicate that the stove radiator in your car is clogged. It won't be easy to clean it. Most likely, you will have to completely remove the entire stove.
And for the most extreme situations, when none of the above helps, and there is very severe frost outside, you can simply block the radiator’s air supply with any dense object, such as cardboard or plastic.
Air temperature regulator damper
If the cooling system of the Lada Granta is working properly, then the reason for the poor operation of the stove may lie in the functioning of the air temperature regulator damper.
Blown-out air temperature regulator (either the slider or the cable with the mechanism to which the regulator transmits tension may be faulty)
The malfunction may relate to the heater control panel or poor operation of the gearbox through which the damper moves. Depending on its position before the breakdown, cool air can enter the cabin in the cold season or hot air in the summer.
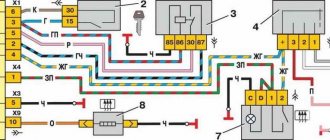
Heater fan and fuse
The fuse box is indicated by an arrow
Also check whether the heater fan turns on. If it remains motionless, then you need to check the condition of the 30A fuse. It can be recognized by its green color and F4 index (in the picture above). It is located in the additional concentration of power fuses. It is located under the hood, near the expansion tank of the cooling system.
If everything is fine with this fuse, then most likely the problem lies in the electric fan motor itself. You can get to it only through a special hole, which will become accessible after removing the glove compartment lid.
Motor repair
Quite often the stove starts howling, the reason is a malfunction of the fan motor. The easiest way to fix it is to install a new part. But this is not always a good solution. For many foreign cars, this small engine is quite expensive. If the car is old, then you will have to look for the part at a disassembly site, which is not the best option. Engine repair is not difficult, and can save quite a lot of money for your budget.
To carry out repair work you will need to remove the part. This process can vary significantly between models, so check the manual for your machine. The engine repair itself is carried out in the following order:
- First we remove the impeller. It needs to be slightly heated with a hairdryer and tapped with light blows of a hammer;
- The rotor is riveted;
- Usually, the cause of howling is the burning of the bushing to the shaft and/or lack of lubrication. Remove the bushing. It will have to be carefully knocked out. Apply grease to the shaft, also lubricate the bushing;
- The bushing is carefully hammered into place, after which the engine is riveted back. The assembled motor is installed in the car.
All work takes a maximum of a couple of hours (depending on the characteristics of your car). The cost of repairs is almost zero. You will only waste a small amount of lubricant. Conclusion
. Any malfunction of the interior heating in winter makes operating the car uncomfortable. Therefore, the question of why the stove fan only works at speed 4 with the onset of cold weather turns out to be a pressing one. In fact, fixing this problem is very simple; for this you do not need any special knowledge in electrical engineering.