The relative simplicity of the Lada Granta’s design, including the liftback, allows for a number of preventive and repair work to be carried out outside the service center. Even during the warranty period, the manufacturer allows basic work to be carried out outside of an official service station.
For example:
- replenishment of cooling system fluid and engine oil;
- replacing windshield wiper blades;
- replacement of light bulbs, front and rear optics.
How to remove a tail light: Granta
The process is extremely simple. To work, you will need a 10 mm socket wrench or a ratchet with a corresponding long head.
Step 1 . We remove the terminal from the battery (any one) - you will need the same key for ten.
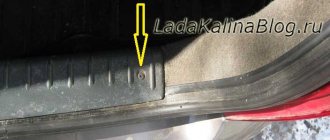
Step 2 . We open the trunk, from the inside to the left and right of the opening we find “pockets” in the felt lining. They are closed with Velcro. Let's open it.
We find a pocket that blocks access to the flashlight. Let's open it.
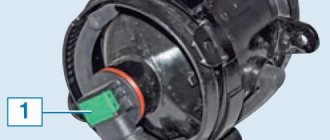
Step 3 . We disconnect the wiring - all the light bulbs along with the sockets connected to the optics. Turn the cartridge counterclockwise to remove it.
To disconnect the cartridge, turn it counterclockwise with force.
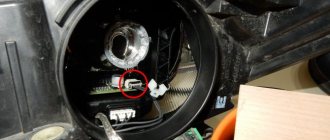
Step 4 . We find three screws securing the lamp. Using a ten-point socket, unscrew all three.
Access to the screws is not the most convenient. Can't fit into the trunk? Try unscrewing it blindly.
Step 5 . We pull the lantern towards ourselves. Disconnected from the wires and body, it will come out of the groove without any problems.
Pushing the lantern from the inside, we pull it towards ourselves.
Reassemble in reverse order. Don't forget to reconnect the battery terminal.
Functionality check
It is checked in the most primitive way. To do this, you need to disconnect the wires from it and connect them directly to each other. After this, you need to turn on the ignition and switch the gearbox selector to reverse speed. If the headlight starts to light, then the fault is in the DHZ; if the light does not start to light, then the problem is somewhere else. It is also possible to connect a light bulb or sensor to another electrical network and check using it.
In order to check the sensor, you need to prepare a multimeter. It is necessary to check the voltage on the ground, as well as the orange wire that is connected to it. If voltage is present, then you need to ring the entire contact group from the fuse block to the gearbox. If there is no voltage, then the problem is in the DZH itself.
How to replace a lamp in the rear light on a Grant
In a similar way, the lamps themselves are changed in 5 steps :
- They threw off the terminal;
- In the trunk we approached the lantern;
- We pulled out the lamp socket for replacement;
- Turn the light bulb in the socket counterclockwise;
- When replacing with a new one, simply fit the nubs on the base into the grooves of the cartridge.
We recommend checking your brake light bulbs regularly. On Grant they are double threaded - often one thread burns out, and the second one works. Thus, the lights may be on, but the brake lights are not .
The clarification may be funny, but car owners often confuse this feature of the Grant with a breakdown . Therefore, they begin to climb into the left lamp to change the reverse lamp, which, in principle, is not there.
Typical signs of a lighting system malfunction
- lack of indication on the dashboard when the turn signals, high/low beam lever, and brake light are activated;
- frequent indication of the above indicators;
- the high/low beam lever does not activate the lamps;
- insufficient brightness of lamps and flashlight reflector.
The above signs indicate damage, deformation, or a break in the electrical circuit of the lighting system. To troubleshoot problems, you will need comprehensive diagnostics, identification of the breakdown, and subsequent replacement of elements. You can do this either independently or by contacting a service center for help from specialists.
Features of replacing the tail light of the Lada Granta liftback
After unscrewing the three nuts, remove the Grant liftback tail light from the guide grooves. This must be done carefully, without jerking and strictly straight. Otherwise, you risk damaging the plastic latch on the case.
The design is too fragile, careless handling can lead to damage. If the guide is deformed, reuse of the flashlight is no longer possible due to the lack of a lock.
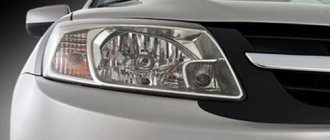
Replacing the Grant liftback fog lamp in the front part is carried out by analogy. Work is carried out from the rear of the bumper.
Snapshotzhzhzhzhzhzhzh
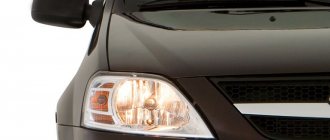
Location of lamps in the rear lights: 1 — fog light;
2 — direction indicator; 3 — brake signal and side light; 4 — reverse. Location of lamps in the rear lights: 1 — fog light; 2 — direction indicator; 3 — brake signal and side light; 4 - reverse
Location of lamps in the rear lights: 1 — fog light; 2 — direction indicator; 3 — brake signal and side light; 4 - reverse
The rear lights include brake and side light bulbs (double-filament P21/5W), turn signal lamps (PY21W orange light), fog light (P21W) in the left lamp, and reverse light (P21W) in the right lamp.
The work is shown on the right lantern. We change the lamps in the left lamp in the same way.
Inside the trunk...
Elements of tuning optical devices
Recently, installation of LEDs has become popular. There are many advantages with analogues: long service life, direction of the light beam, brightness, resistance to high plus and minus temperatures.
And the main trump card is cost, availability, and a wide range of color shades.
The installation process is somewhat different from the usual, as it is necessary:
- dismantle the standard illuminator (lamp);
- depressurize the lantern, remove the rubber seal;
- cover the seat with LED strip of the required length;
- connect the contact board;
- Reassemble the structure in reverse order.
Recently, it has become popular to install fog lights on the rear bumper. This improves visibility when passing backwards and prevents accidents. Replacing the rear fog light of a Lada Granta liftback is carried out by analogy.
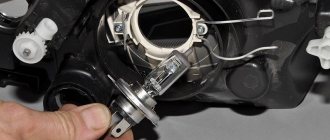
Raising the headlight without replacing the hydraulic corrector
- The hydraulic corrector tube is removed or cut with pliers at the very base. In this case, you need to be extremely careful - the liquid contained in the hydraulic system is very toxic;
- We take a self-tapping screw and screw it into the hydraulic corrector module until the “foot” in the module moves to the required distance. The self-tapping screw should be screwed in at an angle, as it will put pressure on the hydraulic corrector piston;
- wrap the resulting structure with electrical tape. Temporary hydraulic replacement is ready!
It should be borne in mind that no matter how you “raise” the headlights on a Lada Granta car, after this procedure you should always check the quality of the lighting system and, if necessary, adjust the headlights.
A malfunction of the headlights on a Lada Granta, such as falling out, at night or in conditions of poor visibility can greatly annoy the driver and significantly reduce the level of safety when traveling. Therefore, if you see that such an annoying nuisance has occurred, be sure to put the headlights in order and “raise” them.
Analysis of reviews from Lada Granta liftback owners
- Grant-Eject (https://www.drive2.ru/l/6512513/): the sedan's lamps are different from those of the liftback. In the first modification they are combined, in the liftback they are separate.
- Diyk: taillights often sweat on sedans, the problem has been eliminated in the liftback;
- Silica Gel: to quickly remove moisture, attach a moisture absorber for shoes to double-sided tape. It doesn't last long, but it's effective. Improving the sealing of the rear lights is an alternative option.
- Grant-Eject: insufficient fixation contributed to the flashlight falling out during movement.
- LADA Granta 2012 (https://www.zr.ru/content/articles/832528-lampy-primenyaemye-v-avtomobile-lada-granta/): the car is reliable, unpretentious, subject to a moderate driving style. Over a period of five years of operation, breakdowns are typical and characteristic.
2279-18-13-(Copy)_cr
...and remove the lamp from the socket.
...and remove the lamp from the socket.
...and remove the lamp from the socket.
The combined brake and side light lamp has two protrusions located at different levels.
When installing a new P21/5W brake and side light bulb, its protrusions must fit into the corresponding grooves in the socket.
We change the reverse lamp P21W and the turn signal lamp PY21W in the same way. The turn signal lamp has two protrusions located asymmetrically relative to the axis of the lamp. When installing a new lamp, its protrusions must fit into the corresponding grooves of the socket.
The type of lamp is indicated on the flashlight body next to the socket of each socket.
In order not to confuse the installation locations of the cartridges in the flashlight body, the fixing protrusions on the cartridges and the cutouts in the flashlight body have different shapes.
How to replace lamps in the rear lights of Lada Granta
Check list
- Turn off the engine, squeeze the parking brake lever;
- Open the liftback cover;
- Remove the plastic protection / sound insulation layer. The choice depends on the model year. More details are described at the beginning of the article;
- Unscrew the lamps, three nuts;
- Replacement of Grant liftback taillight lamps, carry out related preventive maintenance;
- Reassemble the structure in reverse order.
Conclusion based on the results of the replacement The design and fixation of optical devices is not at all complicated. Every car owner can do the replacement; there is no need to contact a service center. Only as a last resort, when a global breakdown is identified or surgical intervention by a specialist is required. After reading the instructions provided, the owner knows exactly how to change the Granta liftback taillight with minimal time.
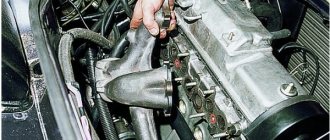
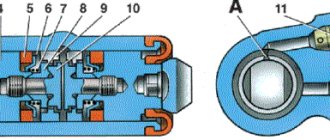
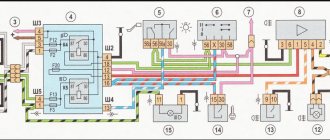
Place of the switch in the light switching circuit
On cars with manual transmission, voltage to the lamps when reversing is supplied through a limit switch (the so-called frog), which is screwed directly into the gearbox housing. When reverse gear is engaged, the switch button is pressed inside the gearbox. The contacts inside the “frog” bridge, and current begins to flow to the lamps.
On the circuit diagram for turning on the reversing lights, we can see that on the VAZ 1118 Kalina, the current from the battery through the ignition switch (No. 2) is supplied to fuse F1. Passing through the fuse that protects the switching circuit, “+” goes to the limit switch (No. 10). The contacts are in a normally open state and close only when reverse gear is engaged. Thus, current begins to flow to the light bulbs. The second contact of the lamps is connected to the “–” battery through the common ground contact of the lamps.
On cars with automatic transmission, the role of the limit switch lies with the selector position sensor. Information about changing the location of the gearshift knob is transmitted to the engine ECU, the light control unit.
How to check the "frog"
- Remove the headlight switch chip.
- Turn on the ignition.
- Using a small piece of wire, connect the contacts of the reverse gear sensor connector to each other.
If the reverse lights are on, then the problem is in the “frog”. Some drivers disassemble the switches, clean the contacts, after which the device continues to work properly. It is up to you to judge the appropriateness of such measures. But keep in mind that on many cars (including VAZ models) the limit switch is located below the oil level in the gearbox. We recommend simply replacing the power sensor. To minimize oil loss, jack up the car on the side where the end switch is installed.
On some cars, the reversing lights do not light up due to incomplete activation of the limit switch. The problem can be solved by installing a thinner washer under the “frog”. To make sure that the switch is working, check with a multimeter in ohmmeter mode whether the contacts close when you press the button.
Checking the circuit
The essence of diagnosing the reason why the reverse lights do not work comes down to identifying the section of the circuit where the voltage is lost. To do this, you can use a regular control light. Continuity testing is done with an ohmmeter, so you need to know how to use a multimeter.
You can start checking directly from the limit switch connector. Turn on the ignition. Connect one contact of the control light to an unpainted metal part in contact with the body, and the second to the “+” connector.
- If power comes in, check the reverse sensor.
- If after installing the “jumper” in the connector the lights do not light up, then the problem is in the section of the wire circuit going from the connector to the lights. Ring the wire to the point where it divides into light bulbs on the left and right sides. Most likely, the reason is the break.
To find the pinout of connectors, light contacts, and wire colors, be sure to study the electrical diagram of your model and vehicle configuration.
The lamps are constantly on
If the lights on your car are constantly on or come on regardless of whether reverse gear is engaged, the cause will be among the following breakdowns:
- short-circuiting the “+” going to the reverse gear sensor and the light bulb wires from the switch;
- the wire going from the connector to the lights has a short to “+” (this happens if the wires in the harness fray);
- The sensor is stuck in a closed state.
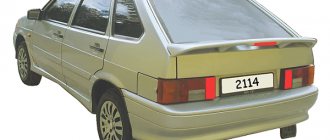
Malfunction of reverse lights on VAZ 2114. Maintenance and prevention
Reversing lights for VAZ 2114
What are reverse lights? These are white road lights that turn on in reverse gear, guaranteeing safety while driving. If the reverse lights are not on, then the possibility of the driver getting into an emergency increases; it is very difficult to park in the dark when the road is not visible, and passengers will not be able to predict the actions of vehicles, which can lead to unpleasant consequences.
The frog signal device is a necessary device. As they say “in the language of a motorist”: everything that is in the car must function properly, the safety of vehicle traffic depends on it!
So, at the slightest breakdown or short circuit of the reverse light, you need to immediately begin repairing it. This can be done both at service stations and at home, quickly and very simply. And this theoretical basis will be a great help!