Applicability
| Brand | Model | Name according to auto catalog | Drawing |
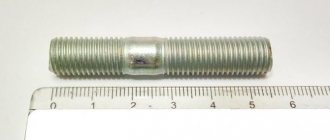
| VAZ | VAZ-2108 | Hairpin | Engine / Engine |
| VAZ | VAZ-2110 | Hairpin | Engine / Engine |
| VAZ | VAZ-2111 | Hairpin | Engine / Engine |
| VAZ | VAZ-2112 | Hairpin | Engine / Engine |
| VAZ | VAZ-2115 | Hairpin | Engine / Engine |
| VAZ | VAZ-2110 | Hairpin | Engine / Engine |
| VAZ | VAZ-1118 "Kalina" | Hairpin | Engine / Engine |
| VAZ | VAZ-2110 | Hairpin | Engine / Engine |
| VAZ | VAZ-2115 | Hairpin | Engine / Engine |
| VAZ | VAZ-2114 | Hairpin | Engine / Engine |
Where else is the spare part used?
The parts data presented on this page is for informational purposes only.
Download price lists
To download price lists, you need to log in. If this is your first time on the site, please fill out the registration form.
Replacing the tension roller stud of a VAZ 2109
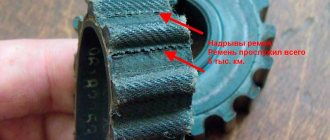
Good morning! I really need help. I have a VAZ 2114, 8 valve. The tension roller repair pin has fallen out. I ordered a stud with a 10/14 thread. They cut the thread and installed it, but after a couple of days I noticed that the timing belt was sliding towards the engine, and it was being eaten away. Along the way, the thread was cut crookedly, and the stud was barely noticeably shifted towards the headlights. Please tell me what can be done here, except how to change the head. I would be very grateful..Repair pin.
Similar articles
34 comments on “Repair pin. The repair pin of the tension roller has come out”
Maybe it's time for a pump.
It's time to change the pump
It's not like there's no way out. To change the block because of one stud. Find a good craftsman or turner, I think.
Beer can washers for the roller. Look on YouTube about the shrinking belt, there is a lot of information
Friend. This will continue to cause problems. I would advise changing the head. Well, let's face these homemade products, the belt will break and the valves will bend
Stas, 8klop doesn’t bend the valve
Alexey, they say 1.5 is not oppressive, but 1.6 is oppressive. Idk
The valve does not bend either 1.5 or 1.6
Try to put the video from 1.5 16 cl
It will be wider
Alternatively, maybe take a ride
If washers do not help, then argon will help. And cut it again on the machine!
Stas, 1.6 has been running since 2012 on motors with new pistons
Gennady, ha I have a 2008
Yesterday, the washer under the roller was slightly ground off on one edge, now the belt will move in the other direction...
Make half-washers and give them a hand, I’ve been riding with them for three years now, everything is fire
Gennady, cut a beer can to size, did I understand correctly?
I also had a belt slide down to the engine, put a 0.5mm washer, and it was in the center
Vlad, won’t the half pucks fly out during operation?
Ivan, look on YouTube there are videos on how to make a channel Alexander Skripichenko master
They will press together and won’t go anywhere, the main thing is not to do it exactly in half, but to make it a little more than half. I have everything so far thank God))) good luck
Don't drive, come on! There is a thick ground washer between the roller and the wall of the block. The pin only presses the washer against the wall and the roller aligns parallel to it. And the belt is eating because the pulleys are worn out. Change the entire set of pulleys, roller and pump with belt. Everything will be fucked up!
Free forecast! Write!
The hairpin can be made of mild steel and bends. If the thread is cut crookedly, the pin can be bent, but this is definitely not easy to do
Andrey, This whole fucking thing started after I got a pin unscrewed while driving, well, I immediately replaced the timing belt, before that there was nothing like this even close... the pin was screwed in a little crookedly, it’s barely noticeable, the thick washer that was between the roller and the head was ground off a little Now the belt goes out.
Buy a new washer and tighten it
The hammer will help you, on the original stiletto it also led away, knocked a little and everything was fine..... the main thing is without fanaticism
Stas, he only bends 1.6 Grant engines, his timing belt is in a separate case, but the simple ones that went to 10-14 will never bend anything
Alexander, at least this makes me happy
Ivan, even if the pin seems to be, it seems, or something else, barely noticeably bent, then when you tighten the roller it will straighten out, because the planes on the washer and the roller are strictly parallel, it is impossible to tighten them crookedly. And your belt is eating because the new belt you installed is new! And the gears of the pump, crankshaft, and camshaft are made to fit the old belt. That is, for a new belt, this is a foreign track. Even if you didn’t change the belt, but just turned it over, it would definitely eat it. You change everything listed in one day and forget about the problem.
Ivan, and in Tyr-Tyr-Net they advise putting cans under the roller, and for some it helps, but only for some and by chance, and not for everyone at once, but after two or three belts. Agree that it is cheaper to buy everything once than to change a new belt every week. Moreover, gears cost pennies. Just got a pump, and even then it’s worth 50 thousand, not that much money.
Don't kick too hard, read and be horrified.
So a problem happened to me. The timing belt tension roller pin broke. How many words did I remember, what ornate designs they were. And as a result - the sound of a falling reinforced concrete slab from my soul and sincere praise to the engineers and designers of AvtoTAZ with their one and a half liter eight-valve engine of my ten. And this is all because my valves don’t bend!
Price list
- Special offers
- KAMAZ spare parts
- Spare parts KAMAZ-5490
- Spare parts MAZ, YaMZ
- ZIL spare parts
- Spare parts ZMZ, for GAZ vehicles
- Spare parts for Volzhanki cars
- Spare parts for Gazelists
- Spare parts for trucks Lawns
- Spare parts for GAZ-71 caterpillar
- Spare parts UAZ, UMZ
- Spare parts KrAZ, BelAZ
- Spare parts URAL
- Spare parts BUSES
- AMAZ spare parts
- IKARUS spare parts
- KAVZ spare parts
- LAZ spare parts
- LIAZ spare parts
- NEFAZ spare parts
- PAZ spare parts
- Other buses
- Tractors, computer equipment, attachments
- Tractors and walk-behind tractors
- Municipal vehicles
- Attachments and trailed equipment
- Spare parts for TRACTORS and SPECIAL EQUIPMENT
- JCB - spare parts for special equipment
- Truck crane (KS-3577, KS-4517, etc.)
- AMZ (A-01, A-41, D-440, D-442, D-447, D-461, D-467)
- Amkodor (TO-18, TO-28, TO-30, etc.)
- ATZ (T-4A, TT-4M)
- VgTZ (DT-75)
- VMTZ (D-120, D-144, D-130, D-145T)
- VTZ (T-25, T30A-80, VTZ-2048)
- LTZ (T-40, LTZ-55, LTZ-60)
- MKSM, UNC, DETVAN
- MTZ - spare parts for tractors
- OTZ (TDT-55)
- PTZ (K-700/701/702/703/704)
- KhTZ (T-150, MT-LB)
- ChTZ (T-130, T-170, B-10, B-12, B-170, T-10M, DET-250)
- YuMZ - spare parts for tractors
- Other special equipment and tractors
- RVD - high pressure hoses and sleeves
- MMZ spare parts and engines
- Spare parts for MMZ engines
- MMZ engines: D-242, D-243, D-245, D-246, D-260
- VAZ spare parts
Replacing the timing roller stud, features of gearbox repair + photo
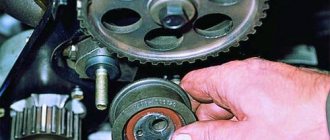
1. One of the owners of a VAZ-2108, engine 1300, attempted to replace the timing belt tension roller pin due to wear on the thread in the cylinder head securing this pin. The attempt was made without removing the cylinder head, the thread turned out to be crooked and not reliable, the pin had to be bent so that the belt would not slip, and later it fell out, the belt jumped and all the valves were bent. To cut the correct thread, it is better to remove the cylinder head. This is what the crooked hairpin looked like
Photo from Photo Gallery on E1.ru
Photo from Photo Gallery on E1.ru
The owner of the car proposed the idea of screwing in not a repair stud, but a fitting (in the photo in the center), the outer size of which was the repair one, and the inner size was the normal size of a normal stud.
Photo from Photo Gallery on E1.ru
Photo from Photo Gallery on E1.ru
We didn’t like this idea because there were too many threads in one place, so a super-repair pin was ordered from a good turner. Why “super”?, because stores sell repair studs only in the next size after the original one. The original one is 10 mm, the repair one is 12 mm, and we ordered 14 mm. Well, then it’s a matter of technique and the right tool: Drill a hole with a 12.9 mm drill
Photo from Photo Gallery on E1.ru
then with tap No. 1 and then No. 2
Photo from Photo Gallery on E1.ru
Photo from Photo Gallery on E1.ru
Photo from Photo Gallery on E1.ru
We additionally placed the stud on a thread locker
Photo from Photo Gallery on E1.ru
2. Igor09 came up with a good and convenient way to remove bearings in the gearbox. The key is a correctly positioned mount, and of course the correct puller. Let's share this secret:
Photo from Photo Gallery on E1.ru
Photo from Photo Gallery on E1.ru
