The production of cars in our country has undergone changes compared to the early 2000s. When purchasing a Lada Vesta music car, two types of standard radio are installed: push-button and with a touch screen. The very basic configuration does not include any music headset; you can install any one at the customer’s request. In the new Lada Vesta models, the multimedia system corresponds to modern technologies.
- Preparing car music
- Touch panel of the Vesta multimedia system
- Provided operating modes
- Lada Vesta radio
- Radio menu
- Checklist: main characteristics of the standard radio
- Problems and solutions - first-hand
- Setting up the Lada Vesta radio
- Control from the multifunction steering wheel
- If you want a subwoofer
- Pros and cons of mmc multimedia
Firmware for radio MMC-2190
Before flashing your audio device, you need to check the software version. Thus, it is strictly forbidden to flash an MMC radio with software versions 23.02.27 and 21.1.2.39.
It is also worth noting that the firmware process always entails risk. Therefore, if you do not want to lose the warranty, then it is better not to flash the MMC radio yourself.
How to flash the firmware of the radio yourself? This question worries many motorists. In fact, the firmware process is not difficult at all. For successful firmware installation, you must follow the instructions.
NAVIGATION mode
The Vesta radio is equipped with the CityGID 7 navigation program.
- Ability to select the most suitable cards from a number of third-party manufacturers.
- Convenient map interface in practical terms.
- During testing of navigation programs on ixbt.com, CityGuide (along with Progorod) received the most mentions marked “our choice.”
- No manual map rotation.
- There is no satellite view screen.
- No maps online.
- There are no alternative route options.
- Shows traffic jams on the route, only for a short distance.
There is a map update that occurs via the SD card. You can learn more about navigation from this video:
You can replace CityGuide with a modified version.
Instructions for flashing standard device firmware
- Load the necessary files for firmware onto a free SD card. When removing the CD media, be aware of safe disconnection. If you neglect this, you can damage the SD card;
- In order for the procedure to be successful, you need to remove the installed software;
- Disconnect the wires from the UES input and turn on the HUB;
- Next, you need to restart the device and insert the media;
- If everything is done properly, the firmware process will light up on the display. All links to the firmware can be found in special folders on your PC. After this, you can easily download the firmware.
- When the firmware is finished, the device boots up on its own. At the same time, take out the CD and, without overloading, go to the “Screen Settings” – “Calibration” tab;
- The necessary menu and drivers are installed.
https://youtube.com/watch?v=videoseries
The firmware process does not take much time. But it should be remembered that any intervention in the radio software can lead to premature breakdowns. Therefore, you only need to carry out the firmware yourself if you have some knowledge. At any time you can use the services of professionals for an affordable amount.
Source
Video mode
To watch movies, you will have to learn how to use a video file converter. A nice feature: if you pause the clip and go to the main menu, then when you switch to the “Video” mode again, playback will begin from the moment it was stopped.
Requirements for video files:
- AVI with support for H.264/ MPEG-4/ MJPEG/ Xvid/ WMV video codecs and WMA/MP3 audio codecs. With resolution up to 720? 536 and frame rate 30 fps.
- MP4 with support for H.263/H.264/MPEG-4 video codecs and AAC/MP3 audio codecs. With a resolution of up to 1920x1080 and a frame rate of 30 fps.
- MOV with support for H.263/H.264/MPEG-4 video codecs and AAC/MP3 audio codecs.
- MKV with support for H.264/MPEG-4/MPEG-2 video codecs and AAC/MP3 audio codecs. With a resolution of up to 1920x1080 and a frame rate of 30 fps.
Setting up GPS on a firmware MMS Lada Granta
Setting up GPS is quite simple and is done only after connecting the Globalsat BU-353S4 GPS module. The setup itself requires the following steps:
1. Go to the “Tools” menu;
2. Calling the on-screen keyboard;
3. Connecting the module itself;
4. You must enter the following path: staticstoredll232usb.dll
5. After the driver search request is displayed on the screen, you must continuously press the “OK” key. Press it until the request disappears from the screen.
If all five GPS settings are completed without errors, then you need to go directly to setting up the navigation software. Directly in the navigation program you need to select the COM5 port and the port speed of 4800bps.
After carrying out such manipulations, everything should work
Please note that Navitel from the archive is already configured
As a conclusion, we must pay tribute to the developers of this firmware, namely the guys from the grant club, who, in turn, developed the interface and additional software to improve the comfort and meet the needs of Lada Granta owners.
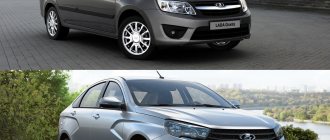
They greet you by their clothes, but they send them off by their minds
The new model of the Russian automobile industry, Lada Vesta, appeared in the eyes of users as a competitive and modern car, ready to boast a huge number of innovations and original solutions, including the new MMC. All the necessary functions, convenient controls and a well-thought-out audio system indicate that Lada engineers approached the development of the car seriously, having thought through not only the unique and modern exterior of the Lada Vesta, but also carefully worked out the concept of the interior and MMC. So, the Lada cannot be called a model of the lowest price category, guided not by the price of the car, which is important, but by the characteristics of the components of this product.
Audio mode
The audio player window is intuitive. All audio files are played on 6 speakers, the sound of the acoustics is at a decent level. You can adjust the sound using the equalizer (there are 6 pre-programmed settings for Jazz, Rock, Voice, etc.).
It is possible to listen to music via Bluetooth from your phone. One drawback worth noting here is that information about the file being played is not displayed on the MMC screen.
Requirements for MP3 files with constant or variable bitrate:
- 32-320 kbit/s at sampling rates of 32000 Hz, 44100 Hz and 48000 Hz for MPEG-1 Layer 3;
- 16-160 kbit/s at sampling rates of 16000 Hz, 22050 Hz and 24000 Hz for MPEG-2 Layer 3;
- 8-160 kbit/s at sampling rates 8000 Hz and 11025 Hz for MPEG-2.5 Layer 3.
Requirements for WMA files with constant bitrate and bit rate:
10-320 kbps, with variable bitrate and bit rate 32-192 kbps, and sampling rates 8/11.025/16/22.050/32/44.1/48 kHz.
Requirements for WAV files:
8/16/24 bit resolution with 44.1 kHz sampling rate.
Requirements for FLAC files:
with a sampling rate of 44.1 kHz.
Powerful audio player
SinglePlayer is a powerful audio player for consoles running WINCE 6.0. Made for an alternative shell for SingleMenu and NewMenu.
Using an audio player will make the sound more interesting (there is an equalizer). The player also has an Internet radio (an access point can be made using a smartphone). You can also listen to radio stations on your smartphone and transmit them to MMS via bluetooth.
All player features:
Show/Hide text
How it looks on the MMC Lada Vesta (photo by Sardar-Kerimov):
Download to w3bsit3-dns.com or ready-made assembly with radio stations:
To download files you need to log in to the site.
Basic principles of successful MMS firmware in Lada Vesta
To reflash mms without any problems, follow the algorithm:
— select the software as specified by the manufacturer;
— use the official version of the software;
— download files from an official car dealer;
- act according to instructions, follow the queue in actions;
— wait until the end, do not interrupt the process;
— do not touch the keys during reboot, do not turn off the power;
— if you are not sure that you can perform the procedure yourself, contact the service center.
Remember that the official dealer is not responsible for errors caused by unsuccessfully performing the procedure on your own, and will not correct defects under warranty service.
Firmware for radio
It should be taken into account that the FirmWare folder and the files that are in it should be located in the root of the SD card. After the files needed for the firmware have been written, the card should be removed from the computer. You need to remove the card from the computer correctly, through a special safe removal menu. If this is not done, the card may fail.
You need to connect the SD card via USB to the multimedia system. Then you need to enable MMS. After the software starts, reboot the Lada Grant's head unit by pressing the volume key.
There are four steps that the reboot program must complete. After the MMC turns on in normal mode, an alternative menu will appear on the radio screen.
This completes the preparatory process for the firmware. If everything went as it should, a new WinCE desktop will appear. Now all that remains is to configure the new software that you installed on the Lada Grant's head unit. This is done by clicking the Start button, after which you need to go to the StartSettingControl Panel.
Sometimes there is a slight freeze when opening the control panel. You can get rid of this by performing a forced reboot of the multimedia system. Once the panel opens, click on the Stylus/Calibration icon - this will allow you to calibrate the screen sensor. For the most accurate calibration, you should use a stylus. If everything is in order, a timer will appear. You don't have to wait until the countdown ends; you can tap on the screen.
Now you need to do a forced reboot. You must press and hold the volume key for at least 10 seconds. One point to take into account: the flash drive with the software must be connected to the multimedia system.
It should be noted that during the reboot, the ATH-08 GPS USB DNS splitter with the Globalsat BU-353S4 receiver must be active. In order to turn on the standard menu, press the “standard” key. In order to be able to customize the menus needed to configure the radio, audio, and video, you will need to install the configuration module. This is done manually.
- You need to open the soft/radio folder.
- And then run start.exe.
This will allow the system to recognize the files that are installed on it. Installing these extensions will allow you to achieve stable operation of the multimedia system, as well as complete the equalizer settings while you listen to the radio.
How is GPS configured after flashing MMC Lada Granta firmware? In order to set up GPS, you need to take a few simple steps. This is necessary so that the Globalsat BU-353S4 module can fully perform its functions.
- You need to use the “Tools” item.
- Go to the screen keyboard menu.
- The module must be connected.
- Specify the path staticstoredll2usb.dll.
- After this, information about searching for a driver will appear, then you need to click “OK”.
- You need to press it until the menu disappears from the display.
After the work has been done, you can fully enjoy the capabilities of the Lada Granta multimedia system.
voice
Article rating
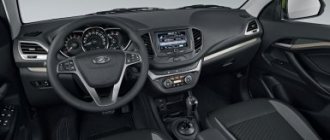
Key Features and Controls
The Lada Vesta radio is located in the standard central location of the dashboard. Main controls and information transmission:
- radio button;
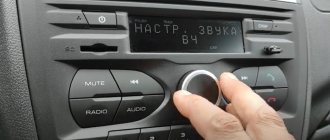
- monochrome display;
- functional music control buttons (previous/next track);
- MUTE mutes the sound;
- SCAN combines several functions;
- DISP – clock display;
- RADIO, AUDIO – switching the radio to radio broadcasting modes and playing music media;
- buttons numbered 1 to 6 are responsible for switching radio stations and other functions;
- multifunctional rotating washer;
- buttons to start and end a call using the Hands free function;
- RESET resets the current settings and reboots the system;
- microphone;
- SD card slot;
- The AUX connector is designed to connect an external sound source to the audio system;
- The USB connector allows you to connect external devices (mobile phone, MP3 player).
Lada Vesta head unit
The built-in battery of the car radio is capable of maintaining audio and radio settings for up to ten days, even when the car's battery power is turned off.
Setting up the radio
The radio receiver of the standard radio operates in three frequency ranges: FM, AM and VHF. To make it easier to search for radio stations, the radio panel has six buttons, each of which can be assigned a specific radio station. For the FM band, you can store up to 18 stations. The search is carried out both manually and automatically.
Audio system functionality
The Lada Vesta car radio works together with four factory speakers installed inside the car. The device menu pleases with a solid number of settings. In addition to several equalizer modes, you can choose how to play tracks: in order, scattered within one folder or all folders, repeat track, repeat folder.
The SD memory card size must not exceed 16 GB, otherwise the audio system will not read it. The number of folders on the card should be no more than 256, and files – no more than 1024.
Hands free system
Thanks to the built-in Bluetooth, the Lada Vesta audio system can operate in telephone mode, which allows the driver to receive incoming calls without being distracted from the road. When you press the button with the green handset, the hands-free mode is activated and finds nearby mobile phones with bluetooth enabled. Then the radio displays a password that must be entered on the phone. To disable this mode, just click on the “red tube”.
Removing the standard radio in Grant Lux
The difference between grants of the luxury configuration: the MMS (multimedia system) installed from the factory. This is a 2 din device.
To remove standard acoustic grants:
- take a knife or plastic spatula to dismantle the acoustics and disconnect the decorative trims to the right and left of the radio. It is not necessary to take pictures;
- in the gap between the cover and the panel we find the head unit lock. There are two of them on both sides. Press it out with a screwdriver;
- we take out the GU on ourselves.
Everything is described in detail in the video:
Replacing the standard MMC in Grant
The process - after removing the acoustics, we install a new system.
Difficulties: you may have to finish the fastenings of the new system for VAZ ones. Plus you need the right frame. The factory MMC frame may not fit.
Reviews
| № | Positive |
| 1. | Sergey Ivanovich , 44 years old (otzovik.com): I use the standard radio, the quality is good, the functionality is sufficient. |
| 2. | Fedor Stepanovich , 40 years old (www.zr.ru): my comrades are all agitating me to install a 2-DIMM stereo system. I haven’t decided yet, because the price is steep, but the offer is good. |
| 3. | Vitaly , 22 years old (autobann.su): the quality of the standard MMC is not great, but it will last for several years, and then I’ll buy an imported one. |
| 4. | Daniil , 33 years old (lada-vesta.net): The factory stereo system is not bad, functional, no complaints. |
| 5. | Vitaly Semenovich , 43 years old (otzovik.com): for me, sound quality is not important, so MMS suits me, no comments. |
| 6. | Stepanovich , 44 years old (www.zr.ru): Three years have passed since the purchase of the car, all components are working properly, the condition is as if from the factory. |
| 7. | Vasilyevich , 20 years old (autobann.su): my positive review of domestic transport and assembly. A worthy car, a rival to many European brands. |
| 8. | Tolik , 43 years old (lada-vesta.net): I’m not a music lover, for me the quality and purity of sound are not particularly important. The phone is always on in the car. |
| 9. | Stepan Nikolaevich , 39 years old (otzovik.com): it has been working properly for two years, no special comments. |
| 10. | Konstantin , 43 years old (www.zr.ru): I’m happy with the purchase of the car, the interior is quiet, the acoustics are good. |
| 11. | Anton , 35 years old (autobann.su): after three years of operation, I can’t say anything bad about the MMC. |
| Negative | |
| 12. | Dmitry Viktorovich , 44 years old (www.zr.ru): constant problems with the firmware, glitches periodically. |
| 13. | Sasha , 37 years old (otzovik.com): in six months I’ve already been to a service station twice, with an electrician, changing relays and switches. |
| Nikolai Vasilyevich , 46 years old (autobann.su): replace the standard radio with an imported one, the sooner the better. |
How can you modify the MMC Lada Granta Liftback
To maximize the functionality of the MMS menu, we reflash the data. The process is not at all complicated; we strictly follow the recommendations of the experts.
Preparatory stage:
- Flash card with a capacity of at least 4GB;
- Laptop (tablet);
- USB cable in case the system freezes.
Sequence of actions for independent firmware MMSlada Granta Liftback:
- We insert the SD card into the laptop, format it into the “FAT” file system;
- We write the modification of the firmware file to the root of the card. It is not recommended to copy the firmware to other directories, since the data is not counted when loading by the operating system;
Insert the SD card into the MMC. Note to the driver!!! The stock firmware is indicated by the index 2.2.2.11. A complete list of official firmware is posted on the official Lada website. Custom firmware is not always installed correctly, and sometimes the system freezes. All actions related to custom firmware are under the personal responsibility of the owner.
- After copying the firmware to the SD card, check for the presence of the following files: chain.bin, chain.lst, NK.bin, TINYNK.bin;
- We insert the SD card into the connector on the standard radio and check that there are no third-party gadgets connected to the USB connector. Restart the radio;
- During the first 20 seconds we observe the process of copying files, after which the screensaver starts - the Lada logo;
- The main menu appears, which will display the following sections:
- Navigation;
- Media;
- Office: reader, PDF reader, notepad, calculator, on-screen keyboard;
- Internet;
- Tools;
- Rear View Camera;
- Exit.
We select the required catalog and use MMS. The firmware for the Lada Granta Liftback radio is finished.
MMC navigation on Lada Granta
It is important to know!!! To use additional options in the standard radio after flashing it, be sure to install:
- GPS antenna - GLOBALLSAT BU - 353S4;
- 3G module Huawei E170, 171, 1550;
- rear view camera (socket with mini ISO connector).
Multimedia errors in Lada Vesta - Kolesa.ru
So, it's time to say it straight: we are unhappy with the multimedia complex of our Lada Vesta.
Therefore, right now and right here we will solve the problems that have arisen with him. And as the process progresses, we will find out a lot of interesting things... Lada Vesta 100 project , as well as those who follow us on Instagram and other social networks, are already aware of the matter, but let us repeat in general terms what did not suit us . Firstly, the screen is periodically calibrated - hitting the right keys becomes problematic.
Secondly, it may completely stop responding to touches or even go out immediately after starting. Thirdly, the “brakes” of the CityGuide navigation periodically bothered me, and several times when loading the application, a Windows window popped up reporting an error .
The view from this window was such that I wanted to call it nothing more than “a window to the last century.”
Exactly as described, or similar glitches, as well as their combinations, from time to time spoiled our relationship with the car. Yes, they were not constantly present, they were just wandering - and this, perhaps, was most annoying, because they appeared at the most inopportune moment.
Neither turning it on and off, nor rebooting (there is a small hole in the lining for this), nor even removing the terminal from the battery helped the situation, and if they did help, it did not last long - sooner or later the problems returned again.
But the day came when we decided that we had enough of it.
How to fix
However, we made attempts to do something before this. In August, we turned to the official dealer with our bugs - when we were changing the interior of the Vesta , but right at the time of the visit to the service, the multimedia behaved quite well, and the answer we received was not very pleasant, but quite logical: now we are not seeing any problems, but this is how they will be - come.
The AVTOVAZ press service did not respond to our official request at that time - we asked about what work was being done on the car after the start of production and, in particular, asked to highlight the solution to problems with the multimedia complex. And only in November the Volzhsky Automobile Plant indirectly responded by releasing a joint video with the Lada Club, “Improvements in the Lada Vesta a year later .
We managed to find out the following on our own. Since the start of assembly of the Lada Vesta car, the manufacturer of the multimedia complex NPP ITELMA has released three firmwares - 41.10, 41.13 and 41.14 - and sent them to AVTOVAZ. The plant, in turn, had to distribute these firmware to dealers.
No recall campaigns were carried out - the dealer had to reflash the complex upon request from the client. Firmware was created as defects were identified, and each firmware corrected some part of the problems.
For example, we found out (and even actually verified this information) that dealers received orders for the latest firmware on September 22, and it corrected bugs in the rear view camera and Bluetooth connection.
But our multimedia is somehow special... Why special? Before because with her everything turned out to be more complicated!
What happened
At first it seemed that most of our problems should be solved by the very first firmware, since our car, let us remind you, was from the first batch of 1,000 cars produced in Izhevsk, which were sold throughout the country on the Vesta Night sales night on November 25, 2015.
However, glitches kept accumulating and becoming more frequent, and we decided not to find out the firmware we needed, but to contact NPP ITELMA directly to solve all the problems at once.
The guys turned out to be very understanding and responded to our problem, for which we thank them very much: they supplied us with “comprehensive” firmware, which, in theory, was supposed to ensure the current state of the entire system - update and fix everything that was possible. The flashing took about 20 minutes, with navigation maps updating most of the time.
By the way, you can update them yourself (this, according to our information, is the most common question about Vesta’s multimedia) using a laptop, the Internet, a flash drive and the car’s instruction manual. But our problem wasn't in the cards, so we waited patiently for the update to finish.
At first impressions, everything became a little better. The interface, with the exception of a couple of little things, has not changed, Finland has been added to the maps for Russia, Ukraine, Belarus and Kazakhstan, the navigation itself no longer slows down or crashes (we have been using the navigator constantly for a couple of weeks), and the touchscreen has become more responsive.
However, the last point was simply related to rebooting the system - it had helped for a short time before. She helped now - and also not for long! After some time, the screen recalibrated again - scrolling through pages became difficult, as well as selecting individual menu items. Thus, the most annoying glitch is back.
In addition, a new disease has appeared: from now on we cannot connect multimedia to the Internet (this is necessary, for example, for the navigator to display traffic jams) - attempts to distribute the Internet from phones - both on Android and iOS - were unsuccessful; the connection begins, lasts and ends with nothing.
Previously, we connected to the Internet without problems - both from the “robot” and from the “Apple”.
In general, we began to find out further what kind of “TV” we have so mysterious.
And we discovered the following: our multimedia complex is from a pre-production batch, in fact a prototype! Our source, whose reliability we have no reason to doubt, said that in theory, such devices should not have been installed on production cars, but apparently, in the rush before the launch of mass production of the Lada Vesta, someone allowed this unit to end up on the assembly line. We don’t know exactly how many of these machines were assembled, and how many other owners suffer from similar problems. However, now we clearly understand that we have only one option left: replacing the multimedia complex. It remains to understand how to implement this. Under warranty, if you can prove the need for this? Without a guarantee, for exactly the same, but correctly working device? Or choose something unusual from what is currently offered on the market, embarking on a new experiment? We are very interested in your opinion - write!
Follow our project on the Lada Vesta 100 , as well as on social networks using the hashtag #ladavesta100.
Malfunctions of MMC Vesta and methods for their elimination
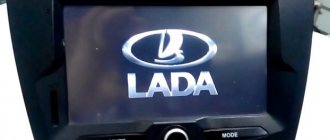
MMC Lada Vesta is the first of its kind on AvtoVAZ cars. It is still far from ideal - sometimes various malfunctions can occur. For example, the radio cannot boot, hanging on the “LADA” logo. To resolve this issue you need to do the following:
- remove removable media from the USB port;
- disconnect the battery terminals and turn off the power to the on-board network for a few minutes;
- format the USB or SD card in FAT 32 format and create an empty text file explorer.txt in the root directory;
- connect the battery terminals and reboot the system (the desktop should appear).
If this method does not help, then you will need to change the software - flash the radio. The next problem is related to navigation - the device cannot find satellites. To fix the problem, you will need to restart the MMC. Then you need to disconnect the battery terminals for a few minutes, reset the settings to factory settings or reflash the device. This method is applicable if the display turns white, the sound disappears, the backlight does not work, or the radio freezes when trying to connect a smartphone.
If you do repairs or firmware yourself, you can forget about the warranty. In most cases, systematic malfunctions can be eliminated by installing fresh software from the manufacturer.
What can a tuner do?
The radio receiver has several operating modes:
- Radio mode . Tuning radio stations can be done both manually and automatically.
- Audio mode . With this setup of the Vesta radio, you can listen to music tracks from an SD memory card, a regular flash drive, or take music from a mobile device via Bluetooth wireless connection.
- Listening to music from an external source . In this case, the “AUX” socket comes into play, through which the signal source is connected. You can connect the output from a phone, tablet computer or flash player. Music through the Aux jack does not lose sound quality, unlike Bluetooth.
- Speakerphone . This mode uses Bluetooth wireless communication, which is convenient because there is no need to connect wires.
Setting the sound equalizer and other audio parameters on Vesta is done by pressing button No. 7 while in the main menu:
- Changing the settings of the Vesta head unit occurs by rotating knob No. 7: equalizer, low frequencies, high frequencies, balance, front and rear speakers, adjusting the tone and exiting the settings.
- There is an equalizer of settings installed from the factory: jazz, pop music, classical, vocals, individual settings.
Settings for the standard radio system on Vesta are carried out by pressing handle No. 7, provided you are in the main menu:
- Clock mode – time format.
- Setting minutes and hours.
- Time adjustment via a special channel.
- Switching to another radio frequency.
- Search for stations by program type.
- Turn on regional stations.
- Medium wave range.
- Phone connection.
- Turns the beep sound on or off when pressing buttons.
- Noise reduction function - for listening to the radio.
- Reset.
Direct firmware mms 2190 grant
The firmware process is quite simple! All you need is an SD card
Note! The SD card must be formatted in FAT16. A common problem after flashing the firmware is the Lada logo freezing on the monitor of the standard multimedia system
This problem may occur as a result of:
• Failure to comply with the parameters of the required formatting system; • Old SD card model, different from SDHC.
If a problem of this kind arises, then it is necessary to check compliance with the above two points of the procedure for flashing multimedia firmware on the Lada Granta.
After the flash drive is formatted and the new software has been decided, for example, NewMenu V7.391Nitro, you need to download the new firmware NewMenu V7.391Nitro and unpack it directly onto the SD card itself.
As for the FirmWare folder, the files located in it must be moved to the root of the SD card. The root of the SD card implies placement of files in addition to other moved folders.
The copying process is complete, which means it’s time to remove the flash drive from the computer. It is worth noting the need for mandatory safe removal, which has long been known to all PC users.
An SD card with files placed on it must be inserted into the mms. After the removable media is inserted into the mms, it must be turned on. After waiting for the device to fully boot, long pressing the volume key will reboot it.
The reboot takes place in four stages, which is shown in the example of four boot lines, upon completion of which, MMS will start in normal mode (standard display menu). Just a few seconds after the standard menu, the radio will go to the altmenu.
Note! If any device is connected to the USB radio, the altmenu will not start. After removing the device, the radio must be rebooted again
The advantage of using the ATH-08 DNS USB splitter, which was mentioned at the beginning of the article, is multi-polarity. A GPS receiver and other USB devices connected to the hub will not interfere with the launch of the altmenu, but will become inactive.
Nuances of multimedia firmware Grants (2190)
It is quite easy to carry out the firmware itself when installing the mms 2190 firmware. To do this, it will be necessary to use an SD card.
Among the common flaws that occur after the dashboard firmware is installed, even if it is the latest version, is the Lada logo freezing on the display of the head unit.
This moment can be provoked by the following factors:
- failure to comply with required formatting principles;
- the presence of an outdated version of the SD card that differs from “SDHC”.
After successfully formatting the card and selecting software (for example, “New Menu V7.391 Nitro”), you will need to acquire the latest firmware and unpack the product onto a previously prepared SD media.
Regarding the “Firm Ware” folder, note: the files located in it will need to be redirected to the root directory of the card itself. Upon completion of the copying process, disconnect the flash card from the PC, not forgetting about the safe removal technique.
Now we confidently insert the SD card with the prepared files present on it directly into the MMC. Then turn on the head unit. We wait for the full download to complete and by long pressing the volume button, we reboot.
The act of rebooting is characterized by four stages, the display of which is implemented in 4 lines of process status. After filling out these lines, the device starts in the usual mode, as evidenced by the appearance of the corresponding original menu. After a few seconds, the device transitions to the altmenu.
The USB splitter “DNS ATH-08” has acquired a significant advantage – multi-polarity. The GPS receiver and other USB modules connected to the “head” are combined with the altmenu, but become inactive.
After the MMS 2190 firmware is completed on a Lada Granta car, its display displays a new type of desktop, namely “Wince”. The 4 files previously mentioned and copied into the depths of the root directory of the map are “responsible” for the presence of the interface on the desktop.
The subsequent manipulation is associated with the need to configure new software in the standard multimedia device of the Lada Granta car. For these purposes, click the “Start” button, after which we follow the following route: “StartSettingControl Panel”. Sometimes owners complain about the slowness of the “Control Panel” opening process, but this phenomenon disappears after rebooting the MMC in forced mode.
When the control panel is open, in its interface click on the “Stylus/Calibration” symbol. With this action, the user of the new software gets the opportunity to calibrate the touch screen for response accuracy.
Upon completion of the simple calibration procedure, a timer appears; you should not wait for the completion of the counting process. Feel free to click on the screen.
Now the long-awaited time has come for the forced reboot process. Long and holding pressure on the volume key (10 seconds or more) allows you to implement this process in MMC. At this moment, the removable media, which contains the new software, continues to reside in the connector of the head unit of the Lada Granta car.
Having completed the reboot action, the device will first display the standard menu, and then, similar to the preparation procedure, the altmenu. If you need to return to the “native” menu, you should hold down the “Native” key.
The process of rebooting the device, after the dashboard firmware has been flashed, requires its connection via a USB splitter of the specified model with the Globalsat BU-353S4 GPS wave receiver. If there is none, then upon completion of the process itself the “head” will display the normal menu mode on the display.
Such common settings as sound, as well as audio or video, are present in any multimedia device in the domestic Lada Granta car.
“NewMenu V7.391Nitro” needs a manual way to install the indicated options, which will require:
- log in to the “soft/radio” folder;
- resort to activating the “start.exe” file.
The procedure will agree to associate present files with the extensions “exe” and “ahk”. This manipulation is quite important and allows you to achieve stable functionality of the MMC, which is used to flash the dashboard firmware.
How to install an application on MMS
Procedure:
- Copy the installation file (with the extension cab) to the SD card.
- Insert the SD card into the MMC.
- Exit to desktop.
- Go to “My Computer” -{amp}gt; SD card.
- Start installing the application by double clicking on the cab file.
It is more convenient to install and launch applications through AppLauncher:
- Launch Total Commander
- Open the SD card and start installing the application by double clicking on the cab file.
Let us remind you that we previously talked about other applications that expand the functionality of Vesta’s multimedia system:
- AppLauncher - allows you to launch applications without going to the desktop.
- A patch that allows you to watch videos while driving.
- Altmenu - allows you to comfortably use several navigation programs at once.
- Improved CityGuide - will make the program interface more convenient, and will add data about cameras, ambushes, etc. to the maps.
- Navitel
- Yandex maps
Key words: cassette player Lada Vesta
Found an error? Select it and press Ctrl Enter..
The door card is attached to self-tapping screws and 4 “hedgehogs”. To install the speaker system correctly, you will need to remove the door trim.
When doing this, you need to be careful not to accidentally damage the plastic. It is not permissible to use screwdrivers or other metal products of suitable shape.
For these purposes, a regular plastic bank card is used. To remove the plugs on the doors, you need to pry them off by one edge. The power window buttons are removed in the same way.
This is how the casing on the left side is dismantled. Removing the door cards on the right is slightly different. There is no need to remove the window lifter buttons - you just need to remove the opening handle cover. Underneath there are two mounting screws. The plugs are removed with a plastic card. Next, the process of removing the door card repeats the manipulations with the left door.
The size of the seat in Vesta's doors is designed for 12-inch speakers. Since the mounting is carried out using three self-tapping screws, installing 16-inch speakers requires that you need to install special spacers for the Lada Vesta speakers. Their size depends on the size of the speaker system. No special adjustments are needed. The main thing is to avoid possible contact with the metal of the doors - there should be a gap of at least 10 mm between it and the speaker magnet. Installation of speakers in the rear doors is carried out according to the same scheme.
Tips for selecting and installing a speaker system
For better surround sound, it is recommended to use a two-component system. These speakers use both a high-frequency tweeter and a mid-bass speaker. With their help, you can competently arrange the sound stage. It is recommended to install such speakers in the front. A coaxial speaker system is installed at the rear, which is used to complement the front speakers. Installing tweeters will require additional wiring.
Tweeters are best mounted in the triangle of the rear view mirror. If such a scheme seems too expensive, you can get by with a cheaper coaxial speaker system. In all cases, no additional adjustments are required, with the exception of adjusting the equalizer.
It is recommended to completely soundproof the doors using any available method - this will significantly improve the quality of the sound stage.
Even a beginner can install sound systems on Lada Vesta cars. It is enough to follow just a few simple rules:
- dismantling work should be carried out as carefully and accurately as possible so as not to damage the plastic casing;
- the manufacturer has already taken care of the audio preparation, so there is no need to connect and install the connectors yourself;
- It is impossible to cut off standard pads if they do not fit the new radio; it is better to purchase a special adapter.
Flashing a multimedia system should only be done as a last resort. It is better to entrust this procedure to specialists or contact the service center of an authorized dealer.
What features does the MMC Grant firmware provide?
Firmware that you can do yourself will help to significantly expand the standard options of the multimedia system. Pre-installed options will only allow you to enjoy the standard set of options. The owner will not be able to configure the navigator or rear view camera. Lada Granta radios are great for flashing.
In order to flash MMS, you will need:
- GPS receiver, preferably Globalsat BU-353S4 model.
- 3G modem Huawei E1750.
According to the manufacturers' promises, these devices provide the ability to use navigation and connect to the Internet. Domestic automakers are not of the opinion that the owner of a Lada Granta may need a navigator and the Internet. In order for the devices to work, you will also need a DNS ATH-08 USB splitter (hub).
Alternative car radio with touch screen
Car radio with touch screen The touch radio on Vesta is installed on a more expensive version of the car in the luxury configuration or as additional equipment. It is a device with a resistive seven-inch sensor. The main advantages of such a display are the ability to view photos and video files, install a navigation system, and display images from the rear view camera.
Controls and capabilities of the touch radio
The radio for Lada Vesta with a touch screen has only three control buttons. In order to turn on the device, you need to press the rotating encoder, which performs several functions at once. Most commands are carried out via taps on the touch screen. The device's processor can operate in multitasking mode. The radio provides installation of additional software (navigation system, road maps, applications), which can be purchased from an authorized dealer or through online stores.
Price of touch radio
Having compared two types of standard car radios on the Lada Vesta, the question arises: how much does a normal radio tape recorder cost? The initial price of a car radio is 20 thousand rubles, and may increase depending on the installed additional programs and applications. A high-quality device should be purchased from trusted company websites.
Source