Benefits of fog lights
These headlights got their name because they are able to provide visibility in foggy conditions. This natural phenomenon minimizes visibility and can easily lead to an accident. It is also difficult for the driver to do without fog lights in rain, snow or blizzard conditions.
The design of such lighting devices as dimensions, low and high beams does not allow leveling the effect of fog. This fact remains evident even when installing the most powerful types of lamps (LED, xenon). The action of the above light devices does not help due to the fact that the rays collide with microscopic drops of H2O in the form of steam or snowflakes, and are reflected or scattered from this. As a result, a translucent veil is formed and significantly impairs visibility. In addition, a dazzling effect is created. Fog lights have trump cards and advantages over main lighting. After all, PTFs are located almost at ground level. But the fog condensate does not reach this level. Therefore, we get the effect that the headlights are directing light under a veil of fog. In addition, the upper beam received from the PTF light has a clear boundary horizontal level and does not allow reflection at all from drops of fog that fall into the driver’s field of vision.
Another advantage of fog lights: they have a wide lighting spectrum. Due to this, the side of the road remains illuminated even during fog, which makes driving on roads with sharp turns much easier. Also, these lighting devices allow drivers of oncoming vehicles to see the dimensions of the car during bad weather. The color of the flashlight does not affect the quality of dispersion, because during fog all colors from the spectrum are scattered similarly. Because of this, the fog appears white or gray in sunlight.
Due to the above advantages, we can conclude that the presence of fog lights is practically necessary for every car. Two main advantages from installing this lighting equipment:
- improving driving safety;
- exterior decoration.
The driver drives calmer and more confident, knowing that in case of bad weather visibility will not be limited. PTFs also help with night driving. They can be used as an additional lighting device. And the fact that fog lights decorate the exterior of a car is especially relevant in the case of the Lada Vesta. After all, with them the design of the sedan is solid and complete.
Most Vesta consumers, when purchasing a non-top version, tend to equip the car with foglights.
Features of the updated panel
- the numbers have become noticeably larger, reading readings while moving has become much easier;
- the backlight is used regardless of whether the lighting is on or not, the backlight is on on all scales at any time;
- instead of white backlight, red is used;
- a voice alert now warns of an unfastened seat belt; the audio also includes a GPS connection and much more;
- the volume of sound notification and voice guidance has increased (information and warning signals);
- the time on the display is now synchronized automatically by satellites of the ERA-GLONASS navigation system;
- The warning indicators have been changed (low tire pressure and unfastened seat belts front and rear).
https://youtube.com/watch?v=WijXqy4AlIs
Export models supplied to Germany and Hungary were the first to be equipped with the updated dashboard. Since 2022, the “tidy” has become available for the domestic market. A function such as adjusting the backlight level has not yet been implemented.
PTF connection
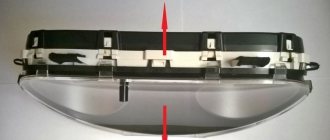
We lay the wiring from the right fog lamp inside a metal box (see photo). We run the wiring from the engine compartment into the interior through the standard hole in the pedal area.
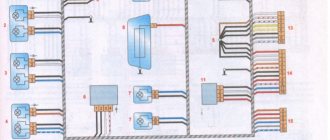
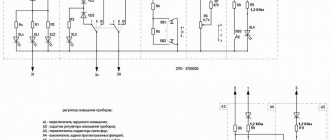
Universal scheme
. We take the load power to the relay (+12V) from the battery (M6 bolt) using a fuse. We take the control plus for the button from the mounting block from the side light fuse (F6 or F7), or the permanent plus from the cigarette lighter (F41). We place the relay in the cabin or under the hood, as desired. Thus, there will be minimal interference in Vesta’s electrical system.
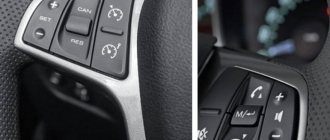
Like on Lada Vesta Luxe
(the idea was submitted by rychagov42). You will need a steering column switch from Renault with fixed PTF activation (part number 8201167981). Its circuit allows you to turn on the PTF when the dimensions are working. In order for the PTF to turn on only with low beam (as in the standard version of the Lada Vesta Luxe), you should solder the black wire to another terminal (see photo). Next, we connect the control wire from the relay to the 12th contact of the steering column switch (you need to pull the white part on the connector and snap it off). As a result, the PTF will work when the dimensions are working.
Using a pulse relay
. There is another option for controlling the front PTFs - using the standard steering column switch for the Standard and Comfort trim levels and an impulse relay 375.3787. Everything is connected in the interior mounting block, no need to disassemble or drill anything (author MiheyA).
Show/Hide text
The PTF control logic is as follows:
- short-term (<0.5 sec.) turn to ON state. and return to OFF state. rear PTF activation rings - the front PTFs are turned on with the indication on the instrument panel;
- repeated short-term (<0.5 sec.) rotation to the ON state. and return to OFF state. rear PTF activation rings - front PTFs are turned off;
- the rear PTFs are turned on/off as before - simply by turning the ring;
- rear PTFs can be turned on and off when the front PTFs are running or disabled, regardless of them at any time.;
- front PTFs are turned on together with side lights or low/high beams;
- you can connect the relay so that the front PTFs will remain on when the ignition is turned off, and the shutdown will occur together with the main relay after a few minutes.
The advantages of this option:
- light control is completely concentrated on the standard left steering column switch while maintaining the ability to turn on the front PTFs with both side lights and low/high beams;
- installation does not require removing/disassembling elements of the center console or steering shaft casing, or installing non-standard buttons with possible differences in appearance;
- minimum additional wiring.
Connection diagram: To download files you need to log in to the site
Connect the power from fuses F2 and F4 in the mounting block and the control line from fuse F8 of the rear PTF to the pulse relay using the following taps:
If you want to use the PTF indicator on the instrument panel, then the TsBKE will participate in the circuit.
The process of installing PTF on Vesta is also shown in the video:
All that remains is to adjust the PTF.
Have you encountered the installation of fog lights on Vesta? Which connection option did you choose and why? Let us remind you that the Lada.online website provides other instructions for tuning and modifying Vesta, for example, an easy way to install a DVR, eliminating chafing of the VUT hose, or tips for dealing with panel crickets.
Photo: Russianvodyara in-flight magazine and Lada Vesta group on VK
Keywords: fog lights Lada Vesta | bumper Lada Vesta | external lighting for Lada Vesta | Lada Vesta headlights
9
1
Found an error? Select it and press Ctrl+Enter..
Coronavirus has an impact on AvtoVAZ, new details
Activating the function of changing the volume of the radio depending on the speed of the Lada XRAY
Is it possible to install the instrument panel from the Cross version on the Lada XRAY?
What is the actual trunk volume of the Lada Granta?
Instructions - installing PTF on Lada Vesta
Installing fog lights on the Lada Vesta is difficult. This is due to the design of the electronic equipment of the Lada model. The fog lights on the Lada Vesta are controlled from the steering column switches, and they do not have a fixed position with the fog lights on. In addition to this, problems are created by the absence of a special electronic fuse box of the EMM type in all but the top-end trim levels of the Lada 2180. The signal about the start of PTF operation in the original design comes here. Owners of cheap modifications of the Lada Vesta have to look for other connection schemes. Despite the difficulties, installing the PTF yourself is possible. To do this, you will need to purchase the headlights themselves, brackets for mounting them, a power button, a contact snout, a set of wires with corrugation, connectors and adapters, and a 16 Am fuse.
First remove the bumper
Connecting the PTF Vesta begins with disconnecting the battery and removing the bumper, which is simultaneously attached to the body, fender liners and lockers with a large number of bolts and screws. Unscrew one by one:
— 4 bolts in the lower part of the body;
— 4 self-tapping screws from the fender liner;
— 2 screws from each locker;
— 6 bolts on top of the body and 2 more under the license plates.
At this time, it is necessary to hold the bumper by the beam to avoid damage if it falls. The Lada Vesta has a massive bumper, so the help of a second person will not hurt. The detached part needs to be pulled slightly towards you and removed from the side brackets.
Preparing the seats and mounting the headlights
We have already said earlier that instead of fog lights, the fret manufacturer installs plastic plugs in which holes must be cut. This can be done with a bimetallic crown, or an ordinary stationery knife. The second method will take a little longer and require additional care. If it seems that it won’t be possible to cut smoothly, you can buy a new lining for the PTF.
Next, you should install and secure the pre-purchased brackets with self-tapping screws, and then place the fog lights themselves inside them.
At the same stage, the power button is installed. It can be placed wherever it is convenient for the driver, but usually a place is selected on the center console, next to the button used to open the luggage compartment. The hole for the button can be drilled or cut.
The most important point is connecting the fog lights
We lay the output to the button through the corrugated box between the side members, starting from the right headlight. It is more convenient to run the wires inside the cabin itself next to the passage into the pedal assembly.
The light bulb is connected in the same way as in the Lada Priora, Viburnum or Grant. Electricity is taken from the battery and connected to the contact relay through a fuse. The relay can be installed in the engine compartment or inside the cabin of the 2180. We extend the plus contact from the size fuse or from the cigarette lighter.
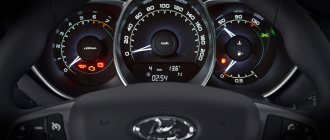
Instrument cluster. Signal lamps
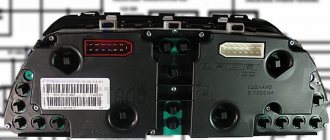
The instrument cluster includes:
1 – tachometer. Shows the engine crankshaft speed (x1000 min-1). The presence of the tachometer needle in the red scale area warns of increased engine speed. To prevent damage to the engine, its maximum speed is limited by the electronic engine management system software.
Above approximately 6200 min-1 the fuel supply will be limited. Possible interruptions in engine operation and jolts in the movement of the vehicle are not a malfunction. When the rotation speed decreases, the fuel supply will resume. Also, do not allow the engine to operate when starting off or while driving at an engine speed below 800 min-1.
ATTENTION!
It is prohibited to operate the engine in a dangerous mode (at engine crankshaft speeds above 6200 min-1 and below 800 min-1).
2 – indicator “Pedal adjustment” (see section “Operation of the vehicle”).
3 – “Seat belt” indicator (see section “Airbag system”).
4 – indicator “Airbag system malfunction” (see section “Airbags”).
5 – reserve.
6 – indicator “Brake failure” (see section “Driving a car”, “Braking and parking”).
7 – indicator “Unclosed trunk” (see section “Body and interior”).
8 – indicator “Hood not closed” (see section “Body and interior”).
9 – speedometer, shows the vehicle speed (km/h).
10 – “Hazard Alarm” indicator.
11 – indicator “Doors not closed” (see section “Body and Interior”).
12 – indicator “Cruise control” (see section “Operation of the vehicle”).
13 – indicator “Speed limiter” (see section “Operation of the vehicle”).
14 – indicator and indicator “Coolant temperature” (section “Engine overheating”). Operating a vehicle with a faulty warning light is prohibited. When the operating temperature of the coolant is exceeded (more than 115°C), the indicator lights up red constantly, and a short-term intermittent buzzer sounds. Do not allow the engine to operate in overheating mode.
Installation and connection of PTF
If everything is clear with the choice of fogs, then let’s move on to their installation. Please note that installing optics involves connecting them to the unit, so if you do not have experience in this, it is better to immediately contact an electrician.
So, how to install Lada Vesta:
- First of all, the battery is disconnected and the front bumper is dismantled, and then it is necessary to remove the plugs installed at the location where the PTF is installed. After removing the plugs, holes are cut; for this purpose, you can use a regular stationery knife. Just do everything carefully to prevent scratches on the bumper.
- Next, the optics are fixed to the plugs; for this you can use simple self-tapping screws.
- Now you should install a button to activate the optics in the center console of the cabin. Choose any convenient place for us, as an option, the button can be placed on the steering column, on the left, near the trunk control button.
- After the installation steps are completed, the optics must be connected correctly. The wiring from the right lamp must be laid in a steel box, after which all cables must be pulled through a special technological hole located next to the pedal assembly. If we talk directly about the connection diagram, then for this you can use the universal option presented below. It is necessary to take load power from the battery through the bolt, which is supplied to the relay through the safety element.
- The “+” terminal is taken from the side light fuse directly in the block; for this you can also use the plus from the cigarette lighter. As for the direct installation of the relay, it is done either in the engine compartment or in the passenger compartment.
How do fog lights work?
Fog lights on Lada Vesta Unlike conventional high or low beams, which create a translucent veil in the rain, complicating visibility, PTFs, with their specificity of a wide range of action, sufficiently illuminate the road surface. In addition, Lada Vesta fog lights play a positive role for oncoming drivers in difficult weather conditions. To ensure excellent visibility in snowstorms, heavy rain, etc. PTF is being developed in the following specifics:
- It has a fairly clear upper edge of the light beam. It follows that illumination and reflection do not rise above the minimum required horizontal threshold.
- Lada Vesta fog lights should be installed closer to the road itself, since there is always a clear gap of atmosphere between the road and the layer of foggy veil, into which a wide beam should penetrate.
Is it possible to install xenon in the standard PTF on Vesta?
They demanded to include a phrase stating that the re-equipment would be carried out in accordance with technical regulations.
How could it be otherwise? I had to go again to NAMI PTIA-Fond, then back to the traffic police - and these organizations are located at different ends of traffic jammed Moscow.
And again stand in line... But finally the coveted approval has been received - let's start re-equipment! A simple matter is to buy components for installing xenon. There would be money. But the acquisition of each element was a struggle.
We simply turn off the original PTF through the windows (the ones that everyone loses) in the wheel arch, remove the bumper, lay a sheet on the overpass and put the bumper on top, we get the following picture: Next we go to the bumper and unscrew 2 torexes each (there are four holes, and the torex two at a time - savings) and remove the standard PTFs and... leave them, you never know - they will come in handy around the house.
What kind of lamps are installed on Vesta from the factory?
Halogen light sources have not yet sung their swan song. At least on VAZ cars, and on all imported public sector cars as well. With proper adjustment, good care and careful selection of lamps, standard headlights without any modifications can shine quite informatively and no worse than foreign cars.
It is important that the engineers took care not only of the visually pleasing modern architecture of the head optics, but also of the possibilities for its configuration and maintenance. For example, in order to replace the low beam, high beam, clearance or daytime running lights lamps, you do not need to completely dismantle the headlight, as was the case with the tenth family or Kalina
Lamps of the following base standards and power ratings were installed on Vesta from the factory:
- low beam lamp with H7 base 55 W;
- for high beams, lamps with an H1 socket of the same power are used;
- side lights and daylight - W21/5W;
- PY21W lamps with an orange bulb are used for the direction indicator.
As for the brands of lamps, Osram Bilux, a Mayak lamp or General Electric, as well as Phillips could be installed from the Vesta factory as a source of low or high beam.
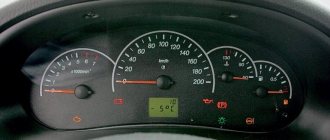
Find out the firmware number
If you are faced with the problem of the lack of backlight on the Lada Vesta dashboard during the day, first you need to find out the current firmware number. This can be done in one of 2 ways:
- Display the current software directly on the on-board computer display. To do this, during testing, you need to press the up button on the right steering column paddle.
- Dismantle the entire shield and look at the label that is glued to the back. The software version is also indicated on it.
The video clearly demonstrates the first method. You don't have to unscrew or remove anything to do this.
As you can see, the issue of the lack of backlighting on the Lada Vesta tidy is resolved quite simply. However, for those who live far from the dealership, it is easier to wait for the next maintenance and replace the firmware on it.
Beginning the installation of the lighting kit
We remove the front bumper, carefully cut out holes with a diameter of 76 millimeters in the places where the plugs are located.
Requires a 76 mm cutter
A sharp knife with a harder blade or a metal crown of the appropriate size will come in handy. We insert the headlights into the holes, securing them to the right and left brackets using self-tapping screws 15–20 millimeters long.
We install a switch button inside the car; you can use a standard VAZ one from LADA 2114, placing it next to the vertical adjustment wheel for the optics. You can draw a conclusion to the standard switch from Vesta, which will be without fixation, located just below the audio system.
Installation of PTF lamp wiring.
We lead the wiring from the headlights through a metal corrugated box to the hole located in the area where the pedals are located. From there we draw output to the button.
Replacing optics
Let's consider the procedure for installing the entire headlight and replacing its individual components.
Headlights Lada Vesta
You don't need any tools to change the light bulbs. The procedure is carried out with the “mass” disconnected.
Lift the hood. If you look at the headlight from behind, you can see the following picture:
Schematic representation of the headlight. Number 1 is the high beam lamp cover, number 2 is the low beam. Both covers are unscrewed by turning clockwise. Inside, you need to disconnect the wires and release the cartridge from the spring retainer. All that remains is to remove the socket and replace the light bulb.
With the turn signal lamp (3), as well as the DRL and side light (4), everything is even simpler. It is enough to turn the cartridge clockwise and remove it. This will give you access to the light bulb.
In each case, assembly is performed in reverse order.
Removing the headlight units may be necessary to replace them or to tune the Lada Vesta optics. There is no need to dismantle the front bumper:
- To do this, using a Torx bit, you will have to unscrew the numerous bolts holding the bumper on top, bottom, sides and under the license plates.
- The headlight itself is secured to the body with 3 bolts on top and 1 on the side. They are unscrewed with a key with a “10” head.
- After this, the unit can be carefully removed and the wire connectors disconnected.
Installation is in the reverse order.
Please note that after all the manipulations, you may need to adjust the headlights.
Taillights of Lada Vesta
Rear lights on Lada Vesta First, disconnect the ground. The bulbs can be accessed by unscrewing the trunk trim at the level of the headlights. You will see wires going to two sockets: a small one for the turn signal lamp and a large one for the brake/side light lamp.
- Disconnect the block with wires from the desired socket, turn it clockwise and remove it.
- The turn signal bulb can be removed by simply pulling it towards you, and the brake light and parking light bulb can be unscrewed counterclockwise.
- Also under the casing you can see the nuts securing the external lamp, unscrewing which you can completely remove it. To do this you will need an 8 key.
To deliver goods to other cities, we cooperate with transport companies.
SDEK courier service: express delivery in Russia and abroad.
We deliver the goods to the warehouse FREE OF CHARGE. The most convenient and fastest delivery method, since you independently select the order pick-up point from more than 1,400 offices in Russia and the world and see the final delivery cost.
Dispatch is made from Monday to Friday. Orders paid before 15:00 are dispatched on the same day; orders paid after 15:00 are transferred to the next day of dispatch.
After sending the order, you will receive a shipment identification number, by which you can also find out about the progress of the order on the company website https://www.cdek.ru
We deliver goods to the warehouse FREE OF CHARGE.
One of the most affordable transport companies.
The order is completed within two working days, after you have paid the invoice price in full in advance. As soon as your order is delivered to your city, an employee of the transport company will contact you to inform you where and at what time you can pick up your order. The company does not limit the volume and weight of cargo. Upon receipt of the order, the client must pay for the services of the transport company for preparing the cargo for shipment and for its delivery to the selected location.
Important! By default, the transport company packs all goods using a special wooden crate, which allows the goods to be delivered in perfect condition. This increases the cost of delivery, so we ask you to inform us in advance about refusing the additional cargo protection service if you want to save on it.
The list of settlements to which you can order delivery, as well as the cost of delivery, can be found on the website: https://nrg-tk.ru
We deliver the goods to the warehouse FREE OF CHARGE.
The order is fulfilled within two working days, after full payment of the cost of the goods on the invoice. As soon as your order is delivered to your city, an employee of the transport company will contact you to inform you where and at what time you can pick up your order. The company does not limit the volume and weight of cargo. Upon receipt of the order, the client must pay for the services of the transport company for preparing the cargo for shipment and for its delivery to the selected location.
Important! By default, the transport company packs all goods using a special wooden crate, which allows the goods to be delivered in perfect condition. This increases the delivery cost by at least 200 rubles. Therefore, we ask you to inform us in advance about refusing the additional cargo protection service if you want to save on it.
The list of settlements to which you can order delivery, as well as the cost of delivery, can be found on the website: www.dellin.ru
We deliver the goods to the warehouse FREE OF CHARGE.
The order is fulfilled within two working days after full payment of the cost of the goods on the invoice. As soon as your order is delivered to your city, an employee of the transport company will contact you to inform you where and at what time you can pick up your order. The company does not limit the volume and weight of cargo. Upon receipt of the order, the client must pay for the services of the transport company for preparing the cargo for shipment and for its delivery to the selected location.
Important! By default, the transport company packs all goods using a special wooden crate, which allows the goods to be delivered in perfect condition. This increases the delivery cost by at least 200 rubles. Therefore, we ask you to inform us in advance about refusing the additional cargo protection service if you want to save on it.
The list of settlements to which you can order delivery, as well as the cost of delivery, can be found on the website: https://pecom.ru
Tuning daytime running lights
On the Lada Vesta, the manufacturer uses double-filament lamps in the side lights and daytime running lights. If instead of them you install LEDs modified in a certain way, then the yellow color of these lights, which is ineffective during the day, will change to a brighter white with blue.
Before performing this operation, you need to familiarize yourself with the pinout of the Lada Vesta daytime running lights sockets, since on this sedan it is non-classical:
- on one side of the cartridge there should be a “-” in the form of two contacts or one common one;
- on the opposite side - “+” for side lights and “+” for daytime running lights.
When purchasing LEDs, you must ensure that the polarity of the lamp base and the Vesta socket match. If such LEDs could not be found, a way out, which is not always harmless, may be to bend the contact pins of the elements according to the indicated pattern.
The desire to make your car better is familiar and understandable to any motorist. However, when deciding to carry out tuning on your own or even with the help of professionals, but before the expiration of the warranty period, you should carefully weigh the feasibility of performing this work and the consequences that are often inevitable with unqualified intervention.
Special anti-fog optics are not a luxury, but a necessary element of a modern car, helping to avoid traffic troubles in conditions of limited visibility. We are not just talking about fog, the definition includes drizzle, snowfall, blizzard, and downpour.
PTF on the Lada Vesta is not available in all trim levels.
On modern domestic cars, such additional equipment is installed exclusively in luxury configurations or as an additional option. If our Vesta did not have foglights when we purchased it, then we will need to do the installation ourselves.
There can only be one way out, try to perform the so-called re-equipment to a configuration an order of magnitude higher than the existing one. You will need a standard kit from AvtoVAZ, which includes:
PTF installation cost
Installing a PTF at a dealer is a very expensive task!
The cost of pleasure, at the time of writing, is approximately 50,000 rubles
. If you have somewhere to add 15-20 thousand, then you can safely go to the dealer and install it on site. If something happens, you can always fix any damage under warranty. Has the desire to save money taken over? We do everything with our own hands.
Recommendations for selection
The first step is to make sure the quality of the products you purchase:
- The product body must be tightly fastened and assembled. The tightness of the fog lamp increases its service life and avoids unnecessary visits to dealerships. The material of the part must be resistant to severe weather conditions.
- High-quality fog lights are equipped exclusively with glass lenses. Plastic is a very brittle material and will break if hit by the smallest stone while the vehicle is moving.
- The color filter recommended for the part is yellow, which best cuts off the long waves of light produced during thick fog. If you feel that such a solution spoils the appearance, you can opt for specific lamps.
- Last, but not least, the criterion will be the possibility of parsing the PTF. In this case, if it breaks down, it will be enough to change the lamp rather than purchase a new one.
Fog lights
Purchase accessories by prior agreement with service station specialists and auto store managers. An exception is cases of purchasing original products, when the article numbers for the Lada Vesta fog lights are identical to the original ones.
Check the integrity of the packaging, the presence of holographic elements, barcodes, dates, and batch numbers. Keep your receipt until the warranty expires.
Install lighting fixtures only if you have experience in servicing the equipment. Otherwise, you risk causing damage and connecting the limit switches incorrectly.
Which fog lights are better for the Lada Vesta is an individual choice. It largely depends on the size of the allocated budget. It is advisable to give preference to foreign analogues.
If you are the owner of a non-luxury Lada Vesta model and decide to install fog lights, then choose from more expensive analogues. If you are the owner of a luxury version of Lada Vesta, which is equipped with fog lights by default, consider replacing the lenses and diode elements. In any case, it will be cheaper than buying and installing accessories as a kit.
conclusions
This article discussed the simplest, but most expensive method of installing anti-fog equipment.
In practice, especially if your Lada Vesta is no longer under warranty, everything can be done at much lower cost using plastic corrugation, simpler wiring, a 16-amp fuse, and a 4-pin relay. In general, the installation sequence will not differ.
By choosing the most suitable method, you can equip your car with enough light for comfortable driving in the dark, when visibility is very limited.
Fog lights, like the main optics of a car, play an important role in creating high-quality lighting. Fog lights are especially important in poor visibility conditions. For example, during rain, heavy fog or snowfall. As for the Lada Vesta, the situation here is such that fog lights are provided only in the “luxury” configuration. Therefore, installing PTF is relevant for this family of cars. If you are determined to install fog lights yourself, then this review is for you.
It must be said that installing PTF on Vesta yourself is somewhat more difficult than on other Lada cars. On the other hand, you will thus save quite a decent amount. So, for example, an official dealer can charge you up to 10 thousand rubles for installation, depending on the region. If you do not have such an amount, then it is better, of course, to carry out the installation yourself. Therefore, be patient and have enough time.
To install fog lights on Vesta you will need to purchase:
- The fog lights themselves - here you have a choice: take Original Valeo PTFs or a good quality analogue or Tune-auto PTFs (and look for bulbs) or take Chinese ones of dubious quality (there were precedents when they simply melted).
- Brackets for installing PTFs are actually what the fog lights are directly supported on. It is very difficult to find original brackets; AvtoVAZ does not release them on the free market. Analog brackets are very suitable; they are of decent quality, completely replicate the geometry of the original ones, and they are always in stock.
- PTF facings. Here the situation is simpler - you can cut holes in your trims for fog lamps with a diameter of 76 mm, or purchase luxury trims for fog lights.
- Wiring. You will need a set of wires to connect PTF Vesta. Everything is more complicated here, since there are no special buttons or space for a button to turn on the PTF in the cabin.
The first thing you will encounter when connecting is the electrical circuit, which is completely different from Grants or Priora. First of all, on Vesta the foglights are controlled via a steering column switch, which does not have a fixed position for turning off the PTF. At the same time, the signal to turn on the fog lights does not go directly to the headlights, but through a special unit, which is present only in luxury cars. Therefore, in order not to damage the car and not waste an extra couple of hours, we recommend adding a separate button for the PTF.
Now you can proceed to the direct installation of the PTF. First, remove the bumper and replace the existing PTF trims with “luxury” ones or carefully cut out the plugs using a utility knife or a 76 mm crown. Then take the fog lights and secure them to the brackets using self-tapping screws, and the bracket directly to the bumper.
Connection is the next and very important point. To do this, stretch the existing wires from the kit to each of the fog lights, the free end is connected to the relay (it can be installed in the mounting block or in the engine compartment). Now we connect according to a universal scheme, like Kalina or Priora. Take the “+” from the battery to the relay, and you must use a fuse. There you can take the “-” mass directly from the “negative” terminal, or it is better to find a nut nearby and screw it to it. The control plus on the relay comes from a button from the passenger compartment. Now stretch the wire for the button into the interior and install the button (the most convenient button for turning on the PTF 2109) on the decorative cover of the fuse box next to the headlight adjustment unit.
Finally, do not forget to check the functionality of the PTF and put the bumper in place.
Using such a circuit, you will minimally interfere with the electronics of the Lada Vesta, which means you will not harm it. The basic rule for installing PTF is to try to be as careful and attentive as possible, then you will get a positive result. Properly installed fog lights will provide you with not only proper visibility on the road, but also safety.
How much does installation work cost?
If you don’t have enough time to install fog lights yourself, you can turn to specialists for help. An official Lada dealer carries out such work for an amount approximately equal to 60-70 thousand rubles. Of this, at least 10 thousand rubles will have to be paid to an electrician for installation. The price consists of the cost of original spare parts required for installing the PTF and complex work that will completely copy the luxury version.
Installing foglights yourself will reduce the required budget. In addition to the headlights themselves, you will need to purchase other equipment, with a total cost of at least 5,000 rubles. To summarize, we can say that installing PTF on fret 2180 without outside help is about 5 times cheaper than from an official dealer.