02/28/2022 5,874 VAZ 2112
Author: Ivan Baranov
In any car, including the VAZ 2112, the ignition module performs one of the main functions in the ignition system (IS) as a whole. Thanks to this unit, the engine starts optimally, as well as its normal operation in the future. You can learn more about device malfunctions, as well as its replacement, from this material.
[Hide]
Where is the ignition module located?
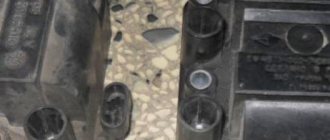
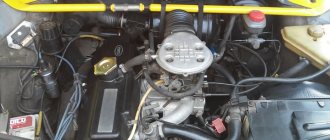
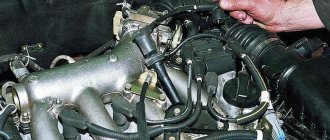
It’s not difficult to find it, well, firstly, to find it you need to at least approximately know its location, and its location is the engine. After you have found out where it is located, open the hood of your car and turn your attention to the spark plugs, wires will come from these spark plugs, so look where these wires lead and after finding it, you will see in front of you a small square-shaped box that called the ignition module, it is also depicted in almost all the photographs posted in this article.
A little about prices
We have already noted which switch and transistor are used when repairing the ignition module of a dozen. The first costs about 3 dollars, and for the second you will have to pay about 6 dollars.
Some craftsmen use a domestic analogue of the transistor - model KT848A . Of course, it costs less. But its problem is its lower quality and larger size, which somewhat complicates the repair process.
Ignition module
As mentioned above, the “ten” has 4 engine types: 16 and 8 valve internal combustion engines, as well as with a volume of 1.5 and 1.6 liters. This will lead to differences in the ignition modules. Depending on the installed engine with a certain volume, its own ignition module will be installed.
Differences
Differences in MZ: on the left 1.6 liters, on the right 1.5 liters 16 valves
The main differences between the modules will be the size and mounting holes. In a 1.5 liter internal combustion engine, the ignition module is larger in size in contrast to the 1.6 liter engine. The cost of the modules depends on the manufacturers, but it should be noted that the MZ from a 1.5 liter engine is always more expensive than a 1.6 liter one.
16 valve MZ
In a 16-valve internal combustion engine, the ignition module is installed on the valve cover near the oil filler neck.
8 valve MZ
The MZ on an 8-valve engine is installed on the front of the cylinder block between the dipstick and the breather.
Repair
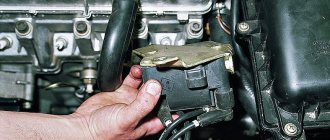
Ignition module VAZ 2107
The design of the ignition module is quite complex: it includes one or more coils, a board, contacts and wires. Of all the above elements, only contact connections can be repaired; in some cases, replacement of parts (transistors, coils) is possible.
The module is dismantled and opened for repair purposes. For this you will need:
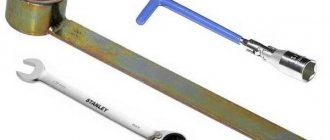
- Socket wrenches with heads 1, 13 and 17.
- Hexagon 5.
- Screwdriver.
- Soldering iron.
- Flux for aluminum.
- Stranded wire.
- Nail polish.
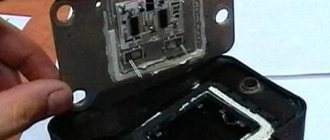
Opening the ignition module
Repair of the ignition module is carried out in the following order:
- On the removed device, open the case by prying it off with a screwdriver.
- Remove the silicone film covering the board.
- All aluminum is removed from the explosive contacts.
- On the board, new wires are soldered in place of all the dismantled old ones. To do this, the surface of the collector is cleaned of deposits, after which the board is heated to 180°C (a characteristic smell will indicate when the desired temperature has been reached). During the soldering process, the ends of the wires are connected to the module.
- At the end of the operation, all contacts, the board and the module are covered with nail polish.
- The device is assembled in the reverse order, installed on the car and the engine is started. In case of normal operation, the ignition module is sealed tightly with sealant, while the wires are tucked inside the cavity so that they are not pinched at the edges by the plate.
If the device does not work, then a breakdown inside the module should be looked for more carefully. The transistor, electronic component may have failed, or there may be a break in the coil. Such a repair makes sense only if its price is significantly lower than the cost of a new part.
VAZ-2110 engines with a two-shaft head with 16 valves are built on the basis of the old one and a half liter VAZ 21083 engine. Changes affected only the cylinder head and air supply system. Twin-shaft 16-valve engines were installed in two types - a 1.5-liter engine (VAZ-2112) and a 1.6-liter engine (VAZ-21124). The ignition system on these engines is different. Today we will look at the ignition module for the injection 16-valve engine 2112 and find out its differences from the 1.6-liter engine 21124.
Device
The ignition module has a common structure regardless of engine size. Inside the switch there are two high-voltage coils and an electronic circuit with many keys.
The coils are designed to switch high voltage and supply it to the spark plug to form a reliable spark in the combustion chamber of the engine.
The ignition module produces a spark in pairs, that is, each of the coils located inside the module is responsible for generating a spark on two cylinders: the first-fourth, the second-third.
Purpose and principle of operation
Ignition module VAZ 2110
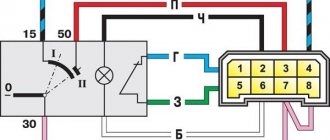
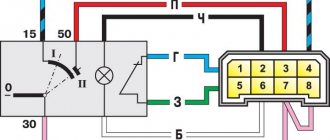
The ignition module of a modern car performs the function of generating high voltage to produce a spark at the spark plugs. It consists of two coils with a closed magnetic circuit and a two-channel switch. Sometimes the switch is made as a separate device, but in most cases it is combined with an electronic control unit for the engine. Externally, the modules differ in the number of wires in the connection connector: a module with a switch has 4 wires, and paired coils have 3.
The ignition module is controlled by the ECU, which supplies constant voltage in the form of low-voltage control signals to the windings of its coils at the right moment. The end of the signal is the beginning of the spark. Thanks to magnetic induction, at the moment of application, a high voltage is generated, creating a spark at the spark plug. The device is located in the engine compartment and can be easily identified by the high-voltage wires leading to the spark plugs.
Everything we know about the ignition module (MZ) 2112
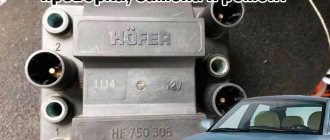
1. Appearance.
Module 2112
2. Catalog number.
2112-3705010.
3. What is it used for?
The module creates a spark on the spark plugs using high voltage, which is generated from low voltage. The spark plugs, in turn, ignite the gas-air mixture in the cylinders, and at a strictly defined point in time. The spark is supplied to the cylinders in pairs, using the “idle spark” method. This means that sparking occurs simultaneously in two “pots” - in one on the compression stroke (working spark), in the second on the exhaust stroke (idle spark). It is the “idle” spark that does not affect the operation of the engine and its characteristics. This principle is “zilch ... zilch and bang" is called pairwise parallel.
4. Device.
It consists of two coils with a closed magnetic circuit (for cylinders 1-4 and 2-3) and a two-channel switch in a single housing, hence the name “MODULE”.
Now in detail:
About the coils.
Their power and reliability depend on the cross-section of the wire and the quality of insulation (varnishing) in the primary and secondary windings. Some wires either reduce the number of turns and, as a result, burnout of the winding, and then infinite resistance. Our notorious short circuit depends on the quality of insulation (varnishing).
Such a parameter of the coils as ENERGY ACCUMULATION TIME is monitored by the ECU. How? Yes, everything is simply set in the firmware.
I wasn’t too lazy to pull out the firmware from the block.
“On the fingers” - We increase the accumulation time - the coil heats up and burns out, we decrease it - the spark energy drops.
About the two-channel switch.
It consists of L497D1 micros and BU931 power transistors. Let's look at the Datasheet on L497D1 - this is a DC/DC pulse converter, and a step-down one. In other words, the output voltage depends on the input voltage. From the characteristics it is clear that the output voltage is from 3.3V to 50V and 1.5A in current, and even and 300 kHz frequency. What is the input voltage?” No translator is needed - black and white from 8 to 55V. The answer to the first “poop” has been received - THE MODULE CAN BE POWERED WITH INCREASED VOLTAGE. Let's look at the second component of BU931.Datasheet. As you know, a transistor is an electronic switch-switch that switches a high current with a low current. From the Datasheet you can see the switching voltage is up to 400V and 15A. But the “saturation” voltage, when the transistor opens, starts from 5V. The answer to the second “poop” is that the MODULE CAN BE POWERED WITH INCREASED VOLTAGE.
5. Schemes.
6. Manufacturers.
Domestic and Chinese++. Imported ones - I will highlight high-quality ones - HUCO, TESLA, BREMI, AT Programm.
7. How to check for functionality?
a) multimeter. Only the secondary winding is checked for short circuit or resistance. It should be about 5.4 kOhm. Although there are so-called “vigorous” ones with 3.4 kOhm from SOATE. b) Stand CNT-SPMZ-3 How? The answers are in my blog. c) An oscilloscope. This is already “for gourmets” 8. Performance characteristics.
For this, let’s go to the company’s official website, say SOATE. They are suitable for stock or near stock motors. 9. Disadvantages.
a) Not repairable, although questionable, but still. b) Aluminum soldering is used, hence its damn unreliability. c) from “B” it follows - Afraid of high temperatures. d) Does not withstand work on “neutral wires” e) Does not withstand work on spark plugs with “zero resistance”. The list can be TRA...TA...TA ad infinitum.
If WHO decides to operate the 2112 module, it is enough to adhere to several rules. 1. Be sure to move the module from the cylinder head cover or away from the engine - it really doesn’t like overheating. 2. Pay special attention to the condition of the explosive wires, since their breakdown leads to breakdown of the MV. 3. Change spark plugs on time and be sure to monitor the gap; it must not be exceeded. 4. Try not to remove the explosive wires from the spark plugs while the engine is running. 5. If you still decide to leave the MZ in its old place, do not overtighten the nuts securing the MZ to the cylinder head cover or bracket - this leads to deformation of the aluminum plate of the module on the heat sink rib - the ceramic control board bursts. 6. It is not recommended to bring the engine speed to the cut-off zone, since de-energizing (short-term) the MG can also lead to its failure.
Design
Structurally, the ignition module includes two main elements:
- 2 ignition coils that generate high-voltage pulses directed to the spark plugs;
- Dual channel switch.
The reasons for failure can be different, ranging from interruptions in the operation of the engine, ending with an unexpected stop of the power unit. Please note that the "Check Engine" light does not turn on.
Symptoms of a problem
Based on some signs, it can be determined that the culprit of a malfunctioning internal combustion engine is the MZ. Below is a small list of symptoms indicating failure of the MH.
Signs:
- Failure of two cylinders at once, namely 1-4 or 2-3;
- Increased fuel consumption;
- Detonation at idle speed;
- The engine does not develop power;
- Difficult starting on a hot internal combustion engine;
These signs indicate a malfunction in the ignition system. These signs also apply to other possible breakdowns: spark plugs, wires and even injectors, but first of all you need to pay attention to the MH.
How to check the ignition coil of a VAZ
If the ignition coil is faulty, the engine will not start. A characteristic sign of a faulty coil is its increased temperature when the ignition is turned off. This is easy to determine by touch.
Signs of a faulty ignition module may include the following:
- hesitant engine starting or failure to start;
- failures during sudden changes in speed;
- high fuel consumption;
- two cylinders do not work, the engine is feverish;
- lack of dynamics;
- a sharp drop in power;
- drop in power and thrust after warming up.
These symptoms may not only be caused by the ignition module. To determine the malfunction, it is enough to spend a few minutes diagnosing spark plugs, high-voltage wires and caps. This will eliminate the remaining elements of the ignition system and make sure that it is the ignition module that is faulty.
Module check
After signs similar to failure of the ignition module appear, it must be checked before buying a new one, since its cost is not cheap.
There are three ways to check: substitution, visual inspection and a multimeter.
Substitution
The best and easiest way to check the MZ is to install another known good one from another exactly the same car. After which it will immediately become clear what the matter is and whether the Ministry of Health is to blame for this problem.
Visual inspection
It is necessary to inspect the module for chips, cracks, etc. There should be no damage to it. There should be no moisture or rust on the contact part.
Multimeter
Testing with a multimeter is carried out using the results of voltage and resistance measurements. This will help identify the cause of the failure of the module or its control circuit.
Step by step check
- Remove the power supply from the module. On the multimeter we set the DC voltage measurement limit to 20V. We turn on the ignition on the car and connect the multimeter contact on one side to the power block (namely to connector 15), and on the other side to the engine housing. The voltage between pin 15 and the motor housing must be at least 11-12V. Otherwise, the power supply circuit of the MH is faulty, or the battery is discharged.
- Next, we check the resistance on the VAZ 2110 ignition module itself. We set the multimeter to the resistance measurement parameter, namely 200 Ohms. We connect the multimeter probes to the high-voltage terminals of the MZ: 1-4, 2-3. The resistance of these coils, with a working MC, should be within 5 ohms.
- Then the resistance at the MC input is checked. One multimeter probe is connected to the central contact and the resistance is measured first on the leftmost contact and then on the rightmost one. The resistance should be in the 5 ohm range.
Checking the Ministry of Health with your own hands
There are several options for checking the device yourself at home; let’s look at the simplest one.
To carry out independent diagnostics, you need to know what the wires connected to the module are responsible for:
- red-blue - provides 12-volt power to the device;
- the brown wire is ground, usually connected to the car body;
- white-blue - connects to the spark plugs of the first and fourth cylinders;
- the red-gray wire connects to the spark plugs of the second and third cylinders.
Cost and article
The table below shows the cost of the VAZ 2110 ignition module depending on the manufacturer and VAZ engine size.
| Engine volume | Number of valves | Manufacturer | vendor code | Price, (rubles) |
| 1,6 | 8 | JSC SOATE | 2111-3705010-03 | 905 |
| 1,5 | 8 | BOSCH | F000ZS0211 | 2600 |
| 1,5 | 16 | StarVolt | 2112-3705010 | 1600 |
| 1,5 | 16 | Omega | 2112-3705010 | 1590 |
Video on repairing KZ VAZ
Often, when the ignition module breaks down, the car owner immediately runs to the store and buys a new one. But, for the VAZ-2112 there is an alternative method - repair. Of course, without proper knowledge in auto electrics, it will be difficult to understand all the circuits and communications. This article will tell you in the most accessible way how to repair the ignition module with your own hands.
Replacement
Replacement is quite simple and effortless. To replace, you will need a ratchet with an extension and a 10mm socket.
Replacement process
- We remove the negative mark from the battery, since the work is carried out on the electrical equipment of the car. This will avoid an unintentional short circuit in the vehicle's network.
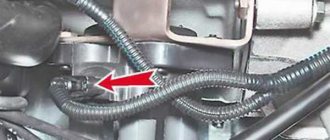
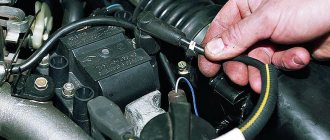
- We remove the high-voltage wires from the MZ and the power connector.
- We unscrew the nuts securing the MZ and dismantle it.
- Installation is carried out in reverse order.
Pay attention to the order in which the wires are connected. Do not confuse them, otherwise the car engine will not start. Cylinder numbering starts from the timing mechanism from left to right. Connect the wires as it is written on the Ministry of Health.
Connecting and replacing VAZ short circuit
The procedure for removing and installing the ignition coil on old VAZ models:
- First, disconnect the central high-voltage wire leading to the distributor (ignition distributor).
- Disconnect all power wires from the coil contacts. Since they are fastened with nuts, you will need an 8 wrench for this.
- If you don’t know which wires to connect to which connector later, it’s better to immediately remember or mark them somehow, so that later during installation you can connect them correctly.
- Unscrew the coil housing. It is attached to a clamp (clamp), which is pressed to the car body with two nuts.
- After the work has been done, you can remove the ignition coil and replace it if necessary.
For new type VAZ cars:
- We remove the “minus terminal” from the battery.
- Remove the top protective cover of the engine. If the engine volume is 1.5 liters, then this part is missing and this step is skipped.
- We remove the high-voltage wires from the coil.
- Now, using a 13mm wrench, unscrew the two fasteners.
- Using a 17mm wrench, loosen one bolt securing the coil.
- We take out the module.
- Use a hexagon to unscrew the coil from the holder.
- Assembly is carried out in reverse order.
Particular attention should be paid to the connection, since high-voltage wires must be located in the strict order provided for by the design. If this is not done, the car will stall or the engine may not start at all.
Replacing the ignition coil on a VAZ is quite simple. Even a novice motorist can do this in his garage, and if everything seems too complicated, contact a car service center. Particular attention should be paid to the choice of product, since this will determine how well the engine and ignition system will work.
Result
After two revisions, a number of improvements were noticed:
- ─ the car accelerates better;
- ─ failures disappeared;
- ─ response to the gas pedal has become clearer;
- ─ idle speed became stable;
- ─ gasoline consumption decreased by 0.7-0.9 liters to 7.8 l/100 km in the city.
- ─ the engine starts faster, the starter does not turn for more than 2 seconds.
It feels like the engine has become 100 thousand km younger.
Let us remind you that you can improve the spark on engines with an ignition module. By the way, do not forget that sparking is affected by high-voltage wires.
Your feedback on modifying ignition coils using capacitors:
Your feedback on reducing the connectors in the ignition coil circuit: