The timing drive of the popular five-door hatchback in the Russian Federation from the Volga Automobile Plant - VAZ-2114, is carried out using a flexible belt, both on 8 and 16 valve units, only in the latter the timing belt is slightly longer and the mechanism uses two roller (tension and bypass).
Replacing the timing belt drive for the VAZ 2114 is provided by the manufacturer every 60-70 thousand kilometers. However, taking into account numerous reviews from experienced motorists, as well as the quality of spare parts, it is recommended to replace the timing belt after half the mileage.
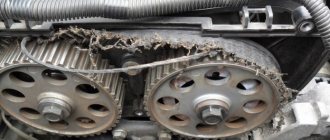
A visual inspection of the belt drive for mechanical damage should be carried out much more often than scheduled maintenance, at least once a month. If the slightest sign is detected that the belt is already worn out, is being eaten, or has any damage, it must be replaced immediately.
If you don’t do this, then at the most unexpected moment you can get a lot of troubles and, at best, this will be a breakdown of the tension roller, failure of the water pump, or blocking of the generator shaft.
In the case of VAZ 2114 cars with 8-valve internal combustion engines with volumes of 1.5 and 1.6 liters, there is good news - a broken belt drive on these units does not threaten bending of the valves and damage to the cylinder head, which cannot be said about 16-valve units, where major repairs after a break The timing belt should be worn in 90% of cases.
Preparatory work
You can change the timing belt on model 2114 yourself. Before starting repair work, you need to do the following:
- so that during repair work the car does not roll back (when lifting the front end with a jack), it is necessary to place stops under the rear wheels;
- then you can begin to loosen the bolts on the right front wheel hub;
- Remove the wheel completely.
That's all, now the car is ready to replace the worn timing belt. This should be done on a VAZ-2114 (8 valves, injector) in the same way as on 16-valve power units. The only difference is that on recent installations the belt is longer, so it is installed one more notch.
Belt selection
To change the strap yourself, you will need the following parts:
- The belt itself. Article number of the original product 2108-1006040-10.
- Tension roller. The original part has catalog number 2108-1006120. Please note that only this type of roller can be used; the use of parts with article number 2112-1006120 is not allowed, since these elements are not interchangeable.
- For a complete replacement, you will need a pin for the tension roller. Its article number is 2108-1006129.
- Sealing element under the casing, if necessary. Catalog number of the original part is 2108-1006149.
- If the plastic timing belt cover is cracked or damaged, it must also be replaced. The catalog number of the original casing developed for the VAZ 2114 is 2108-1006146.
Analogs
If you cannot purchase original spare parts, you can install an analogue:
- Gates, model 5521 or 5521XS (this belt will be reinforced);
- Bosch, article number 1987949559;
- Kontitek, catalog number ST-527;
- Daiko 111x190/1;
- Good Er, there are two options - with semicircular teeth G1474 or with trapezoidal teeth G1485.
Learn more about how to independently replace the timing belt in a VAZ 2114 car and set the marks correctly from the video made by user Alexander Amochkin Kolomna AAK.
As for the videos, they can also be unoriginal:
- Gates, model T42042 or T42042A;
- Flennor, model FS99018;
- Optimal 0N1917.
Removing the belt
To dismantle a worn-out timing belt, reliable fixation of the crankshaft is required to prevent it from accidentally turning. To do this, you need to unscrew the crankshaft pulley bolt.
- This can be done without removing the wheels, having previously set the handbrake to the working position.
- Next, already under the car, you can begin to tear off the bolt with a head on “19”.
- After removing the wheel, with the participation of an assistant who will squeeze the brake, you can begin to lock the crankshaft.
- After unscrewing the bolt on the crankshaft, you need to remove the generator drive pulley.
- Then, using the key set to “17”, you can begin to unscrew the nut from the roller and completely remove the timing belt itself.
In general, experienced car enthusiasts change the timing belt on brand 2114 literally in a matter of minutes, but beginners in this matter should not rush, and it is better to check everything at least twice.
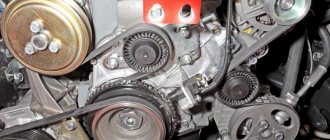
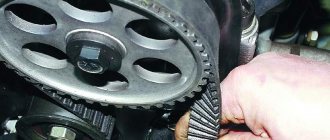
How to find a timing belt for a VAZ 2114?
Finding this part is very easy, because it is located under the hood and when opened it immediately catches your eye. The timing belt can be distinguished from the rest not only by the fact that it has a toothed surface, but also by the fact that it also synchronizes the operation of some auxiliary mechanisms. This is what causes the part to wear out quickly and you should always monitor the condition of the belt, correcting breakdowns or replacing it in a timely manner.
After a while, the timing belt begins to come off, the part slips or breaks. Sometimes it happens that a breakdown occurs while the car is moving. In such a situation, as mentioned above, the car will stall and it will not be possible to start it until the problems are corrected. In some versions of the VAZ 2114, a sensor on the panel may light up, indicating an error in the phase sensors.
Installing a new timing belt
To install a new timing belt, you must follow the steps below.
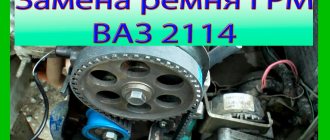
- First, we install the camshaft pulleys according to the marks, after which we securely fix them from accidental rotation.
- To align the crankshaft to the mark, you need to open the inspection window in the clutch housing. Only if all marks match is the correct installation of the new belt drive guaranteed.
- After aligning the timing components according to the marks, we install new rollers (tension and bypass).
- The belt itself is threaded through the pump and is first located on the crankshaft pulley.
- Installing the belt on the camshaft pulleys occurs last.
- The position of the tensioner, pre-lubricated on both sides with machine oil, is adjusted using a special key and counterclockwise*.
- Further installation is carried out in reverse disassembly sequence. If the marks are accidentally lost, they must be set again.
- At the end of the work, you should start the engine and listen for any extraneous noise. If there is any rustling or humming coming from the timing belt, this most likely means that the belt is too tight and needs to be loosened a little.
*For proper tension of the timing belt drive, it is necessary that the part of the belt between the shaft pulleys rotates 90° without applying any serious force. If this is done with little to no force, then greater belt tension is required. If the belt cannot be turned at all, then the tension should be loosened.
Belt replacement
Required tools:
- socket wrench 10 or similar size ratchet head;
- open-end wrench 13;
- open-end wrench 17;
- slotted screwdriver (large);
- special tension wrench for the tensioner pulley;
- jack, wheel wrench;
- a little machine oil.
First you need to set the timing gear and engine flywheel in accordance with the existing marks.
1. Place the car on a level surface and engage any gear.
2.Use a jack to lift the front right wheel so that it can rotate.
3.Open the hood, use a 10mm wrench to unscrew the 3 bolts securing the timing belt protective cover.
4.Using a 13 key, loosen the generator belt tensioner and remove it.
5. On the camshaft gear we find a mark in the form of a rectangular protrusion on the edge. It should align with the protrusion on the belt cover mount.
6.If it doesn’t match, put the car in gear and turn the right wheel until the marks match.
7.After this, we find a rubber plug on top of the clutch housing. It is located to the right of the cylinder block. Pry it off with a screwdriver and take it out. Below it is the flywheel crown, which also has a mark that should coincide with the triangular protrusion on the left.
8.If there is no such coincidence, use a 17 wrench to loosen the fastening of the tension roller, and using a tension wrench, turn the roller counterclockwise, loosening the belt.
9. Having removed the upper part of the timing belt from the timing gear, use a 17 mm spanner to turn the crankshaft until the flywheel marks coincide.
10.Fix the flywheel in this position by inserting a screwdriver between its teeth. It’s great if you have an assistant who will additionally hold it.
11. Dismantle the front right wheel, remove the arch protection.
12.Using a 17 wrench, unscrew the nut securing the generator pulley, making sure that the flywheel does not rotate.
13.Remove the generator pulley and take it out.
14.Now the timing belt can be removed from the crankshaft pulley.
15.Using a 17 wrench, completely unscrew the tension roller fastening and remove it; you can simply loosen it and the belt will come out.
16. Without disturbing the position of the marks, put a new belt on the crankshaft pulley, install the generator drive pulley in place, having first put the belt on it.
17. We put the belt on the timing gear.
18.Install a new tensioner roller, lubricating it on both sides with machine oil (if removed).
19. We tighten the belt by rotating the tension roller with a special wrench (if you don’t have one on hand, you can insert two pins or screws into the grooves and secure them with a screwdriver) counterclockwise. The tension at which one plane of the belt can be rotated 90 degrees horizontally using your fingers is considered normal. In this position, tighten the tension roller mounting bolt.
20. We carry out further installation in the reverse order; if your marks are lost, then you definitely need to set them again.
Prices for timing belts, their articles, originals and analogues, replacement cost
Today, a timing belt for any VAZ-2114 engine can be purchased without any problems at any auto store. Price tags for these parts vary depending on the manufacturer and on average range from 500 to 1000 rubles. However, when replacing a belt drive, it is better to immediately change the rollers, the price tags for which start at 400 rubles apiece.
The approximate cost of replacing a timing belt complete with rollers is from 1000 rubles at service stations. However, this repair can be done with your own hands. Of course, first you need to buy a new timing belt and pulley, and it is better to do this in a kit, the price of which also varies in the range of 1000 rubles.
Considering possible malfunctions caused by a broken timing belt, as well as the complexity of subsequent repairs, you should purchase products from even well-known companies with extreme caution so as not to fall for a fake.
The original spare parts used for the 2114 are unified with many other VAZ cars, mainly with the “ninth” and partly with the “tenth” models. A branded timing belt for the VAZ-2114 complete with a roller will cost an average of 1,300 rubles.
- The cost of analogues is also not high. For example, a timing belt kit with a pulley from Gates (article - K015521XS) for a VAZ 2114 (1.5-1.6 l., 8 valves) costs 1,200 rubles.
- The timing belt kit from Contitech - CT527K1, will cost more, from 2000 rubles, however, like products from the brands BOSCH (art. 1987949095), DAYCO (art. 94738) and GOODYEAR (art. G1474).
Why change the belt?
In the list of routine maintenance for the VAZ 2114, the manufacturer provides for replacing the timing belt every 60-75 thousand kilometers. However, given the quality of our spare parts, experienced car enthusiasts recommend replacing it after no more than 30-40 thousand km.
The belt should be visually inspected for visible mechanical damage at least once a month. If the slightest problem is detected, it must be replaced immediately.
If this is not done, the tension pulley may fail, as well as the water pump. In addition, there are cases when parts of the belt wrap around the generator pulley, which leads to blocking of its shaft.
But there is also good news. In VAZ 2114 cars with 8-valve engines of 1.5 and 1.6 liters, a broken belt does not threaten bending of the valves and damage to the cylinder head, which cannot be said about sixteen-valve engines, where a similar problem occurs in 90% of cases.
When is replacement required?
According to official regulations, the manufacturer recommends that owners of fuel-injected VAZ 2114 cars change the strap every 60-75 thousand kilometers. In this case, once every 5-7 thousand km it is necessary to perform a visual inspection of the belt for wear. The strap will last 75 thousand km if installed correctly and following the operating rules. When performing repairs along with the product, the manufacturer recommends replacing the tension roller, since its wear can lead to breakage.
Broken timing belt in a VAZ
When to change a belt if it has not yet reached its service life:
- When the product is deformed.
- The appearance of cracks in the structure.
- Delamination. Over time, the threads that make up the structure may peel off from the belt.
- Damage to the teeth of the structure. If even one tooth is cut off, it can cause the belt to slip. Operation of the vehicle may become impossible.
User Levan Bugulov in his video showed how to replace the strap on a VAZ 2114 with your own hands.
Stages of work
Replacement is quite simple, you just need to remove the installed part and put a new one in its place, making sure that there are no defects on it that could interfere with normal operation. But both dismantling and replacing the strap with a new one must be carried out in strict accordance with the instructions.
Preparation
Before the replacement procedure itself is carried out in the VAZ-2114, you need to turn on the handbrake and also set the lever to fourth gear. This is done in order to ensure not only safe, but also convenient performance of all work, since otherwise carrying out all work will be quite difficult.
Removing the old timing belt
- Remove the cover, which protects the parts from external factors, and then remove the drive belt.
- Next, you should carefully remove the crankshaft drive pulley, without touching the mounting bolt, and then switch the lever to neutral gear.
- Carefully rotate the crankshaft clockwise, constantly paying attention to the current condition of the flywheel and the marks, which can be seen through the special hole in the clutch housing. You need to move the crankshaft until the mark is in line with the middle strip of the scale.
- Once the mark is exactly parallel to the one at the back, you should unscrew the tension roller mounting nut in order to later remove the used belt.
Install a new belt and tension it
- The new belt, to which the used part is replaced, is put on the camshaft pulley, after which both of its branches should be sufficiently tensioned.
- The left part, which remains loose, should be placed behind the roller, then put it on the crankshaft and pump pulleys, and then constantly turn the roller counterclockwise until you are absolutely sure that the timing belt is fully tensioned.
- The crankshaft is rotated approximately one and a half to two turns, after which the repairman must make sure that both marks are in the middle. If, after performing the replacement, it turns out that the marks do not coincide with each other, you need to remove the timing belt again and repeat all the above operations again, and do this until both marks are parallel to each other.
- If everything is correct, the crankshaft bolt should be removed, and then the generator pulley should be returned to the workplace, which should then be secured with the bolt.
- Tension the belt and return the generator drive belt by turning the special roller counterclockwise.
Ultimately, after replacing the timing belt on a VAZ-2114 is completed, you need to start the engine to make sure there are no problems. In addition, based on the sound, you can approximately understand how well the belt is tightened.
If something remains unclear, you can watch the video instructions for performing this operation on a VAZ-2114: