Timely replacement of the timing belt on a Mitsubishi Lancer 9 with a 1.6 liter engine is one of the most important maintenance operations for the power unit of this vehicle.
The peculiarity of the model is that the engine here is “plug-in”. This term means that if the timing belt breaks, the pistons collide with the valves, causing the latter to bend.
Motors on which the valve bends are found on various brands and models of cars, including the Mitsubishi Lancer 9 with a 1.6-liter power unit, which will be discussed below.
Replacement frequency
In order to prevent the Lancer 9 from breaking the timing drive and subsequent serious and expensive repairs, the belt should be replaced every 90 thousand km (according to the recommendation of the car manufacturer). But in reality, it is better not to reach such a mileage and change the drive a little earlier - at 70-80 thousand km.
We also note that you should not rely on the high quality of the belt and be sure that it will serve the required period, and periodically inspect it.
Delamination, small cracks, severe wear of the teeth, traces of leaks of technical fluids on the drive surface are reasons for premature replacement, since a belt with such damage can break at any time.
Engine design Lancer 9 1.6 l.
The Mitsubishi 4G18 engine with a volume of 1.6 liters appeared in the process of modernizing and increasing the displacement of the base 4G13 engine with a volume of 1.3 liters, which was developed back in 1983. But before the 1.6 liter version there was a 1.5 liter 4G15 model; the 1.5 and 1.6 liter Mitsubishi engines are structurally identical. The difference in working volume is only due to the different piston stroke. But we will not delve into the history of the formation of this motor.
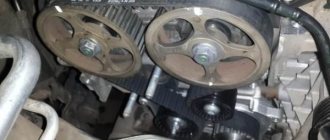
Mitsubishi Lancer 9 has under the hood an inline 4-cylinder 16 valve engine with a cast iron block and a timing belt. A design feature can be called SOHC V16 - an overhead camshaft with 16 valves. The Delphi MT20U2 electronic engine management system is a multi-point fuel injection system, direct ignition without the use of a distributor.
Lancer 9 1.6 l engine cylinder head.
The Mitsubishi Lancer 9 cylinder head has a rather interesting design. The camshaft is inserted inside the head, which is a large bearing housing for the camshaft. The camshaft cams run onto rocker arms, which are mounted on top and secured to common axles. Until a certain moment, this design did not have hydraulic compensators. To adjust the gap, it was necessary to rotate a special adjusting bolt and nut. But a little later, hydraulic compensators were introduced into the design. The bulk of cars that were sold in Russia through official dealers have hydraulic compensators.
We select replacement parts
Along with the timing belt on the Mitsubishi Lancer 9 1.6, the tension roller must also be replaced, so you also need to purchase it. You can choose both original spare parts and their analogues.
Original for Lancer 9 are Mitsubishi belts with indexes MD342154 and 1145A051.
Analogs for them are consumables:
- Gates (5535XS);
- Contitech(CT1008);
- Sun (A343YU100).
As for the roller, the original spare part bears the Mitsubishi MD356509 index.
As an analogue, you can use NTN JPU57-008A-4 or NEP57008A6 rollers.
It is also worth noting one fact - the automaker Mitsubishi does not produce consumables - rollers and belts - on its own. Because of this, a situation often occurs that a car owner orders an original, and receives analogues - a Sun belt and an NTN roller.
In fact, these spare parts are original - they are what the automaker installs on engines from the factory, so it doesn’t make much sense to look for parts with only the Mitsubishi label, and you can safely install Sun and NTN products on your car.
Why does the valve bend when the timing belt breaks?
The valve mechanism works as follows: when the piston reaches top dead center, both valves in the combustion chamber close and a certain pressure is created in it. A broken belt means that the valves do not have time to close in time before the piston arrives. Thus, their meeting occurs - a collision, which directly leads to the fact that the valve bends. Previously, in order to prevent a similar problem, special grooves were made for the valves on older engines. On new generation engines there are also similar notches, but they are intended only to avoid valve deformation during engine operation and in the event of a belt break they do not help at all.
From a physical point of view, from the moment the timing belt breaks, the camshafts immediately stop, under the action of return springs that brake its cams. At this moment, the crankshaft inertially continues to rotate (regardless of whether the gear was engaged or not, whether the speed was low or high, the flywheel continues to spin it). That is, the pistons continue to work, and as a result, they hit the currently open valves. Quite rarely, but it happens when the valves damage the piston itself.
Causes of timing belt breakage
- wear of the belt itself or its poor quality (shaft gears have sharp edges or oil from the seals).
- crankshaft jams.
- pump jams (the most common phenomenon).
- Several or one camshaft is jammed (for example, due to one of them becoming unusable - however, the consequences here are slightly different).
- The tension roller unscrews or the rollers jam (the belt becomes loose or overtightened).
Modern engines, since they are more powerful compared to their predecessors, have much lower survivability. If we consider the cause based on the valves, this problem arises due to the small distance between them and the piston. That is, if at the moment the piston arrives the valve is slightly open, then it immediately bends. Since for greater compression and contraction in the bottom of the piston there is no groove under the valve of the required depth.
What else can be changed together with the timing drive?
In the process of replacing the timing belt on a Mitsubishi Lancer 9 1.6, you have access to a number of other consumables and components, which allows you to change them at the same time, rather than dividing the work into two separate stages.
So, while servicing the timing drive, you can simultaneously replace:
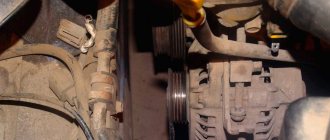
- cooling system pump;
- drive belts for engine attachments (generator, power steering);
- crankshaft and camshaft oil seals;
- crankshaft sensor (if necessary).
But these elements can be replaced every second time when replacing the timing belt. That is, we install only a new timing belt and pulley once, and at the next replacement we also install the above-mentioned spare parts, and this is every 140 - 180 thousand km. mileage
The situation with the selection of attachment belts is the same as with the timing drive - there are both original consumables and their analogues.
Original consumables should be looked for by the following indices - Mitsubishi MD375935 (power steering) and MN183019 (generator).
As for analogues, for replacement you can purchase belts from two companies - Mitsuboshi (5PK1065 - power steering, 5PK905 - generator), and Gates (5PK1063 - power steering, 5PK903 - generator).
The main causes of breakage: how to avoid it
One of the frequently asked questions regarding the timing belt is why it breaks. This includes:
- wear and tear directly due to long-term use or poor quality of the product;
- the pump or rollers are jammed;
- a breakdown occurred and the camshaft “caught” a wedge;
- The crankshaft is jammed.
The best way to solve a problem is not to create a problem for yourself, so we recommend that you familiarize yourself with the basic rules that will help you avoid such a breakdown:
- The belt must be replaced on time (every 40-50 thousand kilometers);
- regularly check the seals for leaks;
- if you are replacing timing components, use only high-quality parts;
- check the belt tension. Its slippage can also cause damage to valves and cylinders;
- check the integrity of the water pump and rollers.
These tips will help you avoid the problems described above.
Tools
Replacing the timing belt on a 9th generation Mitsubishi Lancer with a 1.6 liter engine is an operation of average complexity, but it can be done in a garage.
To carry it out, you don’t need any special tools or devices; it’s enough to have:
- A set of open-end wrenches (required - 10, 12, 19);
- Set of heads and cranks with ratchet mechanism;
- Pliers;
- Rags;
- Marker (crayon);
- Jack;
- Time and patience.
To carry out the work, it is not necessary to have an inspection hole; everything can be done by placing the car on a flat area with a hard surface. It is also better to perform the replacement with an assistant:
About the car
The Mitsubishi Lancer 9 first rolled off the assembly line in 1973. At first there were 12 modifications with engine capacities from 1.2 to 1.6 liters. In the 70s, Lancer 9 was produced with a coupe body. Then the car began to be produced with four doors and engines of 1.6 and 1.8 liters.
Lancer 9 is the ninth generation and, under an agreement with Mitsubishi, it was produced in our country from 2007 to 2015. Over 8 years, 145 thousand copies of the model were sold in our country at a price starting at 760 thousand rubles.
The car is equipped with two versions of 16 valve engines:
- SOHC - one camshaft with valves is used (engines 4G13,4G18);
- DOHC - two camshafts are used (4G63 engine).
Work technology
Algorithm of actions:
- Remove the power steering drive belt. To do this, loosen 3 fastening bolts (you can get to two of them through the technological holes in the pulley), and then unscrew the adjusting bolt, after which the power steering pump will move, which will allow you to remove the belt;
- Jack up the front of the car on the right side (in the direction of travel), remove the wheel;
- Remove the protective cover on the fender liner to gain access to the crankshaft pulley;
- We dismantle the generator drive. Loosen the bolt securing the unit to the engine (located at the bottom of the generator) and the adjusting bolt lock. Then unscrew the adjusting bolt a little and remove it from the bracket. We feed the generator towards the engine and remove the belt;
- Unscrew the bolt securing the pulley to the pump and remove it;
- We dismantle the crankshaft pulley. To do this, ask the assistant to turn on the 5th gear at the gearbox and hold down the brake pedal, thus stopping the engine, which will allow you to tear off the pulley mounting bolt;
- Unscrew the 3 mounting bolts of the upper protective cover of the timing drive and remove it;
- We dismantle the lower timing cover by unscrewing its 5 fasteners;
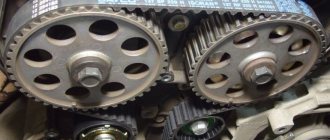
- We set marks on the crankshaft and timing belt. To do this, turn on the 5th speed at the gearbox, put the wheel on the hub, and turning it, align the marks with the special ridges on the engine. We make sure that the marks on the knees and camshafts coincide with the sagging marks;
- Using pliers, remove the end of the roller tension spring from the groove and remove it. We unscrew the bolt securing the roller and dismantle it. After this, turning the crankshafts and timing gear is strictly prohibited, so as not to displace the marks;
- We install a stop (a wooden beam of suitable height) under the power unit;
- Unscrew the motor mount (mount). Moreover, you should unscrew its fasteners both to the body and to the engine. Remove the support;
- We unscrew the bolts of the jumper installed between the landing pad of the engine support and the power steering pump. Don’t forget to lubricate the contacts with graphite grease;
- Remove the timing belt;
- Install a new roller and secure it with a bolt;
- We put on a new belt, correctly placing it behind the roller;
- Install the tension spring.
After this, we check that the marks match correctly. To do this, after installing the new belt and tensioning it with a roller, turn on 5th gear again and install the wheel.
When turning the wheel, we make two revolutions of the crankshaft, align it with the mark and see if it coincides with the influx on the camshaft.
You can turn the gear off with the key.
If the location of the marks is not violated, we assemble the power unit in the reverse order. For convenience and correct assembly, it is advisable to mark some elements and parts with a marker or chalk during disassembly.
Specifications
The 4a91 engine unit is one of three representatives of the 4a engine line. The volume of its working cylinders is 1499 cubic centimeters. Depending on the vehicle on which the 4a9 is installed, it is capable of developing power from 102 to 109 hp. The approximate lifespan of the engine, which it can cover without major repairs, ranges from 80,000 to 150,000 km, depending on the loads on the engine and the quality of the lubricants and fuel fluids used. Its operation is based on the DOHC system. Engines with this system have two camshafts, 4 cylinders, and 16 valves.
The location of the camshaft is on top of each row of intake and exhaust valves. This engine has no rocker arms, rods or rockers. To significantly reduce loads and better combustion of the fuel-air mixture attributable to the springs, these engines install four lightweight valves per cylinder, instead of two, heavier valves. This also led to the fact that, thanks to two valves with a small diameter at the inlet, 50% more fuel enters the cylinder than through one valve of a larger diameter.
It also contains a system that allows you to change the phases of gas distribution. Engines with this mechanism have higher economic indicators and efficiency compared to other naturally-aspirated engines of the previous generation. The power unit number is located on the surface of the front part of the cylinder block, near the location of the hydraulic power steering pump.
An alternative method for unscrewing the crankshaft pulley
One of the most difficult moments when disassembling an engine is unscrewing the crankshaft pulley fasteners. This bolt often “sticks” and is difficult to remove, and it is not always possible to do this by blocking the engine with the gearbox and brakes.
As an alternative to the above method of breaking the bolt, you can use a starter (although it is not advisable).
The technology for its implementation is as follows:
- Disconnect the wires from the ignition coils and injectors (so that the engine does not start while unscrewing the bolt);
- We put a long key on the bolt and, turning the crankshaft, bring the key so that it rests on the suspension arms or the ground;
- We get into the car and briefly (no more than 1 second) turn on the starter;
- After each switch-on, we check whether the bolt has been removed.
The power of the starter with a well-charged battery is quite enough to break the pulley bolt. But this method should be used only as a last resort if other methods have not brought results.
But the timing belt can break prematurely. Any signs of replacement?
Yes, this can happen. For example, due to non-compliance with basic operating requirements: ingress of technical fluids, errors when installing the timing belt (misalignment, overtightening, incorrect installation of marks) or the use of low-quality parts. In addition, the belt can break due to faulty rollers and a jammed crankshaft, camshaft or pump. The latter is the most common, which is why it is recommended to change it along with the belt.
Signs such as unstable engine operation, for example, may indicate that a belt replacement is approaching. Also, do not neglect a simple visual inspection, which will help identify belt defects - delamination, protruding threads, tooth wear, large cracks and traces of oil on the surface. In such cases, delaying replacement is dangerous.
At the same time, if you find very tiny cracks that are barely visible to the eye, you shouldn’t worry too much, unless it’s a new acquisition. The timing belt is not so flimsy, since it consists of dense rubber with metallized elements that allow it to withstand the workload of all these declared thousands of kilometers. But yes, this is the first sign and over time the cracks will grow, becoming the basis for concern.
List of works during maintenance 1 (mileage 24 thousand km.)
- Changing the engine oil. Filling volume including engine filter. 1.5l - 4.2 liters, for dv. 2.0l is 4.3 liters. Price per 1l canister. Mobil 5W40 Super 3000 X1 - $7 (150012), cost of a 4 liter canister. — $27 (150013). You will also need an O-ring for the drain plug - $0.5 (MD050317).
- Replacing the oil filter. for 1.5l. price - $7 (MR984204), for 2.0 price - $7 (MD322508).
- Replacing the cabin filter. The price for an original carbon filter is $10 (7803A005).
- Checks during maintenance 1 and all subsequent ones:
- auxiliary drive belt;
- crankcase ventilation systems;
- hoses and connections of the cooling system;
- coolant;
- exhaust system;
- fuel lines and connections;
- covers for joints of different angular velocities;
- checking the technical condition of front suspension parts;
- checking the technical condition of rear suspension parts;
- tightening the threaded connections securing the chassis to the body;
- condition of tires and air pressure in them;
- wheel alignment angles;
- steering gear;
- power steering system;
- checking the free play (play) of the steering wheel;
- hydraulic brake pipelines and their connections;
- pads, discs and drums of wheel brake mechanisms;
- parking brake;
- air conditioner refrigerant
- brake fluid;
- accumulator battery;
- spark plug;
- headlight adjustment;
- locks, hinges, hood latch, lubrication of body fittings;
- cleaning drainage holes;
Mitsubishi Pajero timing mechanism drive
- Repair manuals
- Repair manual for Mitsubishi Pajero 1982-1998.
- Timing mechanism drive
3.5.9. Timing mechanism drive
Camshaft drive and high pressure fuel pump parts
| 1. Crankshaft pulley bolt 2. Special washer 3. Crankshaft pulley 4. Upper timing belt guard 5. Lower timing belt guard 6. Plug 7. Flange 8. Timing belt tension roller 9. Spacer 10. Spring toothed belt tensioner | 11. Toothed belt 12. Camshaft timing pulley 13. High pressure fuel pump timing belt pulley 14. Crankshaft timing pulley A = 80–90 Nm B = 22–30 Nm C = 170–190 Nm D = 65–75 Nm |
Lower timing belt drive parts
| 1. Flange 2. Spacer washer 3. Spacer 4. Toothed belt tensioner spring 5. Toothed belt tension roller 6. Lower toothed belt 7. Right compensating shaft drive gear | 8. Drive gear of the left compensation shaft 9. Spacer bushing 10. Crankshaft toothed pulley 11. Bolt, 34–60 Nm 12. Bolt, 34–40 Nm 13. Nut, 22–30 Nm |
Applying the lower timing belt (belt “B”)
| 1. Mark on the compensation shaft 2. Toothed belt tension roller | 3. Marks on the crankshaft timing pulley and on the compensation shaft 4. Toothed belt “B” 5. Crankshaft timing pulley |
Installing the timing belt tensioner
| 1, 2. Bolts |
To the tension of the timing belt
| 1. Belt tension side 2. Camshaft timing pulley 3. High pressure fuel pump drive gear 4. Timing belt tension roller 5. Belt tension side 6. Crankshaft timing pulley |
The figures below show the drive on a motor without compensation shafts. In the following description, the timing belt for driving the compensation shafts will be called the “B” belt. When describing, the starting point is that all timing drive parts have been removed and must be installed.
How to determine timing belt wear and when to change it?
Every driver should know that under no circumstances should the belt break. In this case, there will definitely be a meeting of the valves with the pistons, and this is a major overhaul, and therefore capital expenditure. Once a year it is necessary to carry out diagnostics of the timing belt assembly in general and the belt drive itself in particular. Periodic inspection will help identify defects at an early stage. The belt simply needs to be replaced if the following defects are present:
- the belt begins to crack;
- teeth show signs of wear;
- the ends are damp;
- the material has delaminated;
- Oil stains are visible on the surface of the belt.
It will be useful: Alarm scher-khan magicar (Sherkhan magicar): operating instructions and autostart In these cases, replacing the belt becomes a necessity
I would like to draw your attention to the presence of oil stains on the surface. This indicates that the seals also need to be replaced, since if this is not done, they will leak oil and it will drip onto the new drive.
And this will certainly lead to its premature destruction, since rubber is afraid of oil.
Someone turns to specialists to replace a belt, and they carry out professional repairs for a fee. Here we will talk about replacing the belt drive yourself. This option is most suitable for those who want to learn how to understand their car and not overpay for its repair. During the repair process, we will be required to disassemble the unit and then reassemble everything exactly. Some car enthusiasts install the crankshaft relative to the camshaft. If during the repair process they stand firm and do not move, this will mean that everything was done correctly. Many people do exactly this, but professionals do it differently: they install the shafts according to the marks they make. This way you can more accurately ensure that the crankshaft is installed correctly in relation to the camshaft.
If you install a belt with a slight misalignment of a couple of teeth, this will cause the engine to run unstably. A large displacement is not allowed at all, as this will lead to the pistons meeting the valves, and this will cause a major overhaul. Experts recommend replacing both the pump and the tension roller along with the belt. It is impossible to say for sure that the pump will have to be changed. The fact is that it is designed for 180,000 kilometers, that is, it can last twice as long as a belt drive. You don't need any special skills to do this job. You will only need to follow the instructions exactly and dismantle and install the parts in a certain sequence.
Motor reliability
This unit does not have very good reliability indicators and requires special attention during the entire period of operation. Even cars that have just rolled off the production line are sometimes characterized by increased oil consumption in large quantities. Violation of regulated maintenance is guaranteed to lead to increased wear of the cylinder-piston group and other elements. In the future, this will lead to the following consequences: the appearance of oil in the spark plug wells, the piston rings may become stuck, and the connecting rod bearings and main bearings may rotate, since the engine oil is not distributed correctly due to wear of the cylinder-piston group.
The designers installed a chain in the gas distribution mechanism. This is a good solution because it gives greater reliability to the engine. The removal and installation of the timing chain must be carried out by highly qualified specialists, since incorrect installation of the chain can lead to serious problems, even to the point of requiring expensive engine repairs.
Which product is better to supply?
In conclusion of the article, we note the most popular and reliable parts of the timing system that may need to be replaced. Only by choosing and purchasing high-quality spare parts for Lancer 9 can you guarantee long and reliable service for the car.
| Product, name | Name, catalog numbers |
| Original timing belts | Mitsubishi MD342154 and Mitsubishi 1145A051 |
| Analogs of belts | Gates 5535XS, Contitech CT1008 and SUN A343YU100 |
| Timing belt tensioner roller, original | Mitsubishi MD356509 |
| Analogs of rollers | NTN JPU 57-008 A-4, NTN NEP57008A6 and SUN A343YU100 |
| Original power steering belt (analogue) | Mitsubishi MD375935 (Gates 5PK 1063) |
| Original alternator belt (analogue) | Mitsubishi MN183019 (Gates 5PK903) |
Mitsubishi Lancer 9 timing kit
All the above parts are of very high quality and are used in almost all official Mitsubishi services in Russia and the CIS countries. They are guaranteed to ensure long and reliable service of the car engine. In general, replacing the timing belt of a Mitsubishi Lancer 9 is a simple task, but it does require some preparation and knowledge.
Source
Design features and purpose
The gas distribution mechanism controls the supply of fuel to the cylinders.
Its operation is impossible without a drive. Modern manufacturers produce systems with chain and belt drives. Many cars have a belt. This product is a closed rubber belt with special teeth on the inside. It passes through several pulleys, but its main purpose is to synchronize the rotation of the camshaft and crankshaft. The use of rubber makes the operation of such a belt almost silent. The high elasticity of rubber can lead to its most unpleasant consequences. If you find the slightest defect, you should urgently change the timing belt.