Without a working lubrication system, no car will last long. Its most important element is the oil pump, which provides full pressure in the system. However, it also does not last forever, and in case of failure it must be replaced. You can solve the problem even without contacting the service, but you will have to spend a lot of time. Today we’ll talk about why the oil pump fails on a Priora and how to change it if it fails.
Purpose of the oil pump: what if the unit fails
One of the frequent procedures performed by car owners is changing the engine oil. However, few people wondered how it circulates inside, thanks to which the process of lubricating engine parts, removing heat and contaminants, and protecting the surface of metal elements from corrosion is realized.
This process is responsible for a small but very important part called the oil pump. With its help, engine oil is pumped from the sump to all working components of the internal combustion engine. The device works immediately after starting the engine, and in addition to the function of supplying oil, it also performs another very important task - creating pressure in the system. A decrease in engine oil pressure is indicated by the corresponding indicator (oil can) on the instrument panel, which every car has.
The reasons for a decrease in oil pressure in the system may be the following factors:
- reducing the engine oil level;
- oil pressure sensor malfunction;
- reduction in oil pump performance. It is interpreted in this form, since the oil pump is one of those mechanisms that extremely rarely completely fails.
If the oil pump fails, the driver will be immediately informed about this. The “oil can” will light up on the panel, so further driving of the car is unacceptable until the cause is identified and eliminated accordingly. The first thing to do is check the oil level. If everything is fine with it, then you can check the oil pump.
You can verify the serviceability of the oil pump on the road by unscrewing the plug from the oil filler neck. The check must be performed with the engine running. If oil jumps out of the neck, and when you try to cover the hole with your hand, it is attracted, then everything is fine with the oil pump. You should make sure that the oil pressure sensor on the Priora is working properly. The reasons for the glow of the oil can indicator on the instrument panel may also be the following factors:
- using oil of inappropriate viscosity;
- malfunction of the pressure relief valve (on the oil pump), which does not maintain oil pressure;
- large gap between the bearing shells and the crankshaft journals;
- oil filter malfunction;
- If the oil has not been changed for a long time, it begins to thicken, which leads to serious problems in the engine.
If the oil pump on the car is faulty and you continue to drive, then the consequences for the engine will be fatal. The car will not travel even a few kilometers before the engine jams. That is why we should not neglect breakdowns of such important and critical units, which, although they very rarely fail, can happen at any time.
Interesting! The service life of the oil pump is on average 120 thousand km. However, with such mileage on the car, you should not immediately change the product. It is replaced only if direct signs of malfunction are detected. They are discussed in the material below.
Lada Priora Hatchback 2009, 98 l. With. - spare parts
Cars for sale
Lada Priora, 2016
Lada Priora, 2016
Lada Priora, 2012
Lada Priora, 2007
Comments 32
Mannol is “tested”, God forbid you pour such oil into the engine, Mannol is produced in Germany? Then I'm a millionaire. The proven Shell is better.
Tell me, how did you find out that the problem was in the distributors? I bought a car with a mileage of 100 tons, with a converted ShPG at 124, and at first I didn’t notice the problem with oil pressure, my light doesn’t come on at idle, but with small drawdowns, it blinks actively, the mechanical pressure gauge shows 0.4-0.5 b when hot, this is very not enough (I’m wondering where to start, how could I have driven 40 thousand with such pressure, the hydraulics are silent. I’ll say right away, changing the oil, filter, sensor did not lead to anything. So I’m thinking maybe this is just my case? Because the old owner mentioned that there were “evil” shafts... And it is not known what was stuck in when the drain was returned.
That's exactly how it was discovered - at random. First the sensor, then I tried different oils (with a filter of course), then the oil pump, and then we got to the camshafts.
As I understand it, there was a problem with the distributors? Is everything right? I've encountered the same problem and am looking for a solution with minimal cost...
That's right, in the camshafts. I’ve only gotten around to them so far, but I haven’t changed them.
Sorry, I didn’t know all the intricacies of your business! It’s just that the reason for this “illness” was the pressure sensor and I changed it. Good luck in solving the problem!
Based on your symptoms, it sounds like the oil pressure sensor needs to be replaced! Let them inspect it at the service station - if it’s all covered in oil, then it’s 100%!
I understand that you sincerely want to help, but the fact is that this problem was solved more than three years ago and replacing the oil pressure sensor did not help, the problem was the wear of the camshafts. And then go to the service station to unscrew the sensor, when this can be done just in the yard. In any case, thanks for participating
Source
What type of oil pump is installed on Priors
There are two main types of oil pumps used on cars today. They are called rotary and gear. Priora uses rotor-type products. In addition, you should also be aware that rotary pumps are adjustable and non-adjustable. Adjustable devices change their performance, which is necessary to achieve the optimal level of oil pressure in the system.
Priora is equipped with unregulated oil pumps, in which the function of changing oil pressure is assigned directly to a structural element such as a pressure reducing valve.
This part of the mechanism works as follows:
- when the engine operates at medium speed, the pump pumps oil, creating optimal pressure;
- When the engine speed increases, the oil pressure increases, and to prevent unpleasant consequences from occurring, a pressure reducing valve comes into operation and relieves excess pressure. The oil simply returns back to the crankcase through the opening channel.
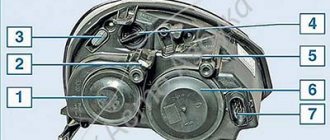
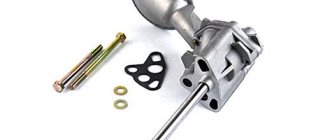
The operating principle of a rotary pump is quite simple. Inside there are two flat gears, one of which is located inside the other. The products engage with each other during engine operation, thereby ensuring oil pumping. Below is a diagram of the Priora oil pump design with the designation of the component parts and their articles (serial numbers).
Diagram of the Priora oil pump
Name and article numbers of the components of the Priora oil pump
The inner gear is connected to the shaft and is the drive gear. Entering the grooves that are inside the outer gear, oil is pumped.
Below is the design and description of the Priora oil pump.
Interesting! If the oil pump on a car fails, this is often due to a jammed pressure relief valve.
What kind of oil to pour into the engine
There are no difficulties with choosing the oil and filter elements used.
This engine is not so critical to the quality of consumables, so the car owner can purchase inexpensive semi-synthetic Russian oil, which is recommended by this automaker. If we talk about what kind of oil to pour into Priora, then most car owners purchase Lukoil lubricant, which in terms of its viscosity should correspond to the climatic region where the car is operated.
You will also need to purchase an oil filter for this job. It is best to buy it original in the appropriate stores, since its cost today is not too high.
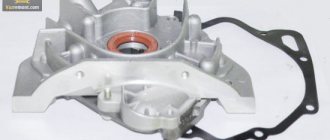
Where is the oil pump installed on Priora
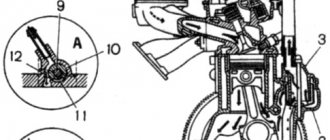
As on most cars, on the Priora the oil pump is located at the bottom of the engine on the timing side. The mechanism is attached to the cylinder block. The drive or internal gear of the device is mounted on the front end of the crankshaft. The photo below shows a view of the location of the oil pump on the Priora (view from the right wheel arch).
This location of the oil pump on the car is not accidental. After all, it sucks engine oil from the crankcase and supplies it to the top of the engine. Due to this placement of the device, the process of dismantling it is quite labor-intensive. However, if there is any suspicion of a product malfunction, it must be dismantled and a detailed analysis carried out to determine its suitability for further use.
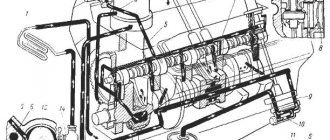
Diagram of some important engine parts
Name and article numbers of the Priora oil pump (1 part)
Name and article numbers of the Priora oil pump (part 2)
Above is a diagram of the location of the oil pump in the engine structure with the designation of its component elements.
Other VAZ cars
Let's look at how to check the oil level on VAZ series cars using the example of the VAZ 2112 and Lada Priora 16 valves.
Level measurements on these vehicles are carried out only on a warm engine. The probes here have a special appearance - a corrugated area with marks along the edges without letters.
Therefore, if the engine is cold, you will have to start it and warm it up until the fan turns on.
Then turn off the engine, wait 3-5 minutes until the oil drains into the crankcase and take measurements, see the algorithm above.
Since the dipstick itself between the marks has a corrugated shape, this causes a problem for many drivers.
Everything is simple here - the working fluid must be in the grooved zone, then the level is considered normal. But where this place should be, opinions differ.
Experienced drivers recommend proceeding from the operating conditions of the vehicle.
If the VAZ 2112 and Lada Priora are operated under normal conditions on flat terrain, then it is considered normal if the oil level is in the middle in the corrugated zone.
If cars are driven on moderately rough terrain, then the normal level may be 2/3 from the bottom mark in the corrugated zone, and if in mountainous terrain, then 3/4.
Also, many experienced car owners rely on the number of engine revolutions.
POPULAR WITH READERS: How to make an antifreeze with your own hands
If during driving the number of crankshaft revolutions does not exceed 3000 rpm, then the oil level can be kept in the middle, if more than 4000 - at 3/4 of the lower mark. Filling 1 liter means raising the level from the lower to the upper marks.
The main types of malfunctions of oil pumps on Priora: methods for identifying breakdowns
Priora oil pumps have a fairly long service life, but when the vehicle's mileage exceeds 120 thousand, malfunctions may occur. What is a common cause of device breakdowns, we will find out further.
First of all, it should be noted that the service life of the product depends on the quality of the motor oils used, as well as the frequency of their replacement along with the filter. Possible types of breakdowns include the following:
- Gear wear
. During operation, they are depleted, resulting in reduced productivity. However, due to the constant lubrication of parts, the wear process is so insignificant that the product rarely needs to be replaced. - Failure of the pressure reducing valve.
Happens much more often than gear wear. The mechanism consists of a spring of a certain stiffness and a valve that opens when the pressure in the system increases. Over time, the spring stiffness changes, so even at low speeds, the pressure in the system will decrease. The valve itself may show signs of wear in the form of scoring and chipping, so the element should be replaced if unsuitable. - Oil receiver filter mesh is dirty
. The reasons for grid contamination are varied. This includes the quality of the oil, the presence of deposits in the engine in the form of carbon deposits, irregular changes of oil and filter, and many other factors. In any case, a contaminated element results in the pump not operating at full capacity, and also with additional load. The problem can be solved by cleaning the oil receiver mesh. - Reduced tightness of the connection between the oil receiver and the oil pump.
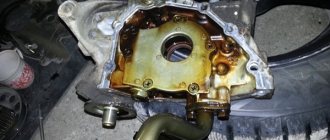
This happens because over time the rubber o-ring gets compressed. To eliminate the problem, you need to replace the rubber ring. The photo below shows what a faulty rubber seal on the oil pickup tube looks like. - Loss of seal between pump and engine block
. Determined by the presence of an oil leak. Occurs due to deformation of the sealing gasket between the engine block and the product body. The problem is solved by replacing the gasket. Some car owners resort to using sealant, but it is better to find a gasket and replace it. The material contains its original code. If a sealant is used, then it is better to use products that are chemically resistant, and they are not squeezed out when connecting parts and do not get inside the body of the working unit. - Loss of tightness between the pump cover and the housing. During operation of the mechanism, the tightness of the connection between two components: the body and the cover is broken. This happens due to production. As a result, the performance of the mechanism decreases. In this case, the device must be replaced. However, you can try to solve this problem by applying a sealant, as shown in the photo below.
Sometimes malfunctions such as damage to the oil pump cover may also occur, which often occurs due to mechanical stress on the cover. In any case, the faulty part should be repaired or replaced. Actually, we will pay special attention to this process and find out how to properly remove the oil pump on a Priora.
Lada Priora Hatchback 2009, 98 l. With. - spare parts
Cars for sale
Lada Priora, 2016
Lada Priora, 2016
Lada Priora, 2012
Lada Priora, 2007
Comments 32
Mannol is “tested”, God forbid you pour such oil into the engine, Mannol is produced in Germany? Then I'm a millionaire. The proven Shell is better.
Tell me, how did you find out that the problem was in the distributors? I bought a car with a mileage of 100 tons, with a converted ShPG at 124, and at first I didn’t notice the problem with oil pressure, my light doesn’t come on at idle, but with small drawdowns, it blinks actively, the mechanical pressure gauge shows 0.4-0.5 b when hot, this is very not enough (I’m wondering where to start, how could I have driven 40 thousand with such pressure, the hydraulics are silent. I’ll say right away, changing the oil, filter, sensor did not lead to anything. So I’m thinking maybe this is just my case? Because the old owner mentioned that there were “evil” shafts... And it is not known what was stuck in when the drain was returned.
That's exactly how it was discovered - at random. First the sensor, then I tried different oils (with a filter of course), then the oil pump, and then we got to the camshafts.
As I understand it, there was a problem with the distributors? Is everything right? I've encountered the same problem and am looking for a solution with minimal cost...
That's right, in the camshafts. I’ve only gotten around to them so far, but I haven’t changed them.
Sorry, I didn’t know all the intricacies of your business! It’s just that the reason for this “illness” was the pressure sensor and I changed it. Good luck in solving the problem!
Based on your symptoms, it sounds like the oil pressure sensor needs to be replaced! Let them inspect it at the service station - if it’s all covered in oil, then it’s 100%!
I understand that you sincerely want to help, but the fact is that this problem was solved more than three years ago and replacing the oil pressure sensor did not help, the problem was the wear of the camshafts. And then go to the service station to unscrew the sensor, when this can be done just in the yard. In any case, thanks for participating
When to remove the oil pump on a Priora and how to check it without having to remove it
The need to remove the oil pump on a Priora arises if it is suspected of being faulty. In addition, the following signs may be a reason for its dismantling:
- to check tightness;
- to replace the oil pump gasket;
- damage to the cover due to mechanical impact;
- damage to the crankshaft sensor mounting;
- Diagnostics of the pressure reducing valve.
The reason for checking the oil pump and oil receiver on a Priora may be expansion joints that begin to bother the owner. If the products begin to knock when cold, but the sound disappears when the engine warms up, then one of the reasons for such consequences may be the oil pump. If its performance decreases, then oil will flow to the compensators late and in insufficient quantities, which means they will knock when the engine is running cold. As soon as the engine warms up and the channels expand, the situation is corrected.
Interesting! One of the most reliable ways to check the serviceability of the oil pump is to connect a pressure gauge to measure the pressure in the system. The pressure gauge is screwed in instead of the pressure sensor, after which the engine starts. At idle, the oil pressure in the system should be at 1 atmosphere. At rpm the value should not exceed 4.5-5 atmospheres. Based on the measured values, we can conclude that the oil pump is working properly.
How to remove the oil pump on a Priora for repair or replacement
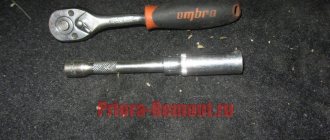
The process of removing the oil pump on a Priora takes relatively little time. This process is quite labor-intensive, but it is quite possible to do it yourself. Before starting the relevant manipulations, it is recommended to prepare the necessary tools and relevant materials. The tools you will need are a puller for dismantling the crankshaft gear and a Torx-E8 socket, and the materials and spare parts you will need are:
- new oil and filter, as the old one will need to be drained. Of course, if the oil has recently been changed, then it is not necessary to change it at all, but to do this you will need to drain it into a clean container;
- alternator drive belt, which is recommended to be replaced if removed. How to do this correctly is described in detail here;
- tray gasket. Its article number is 21080-1009070-00;
- gasket for oil pump. Its original number is 21080-1011065-10;
- crankshaft oil seal (if necessary).
After preparing all the necessary materials, you can begin to work. Traditionally, below are instructions for removing the oil pump on a Priora 16 valves from the manufacturer.
Naturally, such instructions are not at all enough to remove the oil pump on a Priora, so we will consider this process in order with a detailed description and photo. We start with the fact that the car needs to be installed on the inspection hole. In the process, you will need to remove the engine sump, and it is almost impossible to do this without a pit.
After this, the engine protection, if any, is dismantled, the car is also jacked up on the right side, and the front wheel is removed. After this, you need to remove the generator belt, and then unscrew the bolts securing the upper and lower timing belt protective covers (using a hexagon at “5”).
After this, we move on to a detailed examination of the process of removing the oil pump on a Priora.
- The first step is to remove the crankshaft pulley. To implement the process, you will need a wrench, a “17” socket and an extension (to allow for greater force). On the car, you need to engage fifth gear, ask an assistant to press the brake pedal, and hold it until the second person unscrews the crankshaft pulley mounting bolt. If the bolt cannot be unscrewed, then you can preheat it with a gas burner.
- After this, remove the pulley. Now you need to remove the timing belt. There is no need to completely dismantle it, but only remove it from the crankshaft gear. To do this, marks are initially placed on the crankshaft toothed pulley with a mark on the oil pump. It is set by turning the crankshaft gear. We also put a mark on the support washer to install it with the same side.
- Remove the support washer.
- It is necessary to additionally tighten the belt on the camshaft gears so that it does not move.
- Relax the belt tension. To do this, use a 15mm wrench to loosen the tensioner pulley bolt.
- Remove the belt from the crankshaft gear after its tension has been released.
- Remove the crankshaft position sensor. To do this you will need a key set to “10”. The plug is first disconnected.
- Now you need to remove the crankshaft gear. A special key will help with this.
- If such a tool is not available, then, as indicated in the instructions from Auto-VAZ, you can do this using a screwdriver. Carefully pry it up and pull out the pulley without changing the position of the crankshaft. In practice, of course, it is simply impossible to remove the pulley with a screwdriver, so it is still better to use a special tool.
- After this, we go to the lower part of the car and first drain the engine oil.
- If you plan to change the oil, then do not forget to unscrew the oil filter to replace it. Don’t forget to return the plug back to the pan after draining the oil.
- Using a 10mm wrench, unscrew the 16 bolts securing the pan cover.
- After this, carefully pry the pan with a screwdriver or go around the perimeter with a knife to separate it from the engine block. We remove the pallet.
- The tray must be thoroughly cleaned.
- Now we remove the oil receiver. To do this, you will need an “8” key, which is used to unscrew the two bolts that secure the device to the cover of the second main bearing of the crankshaft.
- And one bolt that secures the oil receiver to the pump.
- Below are instructions for removing the oil receiver on a Priora.
- We remove the oil receiver and check the seal.
- Now all that remains is to dismantle the oil pump. To do this, unscrew 6 bolts from the right wheel using a “10” key. However, it is important to note here that on the first Priors the pump was fastened using 10-key bolts; on all subsequent ones they began to use bolts with a Torx-E8 head. Below is the location of the oil pump mounting bolts on the Priora.
- We unscrew them.
- There is a gasket between the pump and the block, so to remove the pump, it must be carefully pryed off and dismantled.
This completes the dismantling process. All that remains is to perform the necessary manipulations with the removed pump, that is, check it, eliminate defects if possible, or simply replace it. Installation is carried out in the reverse order of removal. At the end, be sure to set the required tension of the timing belt and generator. You can read more about this in the relevant articles on our website.
Interesting! Before assembly, do not forget to thoroughly clean the oil receiver mesh using gasoline, kerosene or solvent.
It is important to note some nuances during the assembly process. When screwing some fasteners, it is necessary to adjust their tightening force. To do this you will need a torque wrench. Please pay attention to the following fasteners:
- the sump or oil sump mounting bolts are screwed in with a force of 5.2 to 8.2 Nm;
- crankshaft pulley mounting bolt - 97.9-108.8 Nm;
- bolts securing the oil receiver to the main bearing cover - 8.3-10.3 Nm;
- bolt securing the oil receiver to the pump - 6.9-8.2 Nm;
- oil pump housing mounting bolts - 7.2-9.2 Nm;
- oil pump mounting bolts - 8.3-10.3 Rm;
- oil pump pressure reducing valve plug - 45.5-73.5 Nm.
This completes the process of removing and replacing the oil pump on the Priora. We make sure that the new mechanism functions properly.
Features of disassembling the oil pump for inspection and repair
The photo below shows instructions on how to disassemble and reassemble the Priora oil pump. This process will be needed if it is necessary to check the parts of the device and replace them.
More details on how to disassemble the Priora oil pump, check it for suitability, as well as assemble and upgrade it will be described in detail in another material. You can find it on our website using the search or site map.
In conclusion, it should be noted that you should not put off checking, repairing or replacing the oil pump on a Priora. This material examined the signs of a device malfunction (both direct and indirect), its design features, purpose, and most importantly, how removal and replacement are performed. Using the instructions, you can perform the dismantling procedure yourself without the need to visit a car service center.