The braking system of a car as a whole is one of the most important elements that allows you to protect the driver and passengers from many troubles. For this reason, it is extremely important to maintain it in working order and carry out regular maintenance.
In this article we will talk about how the brake system works on the VAZ-2115 car (injector).
Design features of the brake system
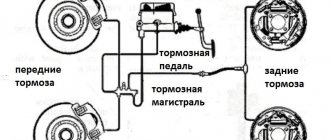
A – flexible hose of the front brake; B – flexible hose of the rear brake; 1 – front wheel brake mechanism; 2 – left front–right rear brake circuit pipeline; 3 – main cylinder for hydraulic brakes; 4 – pipeline of the right front–left rear brake circuit; 5 – master cylinder reservoir; 6 – vacuum booster; 7 – rear wheel brake mechanism; 8 – elastic lever of the pressure regulator drive; 9 – pressure regulator; 10 – pressure regulator drive lever; 11 – brake pedal
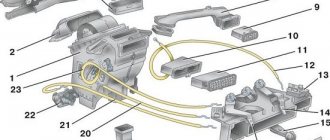
Front wheel brake mechanism: 1 – brake disc; 2 – pad guide; 3 – caliper; 4 – brake pads; 5 – working cylinder; 6 – piston; 7 – sealing ring; 8 – protective cover of the guide pin; 9 – guide pin; 10 – protective casing
Rear wheel brake mechanism: 1 – hub fastening nut; 2 – wheel hub; 3 – lower tension spring of the pads; 4 – brake pad; 5 – guide spring; 6 – working cylinder; 7 – upper tension spring; 8 – expansion bar; 9 – finger of the parking brake drive lever; 10 – parking brake drive lever; 11 – brake shield
Rear wheel brake working cylinder: A – slot on the thrust ring; 1 – block stop; 2 – protective cap; 3 – cylinder body; 4 – piston; 5 – seal; 6 – support plate; 7 – spring; 8 – crackers; 9 – thrust ring; 10 – thrust screw; 11 – fitting
Device
The VAZ-2115 uses a brake system in which the operating circuits are divided diagonally. This can significantly increase the degree of reliability and safety of people. In particular, the first of them controls the operation of the front right and rear left brake mechanisms. If it fails, the second circuit is switched on.
In addition, the hydraulic drive operating diagram also includes:
- vacuum booster;
- a dual-circuit regulator whose task is to maintain pressure in the brakes located behind.
A sensor is installed on the VAZ-2115 that signals a decrease in brake fluid volumes. It's mechanical. In addition, there is also a parking brake system, which, in turn, has a separate drive that blocks the rear axle if necessary.
As can be understood from the diagram, the system in question is quite complex, and from time to time certain breakdowns occur in it.
To understand what kind of problem arose at one time or another requires quite a lot of experience. However, it is not difficult to make the diagnosis yourself if you use the recommendations below.
Relays and fuses VAZ 2114
- F1 for 10 Amps (A) rear fog lights and rear fog light warning lamp.
- F2 for 10 A turn signal lamps, turn signal relay, hazard lights, hazard warning lights.
- F3 7.5 A lamps for interior lighting (both) and trunk, ignition lighting, powertrain control system control lamp, brake lamps, computer, if available.
- F4 20 A carrier, relay and rear window heating element.
- F5 20 A horn and its relay, cooling fan.
- F6 30 A power windows and their relays
- F7 30 A motor for heater, headlight cleaner, windshield washer, cigarette lighter, glove compartment light bulb, rear window heating relay coil.
- F8 7.5 A right fog lamp.
- F9 7.5 A left fog light.
- F10 at 7.5 A left side marker, lamp signaling the inclusion of the side light, lamps for illuminating the sign, engine compartment, illumination of switches and instruments, instrument lighting switch.
- F11 at 7.5 A right side.
- F12 at 7.5 A right low beam.
- F13 at 7.5 A left low beam.
- F14 for 7.5 A left high beam and a light indicating that the high beam headlights are on.
- F15 at 7.5 A right far.
- F16 30 A - a light indicating insufficient oil pressure, brake fluid level, engagement of the parking brake, low battery, instrument cluster, relay for monitoring the health of lamps, indication of control systems, reversing lamps, turn indicators and their relays, as well as an alarm if turning mode is turned on, computer, generator excitation winding is turned on at the moment the engine starts.
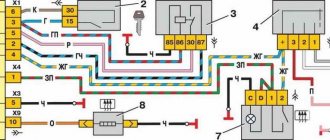
Location of relays and fuses of the new model
- K1 - relay for turning on headlight cleaners;
- K2 - relay-interrupter for direction indicators and hazard warning lights;
- K3 - windshield wiper relay;
- K4 - lamp health monitoring relay;
- K5 - power window relay;
- K6 - relay for turning on sound signals;
- K7 — relay for turning on the heated rear window;
- K8 - headlight high beam relay;
- K9 - relay for low beam headlights;
- F1-F20 - fuses.
Connection diagram of the new type mounting block
- K1 - relay for turning on headlight cleaners;
- K2 - relay-interrupter for direction indicators and hazard warning lights;
- K3 - windshield wiper relay;
- K4 - lamp health monitoring relay;
- K5 - power window relay;
- K6 - relay for turning on sound signals;
- K7 — relay for turning on the heated rear window;
- K8 - headlight high beam relay;
- K9 - relay for low beam headlights;
- F1-F20 - fuses.
The brake pedal has too much travel
In this case, one might suspect that:
- air has entered the hydraulic drive;
- the rear cylinder piston thrust ring lost elasticity, as a result of which it shifted inward;
- Brake fluid has leaked from the system;
- There is too much clearance between the main cylinder piston and the vacuum booster adjusting bolt.
Respectively:
- in the first case, you will need to bleed the system;
- in the 2nd - you will need to completely change the cylinder;
- in the 3rd - eliminate the leak by replacing seals or hoses that have become unusable.
Brake performance is low
The most common reasons for this problem are:
- brake pads are oily;
- pistons jam in wheel cylinders;
- the linings on the blocks have become unusable;
- the brake system mechanisms overheated;
- the pressure regulator was set incorrectly;
- one of the circuits has lost its tightness.
The linings on the brake pads will need to be cleaned using a wire brush, warm water and washing powder.
If the pistons jam, you will have to change the cylinders and bleed the system.
When the linings wear out, they need to be removed and new ones installed.
Overheating of the system is eliminated by immediate shutdown. It will take some time for it to cool completely.
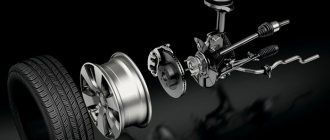
How to replace stabilizer struts on a Chevrolet Aveo
- Stabilizer struts are one of the elements of the Chevrolet Aveo anti-roll bar.
- Their main purpose is to ensure the connection of the main structural elements with the hub or steering knuckle.
- Structurally, the stabilizer strut is a rod with fasteners at both ends.
- The main purpose of the Chevrolet Aveo anti-roll bar, the element of which is the strut, is to minimize the horizontal vibrations of the car, including cornering.
- Symptoms of a malfunction are:
- A knocking sound occurs when driving, especially on bad roads.
- The car pulls to the side, which leads to the need for constant steering.
- The appearance of a noticeable roll of the car when cornering.
- Strong rocking of the car, especially when making sudden starts or braking.
Particular attention must be paid to the hinge and boot used. In most cases, it is the failure of these components that leads to the need to replace the Chevrolet Aveo stabilizer bar. There are two ways to check the condition of the rack:
- Rock the car. To do this, it is enough to apply force to one of the sides, and if the vibration turns out to be excessive, then the problem exists.
- Using the lever, try to influence the rack, first turning the wheel to the side. If play appears, the rack should be replaced.
If a malfunction is detected, it would be more advisable to replace the stabilizer link rather than repair it.
Why the wheel mechanisms are not fully released
Most likely, this malfunction will cause the brake pedal to stick. In this case, you will have to adjust it.
In addition, the disappearance of the gap between the piston in the master cylinder and the vacuum booster adjustment bolt may also be the cause. The problem is eliminated by increasing the lumen.
If fuel or oil gets into the brake fluid, the gaskets in the master cylinder sometimes swell. You will need to flush the entire system with new brake fluid and replace seals that have become unusable.
Braking of one of the wheels is observed when driving
Most often, such a breakdown is caused by the destruction of the tension spring on the rear brake. The damaged one will have to be removed and a new one put in its place.
It is also common for pistons in wheel cylinders to not function properly if dirt has gotten inside or they have begun to rust. Cleaning and rinsing will eliminate the problem.
Sometimes braking occurs due to loosening of the bolts that secure the guide pads directly to the steering knuckle. If they are re-tightened or replaced with new ones, the problem will be eliminated.
And finally, this can happen because the parking brake system has not been adjusted correctly.
Symptoms of a malfunctioning idle speed sensor (IAC)
Unfortunately, the idle air control is not equipped with a self-diagnosis system, so neither the on-board computer (OB) nor the illuminated check engine will tell us about this. But if you encounter the following problems, then the sensor needs to be checked (How to check the IAC?), cleaned (How to clean the IAC?), repaired (How to repair the IAC?) or replaced (How to replace the idle speed sensor?) in case of a malfunction.
- Stalls at idle.
- Idle speed fluctuates.
- When starting a cold engine, there is no increased speed.
- It stalls when the transmission is removed from the gearbox.
In principle, all the symptoms of death of ICH are similar to the symptoms of TPD. But the difference is that if the TPS dies, the on-board computer will show an error or the check engine will light up.
The car skids or pulls to the side when you press the brakes
Most often this happens if the piston in the wheel cylinder is jammed. It will need to be disassembled and cleaned. All detected damaged elements must be replaced with new ones.
In some cases, the problem also occurs if one of the metal pipes in the brake system has been broken or clogged.
Similarly, skidding when braking is caused by oil getting on the following parts of the system: discs, linings, drums. In this case, they need degreasing.
In addition, this may indicate a breakdown of the pressure regulator - repair of this part is not provided, so it is simply replaced with a new one.
And finally, the car skids when braking due to:
- incorrect wheel angles;
- low pressure in one of the tires;
- failure of any of the brake circuits.
How to replace the pads on a VAZ-2115 is described in detail in this video:
Installing new pads
In order to install the stops, it is necessary to place the piston in the area of the brake cylinder.
Here it is important to balance your strength and not overdo it, because this work is hard, requiring not only effort, but also caution, since the part is made of aluminum, which, as is known, is not very strong
The second step is to install the pads in the caliper. The caliper itself is installed in its place and secured with a bolt. Installation of parts is carried out in the reverse order of dismantling.
The job is done, all that remains is to put on the wheel.
For an experienced motorist, replacing pads is not a complicated procedure that takes a little more than fifteen minutes. It is necessary because the pads primarily affect the safety of the car, because they are directly connected to the braking system.
Therefore, you should not neglect this type of repair work; it is better to spend some time in the garage and a certain amount of money on buying new parts than to suffer more serious losses in an accident, which is what worn pads lead to.
We wish you good luck and a bon voyage!
The brake system worked well, but still not perfect. I was especially infuriated by the beating of the pedal when I pressed the brake in the middle, and I wanted to carry out preventative measures: replace the fluid, replace the vacuum seal, bleed it.
I didn’t choose wheels for a long time, I couldn’t financially cope with the transition to R14, so the stock is from Autoreal (cost: 1200 rubles per pair)
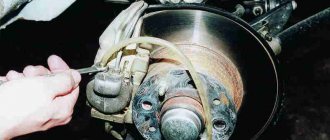
The process of replacing discs is generally simple; all difficulties arise from stuck bolts and the discs themselves to the hub. You can change in one helmet, no assistants are required, if only to save you from boredom.
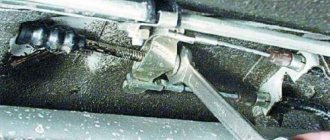
As usual, we place the wheelbarrow on the platform, do not forget to provide a reliable support for the car, so that during the work it does not fall on our heads! We remove the wheel, for easy access to the bolts we turn the caliper towards ourselves. We unscrew the two bolts securing the caliper, move it to the side, securing it or placing it on some kind of support so that it does not hang on the hose.
Then unscrew the caliper bracket from the steering knuckle and remove it, thereby freeing the brake disc.
All that remains is to unscrew the last two studs, and you can begin to knock down the brake disc. This activity is very interesting. Here, depending on your luck, it happens that the discs come off after just a couple of hits, and sometimes you have to suffer because the discs are no longer needed. I hit the work surface, naturally it was all chipped. If the disc is needed, we hit it on the inside of it, using the pointed bit. It is more convenient to perform this procedure from the pit. I cleaned the disk landing area with a metal brush. As you can see in the photo, there is paint and dirt, and WD40 was poured in generously.
Before assembly, I started painting work, I didn’t bother too much, I sanded the discs lightly, but I had to tinker with the calipers and brackets a little longer, I didn’t sand them to perfection. I didn’t want the usual color, I was already pretty tired of red and silver, and since there isn’t much choice in the village, I took the paint: Auto enamel 1K repair, alkyd, Adriatic color 425, I’ve already driven more than 5 thousand km, the paint is spot on))
In order to seat the new disk evenly, I tightened all the wheel mounting bolts and began to gradually tighten it with a cross, the disk sat smoothly, without distortions...
Everything else is in reverse order. And don’t forget to bleed the brakes, this is where you will need an assistant. There are plenty of pumping methods on the Internet and I don’t see the point in describing my own.
The color turned out to be very unusual, some people like it, while others are drawn to red.
And now, after several days of repairs, happy as an elephant, I jump behind the wheel and go to check the brakes, and at the first braking I fell into a stupor! NO BRAKES! (I didn’t brake all the way, but in a smooth, gentle mode, so as not to ruin the disks). At first it seemed to grapple, and then it swam. In shock, I check all connections for leaks - everything is normal. I touched the discs, and they were boiling water, and it was just a couple of smooth stops! I didn't expect this. Go home straight away and let the discs cool. After some time, leaving again - the same thing, but a little better. At this rate I drove 80 kilometers, and each time the brakes grabbed better and got less hot.
https://www.drive2.ru/l/7951803/
https://youtube.com/watch?v=1M8iKMFVM0k
Sources
- https://vaz-russia.ru/remont-vaz-2113/zamena-perednih-tormoznyih-kolodok-na-vaz-2113-vaz-2114-vaz-2115.html
- https://mylada.net/remont/zamena-perednix-tormoznyx-kolodok-na-vaz-2110.html
- https://spike.su/index.php/Replacing-brake-discs-VAZ-2113-2114-2115.html