Numerous owners of Chevrolet Niva SUVs note that most of the problems that arise with the car are related to the chassis. Basically, with frequent off-road travel, jet thrusts suffer. This is quite strange for a car that was created specifically for use in these conditions. However, when operating it in such conditions, you must be prepared for this kind of malfunction or install reinforced parts in advance.
What rods are included in the rear suspension?
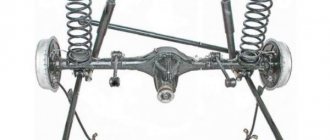
The Chevrolet Niva is equipped with a spring-dependent rear suspension that controls the vibration of the car body.
The beam and the body are connected by 4 longitudinal and 1 transverse reaction rods:
- a cross bar keeps the body from swaying from side to side;
- longitudinal ones are designed to transmit braking and pushing movements.
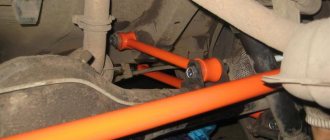
The rods are attached between the body bracket and the beam. The end of each rod is equipped with lugs; silent blocks are built into them, which prevent knocking in the suspension.
The rods differ in length. The longest of them is transverse. The diameter of the hole at the end of the elements is the same. Long rods do not allow the bridge to move, as a result of which the silent blocks do not twist, even if the suspension displacement is the full step of the shock absorber.
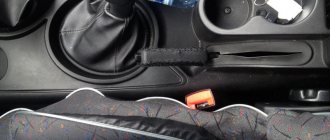
This is interesting: Budget repair of the cigarette lighter ring Chevrolet Lanos 2005 - 2009
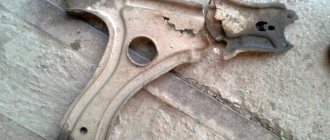
Removing the upper longitudinal rod
Using a 19mm spanner, unscrew the nut of the bolt securing the rod to the rear axle beam, holding the bolt from turning with a wrench of the same size.
We knock out the bolt through a soft metal drift
Using a 19mm spanner, unscrew the nut of the bolt securing the rod to the body spar, holding the bolt from turning with a wrench of the same size
We change the rubber bushings as shown above
Install the rod in reverse order.
Why is there a need for replacement?
The thrust rods themselves are made of high-strength material to withstand high loads that occur during movement and long-term operation of the vehicle. But using only one metal in the manufacture of rods is impossible. At the mounting points, special eyes are made into which silent blocks are installed. They are installed in the rods directly at the factory and secured by welding. Therefore, they are the weak point of the system. If errors were made during manufacturing and microcracks appeared, this could eventually lead to destruction of the product. Therefore, it is important to correct the malfunction in a timely manner and periodically diagnose the car.
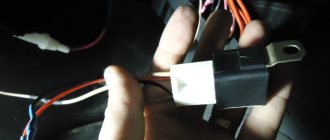
The design also includes rubber bands that protect against dust. If the seals are damaged, the rubber bands bear increased load. They begin to deform and tear. Over time, this can cause the rod to come off.
But it is impossible to constructively do without oil seals. Therefore, the rod must rotate slightly to compensate for the movement of the suspension.
Purpose of the part
Niva Chevrolet thrust rods are one of the main suspension elements. The main purpose is to limit the travel of the front steering knuckle. The rear ones adjust the position of the axle. Rods are also necessary to hold the wheels in place in a longitudinal position. Thanks to the rods, the part can only move to the extreme upper or lower position. The lever is attached at two points; bolts and silent blocks are used for this.
The rear links are installed mainly on multi-link suspension. They are necessary in order to avoid oscillatory movements in the transverse direction of the bridge.
For the manufacture of rods, only high-quality elastic steel is used, which is able to withstand constant exposure to high loads. But if they consisted only of metal, they would practically not need to be replaced. But this design also has one weak point - silent blocks. Their fastening is carried out by welding. This seam is the weak point of the part. With increased load on the element, a small crack may appear at the seam, even unnoticeable at first glance. But over time, this can lead to major damage on the road. Therefore, in case of strong impacts on the suspension, it is necessary to carefully check all components of the system and change them at the first sign of malfunction.
In addition, malfunctions with silent blocks can occur when dust and dirt get inside. This occurs when the protective rubber band breaks. They can be deformed under strong physical impact on the levers, and the structure of the material can also deteriorate over time. It must be remembered that over time the situation will only worsen due to the fact that the lubricant inside dries out and increased wear begins.
Types of breakdowns and their causes
The thrust rod is made of durable metal and rarely wears out. Most often, the element is damaged near the bushings and welds.
Causes:
- The suspension is constantly subject to shock and vibration, especially when used in severe conditions. This area is the weakest point of the assembly, which wears out over time. Often the bushings become unusable and cause extraneous noise and knocking.
- The second reason is that the rods are located under the bottom, which is constantly exposed to moisture, salt, and dirt. As a result, corrosion forms on the element. After a while it corrodes the metal. The traction loses its strength and functionality.
To avoid this situation, it is necessary to constantly monitor the degree of wear of the suspension elements and carry out an inspection approximately once every six months. If there are cracks or various deformations, the element must be replaced with a new one.
A malfunction of the jet rods on a Niva Chevrolet car can be determined by the behavior of the vehicle. During long-term use, the bushings break and the rod ceases to perform its functions:
- the car leans more when turning;
- You can hear dull knocks coming from the rear suspension of the vehicle, especially when starting, braking or changing gears.
For an accurate determination, it is necessary to install the car on an inspection pit or overpass and inspect it for the presence of cracks on the rods, especially in welding areas. You also need to check the condition of the rubber bushings.
Then, by shaking each reaction rod, check the play. If one element malfunctions, all rods must be replaced, because The load is distributed evenly on the rear suspension.
If the rod is rotten or broken off, it will drag along the ground. The car will have problems with control. In such a situation, you need to tie the rod with a wire to the stationary part of the suspension and go to the repair site at low speed.
Do-it-yourself replacement of jet rods
When replacing jet rods on a Niva Chevrolet, you will need the following list of tools:
- set of open-end wrenches or sockets:
- metal brush for cleaning rust;
- mount;
- WD-40 liquid for easy unscrewing of threaded connections.
Step-by-step instructions for replacing rods:
- Place the car on a viewing hole or overpass, set it to speed, put the handbrake on.
- Unscrew the lower shock absorber fastenings - this element will interfere with dismantling the rod.
- Using a wire brush, thoroughly clean the threaded connections from dirt and rust.
- Treat all threaded connections with WD-40 and wait a while for the lubricant to eat away the rust.
- Take a wrench or socket of the required size and unscrew the nut, which is extremely difficult to unscrew. Therefore, you need to take a wrench with a long lever and treat the connection again with WD-40.
- After unscrewing the nut, remove the bolt.
- Unscrew the nut and pull out the bolt on the other side of the rod.
- Using a pry bar, remove the jet rod.
If you cannot unscrew the nut, use a grinder to cut the bolt and knock it out of the eye.
Installation of elements is carried out as follows:
- Install the rod eye into the front bracket.
- Insert the bolt through the bracket into the eye and tighten it well with the nut. Before doing this, lubricate the bolt with nigrol or lithol.
- Install the rod on the other side into the rear bracket.
- Insert the bolt, lubricate it with nigrol and tighten the nut.
- Replace and tighten the lower shock absorber mount.
When dismantling the rod, the rear axle moves, so when installing the rod in place, it is necessary to guide it using a pry bar or crowbar so that the bolt gets into the eye.
If the metal elements are in good condition, it is not necessary to change them. It will be enough to replace the rubber bushings in the rods.
To do this you will need:
- dismantle the rod;
- fix it in a yew and knock out the rubber element; for this you can use a special puller;
- press in new rubber bands and bushings; to facilitate pressing, use dishwashing detergent; it does not corrode the rubber;
- install jet thrust.
It is not recommended to weld cracks on the rod - the weld may not withstand the load and will soon burst. A rod with cracks will only need to be replaced.
This is interesting: Removing and installing the air supply, rods and bracket of the Chevrolet Niva heater levers
Messages [1 to 25 of 49]
1 Topic from the cast 04/01/2013 14:21:46
- caste
- Participant
- Inactive
- From: Severskaya station 918-345-05-47
- Registered: 25.02.2011
- Messages: 5714
Topic: replacing tie rod rubber bands in the field
Guys, who uses what to press the rubber bands out of the rods, what devices are there for this task?
2 Reply from umrnet 04/01/2013 14:59:08
- umrnet
- Participant
- Inactive
- From: Krasnodar YMR
- Registered: 11.06.2010
- Messages: 5828
Re: replacing tie rod rubber bands on a field
I was re-pressed using a vice. There seems to be another press for this matter.
3 Reply from the cast 04/01/2013 16:35:15
- caste
- Participant
- Inactive
- From: Severskaya station 918-345-05-47
- Registered: 25.02.2011
- Messages: 5714
Re: replacing tie rod rubber bands on a field
I have a vice at home, it’s already nice
4 Reply from 777 white 04/01/2013 16:51:52
- 777 white
- Participant
- Inactive
- From: Krasnodar
- Registered: 26.11.2009
- Messages: 565
Re: replacing tie rod rubber bands on a field
Why press them out? First, you press out the metal sleeve in a vice, cut the rubber band (with a knife or hacksaw blade), clean the seat, press the rubber band in a vice with a soapy solution (hemorrhoids can happen in this place, so it’s better to do everything slowly), press in the metal bushing. Seems like I've always done it this way
5 Reply from Werwolf 04/01/2013 18:04:49
- Werewolf
- Participant
- Inactive
- From: Korenovsk
- Registered: 13.02.2011
- Messages: 10054
- User Karma: 7
- drive2.ru/users/: HODOVIC
Re: replacing tie rod rubber bands on a field
In general, this is done without any vice, you knock out the bushing, then use a screwdriver to pry out the rubber itself, but with pressing in the bushings, it is better to have a conical bullet so as not to damage the elastic
Lift kit for Niva: which one to buy and how to install it yourself
Hello, dear friends! Today I propose to talk to you about the elevator kit for the Niva. This could be a Chevrolet Niva, that is, series 2123, or the more “our” Niva Urban, 2131 or 4x4, and representatives of the 2121 series, that is, 21213, 21214. It all depends on what kind of car you have at your disposal.
Russia, Ukraine, Belarus and a number of other countries are the greatest admirers of Niva cars. They are affordable and provide many benefits.
Some people prefer to do everything themselves. I can’t say that modifying the front and rear suspension of a Niv car will be an easy job in a minute. No, you will have to spend a lot of effort, time and patience on this.
You can find out how much such a service costs at a service station. The price for a professional lift is steep, so not every owner of a not-so-expensive crossover like the Niva is willing to spend that kind of money, having the opportunity to do everything themselves. And if you put a power bumper and an expeditionary trunk on top, it will turn out great. At least now on a round-the-world trip on Niva.
Increasing the ground clearance of the VAZ 2121 (lifting) allows you to increase the vehicle's off-road capability. Thanks to simple manipulations, the ground clearance increases significantly by changing the suspension height (the Niva lift kit will help you here, which makes the work very easy to do even with your own hands without the help of a service center) and installing slightly larger diameter wheels.
Lifting - increasing the vehicle's ground clearance by upgrading the suspension. Performed in order to increase cross-country ability.
We propose to consider this issue in more detail.
As a rule, a lift kit for Niva 2121 includes:
- Rear and front springs.
- A set of spacers for the upper ball joint.
- Front oil shock absorber.
- Adjustable Panhard rod.
Basic faults
Chevrolet Niva suspension parts are designed for different service life.
The levers, beam and anti-roll bar do not need to be changed even after 100-200 thousand kilometers.
But rubber-metal hinges, boots and bushings gradually lose their properties even while parked.
VAZ-2123 owners have to deal with the following malfunctions:
- Wear of silent blocks, ball joints.
- Damage or cracking of anthers.
- Reduced performance of shock absorbers.
- Breakage of jet rods.
In addition to replacing faulty parts, it is necessary to regularly check and adjust the angles of the front wheels.
Otherwise, the car's handling deteriorates, and the tires begin to wear out rapidly. Wheel alignment is checked every 10-15 thousand kilometers and after very strong impacts when falling into road potholes.
Remedy
Increased noise from the rear wheels
— The wheel fastening is loose
Tighten the wheel nuts
— Wear or destruction of the axle ball bearing
Inspect the axle shaft and replace the bearing
Constant increased noise when the rear axle is operating
— The rear axle beam is deformed, the axle bearings are damaged
Straighten the beam and check its dimensions, replace the axle bearings
— The axle shafts are deformed and have unacceptable runout
Replace the axle shafts with new ones
— Incorrect adjustment, damage or wear of gears or gear bearings
Determine the gearbox malfunction, repair or replace the gearbox
— Worn or incorrectly adjusted differential bearings
Remove the gearbox, repair and adjust
Noise when accelerating and braking the car
— Incorrect adjustment of the main gear gear engagement
Adjust the engagement
— Damage to the axle bearings
Replace bearings
— Insufficient amount of oil
Restore the oil level and check for leaks in the seals or rear axle beam
— Incorrect side clearance in the meshing of the final drive gears
Adjust the gap
— Increased clearance in the drive gear bearings due to loosening of the flange nut or wear of the bearings
Adjust the clearance, replace bearings if necessary
Noise when cornering
— Damage to axle bearings
Replace bearings
Knock when starting to move the car
— Wear of the hole for the pinion axle in the differential box
Replace the differential box and, if necessary, the pinion axle
— The rear suspension rod mounting bolts are loose
Tighten the bolts
Oil leak
— Worn or damaged drive gear oil seal
Replace the oil seal
— Wear of the axle shaft seal, leading to oiling of the brake shields, drums and pads
Check the runout of the axle shaft and beam deflection. Repair or replace damaged parts
— Loosening of the bolts securing the rear axle gear housing, damage to the sealing gaskets
Tighten the bolts, replace the gaskets
Front suspension.
The front suspension is independent, spring type. It consists of a pair of wishbones on each side and telescopic shock absorber struts with an anti-roll bar. The suspension also includes the following components:
The upper and lower arms are responsible for ensuring independent vertical movement of each of the two front wheels, which allows you to overcome all kinds of road obstacles. The ball joints are connected to the steering knuckles and suspension arms. The upper arm is connected to the cross member bracket using an axle. And the axle, in turn, is connected to the bracket with two bolts, the second lever, the lower one, is connected to the suspension cross member. The adjusting washers are located in the space between the lever axis and the bracket. Using these washers you can adjust certain indicators. These are the wheel camber and the longitudinal angle of the axle. The suspension arms are connected to the axles via silent blocks, which allows you to create a backlash-free connection.
Device
The unit consists of two key elements housed in one housing:
- Main gear, consisting of drive and driven hypoid gears. It increases torque, reduces angular velocity and rotates the axis of rotation by 90 degrees.
- Center differential, which includes axle gears and satellites. They allow the wheels to spin at different speeds when turning or driving over rough terrain.
The rear gearbox also includes a flange, bearings, oil seals, oil deflector, axles, shims and other parts. There are plugs on the housing for draining and filling transmission oil.
A breather is installed in the upper part to ventilate the housing. If its hole becomes clogged, excess gas pressure can force oil through the seals.
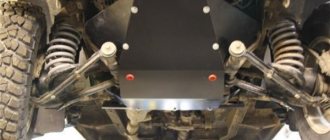
Installation of reinforced rods
To increase the life of the suspension, to be more confident in the condition of the car, you have to use higher quality, but also more expensive parts. Reinforced thrust rods of the Niva Chevrolet are made of more durable materials. In addition, the place of welding seams is processed more carefully to prevent the occurrence of cracks. Some reinforced rods are specially made not round, but diamond-shaped. According to experts, such angles of rigidity allow them to withstand stronger loads.
In general, there are several criteria that distinguish enhanced jet thrusts:
- lower weight
- high quality production. The special shape allows protection against twisting and compression, which gives an advantage when driving off-road.
- factory production
- Technological painting. The use of powder coating helps prevent corrosion due to higher adhesion to the metal. This also protects against the occurrence of microcracks.
Advantages and disadvantages of the Niva Chevrolet suspension
A comprehensive assessment of the suspension takes into account the study of the design, its effect on handling and cross-country ability. You also need to take several factors into account.
Pros of car suspension
- excellent cross-country ability – thanks to high ergonomics and adaptive design;
- maintainability - you can replace worn parts yourself according to the instructions;
- Availability of spare parts - always available in any store.
In terms of costs, repairing the front or rear suspension of a Chevrolet Niva is cheaper than foreign cars - the price of spare parts is 2-3 times lower. The parts have a shorter lifespan, but even with scheduled maintenance, it is more profitable to maintain a domestic SUV.
Disadvantages of the Chevrolet Niva suspension
- vibrations - mainly due to the rear dependent suspension or due to “oak” rubber bands when replacing them is missed;
- low quality of spare parts - if you buy cheaper analogues instead of original ones;
- increased fuel consumption - mainly due to the heavy rear gearbox.
Some people note other shortcomings, such as play in the front hub due to a worn tapered bearing, ball joints or silent blocks. But the cause of these malfunctions is poor vehicle maintenance and missed scheduled maintenance.
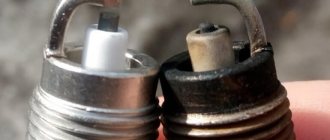
Old and new silent blocks for Niva Chevrolet
The topic of the article is silent blocks in the field. What is this anyway? This is a rubber-metal hinge, or a polymer-metal (polyurethane) hinge, which works in torsion. There is an internal metal bushing that is tightly clamped onto the axle, there is an outer bushing that is pressed into the lever and an elastic elastomer between these bushings.
Upper arm and silent blocks.
Rubber-metal articulated bushings (silent blocks) on all Nivas until 2008 had a different design from the modern one, and the design and dimensions changed only for the lower front ones.
Broken silent blocks of the old design
The service life of silent blocks of the old design ranged from two to three years, depending on the intensity of use and climatic conditions.
After 2008
On the new parts, the diameter of the inner sleeve increased by 2 mm, and the outer diameter by 7 mm, which could not but affect the service life. Old bushings turned out well from Balakovo and Dimitrovgrad silent blocks, they were packed in branded VAZ packaging. The quality of other manufacturers is poor.
New bushings are supplied to the conveyor. And about the new articles: the upper silent blocks, interchangeable with the old ones, received the number 2101-2904040, the new lower, reinforced ones - 2121 2904040.
Polyurethane silent block.
Not so long ago, polyurethane bushings, dampers and silent blocks became popular. The thing is good and useful, but you shouldn’t take polyurethane unconditionally enthusiastically and here’s the thing.
Classic regular silent block
For example, shock absorber bushings made from it are quite durable. But the silent block mainly works to twist, and the articulation of the SUV’s suspension implies large angles of rotation of the levers. And rubber parts cope better with this; on off-road they work smoother and longer.