Starting the engine, its systems, as well as other important devices and mechanisms in cars of the Samara family is impossible without the ignition switch. Those car owners who have had to deal with a malfunction of this device know what its unexpected failure can lead to. Especially if it happens on the road.
Further in the article we will talk about what the VAZ-2114 ignition switch is, consider its main malfunctions and how to eliminate them. In addition, we will try to figure out how to replace it ourselves and connect it correctly.
Where is the ignition switch located on the “fourteenth”
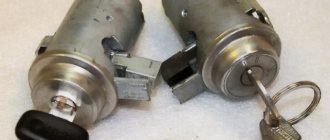
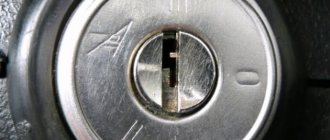
In VAZ-2114 cars, the ignition switch, unlike the “classics”, is located not on the dashboard, but on the right, on the steering column. It is covered with a plastic casing on top, so only the upper part of the “larva” is visible to our eyes.
The VAZ-2114 ignition switch consists of five main parts:
- steel body;
- locking mechanism;
- locking device;
- contact group;
- key
The device is placed in a steel case, which is designed to protect it from hacking. As for the locking mechanism, it is practically no different from the door lock we are used to.
The locking device allows you to lock the steering shaft in the absence of a key. In this simple way, it protects the car from theft. The contact group is an element that is responsible for starting the engine and its systems. The VAZ-2114 ignition key is used to unlock the locking device and activate a group of contacts. Without it, it is impossible to start the engine without disassembling the device.
How to remove cravings
To remove this piece, you will need an impact screwdriver and a size 8 wrench. The piece is attached to the internal locking mechanism and the lock switch. Algorithm of actions:
- The internal lock of the outer handle rod is completely disconnected.
- The handle is removed along with the rods.
- The pin is removed from the end of the rods.
- The plastic tip is removed from the core of the cylinder device.
- The return spring is removed. The old larva is being removed.
Usually the rods are fixed with plastic hinges, so they can be disconnected with a flat-head screwdriver.
Principle of operation
The lock works as follows. When the key is placed in the hole, its locking mechanism is deactivated. This happens due to the reverse movement of a special rod. By turning the key to the first position, you will power the “15” and “30” contacts. This will alert (but not enable) the following items:
- ignition system;
- headlight bulbs;
- external light alarm;
- electrical equipment of the dashboard;
- windshield wipers and washer;
- cigarette lighter;
- rear window defroster;
- generator excitation winding.
If in a VAZ-2114 car the ignition switch is moved to the second position, in addition to the listed equipment, the starter will start. As you can see, a lot depends on the serviceability of the device in question.
Instructions for replacing the ZZ
Replacing the ignition switch on a VAZ 2114 injector takes place in stages. At each stage certain actions are performed.
Preparation
First of all, you should prepare for the replacement procedure by preparing an electrical circuit diagram and the necessary materials and tools:
- new node;
- 4 assembly mounting screws;
- chisel;
- a set of keys;
- Phillips screwdriver;
- hammer;
- pliers.
ZZ for a VAZ car
For ease of operation, remove the cover from the steering column and switches.
Dismantling the casing is carried out step by step:
- First of all, the car is de-energized by disconnecting the negative terminal from the battery.
- Use a Phillips screwdriver to unscrew the screws securing the casing.
- Then the self-tapping screw is unscrewed, with which the housing is secured.
- Now you need to remove the screws holding the lower part of the housing to the steering column.
- At the next stage, the lever is lowered down, with the help of which the steering column is fixed at the angle, and the steering wheel.
- Next, the lower casing is dismantled.
- After disconnecting the power supply, you can remove the upper part of the casing.
- To remove the steering column switches, press the locking elements and remove the elements from their standard places.
- The switches should also be disconnected from the power supply.
Removing a faulty device
Having opened access to the protection zone, you can dismantle it. The difficulty of dismantling is that there are no heads on the 4 bolts that secure the ignition switch to the steering column on the VAZ 2114. The absence of heads prevents criminals from stealing a car without a key.
Dismantling with hammer and chisel
Dismantling of the protection zone is carried out as follows:
- you need to loosen the bolts using a hammer and chisel;
- then the loosened bolts are removed with pliers;
- then the bracket is removed from the steering column;
- the power supply is turned off;
- Now you can dismantle the unit.
The node connection diagram is simple. If it is purchased assembled, then it is not difficult to understand the diagram in order to connect the wires correctly.
Installing a new lock
The procedure for installing the ignition switch on a VAZ consists of the following steps:
- first you need to install the key in the new unit in position “I”, then the latch, thanks to which the steering wheel is locked, will hide;
- then the protection is mounted and the actions are performed in the reverse order of removal;
- After tightening the 4 bolts, you need to tighten them a little.
After installing the new unit, you need to check the steering lock. To do this, remove the key from the lock and turn the steering wheel to a small angle. If the steering wheel does not lock, you must install the unit correctly: the latch must fit into the groove located on the steering column. If the locking function works, all you have to do is tighten all the breakaway bolts until they stop. You need to tighten them until the heads are broken.
Sorry, there are no surveys available at this time.
This is interesting: How to close the starter directly with a screwdriver - photo and video
Symptoms of a problem
What are the symptoms of a failed ignition switch? Let's start with the fact that its malfunction can be either mechanical or electrical in nature. In the first case it is:
- lock jamming in one of the positions;
- inability to unlock the steering shaft;
- turning on the ignition with a non-original key or other object.
If the lock has an electrical problem, you may notice the following symptoms:
- the warning lights on the instrument panel do not light up or light up and go out periodically;
- the starter does not start;
- Some or all electrical appliances, the circuit of which is powered through the ignition switch, do not work (cigarette lighter, headlights, washer, wipers, etc.).
Most common defects
If your car's ignition switch won't turn on, there's a good chance you're dealing with one of the most common problems:
- the battery is low;
- the battery terminals are not in good contact with each other;
- switch malfunction;
- security system error;
- solenoid malfunction;
- When cranking the engine it still won't start.
The groups of defects we have identified can be divided into 2 groups - mechanical and electrical. They will differ in negative receptors that lead to breakdowns.
This is interesting: Body identification number (VIN code) of the Lada Granta - we explain it carefully
Why does the ignition switch fail?
Jamming of the device is possible due to wear of the “larva” itself or due to problems with the contact group. When faced with such a problem, you should not use force to turn the key in the right direction! There is no need to “tear” the steering wheel if it is impossible to unlock it. It is better to carefully disassemble the lock and find out what the reason is. But more on that a little later.
Having noticed that the ignition in a car can be turned on with any key or foreign object, hurry to replace the “cylinder” or the complete device. This way you will protect your car from possible theft.
If the ignition switch on a VAZ-2114 car works normally, but when you turn it, the instrument panel does not light up, the starter does not start, and electrical appliances do not work, then most likely the contact group has failed. A similar problem may arise due to its natural wear and tear. After some time, the contacts are erased, which leads to a break in the electrical circuit. It is also possible for them to burn, caused by power surges, constant overloads, due to the use of additional electrical appliances and their incorrect connection.
Important: if you want to install additional electrical equipment in your car, connect it to the on-board network only through a relay!
Withdrawal procedure
Depending on the reason, a complete or partial replacement is performed. It is not recommended for the average person to engage in reassembly, since there are too many nuances in this process, but almost anyone can replace the mechanism. Step-by-step instruction:
- Three screws are unscrewed. They are located on the inside of the handle. To do this, use a Phillips screwdriver to remove the cover.
- The front trigger glass position switch is removed along with the wiring harness block. To do this, the wires are first disconnected.
- The plug on the armrest handle is removed, the element is picked up with a thin corner of a screwdriver.
- Unscrew the 2 screws on the handle that hold the inner panel.
- The plastic clips are pressed out to remove the lining.
- 6 pistons are removed to remove the door card.
- The external fastenings are removed, the nuts are unscrewed with an 8mm wrench.
Is it possible to check the contact group with your own hands?
Diagnostics of a contact group consists of measuring the resistance value between certain terminals on the device wiring harness block.
To check it you need:
- Remove the plastic steering column cover (to do this, unscrew three screws).
- Disconnect the wires of the VAZ-2114 ignition switch (remove the block from the socket).
- Turn on the ohmmeter (if you have a multimeter, set it to resistance measurement mode).
- Connect the probes of the device (polarity does not matter) to terminals “4” (upper right) and “7” (second from the bottom right), corresponding to contacts “15” and “30”.
- Turn the ignition switch to the first position.
- Take ohmmeter readings.
- Turn off the ignition, connect the probes of the device to terminals “3” (second from the top right) and “7”, corresponding to contacts “50” and “30”.
- Turn the lock to the second position.
- Measure the resistance between the terminals.
If the VAZ-2114 ignition switch (injector) is working properly, the resistance between the contacts will be zero. Otherwise, most likely, the contact group of the device has become unusable.
Preparatory activities
Before you start removing the ignition switch on a VAZ-2114, you need to stock up on a set of tools and materials. In addition to a new lock, an independent car mechanic will need the following tools:
- hammer;
- Phillips head screwdriver;
- head or horn for 10;
- pliers;
- a small chisel with a diameter of 10–12 mm.
There is no need to purchase a lock mount. Manufacturers usually include several bolts to hold the clamp in place. We recommend bringing a headlamp to illuminate the treatment area.
First of all, you will need to provide access to the fastening of the old lock. To do this, you need to get rid of the casing that hides the steering column. Next, the worn-out unit is dismantled. The following technique is often used:
- removes the negative terminal from the battery;
- use a screwdriver to unscrew several screws holding the protective plastic case;
- remove the self-tapping screw that secures the casing with switches;
- remove a couple of screws from the bottom side of the column;
- remove the lever that blocks the rotation of the steering wheel;
- lower the steering wheel down;
- get rid of the lower casing;
- We disconnect the power contacts from the emergency lights;
- it becomes possible to dismantle the upper casing.
The steering column switches are removed one at a time. After pressing simultaneously, we remove the pair from their seats, and then remove the power and connecting wires.
Repair or change
What to do if a faulty ignition switch is detected? You can, of course, try to restore it. But this is only if you have some experience in this area, the device is relatively new, and you suspect that contact wear is to blame. Otherwise, it is better to replace the lock assembly. Fortunately, it is not that expensive - no more than a thousand rubles, and this procedure does not take much time.
Step-by-step replacement of the ignition relay
If during the inspection it turns out that the ignition switch relay has failed, then experts do not recommend repairing this element, as was previously said. To buy a new relay, minimal cash costs will be required, and every car enthusiast can make a replacement if all operations are carried out in stages:
- The most important thing to do first is to disconnect the battery from the power supply; to do this, simply disconnect the negative terminal from the battery.
- When using a screwdriver, it is best to use a slotted tool. You need to unscrew the 4 fasteners from the steering column casing to simplify the process of removing the “relay”.
- The latch holding the lower part of the casing is most conveniently unscrewed using a Phillips screwdriver.
- The casing, loosened from the fasteners, is carefully removed from its place.
- The ignition relay is connected to wires that are located at the bottom of the block. To replace an element that has become unusable, you simply disconnect the wires from the block and install a new one in place of the old relay.
After this, you need to check the result of your own work by starting the engine of your car. If the fault does not show itself, it means that the replacement process was completed correctly, and the car owner can be proud of his next, albeit small, but still achievement.
After reading this article, everyone should understand that the process of replacing this device is simple and straightforward. And since the “relay” rarely fails, VAZ-2114 owners do not constantly have to perform such an operation. But if difficulties arise when replacing the ignition switch relay, you should never despair, because you can find the answer to any question in a training video on the Internet resource, which you can watch both day and night.
Where is the valve for the VAZ-2114 stove located?
The training video lesson was prepared and conducted by true professionals who thoroughly understand all stages of car repair. Therefore, everyone will be able to obtain additional information on replacing the relay and determine its exact location from the photo. Well, after watching the training video, the replacement process will become even simpler and you can be sure that every car enthusiast can handle this task.
Removing the ignition switch
Before changing the ignition switch on a VAZ-2114, make sure you have the necessary tools at hand. You will need:
- screwdriver with Phillips bit;
- wrench set to “10”;
- small hammer;
- sharp chisel;
- pliers.
Now let’s figure out how to remove the ignition switch on a VAZ-2114. The procedure is as follows:
- We de-energize the on-board network by removing the “negative” terminal from the battery (to do this, use a “10” key to loosen the bolt on the terminal).
- Remove the plastic steering column cover by unscrewing the three screws securing it.
- For convenience, you can also remove the steering wheel with switches, but you can do without it.
- Disconnect the wiring block of the emergency stop button.
- Disconnect the ignition switch block.
- Inspect the lock mounting bolts. If you are replacing a lock for the first time, you may be surprised that they do not have heads. This is a kind of standard anti-theft concept.
- Using a chisel and hammer, loosen these bolts and unscrew them with pliers.
- Remove the lock mounting bracket.
- We dismantle the device.
How to replace all door locks, rods and cylinders on a VAZ 2113-VAZ 2115?
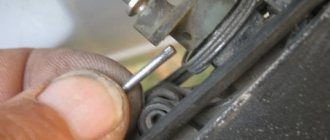
Removal: 1) First, let's start with the most important thing, without this you won't be able to replace the locks, but in general you won't be able to start the operation because all the work to replace all the things that are listed in the title is carried out with the trim removed from the door, it is removed quite easily and in more detail about how to do this, if you don’t already know, read the article: “Replacing a door on a VAZ” in paragraphs 1-8, and after the trim is removed, proceed to removal, let’s immediately note a couple of facts so that to replace the cylinder, the rods will need to be disconnected from it, but to replace the rods, you don’t need to remove or disconnect anything, the same with the door locks, the rods from them will also need to be disconnected and only after that unscrew the screws that secure the locks, so first Let's start with the rods themselves and explain how they are removed, firstly, you can start disconnecting them from absolutely any side and from any place, for example, start disconnecting the rod first from the internal lock as shown in photos 1 and 2 (Photo 1 shows disconnecting with a locking screwdriver the washer that holds the rod, and already in photo 2 the disconnection from the internal lock of the rod itself is shown), then using a screwdriver and your hands, disconnect the other rods and continue the entire operation until the rods on both sides are disconnected, as soon as they are disconnected on both sides , completely remove them from the car (there are several rods in the car and each one goes to the locks and there is even a rod to the cylinder, they are disconnected, as you already understood, with a screwdriver and your hands, in the beginning just disconnect all the lock washers or plastic clamps and pull them by hand by the rod, disconnect it from the lock or from the cylinder, etc., but the rod is not always secured with the help of clamps, sometimes it is hooked at one end to something, in this case, also disconnect its end with a screwdriver and then remove it completely rod), thus remove all rods from the car.
2) After the rods are removed or disconnected from those things that you are going to replace, proceed to removing these things themselves, first we will look at the removal of both door locks, the internal lock and the external one are removed together, that is, if you decide to change the external lock, then you the internal one will have to be touched (You don’t even have to replace the internal lock with a new one, but you’ll just have to tinker with it even if you only need to replace the external one) and vice versa, everything is the same, to remove the external lock you will need to loosen the two screws that it is secured (Please note, loosen, the impact screwdriver does not serve anything else, we recommend that you completely unscrew the screws with a regular screwdriver) these screws are also indicated by arrows in photo 1, as soon as the screws are unscrewed, go further and pull the lock, remove it from car (see photo 2) if you also need to replace the internal lock, then in this case remove the door opening handle (read how to do this in the article: “Replacing a window lifter on a car”, everything is described in the paragraphs) and then into the internal climb up part of the door and use a screwdriver and your hands to disconnect the two rods (Those rods that you will need to disconnect from the internal lock are shown in the photo below under number 1), as soon as the rods are disconnected, pull out the internal lock and as soon as it is removed, proceed to disassembling it, to do this, remove the lock washer from it using a screwdriver that secures the internal drive rod (see. photo 3, on it the lock washer is indicated by an arrow) and then disconnect the rod itself from the lock (see photo 4), disconnect the other rod in almost the same way, it is attached to the internal lock by a plastic retainer, you just need to move it and the rod can then be safely disconnected from the lock; see the video clip at the end of the article for more details.
3) Now we’ll talk about how to remove the cylinder from the outer handle, it is inserted into the handle itself and in order to remove it, you will have to first remove the handle from the door and then remove the cylinder, this is all done as follows, from the outer handle to the inside doors, both rods are disconnected (see photo 1) and after the rods are disconnected, unscrew the two nuts that secure the handle to the door (see photo 2) and by pulling the handle with your hand, remove it completely from the car, after the handle is removed (It By the way, it will be removed with the rods), take an awl in your hands and use it to push out the side pin that holds the cylinder and the cylinder leash (see photo 3, the leash is indicated by a red arrow, when the pin for its fastening is pushed out, remove the leash completely from the cylinder), then use a screwdriver pry up the spring that secures the same cylinder and remove it (see photo 4), and finally, when the leash and spring are removed, insert the key into the cylinder and turn it, thereby you will unlock the mechanism and you can easily pull the key to remove the cylinder from external handle.
Installation and connection of the ignition switch VAZ -2114
The algorithm for installing the lock and connecting it to the on-board network is as follows:
- We insert the key into the hole and turn it to the first position. This way we will hide the rod that blocks the steering shaft.
- We install a new lock on the column by placing a bracket.
- We tighten the bolts securing the lock, but not completely. You may also need to adjust the position of the device.
- We check the operation of the locking device. To do this, pull the key out of the “cylinder”, tugging it to the sides. The steering wheel should lock. If there is no locking, adjust the position of the lock relative to the steering shaft. The rod should fit easily into the groove on the steering shaft.
- After this, insert the key and turn it to the first position. The steering wheel should unlock. We check several times to make sure that the device is working properly.
- Now you can tighten the lock bolts. Twist until their heads fall off.
- We connect the ignition switch wiring harness block.
- We connect the wires of the hazard warning button.
- Connect the negative terminal to the battery. We check the operation of the device in all possible modes.
- We install the plastic casing on the steering column.
Steering lock testing
If you don't check the steering lock, you may encounter certain problems in the future. Therefore, do not waste your time on this event. It consists of removing the key from the ignition and turning the steering wheel at a slight angle.
- If there is no lock, you will need to slightly adjust the position of the lock. Make sure it fits into the groove located on the steering shaft.
- If the locking is effective, you will only need to tighten the four installed breakaway bolts until they stop. Twist until the heads break.
When the lock installation is completed and the test has passed, do not forget to connect the device to power and start the engine. If it starts, all systems dependent on the ignition switch are working, you can fully begin reassembly. Follow the reverse instructions for removing the casing and steering column switches. It would not be amiss to check the condition of certain nodes along the way. It is quite possible that some of them also need replacement or a little preventive maintenance.
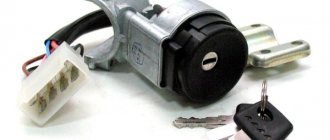
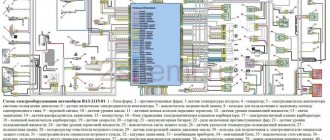
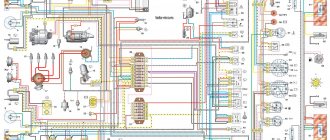
In the technical documentation for the VAZ-2114 there is a separate section that specifically describes the design of the vehicle’s electrical equipment. So, all the elements are described in full. But, in this particular case, the issue of independently connecting the ignition wires will be considered.
So, let's look at the diagram to see how the contact connections of the ignition switch are connected.
Ignition switch pinout diagram
Regardless of the ignition being turned on, the following devices can operate: high beam, interior and instrument panel lighting, hazard lights, brake light, sound signal, as well as exterior lighting.
A separate item worth highlighting is additional equipment: a car radio (of any format), speakers, additional lighting devices are powered directly into the battery or on-board network, and much more.
Ignition switch device
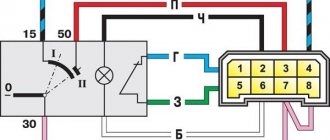
Next, we will consider the switched circuits of various key positions in the ignition switch:
| Key position | Live contacts | Switched circuits |
| 0 (Disabled) | 30 | _ |
| 1 (Ignition) | 30-15 | Ignition system, generator excitation, headlights, turn signal, control devices, windshield and headlight cleaners and washers, heater fan motor, rear window defroster, cigarette lighter |
| II (Starter) | 30-15 | See Regulation I |
| 30-50 | Starter |
Ignition switch pinout
Product selection
There are several options for the ignition switch on the VAZ-2114. Let's look at each one separately:
- 2110-3704005 or KZ-881 – original catalog numbers of the ignition switch manufactured by AvtoVAZ. The wiring diagram is standard, that is, factory. Installation is quite easy. The average cost is 1000 rubles .
Replacing the contact group
If you still decide to save money and not buy a whole lock, the best solution for a working “cylinder” would be to replace the contact group. It is produced as follows:
- Having dismantled the ignition switch, we remove the retaining ring from the end of its body, which holds the core of the device.
- We remove the contact group from the housing.
- We install a new part in place of the old one. In this case, the position of contacts “15” and “30” must correspond to the position of the rod that locks the steering shaft.
- Please note that the wide protrusion of the contact group is inserted into a wide groove on the housing.
- Install and check the device in the order described above.
Installing a new part
The removal and assembly algorithm is the same, although the instructions for installing the cylinder mechanism have its own nuances. Before inserting a new cylinder into the core, the part is lubricated with a silicone substance and only then inserted into the handle. Further algorithm of actions:
- The return spring is inserted next to the cylinder.
- The functionality of the key is checked. It should turn easily in all positions.
- A pin is installed on the tip of the rotary rod. Connection is being made.
- The inner and outer panels are screwed on, the handles are fixed, and the plug is returned to its place.
- The main three screws are tightened from the inside.
You won’t have to change the lock cylinder for a long time if you carefully use the opening mechanism.