I found a topic on the forum on how to remove a ball joint without a puller, read it and forgot. The other day I had to remove the lever and decided to try it. But there was no hole, I remembered the theory but not verbatim, and the result was this. First, I describe the method posted on the forum. ——————————————————————————- You need a pit, not a lift (relevant for DIYers). 1. Remove the cotter pin nut. 2. Pour wd40 onto the nut. 3. Loosen the nut, but not completely, that is, so that it is screwed in at least 3 turns of thread. 4. Pour wd40 under the nut onto the finger. 5. Take a flat chisel, or any piece of metal 15mm thick. 6. We insert it between the lever and the steering knuckle so that it comes into contact with the ball joint boot. 7. Jack up the car. When jacking up the car, we see that the chisel begins to be tightly pinched between the fist and the lever. 8. When the wheel leaves the ground, we hear a strong click; this is the finger coming out of the fist. 9. If the wheel leaves the ground and the finger does not come out, use a small hammer to lightly hit the fist through a drift. All. forums.drom.ru/toyota-vitz-yaris … 66203.html
And how did I do without without a hole
It is possible without a hole and with the wheel removed, as long as you have a hydraulic jack or any other. You need to jack up the lever itself in the ball area, then insert the same chisel between the ball and lever and lower the jack. The ball flies out for the sweet soul. If you don't have a hydraulic jack, you can probably use any other one. Since the ball flies out under the action of the shock absorber strut spring.
Quite often, car enthusiasts are interested in how to remove a ball joint without a puller. This need may arise for various reasons. Most often, the existing puller does not fit the given car model. Although the principle of mounting the support is the same, the overall design of the suspension may be different. Therefore, it turns out that the existing puller simply cannot get to the part. Also, many novice drivers do not have some equipment available. You should not go to a service station due to the lack of a puller; again, you can do without it. In addition, there should not be any negative aspects.
Replacing a ball joint on a Renault Logan.
Owners of this brand of car are recommended to replace not only the ball joint, but also the lower suspension arm at the same time (here, I wrote on this topic). This procedure is performed as a result of wear or damage to the unit. To carry out the operation you need:
- Hammer.
- Flathead screwdriver.
- Socket wrench - size 30.
- Dimension key 13.
- Open-end wrenches for 16 and 18.
- Two pipes of different diameters.
- Bar.
Basic steps of the process.
- The car is hung up, or its front part is raised using a jack, and the car is placed on supports.
- The wheel is removed.
- The nuts of the upper and lower bolts, as well as the connecting rod, are removed.
- The nut at the stabilizer bar link is unscrewed, then the bolt is pulled out.
- The ball bolt is removed.
- The finger is pulled out from the rotating mechanism housing.
- The bolts of the silent blocks, both front and rear, are removed.
- The lower suspension arm is removed.
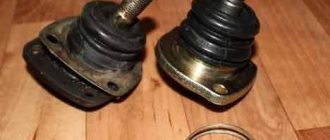
- The old ball joint is removed. To do this, remove the rubber cover and the metal fixing ring from the assembly. At the end, the support is knocked out with a hammer (more details in the video).
- The new ball is installed so that its teeth fit into the grooves of the spline.
Reassemble the mechanism in reverse order.
Video instruction.
Diagnostics
How to remove a ball joint without a puller? This question is asked by people who are faced with replacing a ball joint. Especially in cases of unexpected breakdown. To prevent this from becoming an unpleasant surprise for you, you need to know how to correctly diagnose a breakdown. The first sign of a malfunction is a knocking sound in the suspension when driving over uneven roads. But here you need to take into account that in extreme cold the lubricant can freeze. In this case, knocking noises may be observed when starting to move.
Don't panic, this is completely normal. Also, with severe wear, the car may wander along the road, and increased tire wear is observed.
Do not forget that it is not only ball joints that can knock in the suspension. Therefore, be sure to carefully inspect the suspension. The easiest way to diagnose is to check the play. To do this, you need to jack up the car. After that, they try to shake the wheel; if there is play, the ball must be replaced. At the same time, we determine which support has failed. This is true for machines with two supports on each side. In some models, it is possible to measure the level of wear of the hinge through a hole in the lower part of the support.
How to replace a Lada Priora?
In this case, the role of a puller can be performed by a hammer and a reinforcement rod. To remove a worn or broken ball joint, you will need:
- The car is raised using a jack.
- The front wheel is removed.
- The two ball mounting bolts are unscrewed and the fastening nut is unscrewed (wrench 17 and 19).
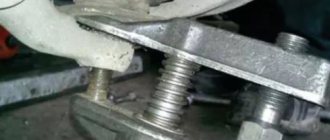
- The reinforcing rod is inserted between the lever and the support body, and then pulled down.
- The pin must be hit from bottom to top in different directions so that the cone of the ball pin pops out of the lever.
- Once the cone is out, the support turns away from the steering knuckle.
- To prevent the ball from being pressed against the fist by means of a lever, the hub is supported, or the wheel is placed and the jack is lowered.
- Next, the ball joint, which is attached to the lever and knuckle, is replaced.
Video instruction.
Sequencing
- place the car on the platform;
- there should be stops under the rear wheels to prevent the car from rolling;
- Place even wooden blocks or bricks under the jack;
- loosen the nuts on the wheels;
- lift the body until the wheels slightly lift off the asphalt;
- completely unscrew the wheel nuts. Be careful, because the car is now standing only on relatively unstable jacks and may fall if too much force is used;
- remove the wheel and place it under the beam for complete safety;
- open your toolbox, take a suitable key and remove the caliper, to which the protective casing can be screwed with a small bolt;
- if replacing the pads is not planned, then move the caliper on the hose to the side and tie it to the frame;
- unscrew the tie rod mounting nut 3 turns;
- insert a crowbar so that one end of the lever rests on any metal part, and the lever itself is on the tip rod. With one hand, press the lever to press out the tie rod cone, and with the other hand, tap the knuckle in the hub with a hammer to release the tie rod;
- unscrew the fastening nut and move the rod to the side;
- unscrew the stabilizer link;
- Use a crowbar or jack to release the tension between the stabilizer and the strut and remove the ball strut;
- remove the shock absorber by unscrewing the upper nuts and the bolt at the bottom;
- loosen the upper support nut;
- insert the crowbar in the same way as when removing the steering rod, but very carefully so that the chassis boots are not damaged;
- tap the hub with a hammer at the point where the hinge is attached to the turning shoe;
- completely unscrew the ball joint nut;
- Unscrew all the upper arm mounting bolts;
- remove the ball joint and begin dismantling the lower one;
- loosen the fastening nut;
- remove the protective cover from the hub;
- remove the locking ring and the adjusting washer;
- Place a jack under the lower arm and lift it until it stops with the upper arm. At the same time, slightly turn the hub towards the bumper;
- continue to lift the hub, straining its connection with the ball;
- tapping on the hub, squeeze out the ball joint, unscrewing the nut completely;
- remove the ball and try not to lose the washer that was between the bearing and the grenade. Cover the hole with a clean rag;
- After unscrewing the mounting bolts, remove the ball from the lower arm.
As you can see, there is no problem with how to remove a ball joint without a puller. I would have free time and a great desire. Assembly is carried out in reverse order. You can always buy new spare parts in our online store!
Is it possible to restore the support?
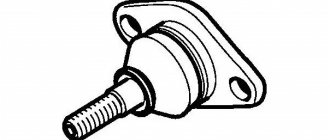
This element has 2 types of faults. Most often you may encounter the depletion of lubricant in the housing. With this development of events, restoring the ball joint to working condition is easy. Using a special syringe, the amount of lubricant in the housing is updated. Experienced craftsmen prefer graphite lubricant, but you can use another type of it, preferably with similar values. I advise you to read the article - how to lubricate a ball lubricant.
If the performance of the ball was restored using the above method, it is worth considering that it will not be possible to extend it for a long time. In cases where there is a high degree of wear, adding lubricant will not change the situation. A replacement part will be required.
The condition of most domestic roads means that car suspensions cannot last for a long time, as a result of which regular and frequent replacement of its elements is required. As for the ball joint, removing it without a puller is not a big problem. This process requires a minimal set of auxiliary tools. At the same time, the absence of a professional tool will not have a negative impact on the parts of the mechanism.
Faulty ball joints are one of the most common chassis failures that motorists encounter. A characteristic knock in the front part, which is difficult to confuse with another knock, indicates the need to replace the ball joint. In earlier articles I talked about how to replace ball joints on a VAZ 2107, this time you will learn how to replace a ball joint on a Lada Priora with your own hands.
To work you will need:
- Jack, pry bar, hammer;
- Spanners for: “17” and “19”;
- TORX E12 socket head;
- Ratchet or crank;
- Special puller for removing ball joints;
- New ball joint for Lada Priora.
How to remove a ball joint without a VAZ 2107 puller
Now I offer you a step-by-step summary of how to replace ball bearings on a VAZ 2107, with a detailed description of the process, supported by informative photographs. Ball bearing replacement for professionals was designed to be automatic and has changed only slightly in the long term thanks to new tools and capabilities.
In my case, replacing the ball joint from a VAZ 2107 is done on an inspection pit or a lift. Firstly, at least smooth out any security work If you are going to work on an inspection pit. Install the wheel chocks, apply the handbrake and engage second gear. Only the jack is strictly prohibited from being used without the above safety measures.
- Metal brush;
- Liquid WD-40;
- Key for 22 and 7;
- Rod for ball bearings;
- Ball joint lubricant;
- Honey syringe (without needle);
- Adjustable wrench.
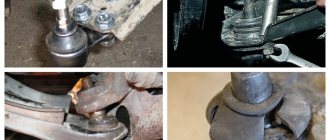
1. First, women appreciate, you need to remove the wheel.
4.5. Then use a wire brush to clean the ball joints.
3. Treat our customer with the connections you unscrew (as shown in the photo) using WD-40 thread penetrating fluid in a different way.
4. Turn the wrench to 22 and unscrew the nuts of the upper and one of the ball bearings by about one and a half to two turns.
5. Now install the special ball bearing puller.
6. You come out at once to pull out two ball bearings at once: first shoots from the top and then from the bottom. If for some reason the ball does not fit and remains in the zone, then, of course, using an iron and a hammer, of course, help it get out. Impacts must be applied to the projection on the handlebar.
Replace the ball bearing VAZ 2101 without a puller
Replacing ball joints Lada Priora - step-by-step instructions
1. First of all, tighten the handbrake, put wheel chocks under the wheels, jack up the car and remove the wheel. I think everything is clear here, no need to describe it!?
2. Use a key set to “19” to tighten the ball pin nut.
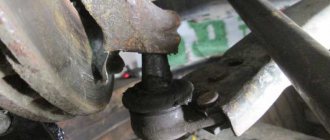
3. Using a ball puller , press the support out of the lever.
4. When the finger comes out of the seat, unscrew the two mounting bolts, which are indicated by a yellow pointer.
Use a pry bar to remove the ball joint.
The support is now released and can be removed.
Take a new Priora ball joint, remove the boot from it, then fill it with lubricant, for example Litol.
Options
As you can see, the quality and durability of a ball joint for any car is built on these important details. And for the VAZ-2110, the support should have the following parameters, if you can check them:
- finger angle - minimum 50°>;
- finger swing moment - 0.4-0.8 kGs/m >;
- moment of finger scrolling - 0.4-0.8 kGs/m >;
- the force of destruction of the top cover (pulling out a finger) is 2900 kgf .