The timing belt on eight-valve “tens” is a ring belt of a toothed rubber structure.
It is designed to transmit torque from the crankshaft gear to the camshaft gear. The timing drive also includes a tension roller, with which the belt is given the required tension. In addition, the timing belt drives the water pump by rotating its drive gear.
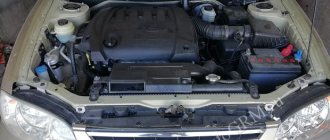
We change the belt ourselves (on the 8 valve model)
Replacing the VAZ 2114 timing belt is strictly regulated in the car's operating instructions. It is recommended to change this part after 30-45 km. But you can’t rely only on recommendations; over time, without running the required kilometers, it slips off the gears, eats, bursts, and may even rupture.
For a car with a 1.5-liter 8-valve engine installed on it, a belt break will not have serious consequences: the car will simply stop and will not start. And in a 1.3 liter engine, the valves may become damaged, which will lead to breakdown of the entire engine. If an injector is installed on the VAZ2114, then when the belt slips, eats or breaks, the dashboard will display: “headlight sensor error.” Solve the question after how many km. This part should be changed after a visual inspection and a replacement should be made if it is in poor condition. Which strap is better to choose is written in the manual for the VAZ 2114.
Required Tools
To carry out the replacement yourself, you need to prepare new spare parts and tools:
- a set of keys;
- new timing belt;
- new tension roller.
Stages of work
The DIY replacement sequence consists of the following steps:
- The car must be set to the handbrake.
- Set to 4th or 5th gear.
- After unscrewing the three bolts, remove the cover that protects the camshaft drive.
- Next, you need to loosen the generator drive belt and remove it from the crankshaft along with the pulley, leaving the bolt that holds it in place.
- Now the car should be put into neutral gear.
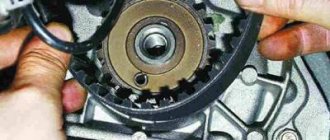
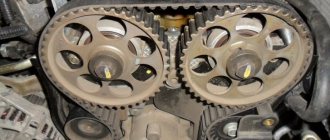
- The next step is to take care of the marks. To do this, rotate the crankshaft in a clockwise direction, observing the marks and the flywheel. The shaft should be rotated until the mark is parallel to the middle division of the scale.
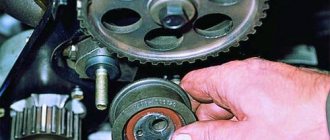
- After making sure that the mark on the pulley is opposite the mark on the protective cover, you need to slightly loosen the fastening nut on the tension roller. If necessary, change the tension roller.
- Using a roller, you need to loosen the tension of the strap to remove it.
- Next, you need to install a new product on the crankshaft timing pulley.
- Then you need to pull the leading branch of the product onto the camshaft pulley so that it does not sag.
- Then turn the crankshaft 1.5-2 turns and set the marks. If the marks do not match, the belt should be removed and the installation procedure repeated again.
- After setting the marks, you need to unscrew the bolt on the crankshaft and put the generator pulley in place, securing it with the bolt.
- By turning the tension roller counterclockwise, it is necessary to adjust the timing belt tension and put on the alternator belt.
Why you should change the timing belt yourself: you will save time and money, you will know what to do if it slips or eats.
Help in choosing a timing belt and rollers
The reliability, efficiency and operating life of the motor depend on the quality of the rollers and belts chosen for replacement.
Research shows that the cost of a belt is from 450 rubles, and rollers will cost you at least 600 rubles.
When buying spare parts, be guided by the opinions of VAZ 2110 car owners. There are many forums. Also consult with specialists at the service station. They will be able to give professional advice, or even order quality components for you.
Surveys among owners of AvtoVAZ’s creation, namely the VAZ 2110, showed that the most popular belts are products manufactured by the following companies:
- Gates;
- Bosch;
- Kraft;
- Power Grip;
- Dayco;
- Contitech.
As for videos, it’s better to pay attention to the following brands:
- Gates;
- Power Grip;
- VPZ;
- BRT;
- Dayco;
- Marel.
Of course, the choice is purely individual and depends on the financial capabilities and available assortment of a particular store. But if the necessary elements are not available in your city, you can always order them online. Nowadays this is not a problem.
How to change it yourself?
Before changing the timing belt yourself, you need to study the diagram of the gas distribution mechanism, stock up on the necessary tools, and also imagine the order of work in the form of a sequence of actions.
Before replacing, study the timing diagram
There are differences between modifications of the VAZ 2112, but the basic algorithm is approximately the same for all modifications. This algorithm can also be used on VAZ cars of other modifications, for example, 2110. It is necessary to have a good manual that explains the progress of work step by step. And if you have at least a little experience in car maintenance and minor repairs, we can calmly carry out timing belt maintenance ourselves and change the necessary parts.
Tools and materials
The set of basic tools is small:
- socket heads for 10, 15 and 17;
- spanner or open-end wrench 17;
- large flat screwdriver;
- key for the tensioner pulley (if power steering is installed on the car).
The materials required are a new timing belt.
Step-by-step instruction
- The work begins by removing the negative terminal of the battery.
- Using a 10mm socket, unscrew the six bolts and remove the gas distribution mechanism cover.
- The crankshaft sensor chip is disconnected.
- The crankshaft sensor mount is unscrewed. Then you need to remove the sensor.
- The sensor hole must be aligned with the part of the pulley where there are no teeth. This is done so that the crankshaft sensor can detect TDC (top dead center). In addition, the area without teeth is used to block the pulley. After alignment, you need to put a 12mm hexagon in the hole of the sensor and fix the pulley.
- When the pulley is blocked, the generator nut is unscrewed.
- The belt tension roller bolt is loosened. After this, the belt is removed. Often during this operation the tension and support rollers and the pump are also changed.
- Installing a new timing belt. There are two ways to correctly install this part. First: put on the belt with the tension roller removed. The tension is adjusted after installing the roller. Second: install the belt by turning the exhaust camshaft pulley using a 17mm wrench.
- Next, you need to tighten the timing belt using the adjusting bolt. It rotates using a 10 key. Rotation clockwise increases the tension, counter-clockwise weakens it.
Replacing a belt on a car with power steering
If your car has power steering. then the procedure for replacing the timing belt has some differences. Before starting work, it is necessary to remove the power steering reservoir, since it blocks access to the timing belt.
In addition, cars with power steering do not have an adjusting bolt. The belt is tensioned using a tension roller and a special key. If such a key is not available, you can use a homemade device consisting of two nails and a screwdriver. During operation, it is necessary to check the degree of belt tension and, if necessary, tighten it. Finally, you need to tighten the tension roller nut.
Features of labeling
Before tensioning the belt and tightening the bolts, you need to check the position of the marks. If the marks are set incorrectly, this will, at best, manifest itself in a decrease in engine power and traction characteristics. In the worst case, in those engines where valve bending is possible, it can occur even with a fully functional timing belt.
In order to avoid these problems, it is necessary to follow the order of placing labels:
- After installing the timing belt, but before tensioning it, the marks on the crankshaft pulley and the oil pump housing are aligned.
- Marks are placed on the intake and exhaust camshaft pulleys.
- The belt is tensioned, the tension roller nut is tightened.
- The crankshaft rotates two revolutions. If after this check the position of the marks remains the same, you can replace the crankshaft sensor, connect the power connector and replace the timing cover. Replacement of the VAZ 2112 timing belt is completed.
The stages of replacing the timing belt can be seen in the photo below.
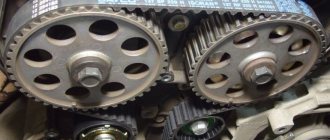
Blocking the crankshaft pulley
Placing marks on the crankshaft
Marking valve pulleys
Belt replacement
Replacing the timing belt must be described separately, depending on how many valves your VAZ 2110 has - 8 or 16. Self-repair of the unit on an 8-valve engine is considered easier, although you should not have any serious problems with a 16-valve engine.
8 valve
The sequence of work will be as follows:
- Disconnect the battery by removing the negative cable;
- Unscrew the bolts from the belt protective cover;
- Remove this protective cover;
- Remove the front wheel on the passenger side, while simultaneously removing the mudguards and engine compartment protection;
- Turn the generator pulley clockwise so that the marks on the cover and the pulley match;
- Remove the protective plug from the gearbox and check in the resulting hole to see how much the control marks match;
- Using a metal screwdriver or other object, you need to block the flywheel;
- After this, you can unscrew and remove the generator pulley;
- Make a few turns to loosen the nut that holds your belt tensioner pulley in place;
- Remove the old belt. You won’t need it anymore, so feel free to send it to the landfill;
- The space needs to be cleaned and degreased. White spirit is perfect for this;
- After rinsing, dry everything using a dry and clean cloth;
- Install the new roller following the direction arrows. If they are missing, then take the inscription into account. It should be located from left to right, that is, you could read it without any problems;
- To tighten the belt, move the roller counterclockwise;
- Check that all marks and the degree of belt tension match correctly;
- The compression ratio should be checked on a cold engine and at an air temperature within 15-30 degrees Celsius;
- Turn on the motor and with the unit running, check whether you have installed everything correctly;
- If the sound is normal, then the installation was completed correctly;
- Reassemble the removed elements in reverse order.
The replacement can be considered complete.
16-valve
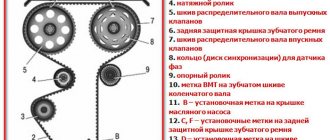
Diagram of the timing mechanism 16 valve VAZ 2110
The VAZ 2110 is equipped with two types of engines - with 8 and 16 valves. At the same time, replacing a 16-valve valve is considered more difficult. Experienced craftsmen assure that for a high-quality timing belt change it is enough to put in a little more effort and attention.
Therefore, in this case, the work must be done as follows.
- Remove the six nuts that hold the protective cover in place. Remove the protection cover.
- Release the crankshaft sensor.
- Find an area on the pulley that is missing a tooth. It will act as a guide to find top dead center.
- Install the piston from the first cylinder so that it is at top dead center.
- Align the pulley and crankshaft sensor, lock the pulley, unscrew and remove it.
- Next, loosen the nut located on the tensioner pulley.
- Remove the old belt and also remove the tensioner pulley.
- Clean the freed space from dirt, oil, and clean it with a dry cloth.
- Install a new belt and secure the pulley with bolts. It is recommended to replace the roller itself at the same time.
- Make sure that the belt and drive marks match, as well as the timing gear marks.
- Tension the belt using the tensioner roller.
- Check the elasticity after stretching.
- Make two full revolutions of the crankshaft to check the quality of the assembly.
- Make sure that the marks match, after which the pulley can be installed in place.
- Turn on the engine, check for correct installation, and then reinstall the protection casing.
Articles
2108-1006120 – roller
Attention: parts 2108-1006120 and 2112-1006120 are not interchangeable!
2108-1006129 – pin for the roller;
2108-1006040-10 – belt;
2108-1006149 – seal under the casing;
2108-1006146 – plastic casing.
Analogs of belts
- GATES 5521 or 5521XS (heavy duty), recommended
- FINWHALE BD-111
- BOSCH 1 987 949 559
- LEMFORDER 58-111-19 or 14458 01
- CONTITECH ST-527
- GOOD YEAR G1474 (semicircular tooth) or G1485 (trapezoid tooth)
- DAYCO 111x190/1
Show all articles
- HANSE HZ 011 008
- BRTI 21080-1006040-10
- TOYOTA 13568-19035
- RENAULT 7701462019
- OPEL 636359
- ROVER GTB1124
- AYWIPARTS AW2110560
- PROCODIS FRANCE 05CD27
- FAI 40305
- GK 791170
- MAGNETI MARELLI 340018181434
- MAPCO 43080
- HEPU 29-0165
- OPTIMAL R-1113
- SCT G124
- WILMINK WG1151273
- VEYANCE G1474
- OPTIBELT ZRK 1123 (3 pcs.)
- TRISCAN 8645 5521 (2 pcs.) or 8645 5124 (2 pcs.)
- FLENNOR 4410 (2 pcs.) or F904410 (belt + roller)
- LYNXauto 111CL19 (1 piece) or PK-1236 (belt + roller)
Analogues of the video
- GATES T42042 or T42042A (2 pcs.)
- MAPCO 23081
- FLENNOR FS99018
- LUK 531 0671 20
- OPTIMAL 0N1917
Show all articles
- BREDA LORETT TDI3009
- TORQUE 830900AE2
- ESPRA 2108-1006120/ES0108
- INA 531075010
- CORAM C747
- VPZ-23 830900AE1
Replacing the timing chain
It remains to note such a point as replacing the timing chain. We can say right away: it is absolutely no different from the belt replacement algorithm. The main difficulty is the preparatory operations, with the help of which you can get to the desired part. On average, this takes several hours, while direct replacement takes a few minutes.
So, it is quite possible to cope with replacing the timing belt yourself. Of course, this procedure is not quick, but it is quite accessible even to beginners.
The main thing is to stock up on the appropriate tools, as well as a user manual for the car. Some things are unique to a particular model.
For example, how to properly tension the timing belt is written there. Remember that if you do something once, it will be much easier the next time.
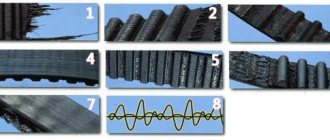
Belt faults
Malfunctions of the timing belt can arise as a result of its long-term operation, and can also be the result of incorrect adjustment or malfunctions of the pump or tension roller. These include:
- violation of the integrity of the belt (cracks, delamination);
- deformation;
- belt break.
If any of the specified malfunctions are detected, the belt must be replaced.
Causes of belt breakage
One of the common problems with the model is the failure of the timing belt. The reasons for this may be different:
- Simple wear and tear caused by a long period of use of the vehicle;
- Regular increased loads under which the engine has to work intensively;
- Mechanical damage as a result of improper operation or received during the repair of other components;
- Manufacturing defect.
Over time, it stretches so much that the gear teeth jump by 1-2 links. This disrupts the valve timing and causes interruptions in engine operation. But this is the best-case scenario for such a situation. The worst is when the strap breaks and the valves bend. By the way, this problem was finally solved on the new Lada Vesta.
List of damage to the timing belt on the VAZ 2110
Replacing the timing belt of a VAZ 2110 8-valve injector with your own hands is carried out:
- As a result of increased tension, the surface begins to become shaggy. Gaps appear.
- If the product was loosely tensioned, this leads to cutting off the tooth. In such a situation, replacing the VAZ 2110 8-valve timing belt on a VAZ 2110 is required immediately.
- The teeth are largely worn. This is also a consequence of poor tension adjustment.
- The surface of the product is covered with small cracks. This happens due to prolonged overheating or hypothermia.
- Sometimes the wear area is between the teeth. This is also the result of poor belt tension.
- If oil constantly leaks from the engine and gets on the belt, then the product is removed. Then you need to find and fix the leak. The timing belt is replaced with a new one.
- On a VAZ 2110 with 8 valves, the timing belt is changed if there was a misalignment during its installation. Its end wear is observed.
When driving the car, you must constantly listen to noises. When it is clearly audible in the engine area, it means you need to stop and tighten the belt.
In some cases, the tooth skips. This problem is indicated by a signal from the sensor. It is necessary to stop and carry out another drive adjustment.
Timing belt life
From time to time you need to inspect the belt and replace it if:
- the belt structure began to delaminate;
- cracks appeared on the surface;
- the teeth that are on the inner surface of the consumable are damaged.
But what could be the reasons that the consumable has reached a state where it is no longer possible to do without replacing it:
- the consumable was not properly tensioned initially;
- the belt has been used longer than expected;
- a lubricant has reached the surface;
- the water pump did not work well;
- the tension roller had play.
If you do not periodically inspect the belt and do not change it on time, this can ultimately lead to a break. And a break is very serious, since in this case the pistons will collide with the valves. As a result, they will be damaged and the engine part will have to be seriously repaired. A broken belt drive will cause real chaos, as a result of which other timing parts will also suffer serious damage.
The manufacturer promises that you should be interested in the condition of the belt only after 50,000 km. This is not entirely true, because premature wear of consumables can be influenced by a number of factors, such as aggressive driving or weather conditions. Therefore, it is recommended to inspect the belt drive after 20-25,000 km.
Signs by which you can determine the need to replace the VAZ 2110 timing belt
To replace the timing belt on time, you need to monitor the condition of the engine. The timing belt needs to be replaced if:
- there are oil leaks on it;
- there are many cracks and signs of increased wear on its surface;
- timing belt teeth are damaged;
- the belt has delaminated, cuts, bulges or folds have appeared;
- threads appeared on the surface.
Why change the belt?
In accordance with the list of routine maintenance for the VAZ 2110, the timing belt must be changed after every 60-75 thousand kilometers, however, here you also need to take into account the conditions of its operation, and this is:
- temperature changes;
- oil getting on the belt;
- problems with the tension roller;
- faulty pump.
All this will inevitably lead to damage.
It is necessary to inspect at least once a month:
- belt (determining its integrity);
- tension roller ;
- water pump gear.
And although on 8-valve VAZ engines, the valve does not bend when the belt breaks, this breakdown can damage the pump or generator.
Consequences of incorrectly setting timing marks
If the ignition is set incorrectly, the following negative aspects are possible:
- If the engine has 16 valves, then they become deformed or bent during operation, accumulating damage.
- The previous problem causes damage to the cylinder head.
- The guide bushings may also become unusable.
- Cracks may appear in other engine components.
Crack in the cylinder block
- The motor overheats.
- The engine piston mechanism can burn out.
- Oil residue may appear on the spark plugs.
Oil deposits on spark plugs
The fuel mixture loses its ignition moment.
After repairs, the following factors most often indicate an incorrectly set ignition:
- The car accelerates worse.
- Frequent overheating of the motor.
- The craving became much worse.
Timing belt VAZ 2114 8 valves: functions, location and signs of malfunctions
So, the belt is under a protective cover on the crankshaft pulley side. The belt itself is a ring structure, made of reinforced rubber, and has an internal tooth structure so that the teeth on the crankshaft pulley and timing gear can engage with the belt.
Engaging with the crankshaft and camshaft with its toothed side, the belt ensures synchronous rotation of the shafts, and with its smooth side it drives the water pump shaft of the internal combustion engine cooling system. The required timing belt tension is maintained by a tension roller.
If the timing belt is torn or has become dislodged/flipped off or jumped, the vehicle’s internal combustion engine stalls or operates extremely unstably. Possible signs of timing belt failure:
- the engine stalls;
- the car does not start;
- “phase sensor error” lights up - failure of the timing belt (displacement or slippage of the belt).
It is important to understand that, subject to constant wear and various loads (including temperature), the timing belt 2114 may fail ahead of schedule
For this reason, it is important to pay attention to signs of problems with this element. For example, the timing belt on a VAZ 2114 “chews”. There may be several reasons why the timing belt is chewing.
This is either mechanical damage to the teeth of the crankshaft or pulley, sagging belt, displacement of the axes of the pump roller and tension roller, etc.
There may be several reasons why the timing belt is chewing. This is either mechanical damage to the teeth of the crankshaft or pulley, sagging belt, displacement of the axes of the pump roller and tension roller, etc.
For example, the timing belt on a VAZ 2114 “chews”. There may be several reasons why the timing belt is chewing. This is either mechanical damage to the teeth of the crankshaft or pulley, sagging of the belt, displacement of the axes of the pump roller and tension roller, etc.
Another such reason may be the belt slipping or moving to the side relative to its working position. This can lead to damage to the timing belt structure (contact with metal parts, abrasion on the edge of the tension roller) and, accordingly, disruption of the car engine.
The main reasons for belt displacement can be:
- manufacturing defect of the product (different rigidity across the width);
- failure of the water pump bearings (play, lack of lubrication, poor cleaning of the seat);
- deformation of the tension roller mounting pin (improper tightening or errors when replacing elements).
Replacing the timing belt for a VAZ with a 16 valve engine
We put the car on a flat surface, raise the handbrake and put it in first gear. Remove the decorative engine cover and the protective cover of the timing belt. Using a 19 mm spanner or a wrench, turn the generator pulley until the mark on the camshaft pulley aligns with the “tendril” of the protective casing mounting bracket on its left side. We move to the right and remove the rubber plug in the clutch housing to make sure that the marks on the flywheel match the triangular cutout on the scale, which is located there.
After all the marks match, loosen the tension on the generator drive belt and unscrew the bolt securing the pulley to the crankshaft gear.
We remove the gear and check the alignment of the marks on the oil pump cover and the crankshaft gear. The generator pulley mounting bolt must be installed back in order to subsequently rotate the crankshaft to check the correct valve timing. Next, you need to loosen the bolt securing the tensioner (tension roller) and use a special wrench to turn it clockwise until the timing belt tension is released. Now you can remove the old belt.
We put a new belt on the crankshaft gear, then on the camshaft gear, tension roller and pump. Once again we make sure that the marks match. Let's move on to belt tension.
Attention! Due to inexperience, you may encounter the following problem: when trying to tension, the mark may “run away” from the crankshaft pulley and flywheel. This happens due to the fact that you do not tension the drive belt branch (the one that “enters” the camshaft gear) loosely. Tension it as much as possible and, while turning the tension roller, guide the belt teeth with your fingers into the teeth of the camshaft pulley so that torque is transmitted to the crankshaft
There is another option - make an allowance of half a tooth - a tooth on the camshaft pulley. After putting on the belt, turn it until the mark coincides with the “tendril” on the bracket, and carefully tighten the loose branch of the belt (from the side of the tension roller and pump) by turning the roller counterclockwise
Tension it as much as possible and, while turning the tension roller, guide the belt teeth with your fingers into the teeth of the camshaft pulley so that torque is transmitted to the crankshaft. There is another option - make an allowance of half a tooth - a tooth on the camshaft pulley. After putting on the belt, turn it until the mark coincides with the “tendril” on the bracket, and carefully tighten the loose branch of the belt (from the side of the tension roller and pump) by turning the roller counterclockwise
This happens due to the fact that you do not tension the drive belt branch (the one that “enters” the camshaft gear) loosely. Tension it as much as possible and, while turning the tension roller, guide the belt teeth with your fingers into the teeth of the camshaft pulley so that torque is transmitted to the crankshaft. There is another option - make an allowance of half a tooth - a tooth on the camshaft pulley. After putting the belt on, turn it until the mark coincides with the “tendril” on the bracket, and carefully tighten the loose branch of the belt (from the side of the tension roller and pump) by turning the roller counterclockwise.
Checking the condition of the belt
First, remember that you need to check the condition of the belt once a year, or every 10-15 thousand kilometers. Replacement is carried out after every 50 thousand kilometers.
To examine the status of an item, follow these steps:
- Remove the plug from the protective front timing cover;
- Remove the alternator belt so that it does not interfere with you;
- Unscrew the six bolts, which will allow you to remove the cover;
- Access the belt and examine it.
Removing the timing belt cover
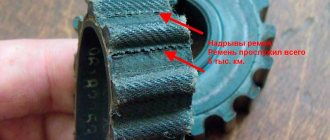
If you notice any of the following, be sure to proceed with replacing the belt:
- The element has bulges or cuts;
- Broken threads and traces of delamination appeared on it;
- There are abrasions, cracks or folds;
- Oil is leaking.
Causes of belt breakage
One of the common problems with the model is the failure of the timing belt. The reasons for this may be different:
- Simple wear and tear caused by a long period of use of the vehicle;
- Regular increased loads under which the engine has to work intensively;
- Mechanical damage as a result of improper operation or received during the repair of other components;
- Manufacturing defect.
Regardless of the causes of the problem, it must be eliminated. Over time, it stretches so much that the gear teeth jump by 1-2 links. This disrupts the valve timing and causes interruptions in engine operation. But this is the best-case scenario for such a situation. The worst is when the strap breaks and the valves bend.
Originals, analogues, articles and prices
Drive specifications: length 1295 x number of teeth 136 x width 9.5 mm.
| Name/article | Price in rubles |
| Original | |
| VAZ-2112 engine 16 valves, 2112-1006040-83 | From 1600 |
| VAZ 21120-1006040-00 | From 1600 |
| VAZ 2112-1006040 (16 valves) | From 1600 |
| GATES K015644XS | From 2000 |
| GATES K015536XS (16 valves) | From 2000 |
| GATES K055781XS, K015587, K015564 | From 2000 |
| Analogs | |
| BOSCH 2112-1006040 | From 1200 |
| INA 530055410 | From 1200 |
| CONTITECH CT996 | From 1200 |
| GATES 5539 | From 1200 |
| BOSCH 1987948286 (16 valves) | From 1300 |
| BOSCH 1987946329 | From 1300 |
| CONTITECH CT527K2 | From 1800 |
| CONTITECH CT1137K1 | From 1800 |
| LYNXauto 137FL22 (16 valves) | From 1500 |
| Hola TH1372 (16 valves) | From 1500 |
| BOSCH 198798527 (tension rollers) for VAZ 8 and 16 valves | From 450 |
Before purchasing spare parts, check the compatibility of the parts with the model of your technical device.
Check the catalog numbers against the data specified in the instruction manual. When we change the belt, do not forget to put marks on the crankshaft and camshaft. Many car enthusiasts neglect this rule, as a result of which the engine does not start, operates unstably, and the ignition angle is lost.
Which belt is better: domestic or foreign manufacturer. Russian analogues are not inferior in quality to imported ones, so it is not rational to overpay for a brand name. The final decision is made by the owner of the technical equipment, but it is necessary to listen to the opinions of experts.
Causes of drive belt wear
- Duration of vehicle operation without intermediate prevention and diagnostics;
- Installation of non-original parts, poor workmanship;
- Mismatch in length, width, number of teeth;
- Aggressive driving style, speed limits;
- Critically high (low) temperature conditions, climatic features.
Signs of belt wear
- Unstable engine starting: excessive wear or weak tension leads to malfunction of the ignition system;
- Copious amounts of smoke from the exhaust pipe due to melting of the catalytic filler;
- The appearance of third-party sounds when the engine is running;
- Presence of oily streaks around the perimeter of the drive mechanism;
- Cracks, fiber breaks on the belt, broken teeth, other signs of wear;
- The power unit does not start, the starter rotates.
Consequences of untimely replacement of the timing drive
- Wear of pistons, crankshaft liners, camshaft, valve mechanism;
- Increased engine oil consumption;
- Deformation of gears, cylinder head (cylinder head).
Replacing the timing belt of a VAZ 2112 with a hanging wheel
If you are changing a belt with a wheel hanging out, then while tensioning the belt, install the wheel and lower the car to the ground. Engage first gear. This will also prevent the crankshaft mark from running away. Having ensured that the tension is correct, the car will still have to be raised so that it is possible to rotate the timing drive to check the marks. But there is a way out! Ask a neighbor or assistant to simply depress the clutch pedal.
Checking the timing belt tension
A well-tensioned belt should bend 90 degrees from the force of your fingers. If you overtighten, there will be problems with the tensioner and pump bearings. If you don’t tighten it enough, the belt will either jump (which will disrupt the valve timing) or fall off altogether.
So, the belt is tight. We turn the crankshaft twice to make sure that the marks match. If the marks match, then return the generator pulley to its place, tighten its drive belt and install the protective and decorative elements of the engine back. After 2 - 3 thousand kilometers of the car, check the belt tension and its condition again. The optimal service life of the timing belt before it is replaced again is 40 - 60 thousand kilometers. The frequency of checking its tension is 15 thousand kilometers.
Dear friends, today we will tell you the basics of setting timing marks using the example of a VAZ 16 valve engine. It's no secret that correctly set timing marks are the key to proper engine operation. If the marks are set incorrectly, then normal engine operation is impossible.
It is also important to tension the belt correctly, this greatly affects its durability. So, when do we have to deal with the procedure for setting timing marks? When, according to the regulations, we need to replace the timing belt at the next maintenance, by the way, the rollers are also necessarily changed along with the belt in this case. Also, if our pump is “covered”, the timing belt will have to be removed, since it is this that drives our “water pump”
Well, if (the worst case scenario) – our belt broke. Here, if the engine is “plug-in”, then this is a huge nuisance, the pistons meet the valves, and at a minimum, we are guaranteed to remove the cylinder head and replace the valves. So, what are timing marks and where are they applied? The first is the marks on the camshaft pulleys, both intake and exhaust:
Also, if our pump is “covered,” the timing belt will have to be removed, since it is this that drives our “water pump.” Well, if (the worst case scenario) – our belt broke. Here, if the engine is “plug-in”, then this is a huge nuisance, the pistons meet the valves, and at a minimum, we are guaranteed to remove the cylinder head and replace the valves. So, what are timing marks and where are they applied? The first is the marks on the camshaft pulleys, both intake and exhaust:
They must coincide with the mark on the crankshaft, and there are already several methods for calculating this mark. It’s quite difficult to remove the generator belt pulley (it doesn’t allow you to see the mark) and see if the marks match.
With such a coincidence of the piston marks, they are at TDC (Top Dead Center)
And finally, the third option for setting the crankshaft position is the marks on the flywheel, they can be seen if you remove the rubber plug on the gearbox:
These are the options for comparing timing marks that we offer you using the example of 1.5 16V engines installed on the VAZ-2110, VAZ-2112 and VAZ-2111. If you still have questions regarding timing marks on your particular engine, ask them on our forum, in the appropriate section.
The 16-valve engine, which is provided in the VAZ-2112, is very good; it has excellent characteristics compared to an eight-valve engine:
- thermal gaps do not need to be adjusted;
- gasoline consumption is significantly reduced;
- The engine was assembled in accordance with international standards.
However, not everything is as smooth as we would like in the 16-valve VAZ-2112 engine, and quite often a serious breakdown occurs due to a broken timing belt.
Timing belt price
The price of a VAZ 2110 timing belt, depending on the manufacturer, can vary from 400 to 1000 rubles. The tension roller costs about the same, which is recommended to be changed along with the belt. The cost of replacing these timing drive elements is 600-1000 rubles.
To save money, you can replace the belt and roller yourself. There is nothing complicated in this procedure, and no special tools are required. You just need to purchase spare parts.
The table below shows timing belt models for the 8-valve VAZ 2110 from different manufacturers, indicating their catalog numbers.
| TIMING BELT VAZ 2110 (8 VALVES) | |
| AVTOVAZ | 2112-1006040 |
| BOSCH | 1987949559 |
| CONTI | CT996 |
| CONTITECH | CT 996 |
| GOODYEAR | G1535 |
| GATES | 5539 |
| FLENNOR | 4428 |
| LUZAR | LTB0112 |
| LYNX | 136CL254 |
| PILENGA | CTP0996 |
| OPTIBELT | ZRK1538 |
| TENSION ROLLER | |
| AVTOVAZ | 21120-100612000 |
Lada 2112 2007, 89 l. With. - with your own hands
Lada 2112, 2007
Lada 2112, 2007
Comments 48
I don’t know what they write about here regarding belt tension on 2112, on PRIOR everything is tightened little by little through the tension roller. The right branch of the belt through the guide roller should already be laid: - through two camshaft pulleys, a crankshaft toothed pulley, through a pump and have sufficient tension. In this case, the marks on the camshaft pulleys and the crankshaft toothed pulley must be fixed using the corresponding counter marks
In this position, holding the belt with your hand on the left side of the branch, on the side of the tension roller, so that it does not weaken and does not jump over the teeth, no matter where and in what place (and this is possible even for one tooth), we place or slip the tension roller under the belt , insert its bolt and tighten everything with such a turn of the roller by hand that the belt does not loosen and does not jump over the teeth
Next, spin the engine several times, or maybe it’s better, by the wheel with 4-5 gear engaged, and make sure that all the marks on all the pulleys match perfectly. How to recognize the mark on the ring gear of the generator drive pulley on the crankshaft, I have already written below and given a drawing. With the wheel removed and the stand hanging with the steering wheel turned, this ring and the DPKV are clearly visible, or almost well, through the mirror.
Then, after cranking the engine several times by hand, carefully, slowly - and what the hell is not joking, the marks didn’t match when parked and the valves were bent with the starter, yikes, then you begin to tighten the roller to working condition. At the moment when, when cranking the engine, the right branch self-tensions when viewed from the side of the pulleys - and the left one weakens, this is where you need to tighten the roller - like how everyone around writes and rips off each other. On a Priora, the tension of the roller can be general or weak, the belt will jump, or the roller may be pressed against the belt so that it and other damn spare parts will feel sick
At the moment when, when cranking the engine, the right branch self-tensions when viewed from the side of the pulleys - and the left one weakens, this is where you need to tighten the roller - like how everyone around writes and rips off each other. On a Priora, the tension of the roller can be general or weak, the belt will jump, or the roller may be pressed against the belt so that it and other damn spare parts will become sick.
Don't be afraid to start the engine to see how your video lives when the engine is running. Nothing will happen to either the belt or the roller when adjusting in a tightened state. The main thing is that the belt does not dangle too much, otherwise it will either fly off or fly like plywood over the toothed pulleys and fucking bend the valves. If the tension roller is dead, overtightened, the belt may hum a little from the overtightening, which in turn will affect on a PUMP, therefore, it will not last long due to a strongly tightened belt (of course it will not immediately fall apart) - then we begin manipulations to tension the roller. The ROLLER on the Priora should be alive when the engine is running. It should vibrate inconspicuously on the tension spring and this is clearly noticeable, and when you press the gas sharply it jumps, pushing up well with the belt and this can be seen even by a blind mole.
What is written in the Talmuds about how to pull a roller does not always coincide with reality. Therefore, it may be that when you set it up as written in the bible for dummies, the roller will simply rest in peace and will not work properly. Therefore, everything is relative to different manufacturers and defects.
In general, honestly, it’s better to under-tighten the roller a little than to over-tighten it. The roller, the pump and the belt will live. The main thing is to watch and listen for extraneous sounds in the timing belt area.
More than once I had cases where the belt was about to fly off, dangled and shouted, pull me up, even rubbed the protective cover. The casing probably saved the day because the belt did not fly off and the piston did not stick into the valves.
But for those who have plugless pistons, they are destined to drive on loose belts. Well, just think, it fell off, hey, hey, but everything lasts a long time and doesn’t break. By the way, the tenth cans have 2110 and some others may have rollers with flanges, they don’t have to worry too much about it, these rollers won’t let the belt fly off just like that from weakness. — It’s okay to slip over the teeth of the pulleys, well, just think, the traction has dropped or it’s completely stalled, corrected it, tightened it and again the gas is up to the limit. The main valve head and pistons cannot be killed. They already write on the Internet that AvtoVAZ began producing engines with 98 hp. and 106 hp with plugless pistons - Freebie please! But the 1.8 liter engines are 122 hp. Not yet, just look for and install such pistons yourself.
So, change the pumps themselves and the safety belts. brr timing belt and don’t be afraid of anything. The main thing is logical thinking and the right approach to what you want to do.
Signs of wear
The timing belt drive synchronizes the operation of the power unit. This is a very important function. The gas distribution mechanism ensures that the camshaft rotates at a speed lower than the crankshaft. And the main purpose of the timing belt is to release gases through the valves. But when the belt definitely needs to be replaced:
- the belt teeth are worn out;
- the structure has delaminated;
- the ends are torn;
- We have already talked about the presence of oil on the surface.
Belt tension
Tension plays an important role in the proper operation of the engine and reduces the effect of wear on its condition. It’s worth knowing when to stop – too much or too little tension leads to interruptions and rapid damage. Let's carry out this setup step by step:
Turn the crankshaft counterclockwise by two camshaft teeth to tighten the belt. Check the tension. If everything is done correctly, then it will turn at a right angle between the pulleys, with a slight force of the fingers. Otherwise, loosen the fastening nut and turn the roller counterclockwise 10 degrees to loosen the tension. Adjust until tension is set to medium. Remember not to turn the crankshaft by the camshaft pulley to avoid engine damage.