A bumper is a part that protects a car when hitting obstacles and minor accidents. After the incident, she needs repairs. Or the motorist decides to upgrade it. For the convenience of performing these actions, dismantling is performed. Therefore, it is important to know how to remove the front and rear bumpers of a VAZ 2109 with your own hands.
- Keys for 17, 13 and 10.
- Heads for 10, 13 and 17.
- Ratchet.
- Phillips screwdriver.
Tools
The peculiarities of fastening the VAZ 2109 buffer are that it is supported by self-tapping screws and bolts. This allows you to use a minimal set of tools for removal. When performing work you will need to stock up on:
- Keys for 17, 13 and 10.
- Heads for 10, 13 and 17.
- Ratchet.
- Phillips screwdriver.
Installation
Installation is carried out in the reverse order of work. To place an object you will need:
- Place the body kit tightly.
- Tighten two nuts under the hood.
- Secure the bolts to the side members and front wings.
In the version released before 1985:
- The body element is installed, and studs are inserted into the holes.
- Nuts are tightened on the side.
- Bolts are screwed into the wheel arch liners.
How to remove the front body kit
When doing the work yourself, you need to clearly know how to remove the front body kit:
- Using head 17, unscrew the two fasteners from below. They are connected to the front fender liners.
- Using head 10, unscrew the nuts on the side fastening of the bumper, two on each side.
- The studs are removed from the holes in the brackets.
- The object is being dismantled from the front.
In some cases, it may be necessary to remove the body part along with the fasteners. The process looks like this:
- Using wrench 13, unscrew the two nuts securing the front bracket and remove it.
- Using a screwdriver, twist three self-tapping screws and remove the side bracket.
On a VAZ 21099 car produced before 1985 and models released later, the removal process is somewhat different.
With later versions of the car, the part is removed as follows:
- The fasteners are twisted from the side members and front wings.
- Under the hood, you will need to unscrew the two nuts that secure the part.
- When removing the body kit, it is carefully pulled away from the body.
Dismantling and tuning of the bumper for a VAZ 2109 car
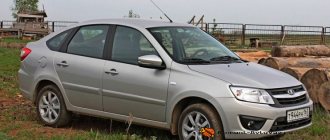
The bumpers of the VAZ 2109 car are famous for their incredible strength. Another feature of the protective elements of the Lada “nine” is its characteristic appearance. Chopped rectangular shapes and black color cannot be confused with another model.
But the time comes when replacing the bumper on a VAZ 2109 is simply necessary. When driving on Russian roads over many years, the protection still becomes unusable. Or the driver gets bored with the outline of the base part and wants to replace it for aesthetic reasons. As an option, use a VAZ 2114 part or resort to tuning. In any case, you will need to remove the front and rear bumpers. This is easy to do even in your own garage. Let's consider the sequence of actions, reasons for dismantling and tuning methods.
How to replace a rear body kit
The sequence of actions for removal is as follows:
- Remove the fasteners using wrench 17.
- From the side, using wrench 10, unscrew the fastening bolts.
- Remove the mounting studs. Due to this, the sides of the object sag slightly.
- Lightly grasping the back of the buffer, pull it away from the body, and remove the object.
- Dismantling the rear brackets attached to the body. This is done with key 13. To remove them, you need to unscrew two screws with a screwdriver.
- It is necessary to remove the beam from the buffer, which increases the rigidity of the structure.
- Removing beam strips.
The installation process is performed in the reverse order of removing the rear bumper.
Reasons for removing a part
Drivers of the “nine” dismantle the front and rear protective elements in such cases.
- Replacement of a VAZ 2109 bumper with the same (basic) one due to severe wear or breakage.
- Installation of a new, more beautiful, protective element.
- Lifting.
- Painting or straightening the body (followed by installing the protective element back).
- Removing the radiator, repairing lighting devices.
In the first case, the protection is removed because it has become unusable. Driving without a VAZ front bumper not only disfigures your car externally, but also leaves body elements and the engine cooling system unprotected. The situation is the same with the rear bumper: without it, the Lada does not look complete, and the body, muffler and rear suspension are at risk. Therefore, it is necessary to remove the damaged part and replace it with a new one. The factory element for BA3 2109 can be purchased everywhere in auto stores.
When replacement is made for the purpose of decoration or bumper tuning is performed, the driver removes the protection and looks for a new one to suit his taste. There are many options for lowered and chunky racing pieces on the market. Some people prefer to equip the “nine” with bumpers from its “successor” - Lada 2114. This is not the best step, because you will have to tinker with installation. The mounting holes are slightly different from those on the 2109. In addition, the rounded shapes of the 2114 exterior do not quite match the chopped style of the “nine”.
You will have to remove the factory part if you decide to completely repaint the body. After all, part of the body is located under the bumper. Dismantling is also necessary to get to the radiator and headlight wiring. If there are failures in the engine cooling system, there are times when you need to remove the radiator. In addition, there is a gap between the protection and the body (sagging), and many believe that such a solution spoils the appearance.
Car enthusiasts do the bumper lifting themselves. This procedure involves cutting off the top edge. Not everyone can do this kind of work with their own hands, and if you are not sure that you can cut the layer evenly, contact a specialist.
Nuances
Before you begin withdrawal, you will need to complete a number of preparatory steps:
- The object is thoroughly washed from dirt and dust.
- The fasteners are tapped with a hammer. Next, traces of corrosion are removed with an iron brush.
- The fasteners are treated with a WD-40 solution. After applying the substance, you need to wait 15-20 minutes. During this time, the product will destroy dirt and corrosion.
- Drive the car to a viewing hole, overpass, or use a jack. The work process will be more convenient.
When replacing the buffer, do not apply much force. This will damage the nut threads. Subsequently, in order to remove the bolt, it will need to be cut off (using a grinder), and this will significantly slow down and complicate the work process.
Almost any motorist can replace the VAZ 2109 buffer. It is important to know the sequence of the operation and be especially careful.
Installing a tuning bumper instead of a standard one
There are a sufficient number of various elements and accessories for tuning the VAZ 2109 bumper. As a rule, bumper tuning is not performed locally, but is performed in conjunction with the installation of other elements such as sills, spoilers and moldings. This type of tuning gives the car an almost unique appearance, but there are also negative aspects.
Firstly, the price, the cost of work and materials quite often reaches a fairly decent amount, which only true admirers of tuning models are willing to shell out.
Secondly, ease of use; in almost all cases of tuning with the installation of purchased body kits, we have rather low bumpers, which are not particularly suitable for driving on bad roads and rough terrain. That is, it is not always possible to go fishing and it will be possible due to the threat of knocking off the bumper.
In connection with these points, car owners of nines are trying to transform it with their own hands in such a way that these changes meet all the wishes and at the same time are cheaper. We will tell you about some methods for making a tuning bumper with your own hands.
Tuning bumper VAZ 2109
Tuning methods
So, in order to create your own unique bumper, you should initially decide what you want - create it from scratch or limit yourself to tuning the standard one?
In the first case, you cannot do without high accuracy, experience and a lot of free time. The joints must be made accurately and accurately, because there should be no gaps or distortions. Particular attention should be paid to the fastenings of the bumper to the body. It is better to install it in its original fastening places or to provide in advance those points where it can be attached. Most of these places are quite simply determined by experienced bodybuilders “on the spot”. Basically, flanges are glued to the bumper, which should be adjacent to the body; in these places they are simply twisted using bolts or self-tapping screws. There are cases when the body surfaces for fastening are quite far away, then it is worth making additional metal brackets.
The second case is the most common due to its relative simplicity. Here we take the standard VAZ 2109 bumper and add new additional elements to it. Such elements include the appearance of new holes, changes in shape, installation of a skirt and air intakes, as well as other elements. However, in this case, the fastening of the bumper to the body remains standard; in principle, the joints do not change.
“What material should I use to make a new bumper or modify it?” - this question arises for any car owner who has decided to independently modify the bumper of his car.
Why invent something if it has long been proven that the simplest materials are polyurethane foam and polystyrene foam. The popularity of these particular materials is due to their availability, price and ease of processing.
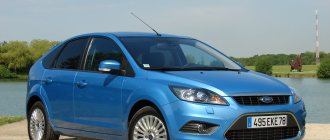
Dismantling of 1st generation cars
For this procedure, you will need Torx keys 20 and 30, a cloth or rags to wipe the trim and the place where the fender liner is attached.
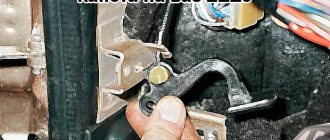
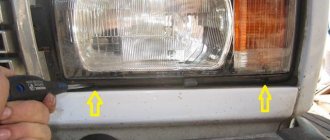
Now you can unscrew the screws holding the front bumper of the Renault Duster. Their location is indicated by arrows in the photo. There are a total of 5 screws around the perimeter, one located at the bottom, under the decorative trim.
After this, using a T20 key, you need to unscrew the screws holding the fender liner. One is located near the junction of the fender and bumper.
There are 2 screws on each side of the fender liner. The second one can be found at the bottom. After this, the T20 key will no longer be needed. You need to take the T30 key.
The most powerful fasteners are located at the top. After these screws are unscrewed, you must carefully move the plastic to the side to disconnect the part from the latches located on special brackets. If during the removal process the brackets are damaged or bent, it is better to replace them with new ones.
After this, it remains to perform a few simple steps.
- Move the top part of the plastic a little
- Pull the bumper towards you, releasing it from its seats
- Disconnect the PTF power connector
How to properly disconnect the PTF connector on a Renault Duster.
The length of the cable is designed in such a way that you can remove the bumper and then disconnect the connector located on the right bracket.
The connector is 4-channel, providing power to two PTFs at once.
Checkpoints
Measuring the distances between body control points is the most common way to check the condition of a car. After taking measurements, you need to check them with the passport data.
The check is performed as follows:
- Dimensions are checked diagonally;
- The current condition of the machine racks is checked;
- The roof is examined visually, the dimensions of the diagonals of the roof itself and the door frame are checked;
- Increased attention is paid to measurements of the rear and front window frames;
- A visual inspection of the entire body is carried out from various angles in order to determine the presence of gaps and bulges that differ from the required parameters.
| Check Point | Passport sizes | Tolerance (+/-) |
| Diagonal of the front doorway from the edge of the lower threshold to the middle of the roof | 1345 millimeters | 5 millimeters |
| Diagonal of the front door opening from the lowest point of the windshield to the middle of the lower threshold | 1000 millimeters | 5 millimeters |
| Distance between front door hinges and pillar in a straight line | 963 millimeters | 5 millimeters |
| Diagonal of the rear door opening from the point where the lower sill joins the central door pillar to the roof | 1112 millimeters | 5 millimeters |
| Diagonal of the rear door opening from the top of the B-pillar to the lower threshold | 860 millimeters | 5 millimeters |
| Long diagonal rear side window frame | 706 millimeters | 3 millimeters |
| Short diagonal rear side window frame | 383 millimeters | 3 millimeters |
| Hood diagonal | 1610 millimeters | 5 millimeters |
| Distance from the middle of the windshield to the middle of the hood | 712 millimeters | 5 millimeters |
Article on the topic: Selection and installation of engine protection on the VAZ 2110
Advice from professionals
Before you start removing the front bumper, you need to perform several preparatory operations:
- wash the part well. Remove accumulated dirt;
- Tap all fasteners with a hammer. Use a wire brush to remove rust;
- treat fasteners with a special solution, such as WD-40;
- After application, wait 10-15 minutes. During this time, the solution will destroy all corrosion and dissolve dirt;
- To make the work easier, use the inspection hole.
Technological process for installing the rear bumper
Before installation, you can completely assemble the part and cover the shock absorbers with a plastic cap. Together with an assistant, the unit is inserted into the side guides available on the car. After installation, it is moved back a little. Install the front element on the sides, moving it slightly forward. Moreover, the front guide must be installed in the hook.
- If the car is equipped with remote parking control, the cable grommet is inserted together with the cable. Then the plug connection is connected. The wire is fixed with a tape clamp;
- new bumper, after installation you need to slightly lift it and set it to be parallel. Tighten all bolts and nuts tightly. The distance from the body to the part should be within 5±1 mm;
- to adjust the desired height, you need to remove the shock absorber, turn the plastic insert until the required position is obtained;
- a rear trim is installed in the trunk;
- The rear visors are mounted, the clips are fixed, and the safety pins are inserted.
You can do the work of replacing the rear bumper of a VAZ 21099 yourself. It is not at all necessary to go to the service station. The most important thing is to have all the necessary tools at hand, to know the structure of the rear assembly, free time and the desire to do the work yourself.
Why change the bumper?
When considering how to quickly change the exterior of a vehicle, you should pay attention to the possibility of replacing a bumper or upgrading an already installed one.
When choosing this body element for tuning, you should pay attention to the following points:
- A bumper is an important element of a car that protects the body from mechanical stress. As a rule, it is made of plastic, which means it does not react to exposure to high humidity and if damaged, corrosion does not appear on the surface.
- As a rule, the bumper becomes the main element of the vehicle's exterior and significantly changes its design.
- All modern cars are equipped with a bumper that has holes for side lights. In this way, the degree of illumination of the roadway can be significantly increased.
Sidebar: Important: If it is necessary to significantly modify the exterior of the vehicle, it is the bumper that should be changed.
Weak spots
What weak points does the body of the domestic nine have? Let's try to find out.
If rotten or deformed elements of the car body are detected, they must be removed and appropriate measures taken to restore the integrity of these areas.
The most vulnerable areas of the VAZ 2109 body include:
- Front floor, reinforced sills, doors, fenders and rear underbody;
- The hood has relative endurance, but over time it begins to lose its former properties. The area above the battery is especially affected. This is where Nine owners most often notice the formation of rust;
- A noticeable problem that many drivers face is the fuel tank floor;
- Optics reflectors and a muffler also cannot boast of a long life without the appearance of signs of rust.
Corrosion is obvious
Corrosion is the main enemy of almost all domestic cars. Although anti-corrosion coatings are done quite well, time, weather conditions and the characteristics of our roads kill everything, rust actively begins to eat the metal and this problem must be dealt with.
Dealing with problems in general terms
To get rid of the problem of rust formation on the body, you need to do some work. On your own or with the help of specialists, decide for yourself.
- Disassemble the engine compartment, drain the coolant and remove the radiator.
- Remove all doors.
- If there is an amplifier (TV) in front, then it will also have to be disassembled.
- Using a grinder, all damaged areas are cut off;
- If the wings or panels are rusty, they will have to be cut off.
- If holes or holes have formed due to corrosion, they can be welded or patches can be used.
- It is recommended to additionally cover areas that are not highly resistant to corrosion with metal inserts.
- Experts advise strengthening mudguards with additional inserts and then securing them with spot welding.
- New body parts that are installed in place of rusted ones must be adjusted in accordance with the standards.
- After processing, the wings and sills are secured with screws, bolts and welding.
- Restoring the geometry of the body is a mandatory activity, on which most of the time is spent. To do this, you will need a bench machine on which the machine is fixed and adjusted in accordance with the norms of the control points.
- The next stage is welding a new floor, if required as a result of assessing the condition of the body. When restoring the floor, patches, connectors and amplifiers are used. At the final stage, the floor is covered with anti-corrosion compounds.
- It is easier to purchase new arches than to try to restore old ones. They can be coated with resin and waste oil mixed together. This mixture is excellent at resisting rust. Just do not use this composition to treat the bottom under any circumstances.
Article on the topic: Adjusting headlights on a VAZ 2114 with your own hands
During body repairs, it is often necessary to jack up the car. If the jacking areas are rusty, use a support beam to lift the car.
Holes, rust
Often, the body is repaired independently if small areas are damaged, dents or holes are formed due to the effects of rust. In addition to correcting the geometry, painting and polishing are performed.
More serious deformations and damage caused by collisions and road accidents necessarily require contacting specialized workshops. Here, focusing on control points and using professional equipment, you can restore the body as correctly as possible without disturbing its geometry, maintaining rigidity and other factory parameters. Sometimes they can even be improved.
Rear bumper removal technology
The part is fastened in three places, on both sides. The mounting bolt (21) is located next to the towing ring, the other is located symmetrically on the opposite side.
To replace the part you will need an inspection hole. If it is not there, you can jack up the rear of the car. It will be possible to unscrew the lower bolts. If the car's ground clearance is high enough, you can do without a jack. Lie under the car, take the keys and a socket to tighten the brackets holding the rear bumper of the VAZ 21099.
First, the fender liners are removed. They are attached with self-tapping screws that can be unscrewed with a Phillips screwdriver. Sometimes the rear wheels interfere with removing the wheel arch liners. They will have to be removed by jacking up the car, each side separately.
This problem can be approached differently. Unscrew only a few screws located along the end of the wing, forcefully bend the fender liner so that it does not interfere with releasing the bolts holding the part.
Use a wrench (10) to unscrew the nuts securing the bumper on each side. Before starting work, so that the nuts can be unscrewed freely, they are cleaned with a wire brush and filled several times with a special liquid WD-40.
Using the head (17), the bolts securing the part to special brackets located on the body are unscrewed. Sometimes these bolts become so severely oxidized or rusted that they become impossible to unscrew. To solve the problem, you can try to unscrew the brackets to which the element is attached.
To operate, you will need a head (13). You can use a spanner wrench.
To remove the rear bumper, you need to remove the pins from the eyes and completely disconnect them. After this, the part itself can be easily removed. It is advisable to carry out the work with an assistant, so that after releasing the bumper, he supports its opposite side, preventing it from falling.
Advice! When the bolts securing the part cannot be unscrewed, you can remove the brackets with a grinder and use a chisel to cut off the nuts holding the brackets.