Everything for the customer, everything for the user. We installed the radio on the car, made the first settings, turned it off, but information messages continue to appear on the display, the backlight is on, and the radio is in a hurry to boast of all its capabilities, except for the ability to disable this demo mode. Let's consider, for example, how to turn off the Pioneer radio yourself.
A modern Pioneer car radio is often a full-fledged multimedia center with a large number of options and a variety of features, for a comprehensive study of which you can create a separate course of lessons for training in a driving school. But sometimes half an hour is not enough to study the operating instructions. But what if leadership is completely lost? Or if you deactivated demo mode on your Pioneer or JVC radio and it restarts.
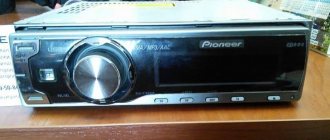
Pioneer car stereo
How to complete the demo
When shipped from Pioneer, the device is set to DEMO ON. Immediately after purchasing and connecting the car radio, it is important to understand whether you need to disable the demonstration intended to advertise the device for sale. In this state, you can use the Pioneer car radio, but it does not seem convenient, since when you turn off the device, the backlight does not turn off and the swipe line does not leave the display.
Turning off the demo on Pioneer Radio Recorder is very simple:
- If long pressing to mute does not help, you need to turn off the Pioneer radio, go to the engineering menu and long press the SRC (Source) button.
- In the settings, by rotating the wheel, we reach the DEMO line.
- Switch from ON to OFF.
- Close settings by pressing BAND.
Pioneer car radio engineering menu
Important: If the red wire (ACC) of the Pioneer radio is not connected to the on/off terminal, the vehicle's battery will be discharged.
Therefore, having purchased a modern Pioneer car radio, the device configuration is quite accessible for independent actions.
Demo mode disabled
What is demo mode?
Demo mode is designed to get acquainted with the car radio.
It starts automatically after the first connection.
This format does not provide for turning off the radio display. It will remain on even after all initial settings have been made. This is necessary so that it constantly displays all the capabilities of the radio on display. The only thing that the radio does not report while working in demo mode is how to disable this state of the device.
Demonstration on JVC car radio
For JVC Japanese, the demo starts automatically if there is no sound for a few minutes. But turning off the demo is simple:
- Press and hold the SEL button until one of the setting options appears on the monitor.
- Scroll through the menu items to select DEMO OFF. On some models, select DEMO ON and press the button - go to DEMO OFF.
JVC car stereo
Note: Do not open the device case. There is a risk of exposure to laser radiation or damage to the player. There is nothing inside the case that can be manipulated by the user; Servicing must be performed by a qualified technician.
Demonstration on a Sony car radio
To disable the demonstration that starts after turning off the Sony radio, you must follow the following sequence:
- Press and hold the select button. The Configuration Monitor is displayed.
- Turn the knob until “DEMO” is displayed, then press the knob.
- Turn the knob to select "DEMO-OFF" and press the knob again. The setup is complete.
- Press the (BACK) button. The monitor will return to normal music/video playback.
It’s important to know: if your car’s ignition switch does not have an ACC position, you need to make sure that the automatic shutdown mode is selected. When the car stereo is turned off, its power will automatically turn off after a while, protecting the battery charge. If Auto Power Off is not selected, each time you turn off the ignition, press and hold the (SOURCE/OFF) button until the monitor turns off.
By the way, many car enthusiasts complain about the player independently switching to another radio wave. The AF (alternative frequency) function is responsible for this. Responsible for switching to a stronger radio signal if the selected frequency, in the opinion of the device, is not strong enough.
It is not difficult to disable it, for example for a Pioneer DEH car radio, the procedure is as follows:
- Press and hold the "TA" button until the "AF" function is activated. The “AF” indicator will appear on the display.
- Press and hold the TA button until the AF function turns off.
In a similar way, you can disable demonstration in players of other brands:
- go to the engineering menu;
- search among the parameters to find the DEMO string and reorder OFF to ON;
- exit the menu.
Everything is simple, the backlight will no longer disturb the driver and passengers, the battery will be more protected from discharge, and music on the road will be a complete pleasure.
Pioneer produces turntables and car speakers in a variety of price ranges. The products are intended for additional equipment of cars. The connection diagram for the Pioneer radio attached to the operating instructions allows you to independently connect and configure the equipment.
Audio
Front speakers
Having configured the radio receiver, as well as connecting sound sources, you can focus on sound quality.
The recommended volume for proper settings is no more than 30 units.
- After adjusting the volume, press the knob to get to the settings menu.
- Here they look for the “Audio” item.
- By pressing the handle, you enter this menu.
- After looking through it, they find the Fader instruction.
Very often it is combined with the balance menu, then the desired menu will sound like Fader/Balance
In the factory setting, these indicators are zero.
It has been empirically proven that here you can bet 100 - 125.
Rear speakers
The front speakers work cleanly, now it’s time to switch the rear speakers on the shelf into subwoofer mode - fortunately Pioneer can do this too.
- Turn off the radio.
- Press and hold the power button (as if you were going to set up the “demo” mode).
- Once in the menu, look for the inscription in the form of SW Kontrol.
- By pushing down the handle, you enter this menu.
- By rotating it, the parameter is set to SW.
- Confirm by pressing the handle again.
- Press the power button to save parameters and exit the menu.
- Then they return to the “Audio” menu (press the volume knob and rotate to select).
- By pressing the handle, you enter the menu.
- Here they look for the inscription SW SETTING1. Click on the handle to enter.
- Of the three options presented in the menu, you need to choose one of two - Normal or Rev.
In most cars, it is the second mode that will give the best sound.
The optimal solution would be to set 50 HZ.
Before moving on to the next settings, check at different volumes how the selected settings work. If you don’t like something, repeat the steps described, trying other values.
Loudness compensation
This option is hidden in the same “Audio” menu.
- Enter the menu, find the Loudness parameter.
- Select by pressing the knob.
- There are three values available here - High, Middle, Low (respectively high, medium, low).
- This parameter is responsible for adjusting frequencies at low volume levels. It is also impossible to give optimal settings here - they are set experimentally.
- Swing the knob to the left to go to “Audio” or from settings by pressing Band.
Equalizer settings
For advanced music lovers, here are a few more equalizer settings. They are hidden in the same “Audio” menu.
- Once in the menu, rotate the knob to select the EQ SETTING parameter.
- Enter this menu (depending on the model, you may need to enter another menu here). The three parameters offered in this menu are responsible separately for the settings of the low, mid, and high frequencies.
- Set according to your preferences. On some models, you can select several preset settings here. Depending on the speakers and your own preferences, adjust these parameters.
The settings here are no different from others - select by pressing, change by rotating, going to a higher level by swinging the knob to the left.
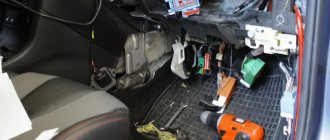
How to install and remove
The Pioneer radio is installed through a rectangular hole made in the dashboard or center console. To hold the body, a metal rod is used, which is installed in the window and fixed with the help of curved triangular antennae. The main unit is inserted all the way into the shaft, held in place by latches located on the sides of the housing.
To disassemble the car radio, you need to remove the decorative frame located around the perimeter of the case. The terminals are unlocked using keys supplied with the device or purchased separately. After removing the housing from the shaft, you should disconnect the pads with which the radio was connected to the on-board network and car speakers.
How to remove the panel
To remove the front panel, you need to press a separate button and then remove the assembly from the seat. To store and transport the voice recorder panel, a plastic case with foam inserts is used to protect the device from scratches.
Installation of 1 din radio
Before highlighting the installation features of various car radios, let's take a short historical excursion. The fact is that in the mid-80s, leading companies producing car audio systems came to the conclusion that it was necessary to unify all radios.
In other words, standardize the sizes of the presented devices. Thus, after some time, the so-called DIN appeared, which received the status of an international standard.
The fundamental parameters of this standard are the width and height of the radio. Thus, the 1 din standard corresponds to dimensions of 178×50 mm. 2 din differs only in height, which is already 100 mm.
How to connect correctly
To correctly connect the Pioneer car radio, you need to familiarize yourself with the diagram included in the documentation. The cables are laid under decorative plastic panels to protect the insulation from physical damage. Proper operation requires a constant supply of positive voltage to maintain the device's memory. To switch, a yellow cable is used, which is connected directly to the car's battery.
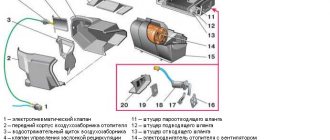
Wire marking
The Pioneer radio is connected using 2 ISO standard plugs, into which wires of different colors are mounted:
- red - to ensure positive power after turning on the ignition;
- blue - supplying positive voltage to the amplifier and antenna motor;
- yellow - positive signal for supporting the memory block (does not depend on the position of the key in the lock);
- black — switching with the body (negative signal);
- purple-magenta with a black stripe - for connecting the speaker installed in the right rear door;
- gray and gray with black stripe for front right speaker;
- white-white with black - to turn on the speaker in the left front door;
- green and green with black - to power the rear speaker on the left side.
Some radios have additional cables designed to connect the steering wheel control panel or multimedia system add-ons. When using component car speakers or amplifiers, connect the speaker cables to the accessory equipment.
Connection diagram
The Pioneer car radio connection diagram can be found in the operating instructions. Cables are connected according to the color of the insulation; The battery and ignition switch cables are used to connect the power source. If you connect the red wire directly to the battery, the main unit will drain the power. To ensure reliable contact between the cables, soldering with tin solder or crimping the joint with a metal pipe is used, followed by wrapping it with electrical tape.
Auxiliary outputs for controlling a subwoofer or steering wheel are connected in the same way. The connector pinout is ISO compliant and uses a positive signal cable and a negative signal cable to connect the speakers. It is prohibited to twist the negative cables into a single busbar that is connected to the vehicle body. The speaker cables are laid inside the cabin and doors along the standard harnesses.
Instructions
To correctly connect all car radio connectors according to the diagram, you should read the operating instructions. First of all, let's start with the marking and pinout of the wires.
What you need to know about wire markings?
By studying the markings, you will prevent errors that may occur during the connection. The device package includes not only a circuit diagram, the necessary plugs and adapters, but also two main ISO connectors. These connectors are standard, so they come with the car radio. Each of these connectors contains a group of contacts consisting of eight elements. One of these connectors is intended for connecting electrical wiring, and speakers are connected to the second connector of the car radio with remote control and amplifier.
You can connect a wired car radio yourself - there are two methods. To make the connection without errors, you can purchase an adapter for installation. When connecting a device, car enthusiasts do it simpler - the connector is disconnected from the wires, and then these wires are connected to the mating part by twisting them. To properly connect the device, plugs, adapters and connectors are connected in accordance with the pinout and the diagram that comes with the kit. Please note that any car radio is equipped with wiring, the elements of which may have different colors.
Universal battery connection diagram
We suggest you familiarize yourself with what functions the wiring has and how they are connected. The yellow wire must be connected directly to the battery; for proper connection, the circuit must be supplemented with a fuse. There is also a red wire in the car radio; it is necessary to turn on the system when the ignition is on, so the red cable is connected through the lock. Under no circumstances should these two wires be connected to each other, since as a result of this, the pinout circuit will contribute to the accelerated discharge of the battery.
The black wire is the negative wire, it is usually thicker than the others, and should be connected to the vehicle body. Each of the cables that comes with a car radio with or without an amplifier performs certain tasks. For example, if the wire is white and has a blue stripe on it, then when connected to the connector it will be responsible for the operation of the antenna, amplifier, and also the subwoofer, if available.
As for the gray wire, it needs to be connected to the positive connector of the speaker located in front on the right. A similar cable with a black stripe is connected to the minus of the same speaker. The same situation is with the white cable, as well as the white wire with a black stripe - they need to be connected to the left column (the author of the video is Anton Eremin).
Connecting the rear speakers of a car radio with an amplifier is carried out according to a similar scheme. In particular, the green wire (to the positive) must be connected to the rear left column, and the green element with a black stripe is connected to the negative plug of the car column. Following the diagram and pinout, the purple element is connected to the right column, in particular to the plus, and a similar wire with a black stripe is connected to the minus with your own hands. If the diagram and pinout are not followed, there is a possibility that the car radio may short out, so be careful.
How to connect?
After you have connected all the adapters and plugs of the radio with the remote control according to the diagram, let's move on to the issue of connecting the system. It is necessary to take into account that all plugs, as well as cable pinouts, are standard, so it will be difficult to make a mistake. Simply inserting the plug into the socket is not a problem, but sometimes car enthusiasts choose a more complex installation process when it comes to manual connection. To do this, the cables need to be disconnected from the plug and connected depending on their functionality.
How to turn it on and off
To turn on the main unit, you must first secure power by turning the key in the ignition. The user then activates the device by pressing the SRS/OFF button. When turned on, the display shows the frequency of the radio station being received or the parameters of the track being played by the player. It is not recommended to leave the main unit on when the engine is off, as there is a risk of draining the car battery.
When the ignition is turned off, the device automatically stops working.
With the engine running, you can turn off the Pioneer radio by removing the front panel. You can turn off the device by long pressing the SRS / OFF button, you must first enter the setup menu and disable the energy saving options. Recorders equipped with infrared control can be turned off by pressing a button on the remote control (available on some models only).
How to reboot
In case of incorrect settings or failure of the microprocessor algorithm, it is recommended to restore the reader parameters to factory values. To restart the main unit, press the hidden RESET button located on the front panel with a thin object. Products with removable panels have a button on the front of the housing (next to the terminal block). The button is held for 4-5 seconds; for further operations you need to configure the recorder parameters.
How to control the radio
The radio is controlled by a rotary encoder and buttons located on the front panel. The purpose of the keys specified in the operating instructions depends on the modification of the multimedia device. Some head units support standard steering wheel controls.
The remote control is connected via a suitable signal converter to the connector on the rear panel of the housing. Some products have an infrared remote control; on the panel there is a signal receiver covered with colored glass.
External ports
- In addition to the radio, the radio can play music from external devices or CDs (older versions).
- To be able to connect external devices, you will need the same “System” menu described earlier in setting the time.
- Go to the menu as described above.
- Scrolling through the menu, select the AUX, USB or Bluetooth option (if this feature is supported).
- Use the arrows on the sides (or tilt the handle itself) to switch the position. There are two options available - enabled (On) or disabled (Off).
- Choose to enable the desired port.
- Press the joystick once to confirm.
- In the same way as in setting the time, exit the menu.
- Further connection depends on the models of the radio and the connected device.
Bluetooth connection
It should be remembered that for the connection via Bluetooth to work correctly, like most other devices that support this function, pairing will be required. The PIN code is entered on the radio and repeated on the device (sometimes, especially if the device has already been connected via Bluetooth, you will only need to enter it on the radio).
How to setup
Pioneer radio settings affect radio reception and music transmission. Modification of operating parameters is carried out through the menu; the settings are described in the instructions. The list of adjustable parameters depends on the modification of the reader and the firmware version stored in the control panel.
Disable demo
The microprocessor of the main unit supports a demonstration mode, which consists of transmitting an information message to the display. To disable the option, press the volume control and go to the radio settings, then turn the knob to find the System section. Rotate the knob to select the Demo Off option, then press the knob to confirm the selection. The user must briefly turn the knob again, select the Yes option, and press the knob to make changes to the memory.
Radio
To properly configure the radio receiver, you must:
- Use the SRS/OFF button to select the radio station reception mode.
- By pressing the BAND button, the user selects the range of received waves. The design of the equipment supports radio stations operating in ultra-short, medium and long waves.
- Then we set the radio station frequency by clicking on the broadcast scan buttons. The user can set the scanning step from two fixed values - 50 or 100 kHz. In addition, you must enter the settings menu and enable manual air scanning (MAN parameter in the SEEK section).
- Record the wave into a memory cell by pressing and holding the buttons labeled 1-6 (located below the screen or on the sides, depending on the change).
You can automatically search for stations using the BSM option selected in the setup menu. The equipment autonomously scans the airwaves and records the frequencies of stations with the maximum signal level into memory cells.
How to set the time
The user can set the clock through the operating menu, which is called up by pressing the volume control. The CLOCK SET section is used to set the hours, hours or minutes, which can be changed by turning the volume control. The parameter is set during the general setup of the car radio in the car, the time value is displayed on the liquid crystal display.
How to change language
To change the language settings on your Pioneer radio, press the rotary encoder to open the menu. Then you need to move the cursor to the desired area by turning the potentiometer washer to the left or right. Having found the LANGUAGE section, the user presses the knob and enters the subsection, which includes 3-6 languages (depending on the change). The owner selects the desired value by turning the corrector; the parameter is set by briefly pressing the knob.
How to turn off the backlight
The design of the equipment uses a stepped dimmer, which allows you to change the intensity of the backlight of the screen and buttons. Settings are made through the LIGHTING section; some models support automatic color changing and turning on the key backlight when a phone call arrives.
How to reset settings
Resetting your Pioneer hardware means restarting the microprocessor while clearing the memory. To start cleaning, you need to press the rubber RESET button on the front panel with a toothpick. The settings are reset after disconnecting the battery from the vehicle's on-board network.
Joystick positions
First, let's characterize all possible movements of the joystick. The positions of its handle can be as follows:
- up;
- down;
- left;
- right;
- recessed position.
So, let's begin. We set the volume to about 30 units, not paying attention to possible wheezing during playback. After that, press down the joystick and go to the list of settings.
You'll see a lot of options here, but don't let that scare you: for now you'll only need one setting. Start turning the joystick to the left or right until you find the “Audio” item. Found it? Now you need to press the joystick again and enter “Audio”, and there you will look for the item where the balance and fader are indicated. It looks like this: FADER / BALANCE.
Press the joystick again so that the words FAD 0, BAL 0 are displayed. If instead of zeros there are other numbers, it’s okay. It just means that adjustments have already been made here before.
Sound settings
In order for the radio to sound rich and reproduce low frequencies well, you need to adjust the equalizer curve and adjust the cutoff of low or high frequencies. The equipment supports adjusting the sound balance between speakers, and there is a separate dynamic bass boost (BASS BOOST).
The sound quality is affected by the bitrate of audio recordings stored on laser discs or removable storage devices. If the recording quality is low, it is impossible to correct the sound image with the settings.
Equalizer
Equalizer curves with standard parameters are saved in memory; to select the desired value, use the menu (subsection “Equalizer settings”). Radio tape recorders support creating your own sound image by recording parameters in a separate memory cell.
High and low pass filter subwoofer
Setting up the crossover is done through the menu where you need to find the crossover option. The function is supported only by some equipment; the adjustment algorithm depends on the modification of the hearing aid. Some models allow you to set individual characteristics for each speaker. The section height is selected from the list of suggested values.
Possible problems and their solutions
The first problems may arise during the installation of equipment. If the radio does not fit completely into the mounting hole, then you need to check the possibility of placing the housing in the dashboard. On car parts, it is necessary to cut out the internal structural elements into which the plugs or the rear wall of the device rest. The defect occurs due to jamming of the side valves (deformation or penetration of dirt).
During operation, sound may come out of the speakers due to poor connection of the connecting cables. To restore functionality, you need to disconnect the plugs, inspect the connection points and reconnect the Pioneer radio. The malfunction occurs when the channels of the external amplifier are broken; it is recommended to connect the speaker directly to the player. The damaged amplifier is repaired in a specialized service.
Doesn't turn on
If the main unit does not turn on when you press the buttons, you must turn off the ignition and check the correct operation of the power circuits and the reliability of the cable connections, as well as the connection diagram of the Pioneer radio car. If you use an infrared remote control to start, the transmitter may not work due to low batteries. In addition, it is worth checking the functionality of the buttons; if dirt or moisture settles on the contacts, the transmission of signals that control the operation of the audio player is interrupted.
Doesn't turn off
Some Pioneer radios have an original operating algorithm that does not allow turning off the power when the demo mode is active. An attempt to turn off the equipment puts the player into demo mode, which can be disabled by removing the front panel. After disabling the function through the menu, pressing the button turns off the main audio unit (except for the memory media).
Many people have been faced with the question of how to turn off the Pioneer radio. Owners of conventional radios especially often face this need. In this case, when you turn off the radio, you will see a transition to the “clock” mode. This will light up the buttons. Drivers usually blame the inept craftsmen who connected the device for this. But in fact the reason is different. This is a technical feature of many radios of this brand. This problem can be solved quite simply. You just need to know how to do it. In fact, this is not the biggest problem and there is no point in contacting the dealer to fix it.
How do I turn off my Pioneer radio? This question can often be heard in crowded areas of motorists. The fact is that the instruction manual does not address this problem. If you read it, you might think that this behavior of the head unit is quite normal for a stereo system. But bad thoughts immediately pop up. The main one is the possibility of battery discharge during long-term parking. Therefore, you still need to find out how to turn off the radio.
Setting up a Pioneer car radio
An article about how to properly configure a Pioneer car radio. Features of setup, step-by-step algorithm. At the end of the article there is an interesting video about setting up radio stations on Pioneer radios.
The name of the car radio “Pioneer” for modern Russian people may sound somewhat archaic for obvious reasons, but, nevertheless, this name speaks for itself - the first of the first.
And this is true: the international corporation Pioneer Corporation has been providing its products to the world market with a guarantee of high quality for many decades.
Therefore, you will not have to regret spending money after purchasing this magnificent radio. And now, it is already displayed on the front panel of your car, you turn it on... But what is it? Instead of high-quality music, you hear some kind of wheezing, which does not please your ears at all, but rather the opposite.
So what is it? Marriage? Deception? First of all, pull yourself together and don’t rush to blame suppliers and manufacturers. The casket opens simply: your radio needs tuning. Yes, that's the whole point. And since setting up a Pioneer radio is a very difficult task, we will now tell you step by step how it is done.
If this is 1, 2 and further, then this is a typical budget version of the Pioneer radio. And you can start setting up only if you purchased model 3100 and higher. Let's take the Pioneer DEH 3100 radio as an example.
Shutdown
This is done in the following order:
- Press button 2 and enter MENU. Then select SISTEM, at the next stage press PW SAVE, all that remains is to turn off the radio with the OFF button. This is how we enter energy saving mode;
- Turn off the radio with button 1. The clock should appear;
- Press button 4 and the display will turn off.
After completing this procedure once, you can turn the radio off and on again using the standard button 1. Sometimes a reset may occur after disconnecting the speaker from the power source. In this case, repeat the previous steps.
Radio in the car
Stations in the radio can be tuned in three ways. Depending on the model, 18 or more stations can be memorized.
For convenience, we assume that the receiver is already turned on - switching to it is done by pressing the Band button once.
Method one is the easiest
- Knowing the frequency of the station, briefly press the left and right buttons to dial it on the display.
- Then hold one of the six buttons (1–6) below the display. The dialed station will be stored in memory, and a corresponding indication will appear on the screen in the form of a number repeating the button number.
- Dial the next frequency and press the next free button.
- Wait for indication on the display.
This is repeated 6 times - for six different stations.
Stations 7 to 12 and 13 to 18 are stored in the following memory banks. Switching between them is done by pressing Band once.
Method two
- While in receiver mode, hold down the right button for one second.
- The radio will begin searching for a station.
- Having found the first one, it will go into playback mode.
- If you are satisfied with the station, save it by pressing the buttons below the display.
- Then repeat steps 1–4 to select further stations
Storing the station and selecting banks is the same as in the first option.
Method three
- From the main menu you go to the functions menu.
- Scrolling through it, you find the BSM parameter.
- Select by pressing the up or right arrow.
- They wait for a while.
- The radio will check the entire range, find stations and arrange them according to signal strength.
- Then it will play the first one.
- You can save stations in the same way as in other methods. You can scroll through the selected ones by single short presses of the buttons under the display.
There is one thing about this method - not all domestic radio stations are included in the list of those found for various reasons. If you have gone through the entire list, but have not found the desired station, you can proceed as follows:
- Exit to the main menu of the radio receiver (exit is carried out in the same way as to the main menu of the entire device - see above).
- Having looked through it with the volume knob, they find an inscription like FM:... Instead of dots there will be some numbers, usually 100.
- After playing with the left and right buttons, select FM:50 and confirm the choice.
- After exiting the menu, start the search again.
- Since the frequency step has just been halved, you need to be patient here.
- Maybe this option will find the right station.
You can experiment with the search step, but if there is still no station, it will be faster to select it using the first of the described methods.
A few words on the topic of memory banks - there is no need to overwrite any stations to free up cells. If you want to replace the selection, just write the new frequency in the selected cell. The old frequency will be deleted automatically.
Setting up a radio receiver for video
Clicking noises when the engine is running
Many owners of standard radios experience periodic clicking noises when the engine is running. First of all, it is necessary to understand the reason for the appearance of such a not entirely pleasant phenomenon. We are talking about the fuel system of the car. During operation of the power unit, small voltage surges regularly occur. This leads to interference.
In principle, the radio is protected by this. But a standard noise canceler does not always solve the problem. Sometimes this happens due to his refusal, which is not uncommon. To solve the problem, you can simply connect the power to the radio through a noise filter. This is guaranteed to get rid of acoustic clicks.
Speaker wheezing
Some drivers have encountered a situation where the speakers began to hiss. Moreover, this does not always happen, but only from time to time. Obviously, the problem could be a faulty speaker. But often the reason turns out to be unsuccessful configuration of the system itself. Therefore, troubleshooting should begin by reviewing the settings. Are you interested in a large menu? Here you can evaluate how the sound is distributed between the speakers. Pay attention to the uniformity of its distribution. Most often, wheezing is caused by unbalanced low frequencies.
If everything is correct in the settings, it makes sense to pay attention to the cable connections. Maybe there's a bad connection somewhere. This is why the speaker chokes. This may be indirectly indicated by the irregularity of wheezing. Especially if the speakers are in the doors. After opening the door, move the wire, one time the contact may be normal, another time not so much. A faulty capacitor can cause wheezing. In this case, you need to check it.
Purchase a radio component of the same power. It is necessary to connect it in parallel with the standard one. Next, turn on the radio and check the result. The absence of wheezing indicates a problem with the capacitor. In this case, the current was passed through the installed additional part. Unsolder the faulty air conditioner and install a new one in its place.
Subwoofer doesn't work
In standard stereo systems with a Pioneer head unit, the subwoofer sound sometimes disappears. The problem is a faulty output to the subwoofer. The problem is treated in 2 ways. If the radio is new and under warranty, you can try replacing it. But this does not always work out; more often they repair and return.
Another option is to resell the products yourself. Perhaps the second option is the most optimal. Do-it-yourself repairs are much more reliable than warranty repairs. Moreover, no difficulties should arise there.
Conclusion. Car acoustics often require a lot of attention. It must be configured accordingly to get the most out of its specifications. How to turn off a Pioneer radio is a question that owners of such equipment often ask. In fact, it's made so simple that the manufacturers don't even mention it in the instructions.