Basic functions and capabilities of the head unit
- Playing music files, radio;
- the ability to connect third-party accessories to play songs via AUX, SD card, other file drives, USB;
- displaying the current time and date on the display, both in active and inactive states;
- Hands Free option allows you to talk on the phone without being distracted from the controls;
- ability to connect third-party gadgets, functional equipment: rear view camera, tablet, navigation system.
Budget versions of MMC do not have a display, so interested car enthusiasts additionally purchase accessories for listening to music. The MMC is located in the center of the torpedo, harmoniously integrated into the overall design.
What can a tuner do?
The radio receiver has several operating modes:
- Radio mode. Tuning radio stations can be done both manually and automatically.
- Audio mode. With this setup, you can listen to music tracks from an SD memory card, a regular flash drive, or take music from a mobile device via Bluetooth wireless connection.
- Listening to music from an external source. In this case, the “AUX” socket comes into play, through which the signal source is connected. You can connect the output from a phone, tablet computer or flash player. Music through the Aux jack does not lose sound quality, unlike Bluetooth.
- Speakerphone. This mode uses Bluetooth wireless communication, which is convenient because there is no need to connect wires.
Setting the sound equalizer and other audio parameters on Vesta is done by pressing button No. 7 while in the main menu:
- Changing the settings of the Vesta head unit occurs by rotating knob No. 7: equalizer, low frequencies, high frequencies, balance, front and rear speakers, adjusting the tone and exiting the settings.
- Equalizer of factory settings: jazz, pop, classical, vocals, individual settings.
Settings for the standard radio system on Vesta are carried out by pressing handle No. 7, provided you are in the main menu:
- Clock mode – time format.
- Setting minutes and hours.
- Time adjustment via a special channel.
- Switching to another radio frequency.
- Search for stations by program type.
- Turn on regional stations.
- Medium wave range.
- Phone connection.
- Turns the beep sound on or off when pressing buttons.
- Noise reduction function - for listening to the radio.
- Reset.
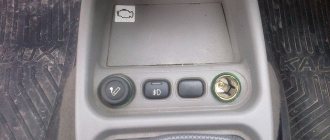
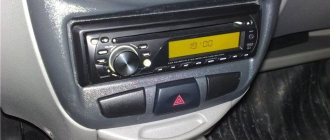
OEM radio controls
In the left corner there is a function key for activating/deactivating the radio. To the right there is a built-in microphone for conversations via Hands Free, and there is also a reset button to factory settings.
To the right is a monochrome display that displays basic information about tracks and radio frequencies.
Below is a slot for a storage card. It is mainly used for inserting a card and flashing the module, but if necessary, it can be used to read music tracks.
Below the perimeter there are preset buttons:
- MUTE – mute sound;
- Key to accept and reject calls (red and green);
- SCAN - multifunctional key for surfing the navigation menu;
- RADIO and AUDIO for switching playback modes from storage media;
- In the center of the structure there is a washer - a regulator for selecting functions, listing, changing the volume;
- At the very bottom there is a block with mechanical keys (6 in total) for quickly jumping to saved radio stations.
Related link:
Adjusting the windshield washer nozzles of Lada Vesta.
Removing the casing and installing the speakers (Acoustic system)
First of all, remove the casing.
Here you need to act extremely carefully; use a plastic card, not a screwdriver, to pry off the plugs and buttons. In addition to self-tapping screws, the casing is held on by clips, which constantly break when removed; it makes sense to purchase spare ones in advance.
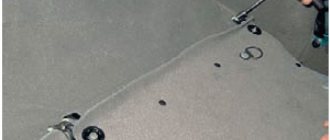
Having removed the trim, when replacing the standard audio system, we see that AvtoVAZ attaches the speakers using blind rivets. If there is a piece of the pull rod left inside the rivet, knock it out inside and carefully drill out the caps. After removing the speaker, we remove the remaining rivets, making sure that nothing remains inside the door. To do this, place a suitable piece of paper in a semicircle in the door in advance.
The speakers are installed using spacers that dampen resonance. If you are cutting a spacer from plywood 10-15 mm thick, it makes sense to cut a thin rubber spacer for it.
We cut out the plywood along the recesses in the door; for this it is advisable to make an initial paper template, tightly attaching the paper to the metal of the door. We draw a small pencil on the outside for the recess, on the inside for the holes, cut it out with scissors, and try it on.
We apply it to the plywood, draw, saw. Ready. We drill holes for the screws, make a recess for the “sunk hole” so that the head does not stick out, and screw it onto the door.
To connect the speakers you will need an adapter; the factory wiring has an original Renault-Nissan plug. It is not recommended to cut it off ; there is a risk of losing the repair warranty. An adapter ST 55-17 or ZRS-AG-22 is suitable. We fasten the speaker with screws or self-tapping screws. Installation of speakers in the doors is complete.
Lada Vesta head unit: price, articles
It often happens that the standard radio tape recorder breaks down and is unstable. When choosing and buying a new one, the owner has difficulty, since he does not know the catalog article.
| Name / catalog article | Price in rubles |
| Original MMS from LADA8450007949 | 33000 |
| Original MMS from ITELMA8450007949 | 14000 |
| Chinese models (AD-UNI707) | From 13000 |
| *prices are as of 04/04/2019 | |
Both modifications of the radio presented are absolutely identical, the difference in price is due to the manufacturer and trade markup.
Replacing the original radio
Many car enthusiasts “for various reasons. Purchasing and installing a new one is not difficult, the main thing is to choose the brand and manufacturer of the gadget.
There are many brands on sale, including Chinese ones. Choice from the cheapest to the most expensive, depending on the budget of the car owner:
- Multimedia center DVM 2117 iQ with Navitel software, price 32 – 34 thousand rubles;
- Chinese version of MMC for Lada Vesta (AD-UNI707) priced from 13,000 rubles.
There is already an article on the website about how to install an MMC radio on a Lada Vesta; in short, it looks like this:
- Remove the plastic frame.
- Remove four screws.
- Remove the standard MMC.
- Connect the blocks with wires.
- Fix the new radio (type 2-DIMM).
Installation of an audio system in the rear doors
Installation of speakers in the rear doors of Lada Vesta is carried out according to a similar algorithm. The hole for the speaker is the same size as in the front doors.
When installing the casing, the algorithm is as follows:
- Remove the window regulator handle if it has a mechanical drive.
- Remove the door handle trim to gain access to the two screws.
- Unscrew the screws, unclip the rivets and remove the door card.
First of all, it is necessary to remove all the insulating material from the seats where the speakers will be located. When replacing standard speakers, it is necessary to disconnect the ground, remove the trim and baffles. Carefully pull the speaker system towards you and disconnect all wires.
When installing speakers measuring 16 cm or smaller, wood spacers are sufficient and there is no need to cut metal.
Mandatory for those who have Vesta under warranty
Important ! When installing, please note that the plug is not standard, but from Renault Nissan. In order not to lose the possibility of warranty service, you must purchase an adapter type CT55-17 or ZRS-AG-22.. Assembly of all equipment after installation is carried out in the reverse order
The casing is securely fixed and the process is considered complete.
Reassembly of all equipment after installation is carried out in the reverse order. The casing is securely fixed and the process is considered complete.
For the Lada Vesta car, not all trim levels have standard acoustics. But audio training is everywhere . Therefore, it is easy to install speakers with your own hands on both the front and rear doors at the owner’s request.
To ensure high-quality sound, you should not forget about the spacer and make sure that the speaker fits comfortably into the depth of the door, where there is a seat for it. It is better to select a size no larger than 16 cm in diameter, then there will be no problems during installation.
Connecting an audio device MMC Lada Vesta
If you plan to connect a factory radio, then you should not have any problems or difficulties.
Related link:
Replacing the clutch on a Lada Vesta with manual transmission and AMT.
Key points that require attention and double-checking:
- ISO 1: Power cables.
- ISO 2: wiring for two (four) speakers, connecting a subwoofer to the MMC.
- USB 3: output to digital storage devices.
- "Antenna 4": to connect an antenna.
How to remove the casing correctly?
This is necessary for installing speakers
Here, the Lada Vesta owner will need maximum care and attention to eliminate the risk of scratching the plastic panels. Using a screwdriver is highly undesirable
It is better to arm yourself with a plastic card.
To remove the plug located on the end of the door, you will need to use a card to pry it through special recesses. Using the same principle, we dismantle the buttons for electric window lifts. Fastening components in the form of tendrils are located on the front, rear and side sections of the MUS.
The fastening of the casing is represented not only by screws, but also by 4 “hedgehogs”. The risk of breaking them is quite high if the owner does not use a specialized tool during dismantling. These “hedgehogs” are borrowed from cars from Renault-Nissan. You can use elements from Grants instead, but minor preliminary modifications will be required. Such “hedgehogs” are stronger and their price is several times lower.
According to these manipulations, the upholstery on the driver's side is dismantled. Removing the trim from the right door panel has its own peculiarities. There is no need to remove the window lift button. There is also no need to look for a self-tapping screw plug.
A sufficient measure would be to remove the handle cover. To do this, we pry off the bottom plug, near which there is a convenient groove. We use the same plastic card. Now unscrew a couple of screws (10 mm), and then remove the upholstery.
GPS navigation connection diagram
There is no need to additionally purchase a GPS antenna for the Lada Vesta, since it is already included in the standard package by default (cat. article 8450008475).
This decision on the globalization of satellite communications was made by the Government of the Russian Federation in 2014. On the Lada Vesta “Lux” modification, data is supplied to the MMC via the CAN bus. After installing the radio, you need to connect the cable to the mini-ISO connector according to the diagram (to C17 - CANL, to C20 - CANH). Now the standard CityGID program finds satellites.
General provisions
Installing music is not a complicated process, but it is responsible. Before directly installing audio components in the Lada Vesta interior, you will need to understand what composition of elements constitutes audio preparation. Therefore, a logical question arises: what is included in audio training?
The “Classic” modification has all the required minimum , allowing you to seamlessly connect both the head unit and dynamic heads. We are talking about the presence of cable lines, with the help of which the designated components of the audio system are switched.
Note that the corners of the doors near the exterior mirrors in this version of the equipment do not have wiring for connecting tweeters.
Installing music involves removing the plastic plug. After removing it, we find connectors according to ISO and FAKRA standards. They allow you to connect the antenna unit. We also see the presence of “USB” and “AUX” connectors.
You can install a 1DIN format radio in the seat. The installation process itself is not capable of causing any difficulties for the owner. It involves the need to connect wires. Please note that in order to successfully install a radio that fits the “2DIN” format, you will need to perform a number of serious modifications to the panel.
Installation of loudspeakers in Lada Vesta is endowed with certain nuances.
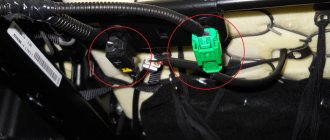
Connecting a rear view camera
Lada Vesta MMC diagram:
To activate the camera, we use the standard connectors (green connector). Mini-ISO MMC:
- C7 – nutrition;
- C8—CAM─;
- C9 - CAM+.
If you followed the step-by-step instructions, the image from the camera will be displayed on the display.
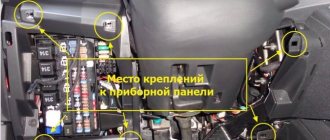
Dismantling
It's better to start with the side deflectors. On the driver's side, you first need to remove the plastic cover behind which is the fuse box. To do this, you first need to pull out the plastic clips and then remove the cover itself.
Next you need to move the fuse box to the side. It is secured with three screws, but unscrewing them right away is not very convenient. Before doing this, it is advisable to unscrew the screw with which the dashboard itself is screwed to the amplifier, and also unclip the wall (side) of the dashboard. This will make it much easier to access the three fuse block bolts.
Then you need to unscrew the 2 screws that actually secure the deflector. According to reviews from Vesta owners, it is very inconvenient to unscrew them and it is unlikely that you will be able to do this without a screwdriver with a universal joint.
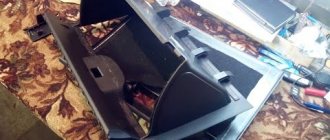
As for the right deflector, it is removed using the same procedure. The only difference is that the glove box on the passenger side still needs to be removed.
After the bolts on both deflectors are unscrewed, all that remains is to remove them. The algorithm, again, is not the most convenient. The deflector itself must be simultaneously pressed a little inward and snapped off from the pipes, and then removed through the seats in the dashboard.
Regarding other components in the dashboard, in particular, elements near the radio, the easiest way to pry them off is with a thin knife wrapped in cloth or electrical tape. But you should work extremely carefully so as not to break the plastic clips.
The components in the door panels are removed in the same way. Of course, to be extra sure that nothing will break, it is recommended to remove the door cards and remove the inserts from them. However, this is quite labor-intensive and time-consuming, so most people prefer to do without such disassembly of the doors.
This completes the process of removing the air deflectors and other interior plastic of the Lada Vesta.
MMC malfunctions and methods for their elimination
Obviously, the standard radio is one of the first developments of the AvtoVAZ concern; there are defects and shortcomings. For example, the display does not load the “LADA” logo:
- We remove the digital storage medium from the connector.
- Disconnect the power terminal from the battery for 10 seconds.
- On the laptop, format the SD card in FAT 32 format, create an empty file “explorer.txt” in the root directory.
- We connect the battery terminals and restart the audio system.
If this method does not help, then problems with the software code of the electronic control unit are obvious. You need to reflash your digital gadget.
Related link:
Vesta SW – is it worth paying extra for the Cross console?
The second, no less common malfunction is “cannot find satellites.”
The solution to the problem is quite simple:
- Remove the power terminals from the battery.
- Reset the device to factory settings.
- We restart the gadget again.
Note to the driver!
To reset to factory settings, you must hold the “Power” button for 15 seconds.
Radio Receiver Capabilities
Modes:
- “Radio” mode (manual and automatic search for radio stations)
- “Audio” mode (listening to audio files from an SD card, USB flash drive or phone via bluetooth)
- AUX mode (To play audio from an external source)
- Hands-free Bluetooth mode
Setting up audio parameters (short press on encoder No. 7 in the main menu):
- Switching and changing the radio settings is carried out by rotating the encoder (position 7) in the following order: Equalizer, Bass tone, Treble tone, Balance, Front/rear balance, Loudness, Output.
- There is an equalizer, the settings of which are carried out in the following order: EQ JAZZ, EQ POP, EQ CLASSICAL, EQ VOCAL, EQ USER.
New Lada: Home> Popular> Cars and motorcycles>»Lada Vesta android car radios»393 results System settings (long press on encoder No. 7 in the main menu) allow you to:
- set the time display format (Clock mode);
- manually set the current time (Setting hours/minutes);
- on off. function of adjusting the current time using RDS signals (RDS CT);
- on off. function of automatic switching to an alternative broadcasting frequency (RDS AF);
- on off. search function for radio stations by a given program type (RDS PTY);
- on off. function for receiving regional radio stations (RDS REG);
- on off. CB band (AM band);
- on off. Bluetooth function (phone connection);
- on off. button press confirmation signal (signal);
- on off. noise reduction function (noise reduction). Affects only operation in “Radio” mode;
- reset the radio settings to factory settings (factory settings). After resetting, the radio settings are set in accordance with Table 2 (clause 1.2 “Description of controls”).
Reviews
| № | Positive |
| 1. | Sergey Ivanovich , 44 years old (otzovik.com): I use the standard radio, the quality is good, the functionality is sufficient. |
| 2. | Fedor Stepanovich , 40 years old (www.zr.ru): my comrades are all agitating me to install a 2-DIMM stereo system. I haven’t decided yet, because the price is steep, but the offer is good. |
| 3. | Vitaly , 22 years old (autobann.su): the quality of the standard MMC is not great, but it will last for several years, and then I’ll buy an imported one. |
| 4. | Daniil , 33 years old (lada-vesta.net): The factory stereo system is not bad, functional, no complaints. |
| 5. | Vitaly Semenovich , 43 years old (otzovik.com): for me, sound quality is not important, so MMS suits me, no comments. |
| 6. | Stepanovich , 44 years old (www.zr.ru): Three years have passed since the purchase of the car, all components are working properly, the condition is as if from the factory. |
| 7. | Vasilyevich , 20 years old (autobann.su): my positive review of domestic transport and assembly. A worthy car, a rival to many European brands. |
| 8. | Tolik , 43 years old (lada-vesta.net): I’m not a music lover, for me the quality and purity of sound are not particularly important. The phone is always on in the car. |
| 9. | Stepan Nikolaevich , 39 years old (otzovik.com): it has been working properly for two years, no special comments. |
| 10. | Konstantin , 43 years old (www.zr.ru): I’m happy with the purchase of the car, the interior is quiet, the acoustics are good. |
| 11. | Anton , 35 years old (autobann.su): after three years of operation, I can’t say anything bad about the MMC. |
| Negative | |
| 12. | Dmitry Viktorovich , 44 years old (www.zr.ru): constant problems with the firmware, glitches periodically. |
| 13. | Sasha , 37 years old (otzovik.com): in six months I’ve already been to a service station twice, with an electrician, changing relays and switches. |
| 14. | Nikolai Vasilyevich , 46 years old (autobann.su): replace the standard radio with an imported one, the sooner the better. |
Related link:
Replacing the low beam lamp on a Lada Vesta.