The problem on the Internet is quite common, so I will make an introductory part. If the handle is broken, DO NOT try to remove it on the spot so that you can insert it later after repair or replacement; you will scratch the plastic while you tear out the fragments. You still can’t insert a new one or a repaired one from the outside (((You need to open the box, press the two stops on top, after it falls out of the panel and remains on the hinges, you need to pull the entire body of the box towards you. The hinges are split, while the torpedo body is solid axles. Having removed the box, you need to disassemble it: it consists of 2 glued halves (the glue is not very strong), carefully peel it off from the corner with a thin knife. The ear (axis) in the handle-lock fell off on one side. Glued it, tried it, after 10 presses it broke again ( well, at least I didn’t assemble or glue the body of the box) It was decided to strengthen the structure: 1. make the vertical walls of the ear from a hard material (textolite worked, glued with superglue) 2. put it on 1 steel axle (drilled a 1.5 mm hole in the center and inserted a piece old knitting needle) 3. Fill the whole thing with epoxy so that it doesn’t come loose.
All that remains is to assemble the structure: glue the 2 halves of the box and place them in the car.
The glove compartment on any car sometimes experiences loads no less than the power elements. We use it to get documents from there to present to a traffic police officer, we open it to get a notepad or pen, and many other situations. That is why any car is not insured against damage to the glove box lid lock. Lada Granta is no exception. A common problem is a broken lid lock return spring. Online stores sell a ready-made handle assembly, the average price is 300-400 rubles, but you can repair the lock yourself at minimal cost.
Glove box repair
If you needed to remove it to fix a broken handle that had a broken hinge, the procedure for removing it is the same.
The box itself consists of a pair of main parts glued together. Yes, precisely glued, and not attached in a different, more reliable way.
Therefore, in order to separate them, it will not take much effort. Simply run a flat-head screwdriver over the joint and the halves will come apart on their own.
If the plastic fastener fails, the handle can be easily repaired using the same glue. The reliable Poxipol is perfect. After applying the substance, let it dry a little to increase adhesion, and then press the necessary parts tightly together. In principle, instructions for use are on each package of glue.
How to glue the lid
When assembling, the cover can be glued with any available glue, for example, the “Moment” type. After this, the glove compartment lid works normally. In total, repairs will require 100-140 rubles, and you’re done!
Of course, buying a new part in a store is easier and faster. But there are no separate brackets on sale, so buying a completely new glove compartment is expensive. If the Lada Granta is still under warranty, you can contact the dealer for a replacement. If the warranty period has expired, then you can do everything yourself.
I forgot to say that instead of superglue, you can use a special compound for gluing plastic. It is made from dichloroethane. When it is applied to a surface, it dissolves, and when the parts are compressed, the plastic mixes with each other. The result is high strength. But you don’t have to use it, I just remembered.
How did you repair the glove compartment, write in the comments. What else have you broken from plastic elements?
How to disassemble the glove compartment of a Lada Granta
Category: Make a car yourself
Vehicle characteristics: The dimensions of the car are as follows: length - 3541, width - 1100, height - 1963 mm. The wheelbase is 2730 mm. Ground clearance 190 mm. The car is equipped with a hybrid power unit. The 2-cylinder engine is equipped with a system that provides engine power output. There are 4 valves per cylinder. The diameter of one cylinder is 77 mm, the piston stroke is 79 mm. The engine crankshaft accelerates to 3000 rpm. Maximum torque is maintained up to 2000 rpm.
Posted by admin: at the request of Vladlen
Watch the VIDEO about disassembling the glove compartment lid of a Lada Granta.
Answer from a car owner named Boleslav: Economical compact in parking lots or traffic jams the tax is just as small
Original title: A disassemble an glove bosca lid Lada Granta
Release date: 04/01/2022
Quality: HD 720
Laughter on the topic: A man had a penis 50 cm long. All his life he suffered with it - he finally decided to do something. I started visiting all sorts of magicians and healers - they didn’t know how to help. Finally he came to some granny, she told him: “There is a small swamp outside the city.” There lives a magic frog, which usually sits on a stone. Find her and ask: “Frog! Do you love me?". The frog will answer “no” and then your penis will shrink. The man went to the swamp and looked - the frog was sitting on a stone. He comes up and asks: “Frog, frog.” Do you love me? - No! - says the frog. The man went home, took a ruler - he couldn’t believe his eyes - his penis became 40 cm! Again he ran to the swamp, found the frog, and said: “Frog!” Do you love me? - No-no... - says the frog. The man runs home, takes a ruler - 30 cm left. Well, he thinks, I’ll run one more time and 20 cm will be just fine. He comes running to the swamp: - Frog! Do you love me? Frog: - Man, listen, well, you're already tired of it! I say no, no and no again!
Removing the glove compartment
Follow the sequence of actions correctly, and you will succeed the first time:
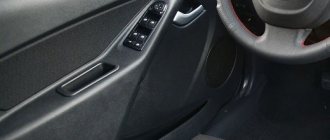
- Open the door.
- Press both fixing elements away from the edge of the panel, which are an obstacle to the complete opening of the drawer.
- Open the door to the maximum possible position.
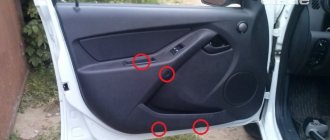
- Pull the glove compartment towards you by removing it to overcome the forces of the four fastening loops on which it is held.
That's all. Now you know how to remove the glove compartment from your Lada Granta.
Glove compartment repair
To fix the broken handle, I had to buy superglue gel. It is inexpensive, about 40 rubles. I glued the flyaway tendril back into place and coated it with hot glue for strength.
I already had hot glue and a gun. You can strengthen it in other ways, or not do it. To put the restored lock in place, I had to unstick the glove box lid. It was fastened around the entire perimeter.
What tends to break down in a mechanism?
Sometimes disassembly occurs only to tighten the fasteners. It is also necessary to dismantle the opening mechanism if it does not work correctly. Main causes and options for breakdowns:
- A defect appeared after an accident.
- The part does not close or open the door well. There is insufficient adhesion to the body part.
- Microcracks, scratches, and abrasions appeared on the product.
- Damage to internal components has been detected. If no defects are found during a visual inspection, you will have to unscrew the handle to make sure that the whole problem is in the fastenings.
- In the case of the driver's door, where there is a lock in the handle, the reason for dismantling is an attempt to break into it.
An equally compelling reason: failure of the external door opening manipulator. It is important to understand that the plastic from which the products are made is not as durable as other elements. It may simply crack due to strong pressure on the handle.
Replacing an internal part
Replacing the internal handles on the rear door of a Granta is slightly different from dismantling the external part. The internal element has more fastenings and is partially hidden by decorative trim. Algorithm of actions:
- The cladding is dismantled. To pull it out, you need to pry up the edge. To do this, use the thin edge of a screwdriver or a sharp knife.
- The rear door card unwinds. There is a rod inside that is important to disconnect.
- To remove the remains of the broken opening device, the fasteners are unscrewed. The handle is removed and a new part is mounted.
Before installation, the internal niche is cleaned. This can be done with alcohol infusion or detergent.
Procedure for removing the driver's door handle
Answering the question of how to remove the Lada Granta door handles on the driver's side is a little more difficult. It is important to consider that this plastic item has a lock installed, so the cause of the mechanism malfunction may be due to a broken cylinder. You will need a Phillips screwdriver, an 8mm wrench and a knife. Basic steps for dismantling:
- The fastening fragments are unscrewed from the top and inside.
- Traction is turned off. The handle is removed. If the cylinder needs to be replaced, the lock cylinder latch is released. It can be easily removed with a simple screwdriver.
- A new core is installed after first removing the larva. To do this, the plastic tip of the rod with the lock switch lever is disengaged with a screwdriver.
- The part is fixed with bolts on both sides and tightened.
Source: infokuzov.ru
How to correctly replace the handle on the rear door in a Lada Grant
Replacing the rear door handle of a Lada Granta is indicated when it breaks or wears out. In other situations, the driver's desire to change this item may cause scratches or microcracks on parts that spoil the appearance of the interior. If in the case of passenger structures only the handle needs to be changed, then in the driver’s door the lock that unlocks the door will also need to be changed. Sometimes replacing the opening mechanism is necessary because the lock cylinder has been damaged by an intruder.
The door structures of the Lada Granta and Kalina modifications are identical, so dismantling the handles is carried out in the same way.
Replacing the outer handle
To understand how to remove the door handle on a Grant, just study our instructions. From the inventory you will need: a Phillips screwdriver, a socket wrench and a knife. Step-by-step work:
- Decorative trims are dismantled. The plastic latches are removed, then the edge of the casing is picked up using a knife.
- The handle is secured with a nut and bolt on the inside and outside. First, the fastening element is unscrewed in front, then in the back.
- The thrust rods and seals are removed from the closing mechanism.
- The product is removed. To do this you will have to pull the handle a little.
- Before installation, the mounting location is inspected and dirt and dust are removed.
Assembly is carried out in reverse order.
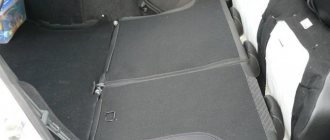
The glove compartment of the Lada Granta FL car is an ordinary, unlined plastic box. Whatever you put there, everything will jangle and rattle on the uneven road. Let's try to solve this problem ourselves. And the appearance will only benefit!
Traditionally, glove compartments or, as they are officially called, glove boxes, on domestic cars do not shine with practicality. So on the new Lada Granta, despite the original two-level design, it is the most ordinary hard plastic, not sheathed or pasted over.
What can you do, the Lada Granta is positioned as a budget car. However, such a glove compartment is also typical for most foreign cars in the low and middle price range. Therefore, rattling and rattling of contents on bumps is inevitable. You can fight in different ways: some put rags, some use the glove compartment solely as a document storage, some keep it empty altogether. But these are all half measures. The problem needs to be solved radically, which is what we will do now.
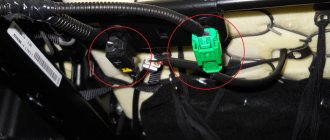
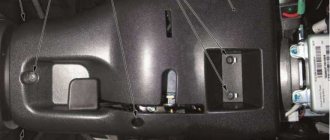
First of all, the glove compartment, or rather its lid, the inside of which acts as the glove compartment drawer, must be removed. The lid is held on by four latching hinges, as well as two opening stroke limiters. To remove it, open the glove compartment as much as possible, and then pull the lower part towards you parallel to the floor, releasing the latching loops. Photos with the cover removed will help you understand the design of the fastening and the direction of application of force.
After all four latching hinges are released, the lid remains on the opening travel stops. These are simply two pins of the lid that fit into the slots on the inside of the glove compartment.
The glove compartment is released by moving it to one side as much as possible, after which the opposite pin of the lid is released. Now the glove compartment can be moved to a more convenient place for work.
Naturally, the idea of covering the glove compartment is not new, so ready-made upholstery kits are also produced for various cars. Here, for example, is the upholstery of the glove box of a Lada Granta FL worth 350-400 rubles.
It looks very much like a piece of felt felt, somehow cut and inserted into place. And the tape, according to customer reviews, sticks weakly and quickly stops holding the upholstery.
Therefore, for upholstering the glove compartment yourself, it is better to use madeline - a thin non-woven material with an adhesive layer protected by paper or film. The thickness of the material is about 1.5 mm.
Parts of the pattern are made from paper, from which the material for pasting the glove compartment will be cut out with your own hands.
Now all that remains is to put everything together into a single pattern. It was decided to make the bottom of the glove compartment a single piece so that dust and debris would not accumulate in the seams.
The pattern for upholstering the glove compartment of the New Lada Granta in real size in PDF format can be downloaded here. Scale marks are made on the sheet in the form of 10 cm segments so that you can check the correct dimensions of the print. Please note that the pattern is mirrored, that is, it is applied from the side of the madeline paper backing.
Madeleine can be cut without much effort with ordinary stationery scissors, but you can also use a sharp knife for cutting.
Now the glove compartment is thoroughly cleaned, dried and degreased with ethyl or isopropyl alcohol. Pasting should be done in a warm room at a temperature of at least 20-25 degrees. It’s even better to warm up the madeleine with a hairdryer so that the adhesive layer becomes more active.
There are no photos of pasting, since it is advisable to have 3-4 hands in the process. But, nevertheless, everything is doable. But you absolutely cannot immediately remove the backing from the entire large part, otherwise you won’t be able to place it correctly in the glove compartment pocket; it will stick to everything. You must first install the part in the pocket and only then begin to gradually remove the backing paper, cutting it along the fold line at the bottom of the pocket. The backing is removed in small sections of 2-3 cm, and the madeleine is immediately glued into place.
Madeline stretches well, which allows you to paste over the bulge under the latch mechanism without wrinkles. However, this can also lead to excess material being formed at the joints. This can be easily corrected with a sharp modeling knife or scalpel. You need to cut through two layers of material at once so that the fabric fits exactly butt-to-butt. At the same time, due to the fleecy nature of madeline, the joints are absolutely invisible.
The outer edges of the madeline along the contour of the glove compartment lid are sealed into the gap between the inner and outer parts with a dull knife or other suitable tool (for example, a regular paper clip). This gives the upholstery a finished factory look.
Now everything is ready. The glove compartment looks more solid, and when you tap on the plastic it responds with a dull, noble sound. For greater effect, it would be possible to lay a layer of vibration-damping material inside between the outer and inner layers of plastic. But, unfortunately, the glove compartment is glued together and cannot be easily disassembled. The glove compartment is installed in the car in the reverse order; the axles are snapped into the holders with light pressure.
If all the necessary materials are at hand, the pasting process takes no more than 2 hours.
We recommend reading
- Seashell painting
- How to make a stamp, facsimile, bookplate yourself?
- Should you repair your car yourself?
- Do-it-yourself handmade soap is a wonderful gift
- Making a small wood chip stove with your own hands
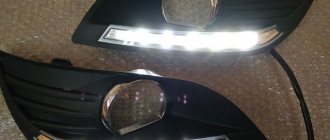
- DIY daytime running lights