Today, car owners are accustomed to turning to a tire shop in case of problems with their wheels. But such services can only be found in big cities, and there are many “out-of-the-way” places where it is difficult to find a tire repair shop. In such a situation, a spare tire can help out the driver, but sometimes problems occur with several tires at once. Therefore, the car owner must know how to trim wheels with his own hands. Moreover, many drivers do not trust tire mechanics and prefer to carry out such work themselves.
How to rim a wheel with a jack and cable
This is one of the simplest ways to disassemble and trim a wheel yourself. If you follow the instructions below, you can easily do this job yourself.
- Remove the wheel from the car and clean off any dirt.
- Unscrew the nipple and bleed air.
- Place the wheel with the nipple facing up.
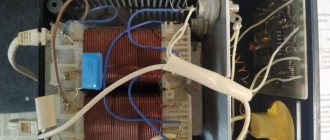
- Tie the tow rope to the disk and jack, as shown in the photo.
- Place the jack closer to the rim on the tire. If it is chamber, then you cannot place the jack next to the fitting, otherwise it will come off when disassembling.
- Securely fasten the ends of the cable together.
- Raise the jack up by pulling the cable and moving the tire sidewall down. Do this until the tire comes off the rim.
- If you only need to replace or seal a punctured tube, then lift the sidewall of the tire with mounting blades from the side of the fitting and place it on the edge of the disk.
- Push the fitting into the inner cavity and pull the tube out of the tire.
Attention! If the nipple is in good condition, then it can be unscrewed and used for a new camera, or put in stock.
Installing a new camera
Boarding work takes less time and effort, but it also needs to be done in a certain order.
- Take the new camera and unscrew the nipple from it; release the air pressure by forcing it out.
- Move the rubber sidewall away from the location of the fitting.
- Place the tube part with the fitting into the tire and insert it into the hole in the rim.
- Reinstall the entire camera.
- Pump the camera without nipple slightly so that it straightens and takes its place. This is also necessary so that when trimming it does not get caught by the mount and damage it.
- Using mounting blades, carefully trim the tire around the perimeter.
Now all that remains is to install the nipple, inflate the tire to the pressure required by the manufacturer, and place the wheel on the car.
Tire design features
Unlike motorcyclists, who rarely experience rubber “sticking,” car owners are sometimes forced to literally tear off the tire. This process is also affected by the composition of the rubber.
For tubeless tires, manufacturers have provided structural bulges along the edges, which are called “humps”. The joint in such tires becomes tighter when inflated and the pressure increases. Due to this feature, this type of wheel is less amenable to self-disassembly. This is where a do-it-yourself wheel disassembly device comes to the rescue. It creates significantly more pressure, with which the tire can be torn off.
In road conditions, tubeless tire repair kits will come to the rescue. Sometimes you have to insert a camera inside a damaged tubeless camera in order to get the car to the nearest service center. This extreme case is suitable for a badly damaged tire.
Dismantling by hitting a wheel
The main difficulty of the work is that even the weight of a person is not enough to separate the tire from the rim. This is also affected by the decrease in elasticity of rubber over time. Drivers sometimes use a car to hit a defective wheel when there is no other way to repair it.
To distribute the load more evenly, you can use a piece of wide board at least 1 meter long. This method is good because there are no shock loads, but often the rubber becomes unusable. It is recommended to perform this work with an assistant to regulate the impact speed and the force generated.
Installation of symmetrical tires
Symmetrical tires do not have sides or specified directions when the wheel rotates. Thus, their installation is carried out regardless of location. It is also worth noting the fact that improper installation of directional or asymmetrical tires will lead to deterioration in directional stability, aerodynamics, control and balancing when turning. In addition, this will cause wear and deformation of the car wheel.
When tires do not perform their intended function, the wheels lose their factory characteristics and properties. Therefore, forced driving of a car with incorrectly installed tires should be calm and uniform. That is, you cannot turn sharply and accelerate over 80 km/h. In this case, it is also not recommended to perform sharp braking. Or better yet, don’t take any risks at all and install tires depending on the direction of rotation of the wheels.
Dismantling with a sledgehammer
The most common method of beading wheels has become impact. It uses a metal corner, a sledgehammer or a large hammer. This method was used by tire mechanics and drivers when there were no special devices.
Attention! The corner should not have sharp edges so as not to damage the rubber.
Device for self-disassembly of wheels
Lubricating the edges of the tire
Once you know how to disassemble the wheels, there will be no difficulties later on. As with any repair, you must initially prepare. The driver must always carry the “duty” tool with him. There are no special devices, but this does not mean that only a hammer and a pry bar will suffice - car owners use these tools for beading wheel tires. This will not bring anything other than damage to the wheel, and it will also lead to problems on the road. Therefore, answering the question of whether tires deteriorate from re-flashing, we can answer that the result depends on the correctness of the repair.
Attention!
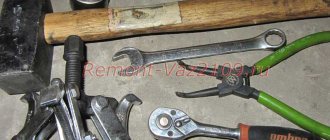
After all operations, you need to wipe the area on the rubber dry, eliminating all damp areas. Beading wheels with homemade devices usually does not imply. The tool kit used is a jack; you will also need wrenches, special blades for installation, and a steel angle.
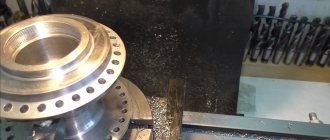
DIY tire changing machine
To manufacture the machine you will need the following materials and tools:
- Electric drill.
- Welding machine.
- Grinder with abrasive wheel.
- Rectangular steel pipe.
- Round pipe 1.5 meters, diameter 2 inches.
- Old wheel hub.
- Steel sheet at least 4 mm thick.
- Rod with a diameter of 20 mm.
The whole device consists of 2 parts: bead beating and tire mounting.
The base of the frame is made from a rectangular profile.
A 2-inch round pipe is attached to the jumper by welding at a distance of 30 cm from the edge. The height should be about 150 cm. To enhance the strength of the welds, you can use triangular scarves. To make it possible to install the wheel, the hub is welded at the height of a person’s waist.
The upper edge of the pipe should be located above the wheel at a distance of 30 cm. A bracket must be welded under the hub to fix the breaker device. It is made from a sheet of iron in which a hole is drilled. The pipe that will play the role of a lever must have a sufficient diameter so that an extension lever can be inserted into it. The tips for it should be made of a steel circle 20 mm in diameter.
Methods for tearing rubber off the rim
The work begins with tearing the tire off the rim; this is not always easy to do. Modern tubeless tires stick to the wheel, which on the one hand is good, there is less chance of air leakage, on the other hand, a number of difficulties arise when disassembling.
To begin, place the wheel on the ground
, be sure to nipple up. Let the air out of the tire; to do this, it is better to simply unscrew the nipple. After this, stand with your feet on the rubber; in the best case, it will simply fall away from the sides. If this does not happen, then you will need to tinker, in some cases it is very difficult to disconnect the edge of the tire. For this purpose, tire shops use presses that develop a force of about a ton. The driver in a garage does not have such equipment, so he will have to use alternative methods.
Most often, you can find advice to use a sledgehammer. To do this you will need a small sledgehammer weighing 5-8 kg. It is used to deliver accented blows to the tire in the area of the nipple. Usually it's enough to hit a couple of times. The main disadvantage of this method is the need to have sufficient strength to operate the sledgehammer. There is also always the risk of accidentally hitting the disc, which could damage it.
Another way
– use of an angle and a hammer. To do this, you will need to take a long corner, it should be at least a meter, or better yet, one and a half. One end is carefully hammered between the rim and the tire, this will allow the corner to act as a lever; usually, much force is not required. There are also a number of non-impact methods for tearing off rubber. One option is a wheelie collision. A thick and wide board is placed on the edge of the tire, and the car wheel is driven over it. It turns out to be a kind of press. Another option
- usage . You will also need a recess in the wall into which the top of the jack will rest. We place the support of the device on the tire, resting the upper part against the wall so that the jack becomes a kind of spacer. We gradually extend the working part of the lift, and eventually the rubber is pressed away from the rim.
Advice from professionals
Beading wheels is not an easy job that requires certain skills. Therefore, you need to follow the recommendations of specialists for beading your tires yourself.
- If you only need to replace one tire, you cannot install another type of tire. It is especially not worth changing a summer tire for a winter one and vice versa.
- It is important to consider the size of tubes, wheels and tires.
- After purchasing new tires, it is better to install a new one as well.
- Do not allow dirt into the inner cavity of the tire.
- You can use a jack, mounting blades and other suitable tools to separate and remove the rubber from the wheel without damaging the wheel.
- Wheels must be periodically inspected in order to detect defects in time and eliminate them.
- It is not allowed to use sharp objects for disassembly that could damage the tire. For example, drivers with little experience sometimes use screwdrivers for such purposes. This leads to additional costs.
If on the road a tire starts to go flat and you find a sharp nail in it, do not rush to pull it out right away. It will allow you to maintain pressure for a while and get to the nearest auto repair shop.
Re-flashing takes a lot of time and effort, and requires convenient mounting blades. Beginners often use a sharp screwdriver and a hammer for dismantling, which is strictly prohibited. At first, the damage may not be noticeable, but later it will show itself. The mounts must have rounded ends so as not to damage the rubber.
Attention! To repair wheels, it is convenient to use a piece of metal corner with a section of 40x40 mm. It is used to insert between the disk and the tire.
Necessary tools for flanging flanging
If there are no blades, you will have to use improvised means. However, this greatly increases the risk of damage to bicycle parts. To be fair, it must be said that in most cases, trimming can be done without using a tool. However, this does not always happen, so there must be edits.
Moreover, they cost mere pennies, cheaper than a camera. They take up very little space and are very light. Their presence will not burden you even on a long trip, and the convenience of their use is worth a lot. You can buy mounting blades at almost any bicycle store.
Land Rover Discovery Bye But name › Logbook › Dismounting tubeless tires
I didn’t think that dismantling the wheel would be a problem for me. Before buying my first car, this was almost the only thing I knew how to repair. Re-flashing a tire is not a problem for me after I didn’t finish the nuts on the wheel of my father’s Moskvich. For the lost disk, Father forced me to completely remove and put on tires from all the wheels that he found in the garage, including the Moskvich. But before, I dealt with the wheels of bloaters, but here they are big, hard... In general, a couple of hits with a sledgehammer on the corner and a pry bar won’t do it. I realized this when I needed to put a camera in the tubeless. You could also contact the service. But the last time they charged me 700 rubles. for the hole. Having a tool, a garage and hands are not enough... And in the forest, the need can happen. He jumped, spun, invented levers, put them under the car. Doesn't break down. I was already thinking about putting it back and driving it around so that it would come apart on its own. Having rummaged through the Internet in search of a convenient tool, I came across an article that clearly displays simple methods. I'll post some of it as it is. Sterenna from the site www.suvorov-castom.ru.
There are several non-impact methods for easily tearing a glued tire off the wheel rim. And the most common method, which by the way has several disadvantages, is to run the car into a board placed on the tire of a wheel, as in the photo.
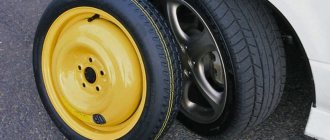
This is not always possible in practice, since firstly you need a strong board, and secondly, in order to run over a punctured wheel, you need to replace this wheel on the car with a spare tire, and if it is punctured. Moreover, if you have a spare tire, then by installing it, you can safely drive to the nearest tire shop.
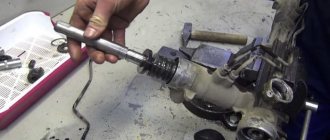
Other non-impact methods for dismantling wheels are based on the use of a standard jack for domestic cars. The use of a jack with a car can be seen in the photo.
But most methods using a jack can be used without the participation of a machine (or rather its weight).