The cooling of a car engine must always be efficient and effective. The VAZ 2114 is equipped with a liquid-cooled engine. Such a system is quite efficient and reliable, and cooling in it occurs due to the flow of liquid through a cooling radiator, which is cooled by a counter flow of air.
As you can see, such a system only works when the car is moving, but as soon as it stops, the radiator stops cooling, which leads to heating of the car engine. For such cases, the VAZ 2114, as well as other cars, is equipped with a special, powerful fan capable of creating an air flow no less than the oncoming air flow.
Quite often, this part on the VAZ 2114 refuses to work, which can lead to the engine boiling, which can cause serious damage to the engine.
This article talks about the engine cooling fan on the VAZ 2114, namely its purpose, causes of failure, the sensor that turns on the fan, methods of replacement and testing.
Purpose
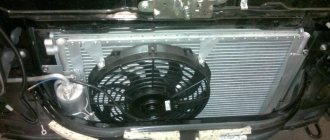
The cooling fan is designed to cool the radiator with air, which it pumps with its impeller. Most often, the fan turns on in hot weather or when the car is stuck in a traffic jam, at these moments the fan is an indispensable part that keeps the engine from overheating.
What can happen to the engine if the cooling fan does not work:
- Due to severe overheating, the coolant may boil away and its level will drop significantly, which will reduce the engine cooling coefficient;
- Due to a significant increase in temperature, crankshaft liners and camshaft pastels, as well as valve seals, may be damaged;
- Possible occurrence of piston rings, both compression and oil scraper;
- Possible breakdown of the cylinder head gasket;
- Engine wedge;
As you can see, if the cooling fan does not work, this can lead to serious consequences, after which it will be necessary, if not a major, then a serious repair of the VAZ 2114 engine.
Checking the functionality of the cooling fan motor
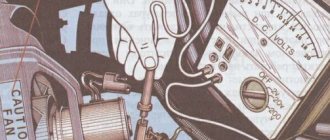
The easiest way to check the operation of the fan is to put two straight wires on it: minus and plus.
The plus is taken from the battery, the minus from the car body. If it doesn’t work when the circuit is closed, then that’s where the problem lies. When starting the blades, we look for the problem elsewhere.
Cooling fan operation diagram
Basically, when a non-working fan is detected, several reasons are identified:
- The electric motor is burnt out, there is a break in the winding;
- Wear of carbon brushes;
- The bearing has jammed or fallen apart.
If in the last two cases the problem is solved with little effort, so to speak, the first involves replacing the electric motor.
Important! When installing wires, the main power supply to the electric motor must be disconnected.
Why the VAZ 2114 cooling fan does not work
If the fan on a VAZ 2114 fails and does not turn on when the temperature is reached, then there may be several reasons, ranging from the most harmless to those that promise replacement of the fan itself: So, the reasons why the fan will not work:
- Problems with the fan switch sensor;
- The fan power fuse has blown;
- The relay coil is burnt out or the contacts are burnt;
- The fan connector is disconnected;
- The fan motor is burnt out;
As you can see, there are quite a few reasons why this part does not work, and in order to find the true problem it is necessary to check all the reasons step by step.
Fan fuse
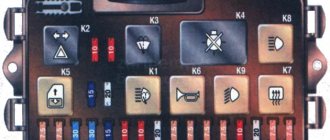
To protect the electrical circuit of the VAZ 2114 cooling fan from short circuits and overloads, a fuse is used, in which, when the current in the circuit increases, the fuse link burns out, which leads to a break in this circuit.
The VAZ 2114 cooling fan fuse is located in the mounting fuse block under number F5 for 20A. Sometimes the fuse box in cars may be different and the fan fuse may be located under the number F7 at 30A.
Fan relay
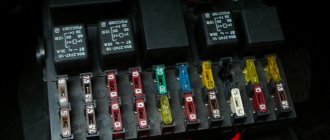
The cooling fan is additionally protected using a relay that relieves the contact load on the sensor. A relay consists of a coil and contacts. Quite often, the contacts on the relay burn out or the coil winding burns out, which prevents the fan from turning on.
The relay is located on the auxiliary fuse box, which is located under the center console next to the engine control unit (ECU). In the picture the relay is marked with a red circle.
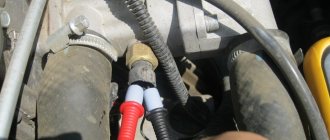
Fan switch sensor
To turn on the engine cooling fan, a special sensor is used that allows it to turn on automatically when a certain temperature is reached. The sensor is located in the thermostat housing and is installed there through a threaded connection with a special sealing washer.
Switch-on temperature
The cooling fan turns on on a working car at a temperature of 102.
Replacement
Tools:
- socket wrench 10;
- socket wrench 8;
- screwdriver with a Phillips bit.
Execution order
- We park the car on a flat surface and immobilize it with the parking brake.
- Open the hood and disconnect the negative terminal.
- Using a 10mm wrench, unscrew the fastenings of the air filter housing.
- Using a screwdriver, loosen the air duct clamp on the air flow sensor and remove the corrugation.
- We unscrew the screws securing the cover of the air filter housing and remove the filter element.
- Using a size 8 wrench, unscrew the air intake mount and remove it.
- Using a 10mm wrench, then an 8mm wrench, unscrew the nuts securing the fan casing around the perimeter (6 pieces in total).
- Disconnect the wire block on the fan connector.
- Carefully remove the fan casing along with the drive.
- Using a 10mm wrench, unscrew the 3 bolts holding the electric motor to the casing.
- We put a new one in its place.
- We install the structure in place, fix it, and connect the connector.
- We carry out further installation in the reverse order.
Ways to solve the problem with interior heating
Having looked at tuning the cooling system of the VAZ 2114 to solve the problem of overheating in the summer, let's look at how you can increase the efficiency of heating the interior. The solution to the problem under consideration is to redirect water from the heater to the thermostat to maintain the most optimal temperature regime. Of course, such a modification is much more complicated than all those previously considered, since there is no suitable pipe for draining water. That is why the work in question involves the creation of a new pipe.
It is quite important to choose the right location when making such a change. The accuracy of temperature control of the internal combustion engine, and therefore the efficiency of the system, will depend on this. The principle of the changes is as follows:
- A new pipe is soldered.
- The new pipe is placed opposite the standard one.
- The pump hole should be plugged to redirect the fluid.
Such a scheme for changing the car’s cooling system should not cause much difficulty. It is important to pay attention to the sealing of all elements, since when heated, the liquid in the system circulates under pressure. If the new pipe does not hold securely in place, then there is a possibility of a leak, which will cause the antifreeze to leak out and cause the engine to overheat.
Additional recommendations
If desired, you can install an additional button that will forcefully start and stop the fan.
VAZ 2114 fan diagram with a button
In order to do this, you will need:
- purchase a button (or toggle switch) and mount it in any convenient place (you can even under the hood);
- make a branch from the wire coming from the battery positive to the fan relay, soldering another wire to it;
- connect this wire to the first contact of the button;
- connect the second contact of the button to the relay leg, from which the “positive” wire goes to the fan.
Thanks to such a simple circuit, it will be possible to control the operation of the fan manually.
Step-by-step algorithm of work
In each specific case, fan repair will differ depending on the existing breakdown. It is necessary to carry out appropriate diagnostics, which will allow us to determine why the radiator cooling fan on the VAZ 2114 does not turn on in a timely manner, which will simplify subsequent repairs. First of all, it is recommended to disconnect the fan connector, and then, observing the polarity, reconnect the connector directly to the battery terminal. If, with such a direct connection, the fan begins to rotate, this indicates a working drive, and the reason in this case may be electrical wiring, a faulty temperature sensor, or problems with the fuse. You can check the fuse responsible for the operation of the cooling fan without opening the plastic box. The fact is that such a relay is dual and is simultaneously responsible for the operation of the horn. Therefore, if the car's sound signal disappears and the fan does not work at the same time, this indicates a blown fuse. The block with such relays is located under the hood in a small plastic box. To open it, you need to remove two latches, then use tweezers to remove and change the fuse you need. Relay failures are difficult to diagnose. We can recommend that you get a 100% working relay, temporarily install it in the socket and check that the fan is turned on correctly. If during such a test the fan starts working, then you should simply replace the relay used with a working one. To check the temperature sensor, from which the signal goes directly to the radiator, disconnect the connector from the sensor and then turn on the ignition. In this case, the automation starts the fan for constant blowing in emergency mode. If, when the connector from the sensor is disconnected in this way, the fan turns on late, then we can therefore conclude that the temperature sensor has failed and will require replacement. The temperature sensor itself is fixed with two bolts, which can be unscrewed with a simple Phillips screwdriver. This sensor replacement usually takes no more than 5 minutes. If the cause of the breakdown is still the fan, you can try to repair it first or immediately replace it with a new one. The problem may be with the bearing or brushes. In this case, you can replace such damaged parts, which will completely restore the functionality of the cooling system fan. If the cause of the fan breakdown is the electric motor, then the repair presents certain difficulties, and such a failed drive is best replaced with a new one.
Cooling fan diagnostics - trying to find the problem
There will be two temperature sensors: one, which is on the thermostat, is connected to the ECU. It is necessary to turn it off - leave the second one as it is.
DTOZH on engine 11183
We disconnect the connector, but do not remove the sensor itself. Then we turn the key to position 1, and so on.
Electrically, things look complicated: the fan relay is in one box, and the fuse is in another. We need fuse F5 (20A). By the way, both a fan and a horn are connected to it.
Mounting block 2114-3722010-60 and 2114-3722010-10
The main mounting block is installed under the hood, and the additional one is located at the left foot of the front passenger.
Additional mounting block (option 1)
In the additional block we see three relays. The "main relay" is located at the bottom. And then there are possible options:
- The fan relay is mounted in the middle;
- This relay can also be installed at the top.
The second option is shown below.
Additional mounting block (option 2)
By the way, there is always a fuse located near the relay we need. It is part of the fan circuit.
How to upgrade the system
The simplest scheme for modifying the VAZ 2114 cooling system is to swap the pipe coming from the stove and the pipe coming from the expansion tank. Thanks to such a simple and quick upgrade, the following happens: during its operation, the car engine heats up the coolant, which then enters the thermostat.
From the thermostat, part of the coolant goes to the stove, and the other part goes to the pump and from there to the engine (a small circle passes). Part of the liquid entering the stove gives off part of the heat and, somewhat cooled, returns to the thermostat.
Cooling system of VAZ 2114 after modification
The thermostat mixes the coolant coming from the heater with the heated liquid coming from the engine. As a result of this, the overall temperature of the liquid decreases (due to the cooled coolant from the stove) and the valve does not open. Thanks to this, the thermostat valve will open only when all the liquid in it has a temperature of +85 C.
As you can see, the circulation of liquid and its temperature in the system will become much more uniform and will not have sudden changes, as when using the “classic” circuit installed from the factory.
For such a circuit, a thermostat with 6 holes (“new model”) must be installed. If for any reason there is a thermostat with 5 holes, then it should be replaced with the specified one.
When preparing to tune the VAZ 2114 cooling system according to the above diagram, you should remember that when replacing pipes in places, their length will not be suitable - one will be longer and the other shorter. That is why, in order to complete the required procedure, you will need to purchase new pipes and adjust them to length or make them yourself.
For this entire procedure you will need a minimum of tools:
- crosshead screwdriver;
- pliers;
- knife.
Before dismantling the pipes, place a cloth under them to avoid spilling the coolant.
Reworking the pipes of the VAZ 2114
When fixing the pipes with clamps, it is important not to apply excessive force. Excessive tightening can soon lead to destruction of the pipe material.
By upgrading the cooling system in this way, you can achieve the following results:
- Even in the most severe frosts, the car interior will be warm (thanks to more uniform circulation of fluid and an increase in the efficiency of the stove, on average, by 20%.
- In the summer heat, cooling the interior will be almost 2 times more effective (after all, the rate of fluid circulation will increase by more than 2 times).
- The operation of the car’s engine will become more uniform and smooth, and the “dips” characteristic of VAZ (and other domestically produced cars) will disappear.
In addition to all this, the temperature sensors will now show the true temperature, exactly corresponding to the temperature in the system.
As you can see, a very simple and quick procedure (the replacement itself can be completed in a few minutes) helps solve a number of serious problems at once. It is also worth noting that such tuning can be performed not only on 2114, but also on other VAZ vehicles.
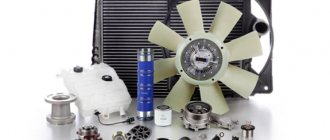
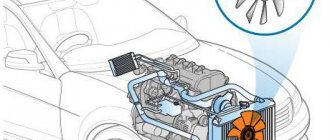
Design and principle of operation of the fan
Before you move on to repairing the fan, you should understand the principle of its installation on the cooling system. To do this, it is better to use the following simple diagram, on which the following main parts are indicated by numbers:
- — cooling radiator.
- - cork.
- - electric fan motor.
- - protective casing.
- - fan impeller.
- — damper pillows.
- - coolant drain plug.
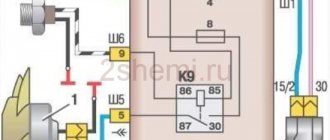
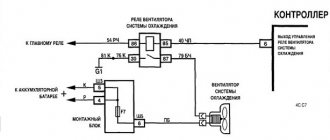
In addition, a diagram of the electrical equipment of the cooling system, which looks like this, will also be very helpful in repairs:
As you can see, the start of the cooling fan is controlled by a relay, which starts after receiving a signal from the temperature sensor.
Once the liquid in the radiator reaches a certain temperature, the temperature sensor closes and thus triggers the fan to start.
Once the temperature of the liquid in the radiator drops below a certain point, the sensor will open and the fan will automatically turn off. But, as already mentioned, sometimes this does not always happen.