28.01.2020
| (No votes) |
Issues discussed in the material:
- Functions and design of the chain tensioner
- Chain tensioner malfunctions in Nissan
- Replacing the chain tensioner in Nissan
- What car enthusiasts say about replacing the chain tensioner in a Nissan.
Replacing a chain tensioner in a Nissan is not a rare situation. If the mileage is high or the tensioner has never been serviced, then extraneous sounds will begin to be heard from under the hood. In this phase, the matter almost always ends in replacing the part.
Of course, replacing the tensioner is an inevitable process, but this does not mean that you need to sit and wait for the characteristic rustling sound from the engine to appear. In order for the part to last longer, you need to know some of the nuances of tensioner maintenance. Our material will tell you about this, as well as about the functions and replacement of the chain tensioner.
Functions and design of the chain tensioner
The hydraulic timing chain tensioner is a unit that performs an auxiliary function. It is made in the form of a hydraulic cylinder with a special design, which ensures constant tension of the chain with a certain force, and the tension does not depend on the ambient temperature, loads, and the condition of the parts.
The camshaft chain drive on Nissan is used quite often, because its replacement is rarely required, it is reliable and can withstand heavy loads. Unfortunately, metal chain expands when exposed to high temperatures. Over time, it wears heavily and becomes stretched. As a result, the tension becomes less, strong vibrations and extraneous sounds occur. As a result, the sprockets begin to slip over the teeth, the phases change, and individual parts of the assembly may become unusable. The solution to these problems lies in a special mechanism - a hydraulic tensioner.
A hydraulic tensioner is necessary in order to:
- maintain chain tension if it wears out and stretches;
- dampen vibrations of the chain branch when the engine is started.
If a tensioner is installed, there is no need to manually adjust the tension. In addition, even if the drive parts wear out, there will be no negative consequences.
The special design of the hydraulic tensioner allows vibrations and vibrations to be damped. This reduces the load on the elements of the mechanism and makes it work less noisily.
However, if you do not replace the Nissan chain tensioner in time, malfunctions may occur. Every car owner should know how this mechanism works and how it works. This is the only way you won’t go wrong when choosing a hydraulic tensioner suitable for replacing on a Nissan.
All hydraulic tensioners produced today have a single design and work the same. The differences are only in some elements, as well as additional functions.
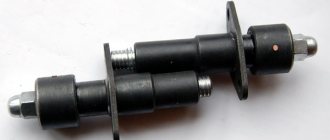
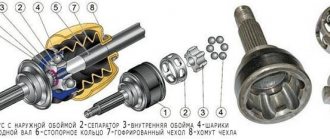
The Nissan hydraulic tensioner includes a cylinder-shaped metal body with a plunger in front of it and a valve assembly at the back. A working cavity is formed between them, which is closed. The plunger is a hollow spring-loaded cylinder that can move along the body; in front there is a surface for resting on the shoe or a lever with a tensioner sprocket.
To prevent the plunger from slipping out of the body, a pin or locking mechanism is installed.
The valve assembly contains a check valve; it is located on the plunger side. It is made of a spring-loaded ball that closes the channel through which lubricant is supplied. The ball is able to move exclusively towards the working cavity.
The mounting flange is located on the hydraulic tensioner housing. In addition, there is a threaded hole so that you can attach a tube or hose from the engine lubrication system. The device is located directly next to the chain, where the plunger rests on the shoe or sprocket lever. As a result, the force is transferred to the timing chain.
To replace a Nissan chain tensioner, you need to understand how it functions. When the driver starts the car, lubricant flows under high pressure to the check valve. It overcomes the spring force and penetrates the working cavity.
Pressure acts on the plunger, it comes out of the body, then rests against the shoe or sprocket lever. When the plunger moves, a force is created, resulting in tension in the chain. Then the tension becomes greatest, and the oil pressure in the working cavity is small so that the plunger can move further.
We recommend
“Winter tires for Nissan: review of models and selection criteria” Read more
Now the chain begins to put pressure on the plunger. Then the oil pressure in the working cavity becomes exactly the same as the oil pressure that comes from the engine lubrication system. As a result, the check valve closes. Thanks to this, the lubricant is locked in the working cavity, and the plunger does not move. The chain is tensioned and secured. If the engine stops, the hydraulic tensioner will remain in the operating position and the tension will not decrease.
Design features of tensioners on domestic cars
The VAZ chain tensioner of early modifications is a design with a spring. Modern models (after the seventh series) are equipped with hydraulic devices. The plunger rod is driven by the pressure created by the oil. This type is fully automatic, requiring no additional intervention to adjust the chain tension.
This part, like any other, is subject to wear and deformation. If damaged or clogged, the tensioner should be replaced or repaired. The device is removed according to the standard version. In early versions of the Zhiguli, it is additionally necessary to dismantle the oil supply tube located at the end of the unit body. To prevent liquid from leaking out during the operation, the hole must be blocked with a bolt of suitable diameter or a rag.
Chain tensioner malfunctions in Nissan
A hydraulic tensioner is installed on the machines. This means that the force on the rod is generated due to the oil flow, which goes under pressure into the working cylinder. As a result, the rod extends and rests against the chain. All this leads to the timing chain being tensioned automatically.
Where does the lubricant come from so that the hydraulic tensioner can function? It comes from the oil circuit of the internal combustion engine. Why might it be necessary to replace the chain tensioner in a Nissan?
Let's look at the most common cases:
- The car owner changes the lubricant irregularly; this is the main reason that can lead to a problem. Over time, when the mileage reaches 8,000–10,000 kilometers, the lubricant changes its original properties, and many engine wear products accumulate in it. Due to the fact that the plunger pair in the tensioner is adjusted 100% accurately, the service life of the mechanism is reduced as a result of microdamage on the cylinder walls or on the plunger. However, it is not only the plunger pair that suffers. If you do not change the lubricant in time, the thrust shoe will quickly fail, and it is the one that comes into contact with the chain. Grooves appear on this part to level out wear, and the rod has to extend more.
- Oil starvation occurred. This problem can lead to serious consequences. When the system depressurizes, when an air lock gets into the tensioner cylinder, the tension becomes insufficient.
- The motor is overheating. If the operating temperature of the lubricant is exceeded, oxidative processes in it will proceed much faster. As a result, sludge build-ups will remain throughout the pipeline. Moreover, this will also happen in the plunger pair of the hydraulic tensioner.
- The mechanism wears out over time. The specialists who created the chain motor were unable to develop a hydraulic tensioner whose service life would be as long as that of the chain. That is why replacing the chain tensioner in Nissan is required quite often.
If you want the need to replace the chain tensioner in your Nissan to arise as rarely as possible, you should regularly fill the engine with new lubricant.
If the power unit on your car has a belt drive, then it can break at the most inopportune moment. When the roller starts squeaking, the driver will probably notice it. If the belt has become unusable, you will not be able to determine it yourself.
However, this breakdown does not occur with motor chains. When the chain tension becomes insufficient, the driver hears a specific rustling sound and the mechanism begins to rattle. Sometimes at idle you can notice a rattling noise, like on diesel cars. But as soon as the engine warms up, the extraneous sounds disappear. This sign indicates that the chain tensioner in your Nissan needs to be replaced in the near future, as it is not functioning normally. Do not delay repair work, as this may lead to more serious damage.
When the chain continuously rumbles and rustles, the timing gear drive should be diagnosed. If during the inspection it is revealed that the chain is within tolerance, the Nissan chain tensioner should be replaced.
If on a Nissan car the valve timing shifts because the chain on the sprocket teeth has jumped or the drive has broken, something irreparable will happen: the valves will meet the pistons. That is, when the valves open, the pistons will rest against them. Both elements will be destroyed.
Note!
If this happens, it will be impossible to restore the engine. The chain tensioner in your Nissan should be replaced in a timely manner so that the car is in good condition.
Purpose
The mechanism in question ensures the normal operation of the chain and the entire drive. The unit is easy to maintain and simple in design. The tension is carried out under the influence of a spring or oil in the working rod of the device. The engine chain tensioner is a fairly reliable element and rarely fails. However, if extraneous noise is heard, it is necessary to check its condition and, if necessary, replace it.
Ignoring this problem leads to the chain weakening and jumping off, which can lead to more serious damage to the power unit. It is quite possible to clean and replace the part on your own. Next, we will consider the features and operating principle of these devices.
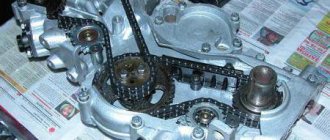
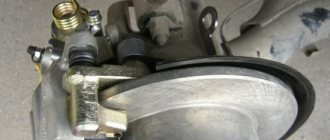
Replacing the chain tensioner in Nissan
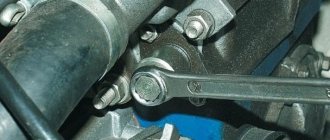
To dismantle the assembly, first unscrew the plunger bolt that secures it. Carry out the work carefully, because the screw is under high pressure due to the action of the spring. After this, we disassemble the spring-plunger filling. The spring size when not loaded is 155.5 mm.
Then we proceed to diagnose the mechanism. Shake the plunger, making sure that the working element - the ball - moves easily. After this, the operation of the valve should be diagnosed. When air under pressure presses on it, it will open; if this manipulation is carried out on the other side, the valve will close. Otherwise, you will have to pull the valve out of the seat and then clean these parts. Look at the blow-out slot, it should also be clean.
It is possible to install a mechanical chain tensioner on a Nissan only when the working chamber is filled with lubricant. The plunger, spring, and the replaced gasket are placed in the seat, then you need to turn the bolt that secures the mechanism. The cone-shaped edge of the spring should face the locking bolt.
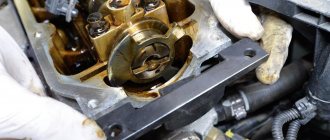
Next, we proceed to unscrew the bolts that secure the cylinder head on the Nissan. Then the BC cover, as well as the camshaft gear cover, must be removed. The tensioner should be moved in two directions until grease appears near the mounting bolt; you should feel strong resistance. The final step is to tighten the closing bolt with the required force of 35 Nm, reinstall the cylinder head covers, as well as the camshaft gears.
We recommend
“Replacing a variator in a Nissan Qashqai: when is it necessary to do it and what is the cost of repair” Read more
Automatic timing chain tensioners are designed almost identically, regardless of the make and model of the car, so replacing them is simple. On sale you can find parts in the housing of which the working rod is located, it is secured with a pin on the back side. Replacing this mechanism is done in exactly the same way as with a mechanical one.
Once the part is installed, the pin should be removed using wire cutters or pliers. Then the spring will rest against the bar. After this, you can screw the control bolt into the rear of the housing. This is necessary to prevent the spring from falling out; the bolt is sold together with the main mechanism. No matter what modification and type of device, replacing the chain tensioner in a Nissan is performed almost identically. The main thing is to follow the steps described above in order to do this job correctly with your own hands.
When the element is removed, you should look to see if it is clogged. After all, the lubricant contains microparticles of dirt, which impair the operation of the mechanism. If the blockage of the unit is severe, the functioning of the plunger rod will be abnormal and it will begin to jam.
Even a beginner can clean the chain tensioner on a Nissan with his own hands. Just put it in a container filled with gasoline and leave it for a couple of hours. Then clean and let the parts dry. Inspect the tensioner; you may find dents, cracks or scratches.
Exactly the same check should be carried out for the plunger mechanism. Are the parts damaged? Let's start diagnosing the functioning of the mechanism. We take it with one hand, and with the other we move the plunger rod in the frame. If it moves easily and doesn't jam, then everything is fine. However, if it is difficult to move, you should wash it again. Did this manipulation not help? This means we are replacing the chain tensioner in a Nissan. The mechanism is assembled in the reverse order.
Automatic design
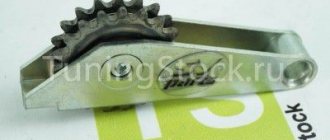
This type of timing chain tensioner has a ratchet that automatically controls the sagging and stretching of the transmission element. The unit consists of a housing and a spring-loaded pawl located in it, as well as a gear strip. The teeth are made with a slope in one direction in increments of one millimeter.
The operating principle of this design is as follows:
- the spring of the device acts on the toothed bar with force, depending on the sagging of the chain;
- the bar transmits force to the tensioner shoe;
- reverse movement is eliminated thanks to the ratchet locking pawl;
- the stopper falls between the teeth, preventing the bar from moving back.
This principle of operation consists in the constant action of the spring on the bar with tension on the chain, and the ratchet device prevents it from weakening.
What car enthusiasts say about replacing the chain tensioner in Nissan
- How to determine that a Nissan chain tensioner needs to be replaced because it is defective? “You can understand that a replacement is needed on a Nissan in the following way: you need to find a small hole on the tensioner; lubricant comes out of it in a thin stream if the mechanism is functioning properly. Have you found such a hole? This means the part is defective, and lubricant will come from under the piston.”
- How to restore the chain tensioner in a Nissan without replacing it?
“If a mechanism breaks down, there is a way to bring it back to life without having to replace it. What needs to be done: there will be a bar on the body; it limits the stroke of the tension piston. It needs to be removed, as well as the aluminum rivets. You will see a hole, it needs to be drilled, for this you will need a drill of 5, the thread must be cut to 6. Now we assemble the mechanism, install it in the motor, turn the knee one turn, so the chain will loosen as much as possible on the tensioner side.All that remains is to screw the bolt into the resulting hole, apply sufficient force, but the thread should not be stripped! After such manipulations, the motor will work perfectly.”
- Do I need to replace the Nissan chain tensioner?
“How to get to the main chain GN? We dismantle the window on the gas distribution mechanism cover. To make it easy for you, study its design. Most likely, you will need to flush the Nissan engine, as well as fill in high-quality lubricant. You will ride 5,000–10,000 km, and there will be no extraneous sounds, and you won’t even need replacement. However, if the chain is noisy all the time, you will have to remove the GN here.” - We remove extraneous sound on Nissan quickly and without replacement.
“Does the chain ring after the engine warms up? Then bend the upper damper upwards from it. There will be no extraneous sounds after this. I guarantee it 100%."
What do users recommend?
Car enthusiasts give different advice on how to improve or select a chain tensioner. Mercedes and other foreign cars from well-known manufacturers are often equipped with a timing chain drive. As a rule, the device for tensioning the chain in modern cars is designed to be automatically adjusted. This makes it easier to maintain and repair the unit, ensuring its reliable operation.
In addition, when replacing the tensioner, users recommend setting the rod of the new device to the minimum position. This makes it possible to pump the working chamber as much as possible, avoiding jamming and unnecessary noise. This, in turn, contributes to the correct adjustment of the degree of chain tension.
conclusions
Making a homemade tensioner is quite simple. To do this you need very few materials and tools. And, of course, your time, desire to do something. At the same time, you will not only save significantly, but also get a lot of pleasure from the manufacturing process itself.
If you do not want to spend money on expensive purchased models of kites for kitesurfing, then you can assemble this type of equipment yourself, following the advice in this article.
Why do you need a bicycle chain guard? During trips, foreign objects, sand, dirt can get into the bicycle chain - all this leads to deformation and wear. How to protect the chain from premature wear? We make chain protection with our own hands.
Not every athlete is able to afford to buy a complete windsurfing board. Let's learn how to make this projectile yourself at home.
Chain tensioner - how it works
How does a bicycle chain guide work and what is it used for?
The tensioner is installed together with the rear derailleur on bicycles with a multi-speed open transmission. Additionally, they can be installed on other types of bicycles, for example, with a planetary control system. The simple design of this device ensures a clear fixation of the bicycle chain, and also protects against flying off in case of strong pulling.
The optimal position of the tensioner rollers is parallel to the rear sprocket system, that is, the chain runs straight along it and without distortions. Otherwise, the switching system holder is bent. To align it, you need to grab and pull the entire device (switch), not just the tensioner.
Rear derailleur diagram with tensioner
Materials
Hardened bicycle chain, dark gray. This steel is used to make hardened wire, which can easily be dulled even by bolt cutters, and most tools - for example, screwdrivers and screwdriver bits, where special strength is needed.
“Golden” coloring is an indicator of the presence of anti-corrosion coating. The composition of the bronze-golden coating includes steel alloying additives, for example, cobalt. This steel is used in the manufacture of multi-stage and conventional drills and has increased hardness and strength.
Aluminum chain is nonsense. It would quickly break if the cyclist pressed the pedals for a quick start. Non-ferrous metal is not used here - it is too soft; any aluminum-based alloys are for frames and forks, not transmission parts. Only steel – and nothing more.
Reinforced chains are mostly single-speed. They can be made from either hardened or (partially) stainless steel.
Titanium is very rare. Titanium itself is an expensive material, tens of times more expensive than iron. If, say, a frame for cycling glasses made of titanium today would cost 3000-5000 rubles, then a bicycle chain would be even more expensive.
A stainless steel chain can be made either entirely from the same steel or coated with the same stainless steel. But all types of anti-corrosion coating are erased over several tens or a couple of hundred kilometers, and unprotected steel is exposed.
Signs that the procedure is necessary
On bicycles that are equipped with a planetary hub or that do not have speed derailleurs, it is not difficult to determine that the chain needs to be tightened. To check, you need to pull it down until it stops. If the distance it travels is more than 1-1.5 cm, then adjustment is required.
There are several methods to determine whether the chain on a speed bike needs to be tightened:
- The speed position is set so that the chain is located on the largest sprockets at the front and rear. Then you need to pull it down and towards the front wheel until the rear derailleur reaches the stop. If after this procedure there are no more than 2 free links left, then there is no need to adjust the chain length.
- The chain is set to the largest sprocket at the front and the smallest at the rear. In this case, the guide roller and the rear shift tensioner roller must be on the same axis, perpendicular to the ground. The required length on 2 suspensions is determined in this way: you should press on the pendulum until the front sprocket cassette moves to the greatest distance from the ratchet. This is the best position to measure the required chain length.
Completion
Such a small but important part as the engine chain tensioner is a kind of fuse against the transmission element weakening and jumping off. Such things can lead to serious malfunctions of the power unit. If an older car model has a manual version, it is easy to upgrade it by replacing it with an automatic version.
It is more convenient in that it ensures tension of the chain without additional human intervention, eliminates jamming of the rod, and is easier to disassemble and install. According to their operating principle, all variations of timing chain tensioners have a similar sequence. The same applies to replacement and repair of parts.
Reflector dampener
One of the simplest to make, but quite effective sedatives. It copes well with the main task - preventing the chain from falling off. At the same time, the chain holds perfectly during a quiet ride and during bumps and bumps.
To make a chain guide with your own hands you will need:
- an ordinary bicycle reflector (it is better if the diameter of the mounting ring matches the diameter of the seat tube);
- nuts;
- bolt;
- screwdriver;
- hacksaw for metal.
When you have found all the necessary tools and materials, you begin production. Take the reflector and unscrew the reflector. All you need is a foot. Mount it to the seat tube above the chain. It should not rub against the chain, but should be as close as possible, just a few millimeters. After this, saw off the excess length so that it does not interfere with pedaling. This type of stabilizer will perfectly hold the bike chain when jumping over curbs and during side landings.
Best articles: Bicycles from Belarus
Chain stabilizer made of reflective material prevents the chain from falling off
You can screw an asterisk to the foot. You need to install such a tensioner on the pen with the asterisk down. This way you can tighten up the sagging lower part of the bike chain.
Visual check of timing chain – TIGUAN 2.0 TSI
Why is a visual check of the timing chain necessary?
Everything is quite trivial - to check the reliability of the readings that can be obtained using standard computer diagnostics. Unfortunately, they are not always reliable. We came across cars where the computer readings were ideal (significantly less than 2 degrees), however, in reality the tensioner was extended almost completely, and the owner took a big risk without even knowing it! And alas, I can’t say that these were isolated cases... checking the timing chain
There are enough fears about the dangers of chain jumping on these motors - you probably already know. And if not, you can look on the Internet, there is a lot of information. timing chain check
The good news is that the test takes only 30-40 minutes and gives a guaranteed answer about the position of the tensioner and the condition of the chain, respectively. All you need as spare parts is a plastic plug for the inspection window. We always have it in stock, and it costs around 200 rubles.
The procedure is not to say that it is completely simple, because... crawling into this viewing window is not easy, but our mechanics have sufficient experience in such manipulations
(1 rating, average 5 out of 5)
Tips for choosing
To choose a suitable bicycle chain, rely on the characteristics indicated on the label. A correctly selected chain – specifically for your sprockets – is the key to running more than one thousand kilometers before significant wear of the parts is detected.
For children's bicycles, the length of the (half) link may not be 12.7 mm, but somewhat less - for example, 11.4 mm. From such a chain, you will only take pins and rings as spare parts, but the plates will no longer fit the sprockets of an “adult” bike. The fact is that by placing at least a few “children’s” links on an “adult” chain, you will quickly sharpen the sprockets. And shortening the chain by even 3 mm, like lengthening it, can kill all the parts in just 100-200 km, even when the transmission is cleaned and lubricated weekly.
But the choice of chains with anti-corrosion coating is not at all mandatory - it is rather a desire to impress those who do not yet have a bicycle. This coating can be successfully replaced with regular lubrication - even in rainy weather your chain will not rust. The fact is that machine oil (or its analogue in the form of a semi-liquid lubricant) is as good as spraying from another alloy and does not allow water to reach the steel. The coating itself will soon wear off, and you will come to the starting point - the need to regularly lubricate the chain.
Top articles: Is an electric scooter with a gasoline generator even legal?Avoid fakes. Chinese manufacturers and some swindlers who produce chains and bearings from aluminum alloys with a short resource and service life are guilty of this. It happens that they dilute steel with cheap additives, turning it into “plasticine” - as in the manufacture of low-quality hex keys, screwdrivers and bits. Violation of production technology did not lead to any good - numerous breakdowns can no longer be avoided.
Do not install a thicker chain on an 11-speed bike designed for, say, 7-speed cassettes. It's all about the number of cassette sprockets: the more there are, the narrower the gap between the planes, in each of which lie the tops (points) of the same sprocket. On the contrary, a narrower chain can be installed on a bike with fewer speeds.
As an example: the author of these lines used a 6-speed chain on a simple “road car” with one speed, where “Tyazhmash” products of greater thickness are used. At the same time, the bike was new, he found a bicycle chain with a broken link in the park - and, shortening it by 2 half-links, rode 9,000 km on it, riding within a radius of up to 25 km from his city on roads of dubious quality, before another link broke. . The “native” product was taken on every trip as a spare. Whether you need such difficulties is for each of you to decide personally.
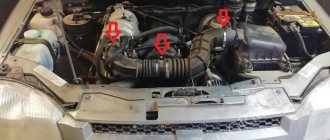
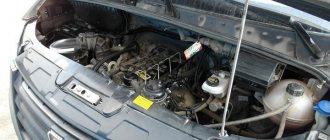
Removing the cylinder head cover
Place the machine on a pit or ramp.
First, the holders of the brake booster pipe and the throttle valve drive cable should be disconnected from the cylinder head cover. They are mounted on special brackets on the left and right sides of the block.
Next, use a 10mm wrench to unscrew the bolt securing the air duct couplings. Move it aside. Next, using a screwdriver, slightly loosen the clamp of the crankcase ventilation pipe, which connects it to the air duct. Now use a 10mm socket to unscrew the bolts holding the cylinder head cover. The order is not important here.
OLYMPUS DIGITAL CAMERA
After that remove:
- brackets for the throttle cable and motor screen;
- lid pressure washers;
- ventilation and air hoses.
Next, all that remains is to remove the cylinder head cover.
Main types
Most often, the chain tensioner is present at the bottom of the derailleur. The tension can be adjusted with a special screw.
On singlespeed and planetary bikes, it is attached to the dropout, rear axle or hanger. The tension is adjusted by changing the angle of the lever or the reach (depending on the design).
On bicycles designed for extreme disciplines, the tensioner may be part of a stabilizer that is mounted between the frame and the system (frame mounting standards: ISCG, ISCG 05, BB).
Basic standards for chain tensioners.
ISCG
International Standard Chain Guide translated into Russian means “international chain guide standard.”
The damper does not tension the chain, but reduces the amplitude of vibration by limiting the free space. However, in the diagram of a row of dampers, there is a tension roller in the lower part.
The standard is designed to simplify fixation on the frame and adjust the seat angle. Before its appearance, the dampers were pressed against the frame by the cup of the carriage.
ISCG provides for fixation on the frame with 3 bolts (the distance between the holes is 46 mm).
ISCG 05
A few years after the introduction of the first ISCG standard, larger diameter carriages with external bearings began to appear more often on the market. Changes were required in the location of the mounting holes.
Thus, in 2005, ISCG 05 appeared (the distance between the holes is 56 mm). This international standard is an excellent example of successful cooperation between different players in the market, from which the consumer primarily benefits. The fastenings have become more convenient and reliable.
BB
The dampers with such a system are attached to the carriage with a locking ring - they are clamped between the frame and the system with the front sprocket.
But quick and accurate adjustment of the distance between the damper and the drive sprocket is impossible. To solve this problem, damper manufacturers included special adapters in the kit, which made the system heavier and, due to the large number of bolts, required frequent adjustments.
Installing a bicycle chain guide with your own hands
The principle of installing dampers of various types is almost identical. To install the protective accessory, you will need the following tools:
- connecting rod squeezer;
- set of hexagons;
- carriage remover;
- thread locker;
- a key for unscrewing the system's bonnets;
- lubricant
The algorithm of actions aimed at self-installation of the damper should be as follows:
Remove the connecting rods and sprocket from the system. If necessary, you can unscrew the carriage in order to fix the star and guide in the correct position. Screw the “banana” to the “ears” of the carriage cup. Install the connecting rods in the standard position, pulling the chain onto the sprocket so that both rollers are in tight contact with the washers
Please note: the fastening elements of the rollers must be tightened simultaneously on both sides (outer and inner). Leaving a minimum gap between the internal damper plate and the star, you need to tighten the three adjusting bolts.
After performing these simple manipulations, you need to make sure once again that all elements of the system are securely fixed. Next, you need to adjust the chain tension, alternately switching to the smallest and largest sprockets. The length of the chain can be adjusted as needed by lengthening or shortening it. Installation work has been completed.