Payment for goods and downloading of the book in electronic form (PDF format) is made on the website.
To do this, you need to find the book you are interested in and click on the “Buy” button. The price of the book is indicated on the button.
For convenience, the price on the website for residents of Russia, Belarus and Kazakhstan is presented in rubles.
For residents of Ukraine in hryvnias, and for all other countries - dollars.
After clicking on the “BUY” button, a payment window will open where you can select a payment system with which you can pay for the selected book using any bank card (Visa, MasterCard, MIR, etc.)
When you click on the “Pay by bank card” button, the Portmone payment system will open, which is the easiest way to make a payment.
In addition, the website offers four payment systems for payment:
- Yandex (payment from any bank cards, Yandex Money account, QIWI Wallet, terminals, etc.);
- Portmone (payment from any bank cards, Portmone account);
- PayPal (payment from any bank cards, PayPal account);
- WebMoney (payment from any bank cards, payment from WebMoney wallets).
Payment via Yandex Cashier
After selecting payment via Yandex, the Yandex Cashier payment system will launch, where you need to select a convenient payment method (bank card, QIWI, Yandex Money account, etc.)
After specifying payment details and confirming payment, payment for the goods will occur.
If you have a bank card in a currency other than the ruble, then the money will be debited from the card at the rate of the Central Bank of Russia at the time of the purchase.
This payment method is optimal for residents of Russia, Kazakhstan and Belarus.
Official website of the Yandex Kassa payment system https://kassa.yandex.ru
Installation
Install the prepared assemblies into place even through the top of the cylinder. Check the connecting rod bearings carefully and replace them. Install the lower elements - covers and secure with bolts.
This is due to the fact that a lot depends on the tightening torque: both the freedom of rotation of the crankshaft and the tightness of the liners on the journal of this shaft. If it is weak, the oil leaks out without proper lubrication, and if it is strong, it seizes and, again, there is insufficient lubrication. Based on these considerations, this value should be exactly 43.32-53.51 H * m or another 4.42-5.46 kgf * m. Only this and nothing more. After this, complete reassembly can be done in reverse order.
Interesting video about Priora fishing rods":
Sometimes it happens that it is necessary to urgently replace the gasket or change the cylinder head. Such work at a gas station is not cheap, and to save money, you can try it yourself. This work is not difficult, but it requires attention; it is important to observe the sequence and tightening torque of the Priora 16 valve head.
Here you also need to know that the tightening sequence is different for 16cl and 8cl blocks, so you need to be careful. The torque on 16- and 8-valve engines is the same and is equal to four revolutions.
Payment via Portmone
After selecting payment through Portmone, the payment system will launch, where you need to select the payment method: bank card or Portmone account.
The price in the Portmone payment system is converted into dollars at the exchange rate of the Central Bank of the country where you are located.
If you have a bank card in a currency other than the dollar, then the money will be debited from the card at the rate of the Central Bank of your country at the time of the purchase.
After specifying payment details and confirming payment, payment for the goods will occur.
Official website of the Portmone payment system https://www.portmone.com
Tighten the engine bolts correctly
All my life I have been surrounded by cars! First, in the village, already in the first grade, I was rushing around on a tractor through the fields, then there was JAVA, then a penny. Now I am a third-year student at the Polytechnic Faculty of Automotive Engineering. I work part-time as a car mechanic and help repair cars for all my friends.
In the table below we have indicated the tightening torques for all threaded connections on the VAZ-2112 engine.
Tightening torque of threaded connections (table)
| Detail | Thread | Tightening torque, N m (kgf m) |
| Engine | ||
| Cylinder head bolt | M12x1.25 | The cylinder head mounting bolts must be tightened in four steps: 1 – to a torque of 20 Nm (2 kgf); 2 – torque 69.4–85.7 (7.1–8.7 kgf); 3 – turn 90°; 4 – turn it 90° again. |
| Nut of the stud securing the intake pipe and exhaust manifold | M8 | 20,87–25,77 (2,13–2,63) |
| Tension roller nut | M10×1.25 | 33,23–41,16 (3,4–4,2) |
| Camshaft bearing housing stud nut | M8 | 18,38–22,64 (1,87–2,31) |
| Camshaft pulley bolt | M10 | 67,42–83,3 (6,88–8,5) |
| Accessory housing mounting bolt | M6 | 6,66–8,23 (0,68–0,84) |
| Nut of the stud securing the exhaust pipe of the cooling jacket | M8 | 15,97–22,64 (1,63–2,31) |
| Main bearing cap bolt | M10x1.25 | 68,31–84,38 (6,97–8,61) |
| Oil sump bolt | M6 | 5,15–8,23 (0,52–0,84) |
| Connecting rod cap bolt nut | M9x1 | 43,32–53,51 (4,42–5,46) |
| Flywheel bolt | M10x1.25 | 60,96–87,42 (6,22–8,92) |
| Coolant pump mounting bolt | M6 | 7,64–8,01 (0,78–0,82) |
| Crankshaft pulley bolt | M12x1.25 | 97,9–108,78 (9,9–11,1) |
| Coolant pump inlet pipe mounting bolt | M6 | 4,17–5,15 (0,425–0,525) |
| Muffler exhaust pipe fastening nut | M8×1.25 | 20,87–25,77 (2,13–2,63) |
| Nut securing the flange of the additional muffler | M8×1.25 | 15,97–22,64 (1,63–2,31) |
| Nut securing the clutch cable to the engine bracket | M12x1 | 14,7–19,6 (1,5–2,0) |
| Front engine mount bracket bolt | M10x1.25 | 32,2–51,9 (3,3–5,5) |
| Front engine mount bolt nut | M10 | 41,65–51,45 (4,25–5,25) |
| Nut of the bolt securing the left suspension support of the power unit | M10 | 41,65–51,45 (4,25–5,25) |
| Nut securing the bracket of the left suspension support of the power unit | M10 | 31,85–51,45 (3,25–5,25) |
| Bolt securing the rear suspension support of the power unit | M10x1.25 | 27,44–34 (2,8–3,47) |
| Nut of the power unit rear suspension bracket mounting bolt | M12 | 60,7–98 (6,2–10) |
| Bolt securing the oil receiver to the main bearing cover | M6 | 8,33–10,29 (0,85–1,05) |
| Bolt securing the oil receiver to the pump | M6 | 6,86–8,23 (0,7–0,84) |
| Oil pump mounting bolt | M6 | 8,33–10,29 (0,85–1,05) |
| Oil pump housing bolt | M6 | 7,2–9,2 (0,735–0,94) |
| Oil pump pressure reducing valve plug | M16x1.5 | 45,5–73,5 (4,64–7,5) |
| Oil filter fitting | M20×1.5 | 37,48–87,47 (3,8–8,9) |
| Oil pressure warning light sensor | M14x1.5 | 24–27 (2,45–2,75) |
| Carburetor mounting nut | M8 | 12,8–15,9 (1,3–1,6) |
| Cylinder head cover nut | M6 | 1,96–4,6 (0,2–0,47) |
Measuring tool
Despite the fact that performing work according to the tightening rules requires a special approach, such a procedure will not take a lot of time.
The only thing required to perform such work is a torque wrench.
This wrench is used to measure the tightening torque.
You can get such a tool in any store, but its price is often steep and can sometimes reach 2,000 rubles.
Payment via PayPal
After selecting payment via PayPal, the PayPal payment system will launch, where you need to select the payment method: bank card or PayPal account.
If you already have a PayPal account, then you need to log into it and make a payment.
If you do not have a PayPal account and you want to pay using a bank card via PayPal, you need to click on the “Create an Account” button - shown with an arrow in the picture.
PayPal will then prompt you to select your country and provide your credit card information.
After specifying the information required to make the payment, you must click on the “Pay Now” button.
Official website of the PayPal payment system https://www.paypal.com
crank mechanism
This basic motor unit mainly consists of the following groups:
Each part of the group has several more elements. For example, each piston has a set of O-rings, a connecting pin, and brackets that hold the pin in place. The crankshaft has bearings and seals. The most interesting thing is the design of the connecting rods.
The principle of operation of the mechanism
VAZ engines, like other cars, are based on explosive combustion of fuel. The piston creates some compression of the gas-air mixture, a spark from the spark generator ignites it, pushing the piston down, and the crank mechanism (CPM) converts translational motion into rotational motion. This is due to the special shape of the crankshaft. The connecting rods are positioned so that when the connecting rods pushing the pistons go up, the connecting rods push them down. And this process goes one by one.
Set of connecting rods "Priors"
These parts add up. The main part is made of high quality metal. Only in the upper ring, where the piston locking pin fits, is a sleeve made of a different metal installed. In general, the connecting rod consists of the following parts:
- connecting rod;
- internal coverings;
- rods 2 pcs.;
- special washers;
- connecting rod bearing.
This is due to the fact that the liners have special grooves for the passage of engine oil. Due to the high rotation speed, this unit requires uniform and abundant lubrication. The slightest discrepancy between these splines and the oil supply holes of the crankshaft will lead to interruption of the lubricant supply and, as a result, to blocking of the engine.
Payment via WebMoney
After selecting payment via WebMoney, the payment system will launch, where you need to select the payment method: bank card or WebMoney wallet.
If you already have a WebMoney wallet, then you need to log into it and make a payment.
If you do not have a WebMoney wallet and you want to pay in another way, you need to select any of the methods that WebMoney offers and make the payment
After specifying payment details and confirming payment, payment for the goods will occur.
Official website of the WebMoney payment system https://www.webmoney.ru/
Engine tuning using connecting rods
Most young people who purchase a Priora are not satisfied with the factory parameters of the car. Many people strive to improve their car. Make it more powerful, more responsive and faster. This is called "charging" the engine. That is, as they also say, make tuning. This concept includes many different actions.
The most popular for such an operation are the so-called “sports” reinforced connecting rods, 131 mm long. They are included in the standard kit for improving the Priora engine.
Downloading a book
After successfully completing the payment (by any method) and returning to the KrutilVertel store from the payment system website, you will be taken to the successful payment page:
On this page you need to indicate your e-mail, where access to download the book will be sent.
If you are already registered on our website, then simply follow the link to your personal account.
The book you purchased will be in your personal account, from where you can always download it.
Please note that after making the payment, you need to return back from the payment system website to the KrutilVertel website.
If for some reason you did not return back to the site and closed the payment system tab with a message about the successful completion of the payment, please let us know - we will send you a letter indicating access to download the book.
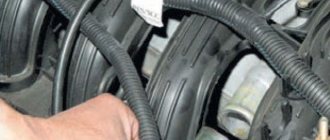
Torque and sequence of tightening the camshaft bed
Camshaft cover tightening sequence
Correct tightening of the camshaft bed, as well as other parts of the cylinder head, determines the normal functioning of all components and assemblies. So, in order to tighten threaded connections, a standard tightening pattern and a torque wrench are used.
Before installing the bolts in place, they must be washed thoroughly and lubricated with silicone grease.
In order to properly tighten the bolts, you need to know the sequence. It starts from the middle part and gradually moves directly to the edges. The detailed sequence can be seen in the photo below.
Tightening diagram for each camshaft bed bolt with numbering
As for the tightening force itself, it is 8.0-10.0 Nm. After the bed is installed on the block head, the connection bolts are tightened by hand or without much force using a ratchet with a head.
We tighten all the bolts by hand, but do not tighten them
When all the bolts are in place, you need to take a torque wrench and tighten them according to the standards in the order indicated above.
Torque wrench for tightening threaded connections
In what cases is it necessary to tighten the camshaft bed?
The bolts are tightened. Marked with arrows
Tightening the camshaft bed will be necessary if it was previously dismantled for restoration and repair work. So, in what cases will you need to remove the bed, let’s look at it in more detail:
- Replacing camshafts, lifters or valve seals.
- Overhaul of the block head.
- Engine repair operations.
- Replacement of individual elements of the cylinder head.
Consequences of improper bed tightening
The consequences of improperly tightening the camshaft bed include the following:
- Oil leakage due to a gap or loose connection.
- Passing air inside the cylinder head.
- Malfunction of the engine or cylinder head.
- Ingress of foreign objects (water, dirt, dust).
Problems when paying with bank cards
Sometimes difficulties may arise when paying with Visa/MasterCard bank cards. The most common of them:
- There is a restriction on the card for paying for online purchases
- A plastic card is not intended for making payments online.
- The plastic card is not activated for making payments online.
- There are not enough funds on the plastic card.
In order to solve these problems, you need to call or write to the technical support of the bank where you are served. Bank specialists will help you resolve them and make payments.
That's basically it. The entire process of paying for a book in PDF format on car repair on our website takes 1-2 minutes.
If you still have any questions, you can ask them using the feedback form, or write us an email at [email protected]
Nuances of work
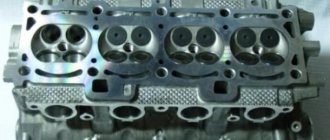
At different times, Lada Priora cars were equipped with engines with a displacement of 1.6 and 1.8 liters and a different number of valves in the heads - V8 (or 8V) and V16 (or 16V). The type of unit head determines the size of the bolts, the order of their installation and the tightening torque of the cylinder head on the Priora.
If the car has an 8-valve engine, then it can use head mounting bolts of different sizes:
- on old motors 21114, M12*1.25 hex head screws are used;
- on more modern 21116, which went into production approximately in mid-2011, M10*1.25 elements with an asterisk head are installed.
When installing a removed head, it is necessary to use new screws, since the old ones will be stretched and have internal damage.
Also, the engines use gaskets of different designs - combined on the old unit and all-iron on the new one. The procedure for tightening bolts for engines with metal and combined gaskets is absolutely identical.
The main nuances when performing work are checking the length of the fasteners, observing the sequence of tightening the screws and monitoring the tightening force. Violation of these conditions leads to damage to parts and the need for additional repair work. The procedure itself is not complicated and can be done independently in any convenient place - in a garage or in an open parking lot, with the exception of the case of installing the head on the engine, which is preferably installed indoors.
It is important to remember that tightening the bolts “by eye” without a torque wrench is unacceptable, since a uniform fit of the mating surfaces of the head and block will not be ensured.
Tools and materials
Before starting the tightening procedure, you should prepare everything necessary to perform:
- wrench with built-in dynamometer up to 100 H⋅m;
- a set of sockets and regular keys;
- Togh E14 key;
- calipers for measuring the remaining length of bolts;
- plate with a marked scale up to 180 degrees;
- new bolts.
A torque wrench is an important tool for DIY repairs.
Step-by-step instruction
Sequence of operation on an 8 valve engine:
- Wipe the cylinder head surfaces and dry the bolt holes in the engine block.
- Install the gasket on the block and align it along the guides.
- Mount the head on top and insert 10 M10 or M12 mounting bolts. If the owner decides to save money and keep the old screws, then they should have a length of no more than 135.5 mm.
- Tighten the elements according to the diagram. The tightening force should not exceed 20 N⋅m.
- Then you need to re-tighten the bolts. The second tightening force should be in the range from 70 to 85 N⋅m.
- Next, you need to tighten the screws by 90 degrees in the same sequence. The rotation angle can be controlled using a special device, which is a plate with an attached scale from 0 to 180 degrees.
- In accordance with the regulations, you need to tighten the bolts again by 90 degrees.
- The attachment of the 8 valve head to the block is complete.
- After assembling the motor, you need to check the quality of operation by starting and warming up the engine. A securely tightened joint between the head and the block should not allow working fluids to leak from the crankcase of the power unit.
Homemade device for controlling the rotation angle
If a more powerful and modern engine with sixteen valves is installed on a car, for example, the VAZ 21126 model or 126 for short, the procedure for pulling the bolts has its own characteristics.
In order to correctly tighten the cylinder head screws on such units, you need to:
- Remove oil from the mating surfaces and check that there is no liquid in the bolt holes.
- Install the gasket, center it and place the head on top.
- Insert 10 mounting screws M10*1.25 into the guide holes, having previously lubricated the threads with engine oil. If you decide to use old bolts, which is permissible for 16 valve heads, then their remaining length should not exceed 98 mm.
- Perform preliminary pulling according to the scheme with a torque of 12-20 N⋅m.
- Increase the tightening degree to 26-34 N⋅m and re-run all the bolts in the same sequence.
- Then you need to tighten the screws 90 degrees, with a force of about 50 N⋅m.
- Repeat tightening by 90 degrees again, the torque on the key will be approximately 80 N⋅m. Some instructions recommend waiting up to 20 minutes between turns, but in practice no advantages of such a scheme have been identified.
- After assembling the power unit, you should check the quality of the work performed.
The procedure for pulling the head on 1.8 liter engines, which are 1.6 liter engines with an enlarged cylinder, is completely identical to that described above.
If during the work process the correct moment of force is applied to the bolts, corresponding to design calculations, then the gasket will be evenly and tightly pressed along the joint, ensuring a reliable and tight connection. It is important to note that if it is necessary to remove the cylinder head from the engine, then the screws are also loosened according to the scheme established by the regulations. Chaotic unscrewing of the elements will lead to deformation of the head and the appearance of invisible microcracks.
Let's move on to the cylinder block
We remove the pallet. Rotating the crankshaft as it is convenient for us, unscrew two bolts on each connecting rod cap. We use a TORX E10 head for this.
We take out the pistons along with the connecting rods. To do this, use the wooden handle of a hammer to press the connecting rod from below and lightly tap it to knock it up. We remove the old liners and buy new ones of the same size according to the markings on them. Here is another stone in AvtoVAZ’s garden, the owner has never climbed into the car from the interior or into the engine, but three pistons were of group “B” and one was “C”. It turns out that at the factory they re-sharpened one cylinder a little and simply put an enlarged piston there, no words. There are no options, we take group “C”, don’t sharpen the engine because of this. We will not touch the main liners either.
We buy a new piston group that does not bend the valves, connecting rods and connecting rod bearings.
Eliminating longitudinal play of the crankshaft
It was noticed on this motor. To eliminate it, replace the thrust half-rings. Standard and repair sizes are available. We take the first repair size, if they are too tight we sand them down a little. We unscrew the middle main bearing and gently push it with a screwdriver and move the half rings. The mark on it is in the form of three serifs, shown below.
When the half ring comes out a little, turn the crankshaft, it will push it out. There are two types of half rings: white at the front and yellow at the rear; the grooves on them should point towards the crankshaft cheeks.
We install them as we removed the new half rings; if they go in with great effort, you can grind them a little on a small abrasive stone, but not from the side of the grooves. Checking the play. We tighten the main bearing with a torque of 8 kgf*m.
Assembling the piston
There is an arrow stamped on the top of the piston; it should be directed towards the front of the engine. And there are marks on the connecting rod that should look the same way. Don't get confused!
We insert one retaining ring into the groove on the piston. We insert the connecting rod into the piston and, having lubricated the connecting rod and the piston pin with oil, insert it into place. Insert the second retaining ring. Although this operation seems simple, it will take some pains. We inspect the assembled structure; all retaining rings must be clearly in their grooves, otherwise a ring that has jumped out while the engine is running can cause a lot of trouble.
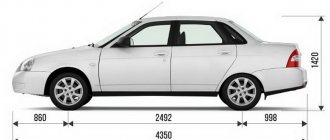
Technical specifications
The technical characteristics of the VAZ-21126 engine are as follows:
- type – four-stroke, gasoline;
- execution option – in-line;
- number of cylinders – 4 pcs.;
- number of valves – 16 pcs. (two inlet and outlet per cylinder);
- engine volume – 1.66 l;
- maximum power – 98.0 l. With.;
- nominal speed – 5600 rpm;
- cylinder operation algorithm – 1-3-4-2;
- compression value – 11.0;
- ignition – electronic;
- weight – 0.12 t;
- gasoline - AI-95;
- filling volumes: lubrication system – 3.50 l;
- cooling system – 7.84 l;
- fuel tank - 43.0 l.