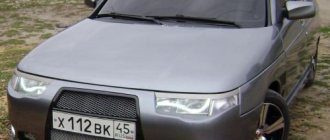
Headlights from BMW in VAZ 2106
Tuning domestic cars often involves installing more advanced parts from foreign cars.
Today's article is no exception. Whatever one may say, the BMW E34 still shines better than the standard six, even though they are the same size. It is well known that the luminous flux created by lens optics is of much higher quality. Moreover, the headlights of the “Zhiguli classics” cannot be compared with it. Therefore, the example of installing headlights from BMW - E34 turned out to be more than infectious, despite the significant high cost.
Externally, the proposed headlight has the appearance shown in the photograph.
To work you need to prepare:
- a grinder (which can be replaced with sharp wire cutters); - drill; - "Movil"; — 2 antenna plugs from the TV, which ideally fit the headlight chip, — a terminal manifold for combining and connecting electrical wires, since the “twisted” connection of wires under electrical tape is not used for safety reasons; — “soldiers” from a regular GAZelle in the amount of 6 pieces (we will extract springs from them); — light bulbs for new optics with H1 socket (best Philips blue vision +30%); — bolts with nuts “10”, always with locking washers (6 sets); — Pliers, a set of screwdrivers.
1. We dismantle the old headlights along with the protection.
2. Mark and drill 3 holes required for attaching new headlights.
3. Place the new headlight in place, install springs under the mounts, tighten the bolts and nuts by hand without tightening them tightly. We mount another headlight in the same way. The final stage is competent and high-quality adjustment of the luminous flux of new headlights. This is precisely why springs were used for fastenings. They give us freedom to move the headlights.
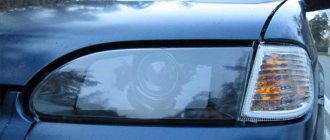
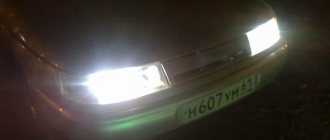
The book on repairing BMW E34 cars describes in some detail the process of adjusting the headlights for this model, allowing you to achieve an almost flawless result. In principle, this process is practically no different from the classic headlight adjustment, known to any driver. The car is located at a distance of 3 meters from the wall (preferably with basic markings) and all settings are made. The photo shows the difference in the luminous flux of the standard (left) and new (right) headlights.
Installation of bi-xenon lenses Morimoto LX MINI H1 G8 3″ in the headlights of a VAZ 2101
I ordered Morimoto bi-lenses, lens diameter 76mm (3.0″). We arrived quickly.
We will need: 1) Grinder
2) Round file 3) Sandpaper 4) Grinding wheel.
5) Vernier caliper 6) Marker. 7) drill with 3 mm drill bit, 8 bolts and nuts.
1) I found old headlights from a gas car, dismantled the glass and ordered new transparent ones made of polycarbonate.
I measured the outer diameter of the lens housing to be 82 mm, marked it on the headlights and cut it off with a grinder
Then, having leveled the surface on the sandpaper and grinding wheel, I cleaned it with a file and sandpaper.
2) Having installed the lens in the headlight, I began to think about the mount. Having determined the top and bottom of the headlight, I placed the lens in the correct position and drilled 4 holes parallel to the hole in the lens.
I secured the lens to the headlight with bolts.
3) Next, the glass and lens hoods will be installed, the headlights will be painted and sealed.
I'll just post photos, if you have any questions, ask.
Do-it-yourself visors for headlight rims for VAZ 2101 from plexiglass VAZ 2101
Visors for headlight rims for VAZ 2101 Orc glass 80cm long and 50cm wide. Here's a drawing
Next, cut it out as in the picture. Go to the kitchen, turn on the gas stove, heat it, bend it, apply it to the rim and hold it until it cools down. Then, use a lighter to bend the remaining tails. Like this
We cover the chrome with tape and make a hole for the bolt. This is what happened
Installing VW Golf 2 headlights in standard VAZ 2101 pots
Everyone writes: they say that the original fasteners are suitable, you just need to cut them and pull them onto the headlight. I went to the garage, poked the headlight into the pot, looked and came to the conclusion that this was nonsense.
Therefore, I took a piece of cardboard and a pencil and started drawing my mount. In the end we got something like this.
Tinting front and rear lights
This method is used for tuning the rear lights of a VAZ 2107 and tuning the headlights of a VAZ 2106. Modernizing a car is a creative and highly individual process. Tinting of front lighting fixtures is allowed. For tinting, car repair specialists recommend using film or specialized varnish. The varnish is available for free sale in specialized stores and is available in aerosol form. The use of these means to change lighting structures 2101 is permitted.
The uses and functions of this product should be carefully studied. It should be designed specifically for tinting the lights, not the grille.
Afterwards, the surface is prepared: dust, dirt, water are removed, and the product is applied carefully, without drips. The treated area must dry. The final stage is polishing. If for some reason you need to get rid of the varnish, just moisten a rag in acetone and wipe the lighting elements.
Applying a tinted film is not difficult; even inexperienced car enthusiasts can handle it. The elements need to be wiped free of dirt and wiped dry. Cut out the required piece from the material, apply a solution of soap and water to the surface, remove the protective layer and attach the template to the headlight. Use a utility tool to get rid of air, and remove any remaining liquid with a cotton rag.
By law, excessive tinting of front and rear headlights can result in a fine. It is worth considering that gluing darkening film to lighting devices will lead to poor quality of light at night.
When using a tint film to upgrade the optics of a VAZ 2107, car mechanics recommend not covering the entire surface of the device. With partial dimming, the flow of light rays will not decrease, and the equipment will look stylish and bright.
Tuning the head optics of the "seven"
With a fairly simple operation, you can significantly improve the quality of lighting at night with your own hands by slightly changing the headlights of the “seven”.
The process of tuning the headlights of VAZ 2107 cars looks quite simple:
- We remove the headlight and open it with a knife, thoroughly heating the sealant at the joints.
- We take the lens from the reversing light of the Oka car and install it in our headlight.
- We put the headlight glass in place, using sealant and making sure that there are no air channels.
After this simple operation, the headlights of your car will provide better quality light, which will significantly improve your visibility of the road at night.
Specifications
The success of the car was colossal. There were queues for the “Russian Mercedes”. At the same time, as for the technical part, the “seven” is not far behind the VAZ-2103. And under the hood there was the same archaic unit with a displacement of 1.5 liters and a power of 72 hp. Of course, it was modernized and equipped with a new, more economical and environmentally friendly carburetor.
The VAZ-2107 was also equipped with an engine from both the “five” (1.3-liter, 64 hp) and the “six” (1.6-liter, 75 hp). As for the gearbox, the car received both a 4-speed manual and a 5-speed.
The success of the G7 in the USSR influenced its prospects in other countries. The car was supplied not only to friendly countries, but to Western Europe. For example, two modifications of the Zhiguli were created for the UK market: VAZ-21077 (with a 1.3-liter engine) and VAZ-21078 (with a 1.6-liter engine). And the steering wheel of these versions, naturally, was on the right. In addition, export cars received changes in design and interior. But for the Chinese market, the “seven” (VAZ-2107-71) was equipped with a 1.4-liter engine producing 66 hp.
DIY headlight tinting
You can use tint to help improve the exterior of your car. It is applied to both front and rear light sources on cars. However, the rear ones are tinted much more often.
This is a job that is very easy to do with your own hands. As materials you can use:
- tinting varnish;
- tint film.
The varnish is sold in cans - one is enough for you. The container should indicate that this is a varnish for tinting car lights. Next you do the following:
- wash and dry the headlights of your car, you can remove them or leave them in place;
- cover them in a circle with masking tape to protect them from getting varnish where it is not needed;
- degrease the surface;
- apply varnish from a can from a distance of 30 cm, make sure that it applies without drips and evenly;
- take breaks between layers, let the varnish dry a little;
- After the last layer has completely dried, polish to achieve a matte effect.
To remove varnish, use a cloth and acetone. This will help you get rid of the tint without any problems.
Tinting taillights with varnish
Film is more convenient in this regard - you can get rid of it at any time when it becomes necessary. Pasting is carried out according to the following scheme :
- the headlights of your car are washed and dried;
- the surface is degreased;
- the film is tried on and cut;
- spray the surface of the headlight with a soap solution;
- the backing is removed from the film and applied to the headlight;
- Using a rubber spatula, the film is smoothed with pressure, water and air are removed.
When applying tint to your car's lighting sources, be careful. Otherwise, you may have problems with the traffic police. This may lead to an emergency on the road.
Do-it-yourself installation of LEDs in VAZ 2107 headlights
Modern technologies offer many new, more serious opportunities in the automotive industry. Experts say that using LED lamps instead of halogen lamps provides higher quality light and is more economical.
You can install LEDs with your own hands in both the front and rear lights of your car. To complete the work you will need the following materials:
- LEDs;
- resistors;
- mounting space for LEDs in the front and rear lights;
- electric drill and drill with a diameter the size of the LEDs;
- wires;
- sealant.
LED headlights at the rear
Once you have stocked up on everything you need, you can get to work:
- We adjust the dimensions of the seats to the front and rear lights where we are going to install the LEDs;
- We drill holes in a circle at the same distance in the seat and install the LEDs there. We select the quantity experimentally;
- We connect the contacts: positive and negative - separately;
- We put a resistor on each four diodes: we select its characteristics depending on which LEDs we chose;
- We place the seats with the entire “kitchen” in the front and rear lights, and connect them to the power supplies.
As you can see, the whole job is quite easy to do yourself, but you will have to work hard to choose the appropriate brightness of the lighting.
By installing LEDs on the front and rear lighting sources on your car, you will be able to appreciate the following advantages:
- the efficiency of LEDs will make it possible to significantly relieve the on-board network of your car;
- this type of lamp provides an even and diffused light - it will not dazzle drivers of oncoming cars and at the same time provide a good view of the road;
- long service life;
- reliability;
- high external aesthetics.
Tuning headlights with film
Some car enthusiasts install xenon headlights in place of halogen headlights: they shine brighter than LEDs. However, xenon strongly dazzles oncoming drivers. This is one of its significant disadvantages.