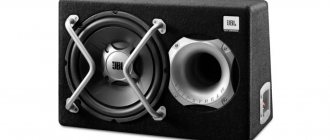
How to calculate the volume and size of a box for a subwoofer is a task that anyone who plans to make a low-frequency sound system with their own hands will have to solve. The main parameter when calculating the volume of a future low-frequency speaker is the diameter of the loudspeaker. The speaker diffuser creates a certain air pressure. Air waves must propagate without interference in the internal volume of the speaker system.
If the box is too small, then many reflected waves in antiphase will appear inside the column, which will cancel each other out. This will negatively affect the sound quality. The bass will be dry and hard. If the volume of the box is too large, a reverberation effect will appear in it and the bass will be booming, but “smeared”. Therefore, it is necessary to calculate the volume of the subwoofer by speaker.
How to calculate the volume of a subwoofer box
To calculate the displacement of a box for a subwoofer, you need to choose the design of a low-frequency device. Powerful low-frequency systems are divided into three groups:
- Closed case
- Bass reflex
- Bandpass
A closed box is the easiest to make. It can have the shape of a cube, rectangular parallelepiped or trapezoid with a beveled front or back wall. The closed box, in its dimensions, is smaller than other structures. A reduction in volume, while maintaining acoustic characteristics, is achieved by filling the internal space with some kind of damping material. Correctly calculating a subwoofer with a closed box is quite simple. It has only one characteristic, volume. Even an untrained amateur can cut blanks for the “closed box” design from the appropriate material.
Despite many advantages, the closed box has one significant drawback. This is the lowest efficiency of all designs. In order to get maximum sound quality from a closed box, the speaker needs to be loaded as much as possible. Only in this case the acoustic characteristics of the product will be at a high level. You can calculate the box for a closed subwoofer based on the diameter of the speaker.
- 8 inches – 10-12 liters
- 10 inches –13-25 liters
- 12 inches – 26-36 liters
- 15 inches – 38-58 liters
The larger the speaker diameter, the greater the volume dispersion. Calculating the volume of a subwoofer for powerful speakers is more difficult than for compact products. This is due to the individual characteristics of different models.
Making a stealth subwoofer with your own hands
DIY stealth subwoofer Tired of carrying a huge box in the trunk? Then the stealth subwoofer is just made for you. This unique type of case is more practical than the classic box. It doesn't sit in a square box in the middle of the trunk and takes up less space. Often, stealth is installed in the inner part of the wing, sometimes in a niche instead of a spare wheel. The minimum volume of the box that requires a 10-12 inch speaker for normal operation is 18 liters.
To make a passive stealth subwoofer we will need:
subwoofer; protective grille and socket for connection to the amplifier; wire for connecting the speaker to the outlet; multilayer plywood or chipboard (thickness 20 mm); a small piece of fiberboard; epoxy adhesive; brush; fiberglass; mounting tape; polyethylene film; wood screws; drill, jigsaw.
Choosing a location to install the housing
After choosing the place where the stealth will be installed, we empty the trunk and begin manufacturing the body. You can remove the trunk trim where the subwoofer will be installed to place it even closer to the fender. First of all, lay a plastic film on the floor of the trunk. It performs two functions at once: it protects the trunk lining from epoxy glue and allows us to make a mount to which we will screw the bottom of the subwoofer. Next, we cover the inside of the wing with mounting tape in two layers. We cover the trunk with masking tape. We cut the fiberglass into small pieces, about 20x20 cm. We put pieces of fiberglass onto the masking tape and glue them with epoxy glue. It is better to overlap the fiberglass fabric so that there are no obvious joints and seams. Epoxy glue + fiberglass mat We sculpt layers of fiberglass on top of each other, simultaneously lubricating them with epoxy glue until the thickness of the sheet reaches 10 mm (about 4-5 layers). The thickness of the panel is approximately 1 cm. The material will harden in approximately 12 hours. To speed up the process, you can use a lamp. Now we cut out the bottom of the subwoofer and glue it to our body. The joint is treated with sealant or glued with epoxy resin. Gluing the bottom In this particular case, the shape needs to be adjusted to the trunk hinges so that our homemade subwoofer does not interfere with its closing. After we cut off all the excess, we cut out the side walls and the top cover from chipboard. We make the rounded part from plywood, we did it “by eye”.
Making the side, top and bottom walls of the box
To make it easier to give the plywood a rounded shape, you must first wet it, give it the desired shape, secure it and let it dry.
Chipboard sheets must be glued with epoxy glue or sealant, and then fastened with self-tapping screws. We also glue the fiberglass box using epoxy resin, and when it dries, we fasten it with self-tapping screws. Gluing and fastening the parts For better sealing, you can glue the seams again. We applied another layer of epoxy glue and pressed the structure with sand to help the glue adhere better. Sandbags for better grip Next we can measure the front panel and cut it out. Using a jigsaw, cut out a circle for the speaker. In order to securely attach the front panel to the body, you need to tighten it with self-tapping screws on all sides. That is, you need to install bars on the entire inside of the panel, at a distance slightly greater than the thickness of the plywood (in our case, we attached the bars at a distance of approximately 25 mm from the edge of the panel). Thanks to this, we will be able to secure the front part at the top, bottom, sides, and most importantly, securely attach it to the rounded element. Preparing the front panel Cut a hole in the end for the socket. Cutting a hole for the terminal block At the end, it was decided to add two more layers of fiberglass and epoxy glue to the curved part of the body for the stealth subwoofer.
We carry out the final assembly: install the socket and connect the speaker to it, but do not screw it yet. Then there are two options - paint the subwoofer, or cover it with carpet. Painting is a little more difficult, since you must first level the surface. For this we used universal putty.
How to calculate phi box for a subwoofer
A phi or a box with a bass reflex uses, to improve acoustic characteristics, the reverse stroke of the speaker cone, or rather the air wave that is formed in this case. When calculating a subwoofer in liters, an adjustment is made for the thickness of the material and only the internal volume is taken into account. The internal space of the structure communicates with the surrounding atmosphere through a special port or tunnel, which contains a certain air volume. This part of the box is called the bass reflex. Its dimensions are selected in such a way that the energy of the diffuser's reverse stroke is transferred to the surrounding space in phase with the air wave of the diffuser's forward stroke. This effect is achieved in a narrow frequency range and increases the efficiency of the speaker system. The bass reflex can have a slot or tunnel design and can be tuned to a specific frequency. The principle of its operation depends on this.
Correctly calculating the volume of a box for a subwoofer with a slot bass reflex is more difficult than for a closed box. The bass reflex design itself has more parts, the dimensions of which are selected based on the type of speaker. You can calculate the box for the subwoofer based on the size of the loudspeaker.
- 8 inches – 20-35 liters
- 10 inches – 35-45 liters
- 12 inches – 46-76 liters
- 15 inches – 78-120 liters
Here, like a closed box, there is an acceptable variation in volume. This allows you to experiment when making a speaker with your own hands, achieving the most natural sound of low frequencies. You can choose a subwoofer housing from scrap materials. The main thing is to respect the dimensions of the bass reflex.
The disadvantage of a slot bass reflex is that it is configured once during manufacture and then its parameters cannot be changed. In this regard, a tunnel bass reflex is more convenient. It is a box with a hole in one of the walls. A plastic glass or tube, which consists of two parts, is attached to this hole. They can move into one another, changing the bass reflex tuning frequency. Correctly calculating the volume of the box for a subwoofer is possible only taking into account the resonant frequency of the dynamic head and other parameters. Often, the speaker passport indicates the volume of the speaker recommended by the manufacturer.
How the device works
Any bass reflex type speaker has a hole - a bass reflex.
This is often called an acoustic tunnel or port. Its operating principle is to change the phase of the sound vibration caused by the rear side of the diffuser by one hundred and eighty degrees. When resonance occurs in the box, the vibration amplitude of the diffuser reaches a minimum value. The volume of air and the resonance frequency to which the channel is tuned depend on the size and type of the bass reflex port. The volume of air in the channel begins to resonate and enhance frequency reproduction when the moment comes when the diffuser emits the frequency for which the bass reflex is designed.
The classic tunnel is circular in shape. But to increase the useful internal area, it is often given a slotted appearance. Refusal of the cylindrical shape of the tunnel makes it possible to reduce its length and reduce the noise that occurs when air is released.
If there are errors in the calculation of a slotted bass reflex, it is much more difficult to configure it than the classic type, since it is manufactured together with the speaker. The calculation itself is more complicated than for closed-type systems: in addition to the volume of the box, the adjustable resonance frequency is taken into account. The optimal dimensions are selected taking into account the amplitude-frequency characteristics of the speaker, namely its uniformity.
How to calculate and calculate the volume of a subwoofer enclosure
A bandpass or bandpass system is an acoustic high- and low-pass filter. The design comes in fourth and sixth order. The acoustic low-frequency system consists of two sections, each of which is equipped with a bass reflex. The sections are divided into two volumes by a partition on which a loudspeaker is installed. The front and rear planes of the diffuser operate in their own space. A speaker with two volumes and one bass reflex is a fourth-order bandpass, and a system with two bass reflexes is a sixth-order bandpass. Calculating the box for a subwoofer of a bandpass system will be the most difficult. When calculating the displacement of a subwoofer, not only the size of the speaker is taken into account, but also the cutoff frequencies of the acoustic filters.
How the device works
Any bass reflex type speaker has a hole - a bass reflex. This is often called an acoustic tunnel or port. Its operating principle is to change the phase of the sound vibration caused by the rear side of the diffuser by one hundred and eighty degrees. When resonance occurs in the box, the vibration amplitude of the diffuser reaches a minimum value.
The volume of air and the resonance frequency to which the channel is tuned depend on the size and type of the bass reflex port. The volume of air in the channel begins to resonate and enhance frequency reproduction when the moment comes when the diffuser emits the frequency for which the bass reflex is designed.
The classic tunnel is circular in shape. But to increase the useful internal area, it is often given a slotted appearance. Refusal of the cylindrical shape of the tunnel makes it possible to reduce its length and reduce the noise that occurs when air is released.
If there are errors in the calculation of a slotted bass reflex, it is much more difficult to configure it than the classic type, since it is manufactured together with the speaker. The calculation itself is more complicated than for closed-type systems: in addition to the volume of the box, the adjustable resonance frequency is taken into account. The optimal dimensions are selected taking into account the amplitude-frequency characteristics of the speaker, namely its uniformity.
How to calculate a box for a subwoofer
The easiest way to calculate the size of the subwoofer is if it is made in the form of a closed box. There is no bass reflex or acoustic filters and the recommended volume is calculated based on the diameter of the speaker. In order to calculate liters for a subwoofer, simply multiply the width, height and depth of the box. You need to keep in mind that speakers of the same diameter, but from different manufacturers, will sound differently. This makes it difficult to independently calculate a low-frequency acoustic system. How the subwoofer box is calculated. You should know that only the “clean” internal volume is taken into account.
Self-calculation does not take into account the type of speaker, its resonant frequency and the output power of the low-frequency amplifier. All these factors influence the dimensions of the subwoofer box. If difficulties arise during the work, it is better to use simple computer programs to perform calculations. The most commonly used programs are:
- JBL Speaker shop
- BassBox 6 Pro
- UniBox
JBL Speaker shop includes two utilities. Enclosure Module allows you to design a box for a sound system, taking into account an existing speaker, or select a loudspeaker to fit a ready-made enclosure. In the program you can calculate a closed box, a bass reflex system, or calculate a box for two subwoofers. Among the parameters needed to correctly calculate a woofer, the program takes into account the manufacturer, model number and resonant frequency. The entire list of parameters used to accurately calculate the future design includes more than ten items. Once the parameters are entered, you can select any type of housing. For a specific speaker, the program demonstrates a closed box, bass reflex or bandpass, indicating the advantages and disadvantages of each system. For beginners in acoustics, there is a training file with visual examples of calculations. The Crossover Module utility allows you to calculate all the parameters of a crossover filter for any acoustic system.
QW Box Calculator
You've probably at least heard something about quarter-wave resonators. This type of enclosure is not so widely used in the construction of subwoofers and low-frequency sections of acoustic systems compared to, say, a bass reflex and a closed box. But why? After all, a quarter-wave oven provides undoubted fat advantages:
- gain in efficiency,
- excellent bass performance,
- low level of group delays.
In a word, “both loudly and efficiently.”
Perhaps because there are disadvantages:
- relatively large box volume,
- CV does not tolerate overloads,
- quite picky when choosing a speaker.
However, the last point also applies to the bass reflex.
Perhaps the widespread use of CV is also limited by the somewhat laborious nature of its calculations. Although the calculation itself is not that complicated, usually while you are designing a box, you have to go through several options, recalculating everything again each time. This is both tedious and time-consuming. And when you do something for a long time, you start making mistakes, and they are completely unacceptable when calculating the frequency factor.
There are two approaches to designing CV boxes:
- “maximalist”: we study theoretical issues for a long time using foreign sources (ours simply do not exist), we use the Hornresp program by David J. McBean, and then, using graph paper and a calculator, we painfully develop the details of the box;
- “minimalist”: we set the tuning frequency, and using the Quarter Wave Box Calculator program (let’s call it briefly: QW Box Calculator) we easily and quickly design a frequency wave box, completely forgetting about the evenings spent with a calculator, pencil and ruler. Now you only need a few minutes to design the CV housing!
The QW Box Calculator program is completely Russian-language. This is what the QW Box Calculator 2.4 window looks like:
As a result of the calculation, you receive a complete list of all parts and their dimensions. The overall dimensions of the box and its approximate weight are also displayed for reference.
This version supports three types of corner designs:
without decoration (simple corners)
gusset (45 degree inserts are glued into the corners from the inside)
radius (the corners from the inside are rounded with a radius equal to the width of the channel).
You select the desired corner design method, and the length of the channel is calculated taking into account the properties of this design. If calculated manually, this would be an additional headache.
QWB ox Calculator version 2 supports the following six types of housings:
Besides:
- a correction for the acoustic resistance of the outlet is automatically taken into account, not everyone knows about this effect, and almost no one takes it into account when manually calculating, but in vain;
- there is a Help System;
- saving/loading projects;
- printing;
- the number of screws for assembly is calculated;
- the minimum possible channel width is calculated.
And the calculated box can be drawn in three-dimensional form using the Google SketchUp program. We simply transfer the data to this program, and the box is automatically drawn, something like this:
The QW Box Calculator program is very easy to use, does not require resources, and pays off its price many times over.
To purchase the QW Box Calculato, click the "Proceed to Checkout" button directly below this line.
How to calculate the displacement of a subwoofer housing
To correctly determine the volume of a subwoofer enclosure, you need to take into account one important quantity. This is the transfer function of the car interior. It is defined very simply. You need to multiply the longest seat in the cabin by two and divide the speed of sound in air by this value. If the length is 2 m 45 cm, then the transfer function of the cabin will be equal to 343/4.9 = 70. The interior PFS is the frequency in hertz. This value is entered as a parameter when calculating the subwoofer box using computer programs.
The more parameters are entered into the speaker system design program, the more accurate and correct its volume will be calculated.
What does the quality factor of a speaker affect?
Q in acoustic systems primarily affects the frequency response and impulse characteristics of the speakers. That is, this indicator largely determines the sound characteristics of the speakers. With a quality factor of 0.5, for example, the best impulse response can be achieved. With an indicator of 0.707, an even frequency response is obtained. Also when:
- Q factor 0.5-0.6 speakers produce audiophile bass;
- indices of 0.85-0.9, the bass becomes elastic and prominent;
- quality factor of 1.0, a “hump” with an amplitude of 1.5 dB appears in the cut, perceived by the human ear as a biting sound.
You may be interested in: Corporate state: definition, essence
With a further increase in the Q indicator, the “hump” in the sound grows and characteristic buzzing noises begin to emanate from the speakers.
Subwoofer volume
How to find out and calculate the volume of a subwoofer in liters. The most labor-intensive calculations will be for structures with a bass reflex or bandpass. Despite the high user parameters, the bandpass design is rarely used in cars. Calculation and production of an acoustic system with a slot bass reflex requires more parts and carpentry work. It is necessary to accurately calculate the area of the bass reflex port, and after manufacturing and assembling the structure, all internal corners must be carefully rounded to avoid air vortex waves. It’s easier to calculate a box for a subwoofer on a pipe.
The pipe is made of plastic and consists of two segments, one of which can move inside the other. Such a device is sold in specialized stores. The movement of the pipe components changes the effective area of the bass reflex, which allows you to tune the structure to a specific frequency.
Which box to choose for a subwoofer is determined by the type of speaker and location of the bass speaker. If the luggage compartment is empty and not used for transporting cargo, then it is best to place a low-frequency speaker system there. If part of the trunk is needed for any purpose, then it is better to choose a closed box, since it has minimal dimensions. When the trunk cannot be used, the bass speaker is mounted on a shelf behind the backs of the rear seats. In this case, the “Free Air” design is selected.
Top 10 articles
- A simple and reliable do-it-yourself metal detector - 206,429 views.
- DIY microwave oven repair - 192,533 views.
- Charger from a computer power supply. — 186,982 views.
- Simple DIY metal detector - 185,864 views.
- Car chargers. Scheme. Principle of operation. — 161,904 views.
- A simple and reliable thermostat circuit for an incubator - 154,431 views.
- Simple automatic charger - 118,375 views.
- A variety of simple circuits on the NE555 - 117,725 views.
- DIY moonshine still - 110,649 views.
- How to change the USB connector yourself? — 103,658 views.
Features of homemade models
If you want your neighbors to envy you just because you have super-powerful semi- or professional acoustics, then it makes sense to complement your main stereo speakers with a powerful subwoofer that is ten times stronger than them. The peculiarity of low frequencies is that, unlike mid and high frequencies, they are not subject to stereo sound. This means that there is no point in making two broadband speakers in which the low-frequency speakers are separate.
Other consumables cost pennies compared to them.
By paying special attention to quality, the user can actually assemble speakers with his own hands that will serve for decades without any problems. Basically, only semiconductor radioelements (diodes, transistors, microcircuits) age.
Almost unlimited imagination in design will allow you to make any column - cube, “parallelepiped”, any other polyhedron. Round columns - cylindrical, ovoid, are also especially popular. Of specific details - for example, an “egg” may have four bass reflexes, which also matters in terms of design solutions.
Recommended amplifier settings
We understand that a large number of people visiting our portal are non-professionals, and they worry that if configured and used incorrectly, they can render the entire system unusable. To relieve you of your fears, we have made a table with recommended settings for this calculation. Find out what the power rating (RMS) of your amplifier is and set the settings according to the recommendations. I would like to note that the settings indicated in the table are not a panacea, and are only advisory in nature.
| Setting name | RMS 400 - 600w | RMS 600 - 900w | RMS 900 - 1300w |
| 1. GAIN (lvl) | 85 — 75 % | 75 — 60 % | 60 — 50 % |
| 2. Subsonic | 30 Hz | 30 Hz | 30 Hz |
| 3. Bass Boost | from 0 to 50% | from 0 to 30% | from 0 to 15% |
| 4.LPF | 50 - 100hz | 50 - 100hz | 50 - 100hz |
*PHASE – smooth phase adjustment. There is such an effect as a temporary lag of the subwoofer bass from the rest of the music. However, by adjusting the phase this phenomenon can be reduced.
Before installing the amplifier, read the instructions, in it you will find what cross-section of the power wire is necessary for stable operation of your amplifier, use only copper wires, monitor the reliability of the contacts, as well as the voltage of the on-board network. Here we have described in detail how to connect the amplifier.
DIY repair
If the audio system fails, you may need to repair it yourself. The reasons for this problem are:
- Mechanical damage.
- An unacceptable sound frequency reaches the head, which leads to its burnout.
- Diffuser wear.
- Loudspeaker failure. You can repair the speaker yourself, without resorting to the help of specialists.
First you need to dismantle the head, being careful and clean. Otherwise, the coil sleeve may be damaged.
Having gained access to the sleeve, you need to unwind the old wiring and determine the number of turns in the layer and coil. The more accurate the calculations are, the faster and better the repair will be completed. Next, you need to evaluate the diameter of the wires using a micrometer. A caliper is also used for such purposes, but the accuracy of its measurements is low.
Repairing a passive speaker by rewinding is not difficult. To do this, strips of paper are prepared, which are inserted in a circle in the places of the body and coil. If the rules are followed, the gap will be uniform.
Volkswagen Polo Hatchback Malolitraжka › Logbook › Installing a subwoofer under the seat
Installing an active subwoofer under the passenger seat
This is probably the most interesting section in my blog (at least for me). I'll try to write a mini essay. I myself haven’t seen much information on this topic, even on the drive, apparently due to its unpopularity. I have always been a fan of good sound and approached this issue responsibly everywhere.
So, a little technical part is the Fly audio head with 6 speakers and all sorts of bells and whistles, in principle the sound suited me quite well, but the stock one was significantly lacking in low purity.
I spent 5 months thinking about how I could implement the idea of a subwoofer. There were many options: subwoofer + amplifier, active subwoofer in the trunk. Then the sound engineers suggested the option of a subwoofer under the seat, and due to my 2 cubic meters of interior space, everything should have been fine. Well, the owner of small cars is familiar (big brothers may not understand), any box in the trunk and there is no trunk, but I, as a lover of active sports and also an “exemplary” son, who sometimes goes to Auchan, could not donate. Although everyone urged me to install a crazy sub and put it on the trunk altogether.
As a result, I found options for a subwoofer under the seat. Although experts and special music lovers say that it doesn’t really pump. I spent a long time choosing, the choice fell on the Pioneer (active sub), I liked the compactness, the control panel and the rated power, and experts say that this is one of the best devices in its class. It fit like a glove, the space under the seat, as it turned out, is catastrophically small, it is almost impossible to put anything larger there without any “bulging” and collective farm, so if you decide to put it very well, measure everything. The control panel led into the salon.
Power 150W, I think it’s enough for a car of this class.
Of course there were some downsides too
, after all, there is less legroom for the front passenger, the passenger also receives a free prostate massage, when washing and cleaning the interior you need to be especially careful, and of course, no matter how much I praise it, this sub is not those luggage monsters of 300W+ and above.
Let's see how it plays after build-up and fine-tuning; to reach peak power you need 120 hours of active use.
CONCLUSIONS:
I consider the most important achievement to be the preservation of ease of use, and an empty trunk, at the end I got what I wanted and was even pleasantly surprised, there is enough power to spare. It’s not even the music that rocks, it’s the car itself that rocks :) in general, I advise everyone who appreciates the ergonomics of their car, I think I described it objectively, if you ask anything, I’ll help you in any way I can or express your opinion, I treat criticism normally. I hope I didn’t take up a lot of your time, Whoever read to the end like, I tried.
In the photo, I tried to display everything as informatively as possible and show what it really looks like
I also recorded aux, iphone and usb, but that’s in another article
source
