All internal combustion engines have a lubrication system. Thanks to it, the rubbing units work for a long time and without interruption, regardless of the load. The lubrication system consists not only of the oil pump, filter and channels in the cylinder block. The VAZ 2110 has another important part - an oil pressure sensor. This is a simple part that has a responsible function. The article will discuss how it works, where it is located and how to check the oil pressure sensor on a VAZ 2110.
Purpose
This device detects the oil pressure level and displays the corresponding information on the control panel. Timely notification allows the car owner to quickly fix the problem. If you ignore it, problems may begin with the engine, leading to expensive repairs. After all, if there is not enough oil in the engine, the piston of the car runs “dry”.
The oil pressure sensor on a VAZ not only notifies that this liquid has run out. Sometimes a glowing red indicator may indicate a malfunction in the pump. This happens even if there is enough lubrication in the motor.
Note to car owners
Quite often, the self-replacement procedure ends in a fiasco, since installing a new device does not give any result; lubricating fluid continues to flow from under it.
But the point here is not at all the crookedness of your hands or lack of repair experience. If you did everything according to the instructions, the culprit in this situation is no longer you, but the sensor itself.
Statistics show that approximately 40% of all auto parts sold on the market are counterfeits.
Therefore, your task is to take the defect you purchased along with the receipt and go to the store where you purchased it. The store employees are obliged to exchange the device for you or return your money. Of course, if you do not save the receipt, you will not be able to return the money or change the sensor according to the law. Therefore, think twice before throwing away this piece of paper.
Another important piece of advice is to avoid such purchases on so-called spontaneous markets. This is where the largest number of fakes and defective devices are concentrated. There are many reliable, certified outlets selling auto parts. If you go to a service station to replace the sensor, you will have to pay more than if you repair it yourself, but you will be provided with a quality guarantee. A kind of protection against counterfeiting.
How the sensor works and how it works
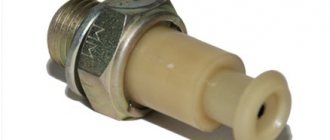
The oil pressure sensor on the VAZ 2110 includes the following components in its design:
- movable and fixed contacts;
- body (usually metal);
- membrane;
- pusher in the form of a rod.
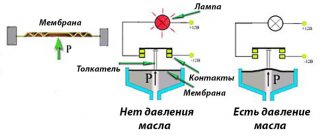
On the VAZ 2110 model there is a contact sample sensor. It connects to the warning light on the panel. When you turn on the ignition, a “plus” from the vehicle’s power supply goes to one contact of the light bulb. The remaining, second contact, contacts the moving part of the meter.
The working principle of the part is not complicated. The algorithm is based on the fact that the lamp terminals are connected to ground. This is the functional task of the moving contact - it is through it that the pusher is connected to the diaphragm. Under the diaphragm itself there is a cavity in contact with the lubrication system in the engine block. When the pressure inside it increases, the load on the diaphragm also increases. And it begins to bend, as a result of which the movable contact moves away from the stationary one. If there is no pressure, the contacts remain closed and the corresponding indicator lights up on the dashboard. For the circuit to open, the pressure must rise above 0.3 atmospheres. At the same time, the light bulb goes out.
When to change the oil pressure sensor
On average, this needs to be done after 10 thousand kilometers. In addition to the distance traveled, the need for an early oil change is also affected by the vehicle's driving mode. For example, prolonged engine operation under increased loads on poor quality roads (slipping). And, of course, the change of season - in winter (when the cold is more than -5°C) and in summer (when the atmospheric temperature rises after the cold to +5°C).
Monitoring the operation of engine oil in the VAZ 2110 engine is provided by several sensors:
- engine oil pressure sensor;
- engine oil level sensor.
Where is
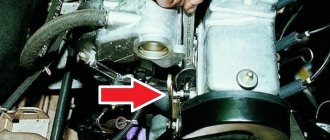
In the tenth VAZ model it can be located in two places, which depends on how many valves the engine has.
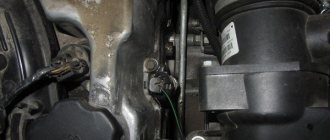
For 2110 8 valves, it is located in the rear right part of the engine, in the cylinder head socket, not far from the belt guard. It is easy to find by the single wire.
Drivers of a VAZ with a 16-valve working unit will have to look for it in a slightly different place. It is also located behind the engine, but to the left. The sensor is mounted on the camshaft block. There is also one wire coming from it, but nearby there are two bundles of cables protected with black insulation.
Price and article
Below is a table with the most common oil pressure sensors that are used in the car in question, article number and price.
| Sensor | vendor code | Cost, in rubles |
| Oil pressure sensor Vernet | OS3573 | 150 |
| Oil pressure sensor TRS ERA | 330337 | 300 |
| Oil pressure sensor (Era) Iveco | 330684 | 250 |
At the moment, there are other names depending on the sensor model and its manufacturer.
Possible faults
There are a number of situations that lead to the breakdown of the DDM on the VAZ-2110 8 valves:
- the membrane is damaged;
- the resistive layer is worn out;
- the heating element of the bimetallic plate has failed or is deformed;
- the channels through which oil is supplied are clogged;
- Wires are oxidized or torn. This leads to “parasitic” resistance;
- The sensor relay has failed. The relay's job is to sound a buzzer if there is not enough pressure in the system. It just starts at certain engine speeds (more than 1500). At idle, it is inactive, because the pressure does not even reach mark 1.
Important information to note
It happens that after replacing the oil pressure sensor, oil begins to leak through the new one. You buy a new one, change it, after a while the situation repeats itself. What causes this? The most common cause of such a malfunction is due to defective sensors , even new ones purchased in a store, and not on a tray around the corner. Many car owners complain about similar problems that they have to change the sweat several times in a row. However, in such a case, we recommend contacting a car service to find out the real reason, so that you don’t end up with a lot of stupid fuss, as already described above.
Sensor check
Sometimes it happens that when starting the engine, when it is idling, the DDM light comes on. It continues to burn even if everything is fine with the motor. Another situation also occurs - the indicator goes out as soon as you turn on the ignition.
To make sure the node is working, you need to check it. It is likely that the wires through which it is connected are damaged. They are checked simply: connect one cable to the engine and see if the lamp lights up. If yes, then everything is fine with the wiring.
One of the reasons for its inoperability is that the sensor is simply oily. But, if upon visual inspection it turns out that it is dry, but the light is still on, this is not the reason.
Here you can already think about replacing the unit, fortunately, it is inexpensive - within 100 rubles. The VAZ 2112 oil pressure sensor is checked in a similar way.
What to do if the sensor lights up
If the sensor is working properly, and during the operation of the car an emergency light comes on on the dashboard, you should immediately determine the cause of its appearance, and also solve this problem as soon as possible. The main reason for the appearance of the corresponding icon on the dashboard of the VAZ 2110 is a decrease in the amount of oil in the engine.
A lack of oil reduces the pressure in the oil system, and the sensor manages to detect this, sending a warning signal to the dashboard.
In this case, it is recommended to begin to resolve this issue as quickly as possible, since a lack of fluid can lead to such unpleasant consequences as premature wear of the car engine elements, as well as the wedge of the shafts (camshaft or crankshaft).
If you ignore the problem, you can subsequently spend a lot of money on repairing damaged parts and devices, up to and including major engine overhauls.
As a result, it should be said that the operation of any vehicle, including the VAZ 2110, requires a responsible and attentive attitude. The car owner must regularly inspect the performance of the car’s structural elements, as well as check the serviceability of the sensors and mechanisms present in it.
Oil level and quality
The first thing you should do when the warning light comes on is check the lubricant level in the engine. To do this, we will use a special probe, which is provided in both eight-valve and sixteen-valve “ten” power units. Measurements should be made with the engine cooled down. If their result shows that the oil level is below the minimum, add it and check the operation of the sensor with the lamp.
Pay attention to the consistency of the oil as well. The further the car has passed since it was replaced, the thinner it is, and an oil pump designed for a certain viscosity will naturally be unable to create the necessary pressure. In such cases, the lamp usually comes on when the engine reaches operating temperature.
If the oil level is below the minimum, it must be added
Similar symptoms can be observed when using oils whose viscosity class is lower than that specified by the engine manufacturer. If you are not sure about the quality of the lubricant, it is better to replace it.
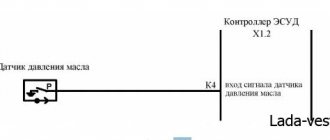
Diagnostic features
If you notice that the emergency engine fluid pressure indicator on the dashboard is constantly on, then you should diagnose the regulator. It would be a good idea to check the wiring as well. Diagnostics of the device begins with checking the electrical circuit in the area directly from the DDM to the indicator on the device.
Diagnostics is carried out as follows:
- First, on an 8- or 16-valve engine, disconnect the wire and connect it to ground, in particular, the body or engine.
- If, after connecting the wire, the indicator on the device starts to light up, this indicates that this section of the electrical circuit is working properly, so you can start diagnosing the regulator. Dismantle it and carefully inspect the device - if it is dry and operational, then the reason for the lit indicator most likely lies elsewhere. For example, this could be a filter or oil pump. But if the controller itself is wet, in motor fluid, then this indicates that it should be changed.
If your oil pressure light comes on, first of all you need to check the oil level; in some cars the light comes on when the oil filter is clogged and the bypass valve in it has opened.
Pressure check
Further search for possible reasons why the warning light comes on requires partial or complete disassembly of the engine. To make sure that the problem is really deep, you need to measure the oil pressure in the system. You can do this yourself if you have a special pressure gauge. And if not, you can buy it. It costs about 300 rubles. In addition to the pressure gauge, you will also need a 21 or 22 wrench and a dry rag.
Procedure:
- Disconnect the negative terminal from the battery.
- Disconnect the power cable from the sensor.
- Using a 21 (22) key, unscrew the sensor.
- In its place we screw in the pressure gauge fitting.
- We start the engine and warm it up (required) to operating temperature.
- We measure the pressure at idle speed. It should be within 1.5–2 kgf/cm2.
- Raise the speed to 5000 rpm.
The pressure should rise to at least 4.5 kgf/cm2. The oil pressure at idle speed should remain 1.5–2 kgf/cm2
Sensor check
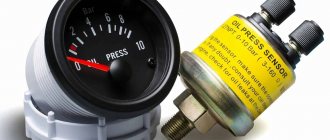
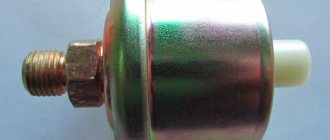
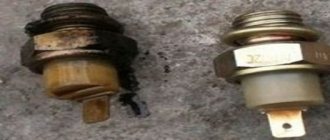
Engines of 2110 vehicles, regardless of their modification, are equipped with emergency pressure sensors of type MM 120, manufactured under catalog number 6022.3829.
Emergency oil pressure sensor type MM 120
Characteristics of the MM 120 sensor:
- rated voltage - 12 V;
- weight - 28 g;
- thread - M14x1.5;
- response pressure - 0.4±0.2 kgf/cm2;
- analogues - MM 120D, MM 120DM.
The emergency oil pressure sensors on the “tens”, as in principle on other VAZs, are very capricious devices and fail very often. Testing them at home is easy.
Tools and tools for checking:
- tire compressor or pump with pressure gauge;
- a piece of hose with an internal diameter of 10–12 mm and a length of 20–30 cm;
- 2 clamps;
- crosshead screwdriver;
- key for 21 or 22;
- car tester or control lamp with battery;
- dry rag.
The procedure for checking the sensor is as follows:
- Disconnect the negative terminal from the battery.
- We find the emergency pressure sensor on the engine.
- Disconnect the power cable from the sensor.
- Using a 21 or 22 wrench (the size of the sensor skirt may differ), unscrew the sensor from the cylinder head. In eight-valve engines, when unscrewing the sensor, a small amount of oil may leak out. If this happens, remove any stains with a rag.
- We put one end of the hose onto the sensor fitting and clamp the connection with a clamp.
- We put the other end of the hose on the fitting of the pump or compressor, and also fix it with a clamp.
- We connect the tester probes or “control” wires to the contact terminal of the sensor and to its body so that the device under test acts as a switch. In the initial position, our “switch” is turned on, so the control lamp should be on and the tester should beep, indicating that the circuit is closed.
- We begin to pump air, creating pressure in the sensor housing. According to the characteristics of the device, it should trigger when the pressure reaches 0.4±0.2 kgf/cm2. When the pressure rises to the desired value, the sensor should open the circuit and remain open until it drops.
- The sensor has tripped - you need to reduce the air supply to the hose and wait until it closes the circuit again.
At this moment it is important to record the pressure value. If it is close to 0.4 kgf/cm2, everything is in order with the sensor. The sensor should trigger when the pressure drops to 0.4 kgf/cm2
Checking the emergency pressure sensor circuit
If the warning lamp turns on periodically, you should check the sensor's power cable. It often happens that its break or short to ground causes the oil can to flicker, especially while driving. The verification procedure is as follows:
- Turn on the ignition (the lamp should be on).
- Disconnect the power wire from the sensor (the lamp should go out).
- If the lamp continues to light, the wire has a short to ground.
When the wire is disconnected from the sensor, the lamp should go out
A visual inspection of the wire and restoration of its damaged section will help solve the short circuit problem.
Malfunctions Oil pressure sensor VAZ 2110
There are several reasons why the oil pressure sensor on a VAZ-2110 8 valve fails. This:
- Damage to the element membrane.
- Wear of the resistive layer.
- Failure of the heating component of the bimetallic plate or its deformation.
- Oil supply channels are clogged.
- Presence of oxides and tears in wires. This may cause the appearance of “parasitic” resistance.
- Oil pressure sensor relay malfunction. The relay is used to activate the buzzer if the pressure in the system is below normal. But it only works at certain speeds (from one and a half thousand and above). After all, at idle the pressure is sometimes below one.
Oil pump
The oil pump is the main element of the system. It is he who creates pressure in it, pumping lubricant into the line. The main malfunctions of this unit include wear of its parts, as well as “sticking” of the pressure relief valve, which happens much more often. The exact reason why the pump cannot cope with its duties can only be determined by removing it and disassembling it. Removing the oil pump involves removing the oil pan, the right wheel of the car and the crankshaft pulley.
In most cases, the problem is solved by replacing the device. Buying a new oil pump will cost about 1000 rubles.
The cause of a drop in oil pressure may be a broken oil pump.
How to check pressure
If it is not possible to contact a car service in the near future, you can try to find the cause yourself, and for this we need to find out how to check the oil pressure. A special device that measures the pressure in the system is designed for these purposes. It is sold ready-made or you can make it yourself based on any pressure gauge, a rubber hose with a fitting, the thread of which should be the same as that of the oil sensor.
First you need to unscrew the thread on the sensor, preparing for the fact that oil will immediately begin to flow. After this, a pressure gauge is inserted into the system and the engine is started. At the time of startup, a second person must watch the instrument readings. If the value is less than 0.5 kg/cm2, it is necessary to stop the engine.
Crankshaft bearings
The pressure in the system may also drop due to severe wear of the main or connecting rod bearings of the crankshaft. This phenomenon occurs on engines that have traveled more than 200 thousand km without major overhaul. Such a malfunction can only be detected after disassembling the engine. Worn bearings allow more oil to pass through, which affects the pressure in the system
Oil receiver mesh
The oil receiver is designed to collect oil from the oil pan and supply it to the pump. To prevent wear products from entering the system along with the lubricant, the device is equipped with a mesh filter. Clogging of this filter prevents the oil from entering in full.
In order to get to the oil receiver mesh, you will have to drain the oil and remove the oil pan. The device is attached to the crankcase and oil pump with three bolts. By unscrewing them, the oil receiver can be dismantled. It is not possible to disassemble the filter, since it has a one-piece design, but you can still clean it. For these purposes, white spirit, solvent, and various household products for cleaning sewer pipes are used.
If the oil receiver grid is clogged, the pressure in the system decreases
It is not recommended to clean the oil receiver mesh by burning it!
How to replace
The replacement is easy to do with your own hands; you don’t even have to go to the garage or visit a service station, where the car owner will be charged a tidy sum.
Replacing a sensor is a task similar in complexity to replacing a wheel. What will be useful for work:
- spanners;
- gloves to avoid getting your hands dirty;
- new device.
Instructions for disconnecting the old sensor and installing a new one:
- Disconnect the wire going to the device.
- Remove the sensor using a 21 mm wrench.
- They take it out.
- Together with the DDM, the sealing ring, usually made of aluminum, is removed. It is also better to replace it with a new one.
- Install and tighten a working sensor.
- Connect the wire that was disconnected at the very beginning.
This is what the procedure for replacing a node looks like. You should be careful when buying DDM, since now about 40% of these products are fakes.
Replacement
You can carry out the replacement yourself, and you don’t have to be in the garage to do it. It’s not worth talking about service station services at all, since they charge a lot of money for work that even a beginner can do.
Oil level
In terms of complexity, replacing a sensor is equivalent to replacing a wheel. Difficult? Absolutely not.
To get started, prepare the necessary tools and materials:
- Spanners;
- Gloves that will allow you to avoid unnecessary contamination of your hands;
- New sensor.
Next, following the simple instructions step by step, you can easily remove the old one and install a new oil pressure sensor.
- Disconnect the wire that goes to your device.
- Dismantling of the device is carried out using a regular 21 mm wrench.
- The sensor is now removed.
- Along with the device, you should get an o-ring made of aluminum. It is not recommended to reuse it. Replace with a new ring.
- Armed with a new sensor, insert it in place of the old one, screw it in and secure it.
- Reconnect the wires you disconnected in the first step. The matter can be considered completed.