The fuel pressure regulator, or simply abbreviated as (FLS - approx.) on the VAZ-2112, is designed to ensure that operating pressure is constantly maintained in the vehicle’s fuel system. And if this element malfunctions, it may require replacement. We described in detail how to do this correctly below in our article.
The video describes in detail the process of replacing the fuel pressure regulator on the VAZ-2112 (and other cars of the LADA family):
Malfunctions of the fuel pressure regulator: symptoms on Priora, symptoms on diesel and other types
The fuel pressure regulator (FPR), despite its modest size and relative cheapness compared to other components, is one of the important parts of the car’s fuel system.
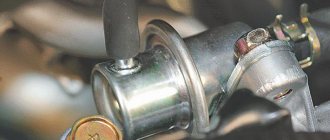
If a regulator malfunction is detected, it is best to replace it. But here’s how to determine what the problem is, what are the characteristic signs of a malfunction and diagnostic options. The device is a safety valve with a membrane. Popularly, an RTD is often also called a check valve or bypass valve. It is usually located on the fuel rail, but can also be located in the tank along with the fuel pump, and also if the fuel system does not have a recirculation function.
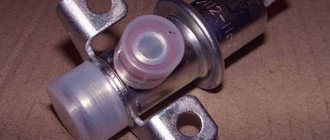
Diagram of a standard fuel pressure regulator
The regulator is divided into two cavities: fuel and vacuum. The membrane is located inside the vacuum and reacts to the air pressure coming from the power unit. The fuel cavity, in turn, contains fuel under high pressure. The RTD maintains the pressure difference plus controls the pressure in the intake manifold and injector. When the pressure in the intake pipe increases, the regulator increases the fuel pressure, and when it decreases, it decreases. In this way, the fuel supply is controlled, and its excess is discharged back into the tank.
Constant loads along with low-quality fuel can sooner or later lead to valve wear. Usually it either remains completely open or closes. In the first case, the engine simply “fills” with fuel, in the second, on the contrary, there is not enough fuel.
The fuel pressure regulator may be at fault if the following symptoms appear:
- Increased fuel consumption (excess is not dumped back into the tank and is injected into the cylinders, where it does not burn completely).
- Increased level of emissions from the exhaust system (as a consequence of the previous point).
- “Walking” engine operation and power loss.
- The car does not idle and stalls.
- Problems at startup.
Similar signs may appear on the Lada Priora, VAZ 2110 and other representatives of the VAZ family.
How to check and replace an RTD using the example of a Chevrolet Lanos
In the engine of this car, the fuel pressure regulator is located on the fuel rail, next to the timing belt. You can see the RTD by removing the engine cover, then the air filter housing along with the bellows and the timing case. To cope with the task, you will need the following tools:
- pressure gauge,
- keys for “10” and “24”,
- hexagon to "5".
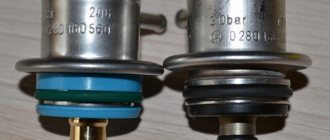
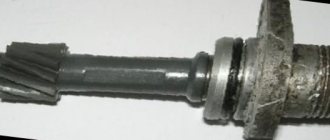
Old and new fuel pressure regulators for Chevrolet Lanos
Whether the regulator is working or not can be determined by starting the engine and then measuring the pressure level in the fuel rail.
- The pressure gauge is connected to the fuel line between the rail and the filter.
- The engine starts. At idle speed the pressure should be around 300 kPa (3.0 kgf/cm2).
- The vacuum pipe is disconnected from the RTD. The pressure gauge needle should show an increase in pressure by 20–70 kPa (0.2–0.7 kgf/cm2). If the pressure at idle speed is noticeably lower than required and does not increase when the vacuum pipe is disconnected, the fuel pressure regulator has failed and requires replacement.
RTD on the fuel rail with the vacuum pipe already disconnected
Installing a new fuel pressure regulator
- The vacuum hose is disconnected (if it was reconnected after diagnostics).
- In order to slightly loosen the fuel supply and drain pipes, you can slightly loosen the two 10 mm bolts, so that you don’t have to bend anything later when removing the RTD.
- The large nut at the bottom of the regulator is unscrewed with a “24” wrench. It may be a little sour, so have a can of WD-40 on hand. Having finished with the nut, the fuel drain tube should be moved down a little.
- To unscrew a pair of bolts that attach the RTD to the ramp, a hexagon with a “5” is useful.
- When everything is disconnected from the regulator, lightly twist the device out of the fuel rail.
- Take a new regulator and repeat the previous steps in reverse order.
Before installing a new RTD, moisten a clean cloth with gasoline and lubricate its installation location on the ramp. The rubber seals of the RTD can still be lightly lubricated with engine oil.
Video on installing a new part on a Chevrolet Lanos 1.4
It is clearly seen that diagnosing a malfunction of the fuel pressure regulator and its possible subsequent replacement are not complicated processes. However, if you are still not confident in your abilities or you are simply too lazy to spend personal time on such things, then it is better to contact specialists at a car service center.
Where is it installed?
There are two options for installing an RTD: on the fuel rail and in the fuel tank.
The regulator was installed on the fuel rail on cars with a 1.5 liter injection engine. On such engines, two fuel lines come from the fuel tank: direct and return.
The regulator was installed in the fuel tank on cars with a 1.6 liter engine. In such engines, the return line was abandoned. Now the regulator directly relieves pressure in the car tank.
Inspection and repair
As mentioned above, if your car's throttle body is protected by a casing, getting to the regulator may not be easy. Before starting the test, we advise you to study this unit and also check the integrity of the wiring. An important point: further checking of the regulator cannot be carried out correctly with a discharged battery. If there are no problems with all this, then you can start checking. There are several methods:
- Check the resistance between the windings. There must be an open circuit (infinite resistance) between C and B, as well as A and D. But between A and B, C and D, the resistance should be from 30 to 100 Ohms;
- Checking with a homemade tester. It can be made from a 6V AC transformer. Armed with such a tester, you will need to check whether the regulator rod moves normally. Some car enthusiasts simply lightly press their finger against the end of the rod and try to understand whether the rod moves.
Let us immediately note that if the elements of the sensor “filling” fail, the entire device will have to be replaced - it is not repairable. However, some manipulations can solve the problem at least temporarily. So, for example, if you checked the regulator using the second method and made sure that the rod stopped moving, do the following:
- Wedge the regulator with silicone grease. If it gets inside the device, there will be no consequences;
- If lubrication does not help, soak the stem in alcohol and wipe with a cotton swab. Alcohol can also replace carburetor cleaner;
- If the above cleaning products are ineffective, use WD-40. This is an extremely aggressive product that should be used last.
If cleaning the regulator does not produce results, you will have to buy a new device. A car enthusiast can disassemble it and try to identify the cause of the breakdown. In most cases, the regulator stops working properly if the guide cone needle is unusable (wedge, abrasion, deformation).
Replacement video
We hope our article was useful to you.
Fuel pressure is one of the most important indicators used in diagnosing the operation of a car engine. The efficiency and usefulness of all parts that make up the fuel system depend on it. That is why it is necessary to maintain the correct pressure, regardless of the functioning of the engine. This task is precisely performed by the RTD in the VAZ 2110. Every motorist must remember that it is the pressure regulator that affects gasoline consumption and engine power. A faulty regulator will not allow the engine to operate normally and should be replaced.
From this article you will learn what signs of problems with the RTD are most often found in the VAZ 2110, as well as how it is possible to independently check the regulator and replace it.
The RTD is a diaphragm valve connected to the fuel supply channel. This valve is influenced by two forces: fuel pressure and air pressure. The regulator is located on the injector ramp.
Before moving directly to the process of replacing the regulator, you need to mention the signs of its malfunction. The main one is problems in the operation of the valve, especially when the valve does not hold well, i.e. fuel circulates freely. This in turn provokes a decrease in pressure. As a result, the engine power decreases, because it does not have enough fuel to increase speed.
When you turn on the engine, it becomes necessary to work for a long time with the starter (i.e., a device that spins the engine shaft in order to start it) in order to create the required pressure. If the valve is completely inoperative, fuel stops being discharged into the tank. This provokes an increase in pressure. As a result, there is excessive consumption of gasoline, as well as incomplete combustion.
In addition, there are other signs indicating a malfunction of the RTD in the VAZ 2110:
- the engine stalls at idle;
- the motor does not work at full power;
- unstable engine operation;
- the content of CO (carbon monoxide) and CH (methane) significantly exceeds the established standards;
- jerking while driving.
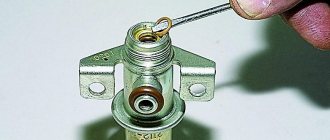
If you want to check the fuel pressure regulator 2110, you must first unscrew the special plug that closes the fitting for checking the pressure. You should look for the fitting on the ramp block, from the end.
After you have unscrewed the plug, you need to unscrew the spool from the fitting. Use the back of a metal tire cap for this.
After the completed operations, attach a pressure gauge to the fitting using a hose. You can take a regular pressure gauge that you use to measure tire pressure. Secure the ends of the hose with clamps. Now you can start checking - turn on the engine. We continue to check the pressure - it is necessary to disconnect the vacuum hose from the fuel pressure regulator. After removing the hose, the correct pressure gauge readings should be in the range of 0.2 - 0.7 cm2. Other data indicates the need to replace the RTD.
Below you will find step-by-step instructions for replacing the fuel pressure regulator in a VAZ 2110 car. Follow this plan and you will definitely succeed.
- Step 1: Relieve pressure in the fuel line, i.e. in the tubes through which fuel is transferred from the gas tank to the carburetor and back.
- Step 2. Unscrew the nut securing the fuel return tube (injector hose) to the RTD and remove the tube.
- Step 3. Remove the two bolts securing the RTD.
- Step 4. Carefully remove the RTD fitting from the ramp hole.
- Step 5: Disconnect the fuel pipe.
- Step 6: Remove the regulator.
- Step 7: Remember to wet the rubber seals with gasoline. If you notice that the rings are inelastic or torn, replace them.
- Step 8. Install a new regulator. To do this, follow these instructions in reverse order.
Ready!
Any motorist knows that a car cannot go without breakdowns. It is only important to notice their first signs and replace the faulty spare part in time. You should also not panic if there is no car service nearby. Follow the step-by-step instructions and you will succeed. Good luck on the roads!
For an injection engine to operate, a certain pressure must be maintained in the fuel system. This task is performed by the VAZ 2110 pressure regulator. A faulty device will not allow the engine to operate normally and must be replaced.
Why do you need a fuel pressure regulator?
As mentioned above, this regulator maintains the required fuel pressure necessary for normal operation of the injectors, taking into account one or another operating mode of the power unit. In other words, the RTD affects the amount and intensity of the fuel supply that enters the engine cylinders through the injectors.
Simply put, the amount of fuel supplied to the engine at the time of injection depends on the pressure that is created inside the fuel rail (rail), as well as on the pulse duration for opening the injector and the vacuum in the intake manifold.
For more accurate dosing and maintaining constant pressure, a diaphragm valve-regulator is used, which experiences fuel pressure on one side, and a spring force on the other. RTD is used in power systems where there is a so-called “return”. The regulator is installed at the fuel rail. Also, this element can be located in the fuel tank, while such systems do not have a return line.
- Let's first look at the common design in which the regulator is located in the fuel rail. The element operates on the following principle: the fuel pump forces fuel from the fuel tank along the line. The resulting fuel pressure acts on the regulator. The device itself has two chambers (a spring chamber and a fuel chamber), which are separated by a membrane. On one side, the membrane is pressed by fuel, which enters the regulator through special inlet holes, and on the other side, there is spring pressure and intake manifold pressure. If the fuel pressure turns out to be stronger than the spring force and the pressure in the inlet, then the regulator opens slightly, resulting in some of the fuel being discharged into the return line. The fuel returns through the return line to the fuel tank.
- In systems without a return line, the regulator is usually located directly in the tank. The advantages include the absence of an additional pipeline. The injectors are supplied with the required amount of fuel directly from the tank, that is, excess fuel does not enter the engine compartment, and there is no need to deliver it back to the tank. This also allows us to talk about less heating of the fuel and provides a number of additional advantages in the form of less intense evaporation.
The fuel pump supplies the injectors with a strictly defined amount of fuel in relation to specific conditions and operating modes of the internal combustion engine. Let us add that in this system there is additionally an excess pressure relief valve, which helps to avoid its increase to a critical level.
Design and operation of RTD
The RTD is a valve with a diaphragm that is installed in the fuel line. When the engine is running, a certain pressure is formed in the system, which must be maintained in the required range, but since the gas pump pumps fuel continuously, the pressure increases. When the pressure increases, the RTD opens the check valve and releases excess pressure into the return system, which communicates with the fuel tank.
WHAT MAY INDICATE PROBLEMS WITH THE SENSOR
For some reason, the developers did not program into the motor control unit a check function and error messages when this device fails. Therefore, to determine problems with px, only external manifestations in the behavior of the car’s engine are applicable. You can observe the following behavior of the power unit:
- The appearance of floating engine speed;
- Stopping the engine while the vehicle is moving;
- Engine failure when driving in neutral gear.
When diagnosing, it is also necessary to take into account the fact that such “symptoms” of the disease also belong to some other sensors of the power unit.
Also sometimes there are increased idle speeds. This device may also be to blame. High idle speeds can be caused by an “extra” amount of working mixture when the cone needle does not completely fit into its seat. The reasons for this phenomenon may be the formation of carbon deposits or the entry of foreign small particles into the air flow. You can find out what speed the VAZ 2114 should be at idle from the machine’s operating instructions. It is recommended to set the idle speed to 750-800 rpm.
Symptoms of a problem
There are quite a lot of signs of RTD malfunctions and it is quite easy to confuse them with other problems, so before you start replacing, you need to check it, but this is discussed below.
One of the main and most obvious signs of a regulator malfunction is its jamming in the open position. For this reason, engine power drops noticeably. The engine may idle well, but the engine will not be able to develop high speeds due to lack of fuel pressure.
When starting the engine, whether cold or hot, you have to rotate the starter for a long time.
When the RTD is jammed in the closed position, excess pressure occurs, which can cause the fuel pump to fail. Excess pressure in the system leads to increased fuel consumption and incomplete combustion in the combustion chamber. The exhaust gases will have a distinct smell of gasoline with characteristic black smoke.
There are also other less noticeable signs of its malfunction:
- The internal combustion engine operates unevenly at idle and stalls;
- The required internal combustion engine power does not develop;
- The car jerks when driving;
You can learn more about the fuel system in our article.
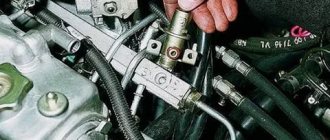
Replacement process for a 16-valve VAZ-2112
If the regulator is still faulty, we replace it in the following order:
- We disconnect the negative terminal from the battery for fire safety.
- Next, we reduce the pressure in the fuel system by unscrewing the nut that secures the fuel line and the RTD to each other.
To avoid fuel spillage, use a rag.
You will have to remove the bolts using hexagons.
Be careful when dismantling.
When connecting, pay due attention to the condition of the O-rings.
Attention! Before installing a new regulator, lubricate the O-rings with gasoline, so they will retain their elasticity longer and will be less susceptible to cracking.
Signs of a faulty RTD?
You can understand that the regulator is not performing its functions by the behavior of the car, and they are expressed as follows:
- When all systems are working properly, there may be interruptions in the engine idling . You will see unstable idle speed. And in some cases, the engine may stall completely when idling and also begin to stall.
- The crankshaft rotates either with increased or decreased frequency .
- The throttle response and dynamics of the engine have decreased significantly , and in order to gain the required speed, you need to apply more pressure to the gas pedal.
- Dips appear and jerk during acceleration, which greatly increases fuel consumption.
- It doesn’t happen often, but sometimes it happens that the engine does not start the first time .
All these reasons have one thing in common: during operation, the fuel pump releases much more gasoline into the system than required, as a result of which it does not burn out completely, which causes gasoline consumption to increase.
Fuel system diagnostics
We first learn about increased fuel consumption from the arrow on the instrument panel. However, on the VAZ-2112 it happens that it fails, or the fuel pressure sensor is lying. We advise you to read this article to be sure that this device is in good working order on your car, and to begin diagnosing the RTD itself as quickly as possible.
Checking the fuel pressure regulator
If you have checked and are already sure that your FLS (fuel level sensor - approx.) is working, but you simply have fuel consumption and other problems indicating it, then you must first check the regulator as follows:
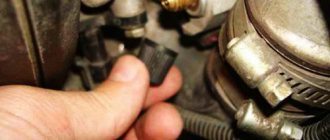
- We unscrew the fitting plug, which is designed to control the fuel pressure. Please note that if it has lost its elasticity, has cracks or other damage, it needs to be replaced.
The location of the fitting plug on the editorial machine (although ours is 8-valve). Pay attention to the condition of the O-ring inside.
This element is also worth checking for serviceability.
When connecting the pressure gauge, make sure that all connections are tight.
In stores, the price of a new RTD is in the range of 300-600 rubles , such a range in price results from the presence of a large number of analogues from different manufacturers.
Rail pressure without return
How the fuel system works
Fuel is supplied to the ramp under excess pressure (6 atmospheres), which is created by the fuel pump. Using the pressure regulator on the nozzle, a constant pressure drop of 3 atmospheres is maintained. At constant pressure and a linear characteristic of the injectors, the amount of fuel injected is determined by the duration of the injector control pulse.
How to check?
Let's connect the pressure gauge to the fuel rail. With the fuel pump turned on and the engine not running, the pressure should be 2.8-3.2 atmospheres. If the engine is idling, the pressure should drop to 2.2-2.5 atmospheres. When over-gassing, the pressure gauge needle should deviate into the zone of 2.8-3.2 atmospheres.
Now let's check the operation of the injectors. With the engine not running, we will create the required pressure in the ramp (2.8-3.2 atmospheres), after which, using diagnostic equipment, we will apply a series of test pulses to the first injector, monitoring the change in pressure. The above procedure must be carried out for all injectors. The pressure drop should be the same in all cases. If the results of checking the fuel pressure correspond to those described above, the fuel supply system is working properly.
What will happen if the fuel pressure in the rail is low (less than 2 atm.) or high (more than 4 atm.)? The amount of fuel injected will change in proportion to the pressure deviation from the norm. In other words, the air-fuel mixture will become lean or rich.
It will be especially painful in engine control systems without oxygen sensor feedback, since the controller does not know about the malfunction and continues to calculate the fuel supply for a normal fuel pressure value. In control systems with an oxygen sensor, the controller can compensate for changes in the composition of the air-fuel mixture, but only within reasonable limits.
Troubleshooting
Let us recall the composition of the fuel supply system. It includes: a fuel tank with an installed submersible fuel pump, a fuel filter, fuel lines (supply and drain lines), an injector ramp and a pressure regulator. Any component failure can cause incorrect fuel pressure. Let's try to list common faults for each component.
Gas tank. Through special pipelines, the gas tank communicates with the atmosphere, which prevents its deformation (flattening). If the connection with the atmosphere is broken, a vacuum is created inside the gas tank. In this case, the pressure in the fuel rail may be low.
Gasoline pump. There are several malfunctions:
- the fuel pump does not develop the required pressure, resulting in low fuel pressure;
- the check valve of the fuel pump does not hold pressure, as a result - a rapid drop in pressure after turning off the ignition;
- contamination of the fuel pump mesh filter, as a result - reduced pump performance, which affects the dynamic operating conditions of the engine.
What is a fuel pump? Principle of operation
Fuel lines may be pinched. If this happens to the supply line, then the fuel pressure will be reduced, if it happens to the drain line, it will be increased. In addition, the use of low-quality gasoline with a high tar content can lead to a decrease in the capacity of fuel lines.
Fuel pressure control. There are regulators with a stuck diaphragm in the open or closed position. In the first case, the fuel pressure in the system will be reduced, in the second - increased.
Measuring pressure using improvised means
Homemade design for measuring pressure in the fuel rail using a standard tire pressure gauge
measuring pressure using available means is not difficult; it is enough to have an ordinary pressure gauge on hand (which is used to monitor tire pressure - approx.). All you have to do is follow our instructions exactly. We will tell you how to do this correctly and what the correct pressure in the VAZ-2112 fuel rail should be.
Tips for motorists
Interruptions in the operation of the engine of the VAZ-2118 Lada Kalina passenger car become very noticeable in idle mode (the engine jerks), as well as when trying to quickly gain speed (the engine does not pull). There are many reasons why an engine may start to work like this. They can be connected both to ignition and power systems, and to gas distribution and crank mechanisms.
It is unlikely that it will be possible to determine immediately what caused the interruptions in engine operation. Therefore, according to the established driving tradition, the search for such a malfunction begins with checking the spark plugs and high-voltage wires. Initially, they check the reliability of the fit of the tips of the high-voltage wires on the spark plugs, and the breakdown of the high-voltage wire to ground is very clearly visible in the dark, naturally with the engine running.
If everything is in order with the high-voltage wires, then you will have to unscrew the spark plugs one by one and check them for the presence of a spark between the central and side electrodes. You need to start this work with a well-warmed-up engine, this will make it easier for you to remove the spark plugs from the cylinder head. Be sure to use a feeler gauge to check and, if necessary, adjust the gap between the electrodes, since an increased gap can lead to misfiring when the engine is running.
Also pay attention to the color of the central electrode insulator, because if there is black carbon on it, the spark plug will not work normally
The engine will operate intermittently in the event of a malfunction in the power system associated with the failure of one of the injectors to inject fuel into the combustion chamber or the pressure in the rail drops below the required level. Considering that the injectors on the Lada Kalina are electromagnetic, and if with the engine running you begin to de-energize their solenoid valve one by one, then by the changed nature of the engine operation you can find a faulty injector. A decrease in pressure in the fuel rail is possible either due to a malfunction of the pressure regulator, or is associated with a malfunction of the fuel pump. But in order to determine this you will need a pressure gauge.
Malfunctions of the gas distribution and crank mechanisms can lead to a drop in compression in one of the engine cylinders. This may be due to leaky valves, as well as breakage or coking of the compression rings.
Due to the fact that the operation of the injection engine is controlled by a controller, and it is located under the interior heater radiator, if it is not sealed, antifreeze begins to drip onto the controller body and if moisture gets inside, malfunctions may occur in its operation, leading to unstable operation engine.
The car became unstable. Although when you start it, it runs normally at high speeds, as soon as it warms up it starts to twitch, not that it shakes, but it’s really noticeable, the steering wheel is already shaking from vibrations. In addition, the engine lost some traction, not much, but noticeably. The check does not light up.
I did the following: - Replaced the spark plugs and Armored wires, also threw in another coil. - Replaced the mass air flow sensor (the old one was dead) - replaced the IAC and TPS and cleaned the throttle (during disassembly I saw a small axial play of the flap, tightened it, I don’t know if it could be from it such an effect?) -Replaced the fuel pump, mesh and filter, as well as the RTD. -I went for diagnostics, there were no errors, the indicators were normal, the mixture in the lambda was a little lean. As a result, I cleaned the lambda. I also tried to drive without a lambda, the check did not light up and there was no difference. — Compression is 13 everywhere (maybe valves? Although the previous owner says that he recently adjusted them) — We also checked the receiver for air leaks — Replaced the DPKV — I looked at the marks on the timing belt It seems to be in place, but there is no mark on the flywheel, I installed it using the old-fashioned method, by unscrewing the spark plug and finding TDC. DPKV hits the 20th tooth. But when the camshaft gear is shifted by 1-2 teeth in both directions, there is practically no difference in the operation of the engine.
The crankshaft pulley also moves a little (+-1 mm), although it has always been like this and it did not affect the operation.
Replacement
Replacing the RTD on a VAZ 2110 is not a complicated process when using our instructions. Even an amateur can cope with this task. Before starting work, you need to prepare the tool and vehicle.
Necessary tool
- Open-end wrench 24 mm;
- 6mm hexagon;
- Rags;
Preparing the car
Before starting work, it is necessary to relieve the fuel pressure in the system. To do this, remove the fuel pump fuse (F15), it is located under the panel on the passenger side. We start the engine and let it run until it stalls.
Next, we remove the negative mark from the battery to avoid fire, since we will be working with flammable substances, such as gasoline.
Step-by-step instruction
- Using a 24mm wrench, unscrew the nut securing the return tube to the RTD and remove it.
- Remove the vacuum tube from the RTD
- Using a 6 mm hexagon, unscrew the two bolts securing the RTD
- Carefully remove the RTD from the fuel rail.
- Installation of a new RTD is carried out in the reverse order. Before installing a new regulator, it is recommended to replace the sealing collar and lubricate it with gasoline before installation, so as not to damage it during the process of connecting the RTD to the ramp.
Malfunction of the fuel pressure regulator VAZ 2114
Be sure to pay attention to the operation of your car, because... if something is faulty in the system, the machine will let you know, the only thing left to do is to identify the cause of the fault
If the VAZ fuel pressure regulator is faulty, we will determine the problem accordingly based on the following signs:
- Increased fuel consumption.
- The engine, idling, suddenly stops.
- When driving, low power is provided.
- The engine is difficult to start.
The regulator valve has failed, as a result, excess fuel is not poured back into the tank, and the level of fuel pressure in the system increases above the required 2.5 kg/cm2, this is reflected in the amount of fuel penetrating into the combustion chamber through the nozzles. As a result, not all gasoline is burned.
The valve cannot withstand it, while the fuel moves unhindered throughout the entire system, and as a result, the pressure decreases; accordingly, when the speed increases, there simply is not enough fuel. The engine power drops; when the engine is stopped, the pressure must be maintained, but given the fact that the valve cannot contain it, before starting the engine you have to turn the starter for a long time, creating more or less the necessary pressure for the engine.
Identifying the problem
In order to accurately identify a malfunction in the fuel pressure regulator, it is necessary to carry out a proper test.
If you have experience, you can probably check the sensor yourself, otherwise you will have to visit a service station.
To determine the quality of operation of the regulator, it is necessary to measure the pressure level in the fuel system; a pressure gauge is perfect for this purpose.
- We measure the level when the ignition is turned on.
- We measure the level at idle.
- We measure the level with the tube removed from the fuel pressure regulator.
- We measure the level with the return current tube pinched.
- During idling 2.5 Atm.
- During ignition, at least 3 atm.
- When the vacuum tube was removed, the vacuum was 3.3 atm.
- When the return current tube is pinched, 7 atm.
- During gas supply, the pressure increases to 3 Atm and decreases to 2.5 Atm.
The pressure gauge is connected in the gap between the fuel hose and the fitting, while the vacuum hose is disconnected.
If the pressure does not increase, replace the vacuum hose and measure it again. But if these manipulations have no effect and the pressure does not increase, it means that the regulator is faulty and must be replaced.
For information: on the surface of the valve there are the values of the required readings; be sure to compare them with the results obtained during the test.
A regulator malfunction may occur as a result of:
- Prolonged downtime of the machine, without operation.
- Poor quality fuel, heavily diluted with water.
- We pump fuel into the system, then turn off the ignition and watch the pressure gauge. According to the norm, the pressure should drop to 0.7 Bar and settle at this value, but if it drops to 0, then the regulator is faulty, or there is a problem in the fuel pump motor valve.
- We increase the speed to 3000 and watch the pressure gauge readings; a drop in the needle means the fuel pump has failed and needs to be replaced.
- If the fuel pump builds up pressure for a long time, the problem lies in a clogged fuel filter or a clogged tank mesh.
Problems and their causes
- Fuel consumption has increased. The cause may be excess pressure in the fuel system due to a faulty fuel pressure regulator.
- The engine power has decreased, the dynamic performance of the car has deteriorated and continues to deteriorate. The reason is often that the RTD has stopped holding pressure (for example, due to a high level of spring wear).
- Problems with starting the engine: in order to start the engine, you have to repeatedly “torment” the starter. The reason is difficulty in the movement of fuel in the fuel system due to a faulty (for example, jammed) fuel pressure regulator.
- The car periodically stalls, and unexpected and unmotivated jerks are possible while driving. The reason is the jamming (permanent or periodic) of the fuel pressure regulator. It is to pressure surges in the network that you owe all of the above “joys”. Such manifestations are extremely dangerous, especially when driving around the city, with a minimum distance between vehicles.
Fuel pressure control
The fuel pressure regulator (aka FPR) is designed to maintain constant pressure in the fuel injector. On one side, a spring with a special valve exerts pressure on it, and on the other, gasoline. The bottom line is that it maintains the same pressure under different engine operating conditions, and when the load is removed, it sends an excess amount of gasoline back to the tank, thereby saving fuel and maintaining pressure in the fuel supply system.
The most common fuel regulator malfunctions
- The pressure is gone. This is why gasoline is pumped back into the gas tank and the car does not start.
- The valve becomes clogged and gasoline is difficult to flow through. As a result, gasoline begins to leak from almost everywhere. This is the most important malfunction of the pressure regulator. As soon as gasoline consumption increases sharply, you can immediately change the regulator.
- This reason is a development of the second. The valve becomes completely clogged and gasoline does not enter the fuel supply system.
- Uneven pressure. Usually caused by a stuck valve. Because of this, the car moves unevenly: it jerks or even stalls.
However, not all faults point to the valve, therefore, it is necessary, first of all, to learn how to check the pressure regulator, and then draw the appropriate conclusions.
Causes of RDP malfunctions
Most often, the valve fails due to sagging of the spring, which begins to wedge. This is caused by natural wear and tear of the metal and, unfortunately, there is no escape from it. This can also be caused by the car being idle for a long time. To prevent this from happening, the car needs to be driven more often.
The second reason why the regulator fails is low-quality fuel. Many gas stations dilute fuel with water to increase volume and make more money. Therefore, refuel only at trusted gas stations.
How to check the fuel pressure regulator of a VAZ 2110
When the first cars equipped with carburetors appeared on the VAZ assembly line, the pressure in the system was measured using the jet density created by disconnecting the valve or pinching it. However, after the market began to fill with injection cars, this method became very outdated.
Currently, pressure is measured using a pressure gauge, which is connected between the hose and the fitting. The vacuum hose must be removed. The measurement is made at idle and the measurement result is individual for each pressure regulator. Typically, the pressure rating can be found on the body of the product.
Replacing the fuel pressure regulator VAZ 2110
As soon as gasoline consumption increases sharply, you can safely begin replacing the RTD. After replacing it, the pressure will normalize and gasoline will flow into the fuel supply system as before. At the same time, fuel consumption will quickly decrease.
Replacement procedure
1. Open the hood and disconnect the battery terminal. This is necessary in order to avoid accidental short circuits, which can damage devices or cause a fuel fire. Then, it is necessary to disconnect the special fitting plug to control the pressure at the end of the ramp. After removing it, a rubber O-ring will be visible inside. If it is in very poor condition, replace it immediately.
2. Using a metal protective cap, unscrew the spool from the fitting.
3. After performing the pressure gauge measurements described above, reduce the system pressure. Unscrew the two nuts that secure the fuel pipe to the pressure regulator.
4. Also unscrew the two bolts that secure the regulator to the fuel rail.
5. Slowly remove the fuel pressure regulator fitting from the rail and remove it from the fuel pipe.
6. Mount the new regulator and reassemble the components in the reverse order. It is recommended to lubricate all O-rings with gasoline. Even those rings that have lost their elasticity during use can be replaced.
That's all. This completes the replacement of the VAZ 2110 fuel pressure regulator. This operation is quite complex and involves working with gasoline-containing units. It is not recommended to carry out this work if you are feeling unwell: headache, dizziness, as this may jeopardize your health. It is best to do the work on another day or entrust all this to specialists from a car service station.
Preparatory work
- We take a pre-prepared pressure gauge and, to avoid fuel spills and air leaks, wrap the tip with linen or smoke tape.
- We are preparing a tube with a maximum internal diameter of 9 mm, and ties are required to secure it.
- We place the prepared rag on the engine so that the hose with the pressure gauge attached to it cannot roll off the surface. This is done to prevent excess fuel from spilling onto the surface of the engine.
- We wrap the pressure gauge with electrical tape or tape, then attach the hose to it and tighten everything with a clamp.
- On the ramp, unscrew the spool valve from the nipple (in this case, fuel could splash out due to the presence of residual pressure - approx.).
A normal cap came in handy.
Pressure gauge with output, ass.
We place the pressure gauge on a previously prepared rag, and the preparatory work can be considered complete.
Measurement procedure
Before starting work, you can try to relieve the pressure in the fuel system. To do this, remove the fuel pump fuse (located on the right side of the panel, under the front passenger’s left foot - approx.). Where there are 3 relays and 3 fuses. Below in the photo under the number “5”. After removing the fuse, turn on the ignition and check by ear to see if the fuel pump is pumping. We turn on the car and wait until the engine stops.
- After everything is ready, we check the already mounted end of the pressure gauge with a hose for reliability of the connection.
- Next, start the engine and observe the readings that appear.
Therefore, we diagnose the results that appear and compare them with the results of the norm.
After all the work, unscrew the tube with the pressure gauge, screw in the coil and return everything to its original state.
Note!
The peculiarity of measuring pressure using a pressure gauge is that its initial value on the scale has some inaccuracy. That is, when the measurement period of the air analogue is 15-20 atmospheres, and for fuel control the maximum required value is 5-7 atmospheres, all measurements performed will have an error equal to the initial values on the device. Therefore, the pressure should be checked using a pressure gauge with a maximum value of up to 8 atmospheres.
We measure the pressure in the system without a check valve
If it happens that your engine does not have a check valve, then you need to know that there is a constant pressure of 3.6 to 4.0 atmospheres on this ramp. But the order of measurements in general is very similar to that described above.
How to check the operation of the fuel pump?
First, you should check the fuse. To do this, check the instructions for its location. Next, you should check the voltage at the pump. Before doing this, be sure to check if everything is in order with the battery. The voltage at the fuel pump terminal must be checked using a multimeter or tester. The instruction manual always indicates the required voltage.
Using a tester, check the voltage supply to the fuse. Often this is where the electrical circuit breaks.
If the search does not yield results, then the voltage should be checked on the contacts themselves. All contacts must be in place and connected to ground. A broken contact or its oxidation leads to failure of the fuel pump system. If no broken contacts are detected, but the voltage drops by more than 1 volt, then the problem is in the wiring or oxidation of the contacts. There should be no short circuit in the wiring.
If, after checking the voltage, contacts and fuse, you do not find any problems, then the problem lies in the fuel pump itself. In this case, the fuel pump will most likely require replacement. In practice, it most often turns out that replacement is a last resort. First, you should try to restore and test the fuel pump again.
Before you check the fuel pump, you need to remember that, as mentioned above, pressure is the most important characteristic of the fuel pump, so it is worth measuring its level.
How to check the pressure in the fuel rail?
You will need a pressure gauge that measures pressure in the range from 7 to 10 atmospheres. If you choose a pressure gauge with a large margin, you risk getting less accurate measurement results. Specialized stores sell a kit for measuring pressure, but you can also design your own device.
If you want to assemble the device yourself, you will also need a hose with an internal diameter of 9 millimeters. You will also need plumbing tow, with which you can seal the connection between the pressure gauge and the tube. All parts are connected and tightened using a clamp. You will also need a car spool. Next you need to perform a series of actions:
- Place the car on a level surface that is prevented from rolling, turn off the ignition and open the hood.
- Check that the injection nozzles have access to the fuel rail.
- Find the fuel pressure plug and remove it. Then you should unscrew the nipple using the spool.
- Prepare an empty container (a regular bucket will do) and a clean rag. This is necessary to collect residual fuel, which under pressure can splash out in different directions. Therefore, take care of the safety of your skin (especially your face and eyes).
- Connect the device to the fitting and begin checking the mechanism.
Checking the pressure in the fuel rail should occur in four operating modes of the power unit:
- when the ignition is on;
- at idle engine speed;
- code the fuel pressure regulator tube is reset;
- when the drain tube is compressed.
Fuel rail pressure measurement results
The results may vary slightly for different car models, but in general they should be as follows:
- when the ignition is turned on, the pressure must be at least 3 atmospheres,
- at idle engine speed - at least 2.5 atmospheres,
- when the pressure regulator tube is reset - at least 3.3 atmospheres,
- when squeezing the drain tube - at least 7 atmospheres.
Fuel rail pressure fluctuates slightly during preparation. When you press the pedal, it suddenly takes on a value of 3 atmospheres; when you release the pedal, it drops to 2.5 atmospheres. When fuel enters the fuel system, turn off the ignition and begin observing the pressure gauge. The pressure in this case should drop to 0.7 bar and remain unchanged.
If the pressure drops to zero, there may be a problem with the fuel pressure regulator. In this case, the regulator must be replaced immediately. The cause could also be the fuel pump check valve.
It is necessary to observe the behavior of the pressure gauge even at 3,000 engine speeds. A drop in pressure will indicate a faulty fuel pump. Sometimes the fuel pump cannot reach the required pressure for a long time. In this case, the problem lies in a clogged fuel filter, which needs to be replaced, or in a dirty fuel pump mesh (read more about where the fuel filter is located).
If the above methods do not reveal a malfunction of the fuel pump, you will have to diagnose other units (DPZD, IAC, mass air flow sensor, compression in the engine and some other indicators and parts).
Preparatory work
- We take a pre-prepared pressure gauge and, to avoid fuel spills and air leaks, wrap the tip with linen or smoke tape.
- We are preparing a tube with a maximum internal diameter of 9 mm, and ties are required to secure it.
- We place the prepared rag on the engine so that the hose with the pressure gauge attached to it cannot roll off the surface. This is done to prevent excess fuel from spilling onto the surface of the engine.
- We wrap the pressure gauge with electrical tape or tape, then attach the hose to it and tighten everything with a clamp.
- On the ramp, unscrew the spool valve from the nipple (in this case, fuel could splash out due to the presence of residual pressure - approx.).
A normal cap came in handy.
We put a hose with a pressure gauge on the ramp fittings and fasten everything with a clamp.
Pressure gauge with output, ass.
We place the pressure gauge on a previously prepared rag, and the preparatory work can be considered complete.
Measurement procedure
Before starting work, you can try to relieve the pressure in the fuel system. To do this, remove the fuel pump fuse (located on the right side of the panel, under the front passenger’s left foot - approx.). Where there are 3 relays and 3 fuses. Below in the photo under the number “5”. After removing the fuse, turn on the ignition and check by ear to see if the fuel pump is pumping. We turn on the car and wait until the engine stops.
- After everything is ready, we check the already mounted end of the pressure gauge with a hose for reliability of the connection.
- Next, start the engine and observe the readings that appear.
Therefore, we diagnose the results that appear and compare them with the results of the norm.
After all the work, unscrew the tube with the pressure gauge, screw in the coil and return everything to its original state.
Note!
The peculiarity of measuring pressure using a pressure gauge is that its initial value on the scale has some inaccuracy. That is, when the measurement period of the air analogue is 15-20 atmospheres, and for fuel control the maximum required value is 5-7 atmospheres, all measurements performed will have an error equal to the initial values on the device. Therefore, the pressure should be checked using a pressure gauge with a maximum value of up to 8 atmospheres.
We measure the pressure in the system without a check valve
If it happens that your engine does not have a check valve, then you need to know that there is a constant pressure of 3.6 to 4.0 atmospheres on this ramp. But the order of measurements in general is very similar to that described above.
After reading this article, you can easily take measurements in the fuel line and compare the results with standard indicators of serviceability in the fuel system.