The ODM (oil pressure sensor) on the Lada Grant, like on any other car, is designed to signal the driver about the oil pressure in the engine. If it falls, the sensor will report this to the BC and the corresponding information will be visible on the dashboard display or on-board computer.
But sometimes it happens that the oil pressure warning light comes on, but the oil level and pressure are normal, and the reason is a malfunction of the oil pressure sensor. We will consider ways to solve these problems below.
How DDM works
The oil sensor is simple to operate: the measuring membrane changes its position under the influence of pressure, which leads to the opening or closing of the contacts. When the oil level drops, the membrane falls off and the contacts become disconnected. This triggers a signal displayed on the instrument panel.
It happens that the oil level is normal, but the oil pressure sensor on the Lada Granta still does not work correctly. In such a situation, it is recommended to find and check the performance of the meter itself.
Without proper experience in working with technical equipment, you should not climb under the hood, as there is a possibility of damaging the car.
Engine of the old modification 11183
Engine 11183 is installed on the Standard Grant. It migrated here from the Kalina car. The unpretentious and time-tested engine is quite reliable and does not raise any questions. Its power is quite enough for city driving. Such an engine is less suitable for the track, but Grant will have quite good luck. This engine also has advantages - its elasticity. Unlike the Kalina engine 1.4l 16kl. from the very bottom he begins to accelerate the car well.
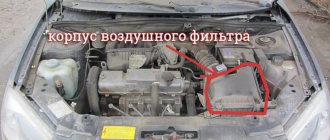
This important sensor is located behind the engine air filter. It is also called an air flow meter. Its purpose is to estimate the amount of air entering the car engine. Based on the information received from the sensor, the electronic control unit (ECU) calculates the required amount of fuel to maintain the stoichiometric fuel-to-air ratio for the given engine operating conditions.
Where is it located and how to check the DDM
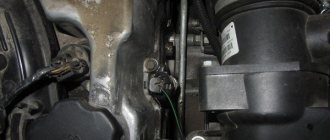
On a Grant with an 8-valve engine, the DDM is located on the right side of the engine, on the cylinder head. To find it, the plastic decorative cover is removed from the engine.
Before deciding to replace, the meter can be checked using available methods. First of all, to make sure that this is the problem, check the oil level and the condition of the oil filter. Often the warning light on the car's control panel lights up due to a clogged filter or insufficient amount of technical fluid.
If this is not the problem, check the sensor directly. Let's consider the verification algorithm:
- See the condition of the electrical circuit of the DDM and the control light. To do this, remove the negative terminal from the sensor and apply it to the battery ground. If there is a break in the circuit, then nothing will happen. If it is in working condition, the warning light will go out.
- Assess the visual condition of the meter. If it is covered with oil stains or technical film, there is a high probability that it has served its purpose. If the DDM is clean but refuses to work, look at the condition of the oil filter or pump.
- To check the pressure, and with it the sensor, use a device - a pressure gauge. To do this, unscrew the meter, and attach a pressure gauge in its place. Having started the engine (idling), the device should show a value of 0.65 kgf/cm2. If the reading is lower, then there is a problem with the oil pump.
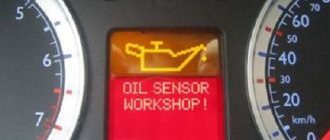
If the Grant has an on-board computer, then the check is even simpler - for this, electronic errors are “punched” in the ECU unit. Error P0523 indicates that it is time to change the meter.
What you need to know about DDM?
A modern car has a large amount of electronics installed, based on the readings of which the electronic control unit issues the appropriate commands. One such device is the oil pressure sensor (OPS).
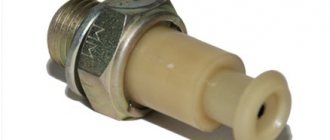
Appearance of DDM
Purpose and location
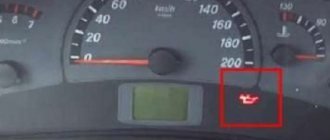
The purpose of the DDM is to monitor the oil level in the power unit; as soon as the amount of lubricant drops below the permissible level, the corresponding indicator light lights up on the instrument panel.
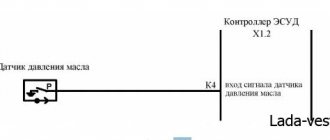
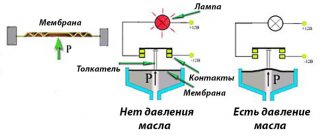
Device operation diagram
The operating principle can be described as follows. Lubricant is supplied to all components of the system under pressure. The system includes a DDM, inside of which there is a membrane indicated by arrow 4. If the pressure is low, then the membrane is not deformed, the contacts numbered 3 are closed and the lamp indicated by arrow 2 is on.
When the engine starts, the pressure increases, the membrane is deformed and acts on the pusher that is installed on it. In this case, the contacts open and the light goes out.
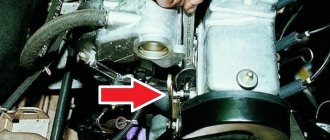
The DDM is located on the cylinder head on the right, when viewed in the direction of travel, on the back side of the engine. It receives power through a wire with a plastic terminal, which makes it easy to detect.
Device location
Diagnostic features
If the indicator on the dashboard is constantly on, you should first check the oil level using a dipstick and the condition of the oil filter. It is also necessary to check for oil stains on the power unit housing. If the level is normal, you should check the device itself. The simplest test option is to install a known-good device instead of the device being tested.
You don’t have to buy a new one, you can ask your neighbor in the garage. True, the sensor should be exactly the same. If, after installing a working device, the indicator stops lighting, then the removed one is faulty.
Replacing the sensor
Even an inexperienced mechanic can change the oil pressure sensor on a Grant with his own hands. Instructions for replacing DDM:
- The decorative cover is removed from the motor.
- The battery is removed. The battery is removed in order to prevent a short circuit and remove ECU (electronic control unit) memory dumps.
- It is clear where the oil pressure sensor is located - in the cylinder head, to the right of the crankcase. Taking a Phillips screwdriver and pliers, dismantle the clamps with which the meter is attached to the motor. The sensor block can be easily removed by squeezing the latches.
- The main wire is disconnected from the meter, and it is then unscrewed from the socket with a 21 mm spanner.
- The steps are similar in reverse order. A new sensor is installed in place of the old one, the wiring is connected and the clamps are fixed.
Where is the sensor located and its part number
The DDM is located on the right side of the engine and is screwed into the cylinder head. To replace it, you will need to remove the plastic decorative cover, after which the sensor will be immediately visible. Replacing the sensor itself is very simple, unscrew the old one and install the new one, no additional actions need to be performed.
The article number of the original oil pressure sensor is 11180-3829010-00 . Its cost may vary in different regions, but on average it ranges from 120 to 160 rubles.
Checking and replacing the oil pressure sensor Lada Granta
The ODM (oil pressure sensor) on the Lada Grant, like on any other car, is designed to signal the driver about the oil pressure in the engine. If it falls, the sensor will report this to the BC and the corresponding information will be visible on the dashboard display or on-board computer.
But sometimes it happens that the oil pressure warning light comes on, but the oil level and pressure are normal, and the reason is a malfunction of the oil pressure sensor. We will consider ways to solve these problems below.
About the sensor
The Granta oil pressure sensor is a small part with a ball inside, which, under the influence of oil pressure in the engine, opens the contacts on the sensor. When you turn the ignition key, the oil pressure light on the instrument panel should light up, and as soon as the car engine starts, the warning light should go out within a few seconds or go out immediately. This indicates sufficient oil pressure in the system and allows the vehicle to be used for its intended purpose. But if the lamp does not go out and is constantly on, this is a reason to turn off the engine and think about solving this problem.
Operating principle of the oil pressure sensor and checking it
The operating principle of the DDM is quite simple - depending on the oil pressure, the measuring membrane inside the sensor bends under the oil pressure and closes and opens the contacts. If the engine oil level drops, the contacts open accordingly and the oil pressure warning light comes on.
Before checking the sensor, make sure that:
- The engine oil level is at the required level
- The oil filter is in good working order and does not leak oil from under it.
If everything is in order with the oil level and filter, you need to check the sensor circuit and itself.
- We check the circuit from the sensor to the warning lamp. Disconnect the terminal from the sensor and lean it against ground. If the circuit is working properly, the oil pressure lamp should go out. If not, there may be a break in the circuit somewhere.
- If after removing the DDM it is in oil, it means it is faulty and requires replacement. If the sensor is dry, the cause is the oil filter, oil level or oil pump.
- You can also check the oil pressure in the engine using a pressure gauge. To do this, unscrew the sensor and screw in the pressure gauge. Start the engine and at idle speed the pressure gauge should show 0.65 kgf/cm2 or more, which means the pump and everything else is fine. The sensor just needs to be replaced.
If your car is equipped with an on-board computer, if the DDM malfunctions, error P 0523 (Oil pressure sensor high voltage) will appear. Error code 0523 indicates that the sensor needs to be replaced.
Operating principle and design of the sensor on the VAZ-2110
The diagram of this element is in our article. The oil pressure sensor consists of several parts:
- Movable and fixed contact.
- Housing (as a rule, it is made of metal).
- Membranes.
- Pusher (moving contact rod).
The “ten” has a contact-type sensor. It is connected directly to the warning light on the instrument panel. After turning on the ignition, a plus from the on-board network is supplied to one of the lamp contacts. As for the second contact, it interacts with the moving element of the meter. How does the sensor work on a VAZ-2110 car? The scheme of operation is quite simple. The sensor's operating algorithm is based on connecting the lamp terminals to ground. A moving contact is responsible for this, through which the pusher is connected to the diaphragm. The cavity located above the diaphragm is in contact with the lubrication system in the engine block. As the pressure inside increases, the force on the diagram increases. The latter begins to bend, thereby moving the movable contact away from the stationary one. If there is no pressure, the contacts will be closed. Accordingly, the red light on the instrument panel will light up. As soon as the pressure in the system rises above a certain level (0.3 atmospheres), the circuit opens. The lamp stops lighting on the instrument panel.
Replacing the sensor yourself
We remove the decorative plastic protection and put it aside so that it does not interfere
Carefully squeeze the clamps and remove the block from the sensor
Using a spanner or open-end wrench set to “21”, unscrew the sensor.
Now we will examine it and diagnose it according to the points that we described above.
We screw in the new sensor, connect the wire block and start the engine. If the oil pressure light goes out, then the problem was in the sensor; if not, you need to look for the cause further.
Video on the topic
For 15 years I have been repairing various types of cars, including brands such as VAZ, UAZ, Chevrolet, Mazda, Kia and many others. Everything related to the gearbox, engine or chassis. You can write me your question below in the comments and I will try to answer it in detail.
A very interesting article, for me, as a person who has his own car, this was not new to learn, but on the whole, I’m sure it will be great for beginners. After all, as a rule, in case of problems, they are the ones who take the car to the service center, they immediately come up with a thousand reasons and seem to change everything, but in fact they often change some small thing, including perhaps this sensor. By the way, it’s not difficult to change, everything was described correctly in the article, the main thing is to know where it is and of course another sensor, and in general, in my opinion, it’s better for us to learn how to make a car ourselves.
Well, you're handsome. Straight to the point comment. Now I know everything about replacing the sensor.
As soon as I didn’t press these damn clamps, the infection didn’t snap off, I just tore my fingers.
Squeeze the chip from both sides in the thick part at the same time from both sides. Help a little with a screwdriver like a spatula from the sensor side. When squeezed, the hooks will come off the sensor mushroom. It may turn out that while the engine is hot, the plastic will be more pliable than when it is cold.
The icon on the tidy goes out, everything is fine, but the BC writes an error, everyone checked the sensor, changed it 3 times, what is the problem, they didn’t find it, the error pops up every now and then
Source
Why is the oil pressure light on?
The oil pressure lamp should only light up when the ignition is on. When the engine is running, the oil pressure indicator should not be active. If the lamp lights up when the internal combustion engine is running, you must immediately stop the engine and check for oil pressure in the engine.
Most often, the culprit for lighting the oil pressure lamp is the sensor itself. When this part fails, the lamp lights up and stays on constantly. To diagnose a sensor failure, you need to check the oil pressure using a pressure gauge at a service station. The oil pressure on a hot engine at idle speed should be at least 2 bar.
Replacement of the Lada Granta low oil pressure indicator sensor
- Open-end wrench 10 mm
- 21 mm straight box spanner (for 8-valve engines)
- Ratchet wrench (for 16-valve engines)
- Extension (for 16-valve engines)
- 21 mm head (for 16-valve engines)
- Pressure gauge with adapter
Parts and consumables:
- Low oil pressure warning sensor
In 8-valve engines, the low oil pressure warning sensor is screwed into a threaded hole in the rear wall of the cylinder head, next to the power unit eye.
In 16-valve engines, the sensor is installed on the right side, and is located directly on the cylinder head.
The further description is illustrated using the example of 8-valve engines. In 16-valve versions, all operations occur in the same way.
1. Disconnect the wire from the negative terminal of the battery.
About LADA car sensors and engine management system
12 October 2015 LadaOnline 159 004
Various sensors are responsible for the operation of all systems of a modern car. They take readings and transmit them to the electronic engine control unit (ECU). If the sensor malfunctions, an error is stored in the memory, and in some cases a Check Engine error appears on the instrument panel.
Where are the sensors located?
All modern Lada cars (Granta, Kalina, Priora, Vesta, Largus, Niva or Lada XRAY) are equipped with domestic VAZ engines. The location of the sensors on these motors is the same:
Elements of the electronic engine control system of the VAZ 11186/11189: 1* – controller; 2* – crankshaft position sensor; 3* – control oxygen concentration sensor; 4* – diagnostic block; 5* – diagnostic oxygen concentration sensor; 6 – throttle control unit; 7* – vehicle speed sensor; 8* – adsorber purge valve; 9* – gas pedal module; 10* – brake signal switch; 11* – clutch pedal position sensor; 12 – battery; 13 – mass air flow sensor; 14 – coolant temperature sensor; 15 – ignition coil; 16 – knock sensor; 17 – spark plugs; 18* – nozzles. *The item is not visible in the photo.
What types of oil sensors are there?
Modern automakers prefer to use two main types of sensors. Each of the devices works only with a certain type of engine, so it is unlikely that it will be possible to determine which device is better and which is worse. Let's consider the most popular types of DDM.
Mechanical sensor
A device of this type determines the level of lubricant pressure in the system and transmits the data to the control panel. The mechanical sensor has a complex structure. A membrane, a pusher and a slider are placed in the housing cup. The winding is made of nichrome wire. Since different elements are used to create such devices, the cost of mechanical-type DDM is very high. The product is large in size, which is not very convenient when assembling passenger cars.
Electronic sensor
This type of device is used more often. Manufacturers note a simple device, but also indicate that the sensor cannot transmit all changes in the lubrication system to the control panel. The device can show only two parameters: normal and critical pressure.
The only purpose is to send the driver information that there is no pressure in the system and it’s time to add lubricant. The signal enters the cabin instantly, so the driver can quickly take action.
Some cars are equipped with two types of sensors at once. This expands the driver’s ability to control the condition of the engine and the pressure in it. Even if one sensor fails, it is quite possible to navigate based on the readings of the second.
DDM review
The oil pressure gauge is an integral element of any modern engine. To begin with, we suggest you understand what types exist, as well as what the principle of operation of the device is.
Today, automobile DDM can be of two types:
- Electronic oil pressure indicator, which is also often called emergency. This device can operate in several modes - either “yes” or “no” mode. In fact, the emergency oil pressure sensor does not provide accurate indicators of the functioning of the system. Such a device can only inform the driver that the working fluid pressure in the power unit has completely disappeared. The device, which is located in the engine, warns the motorist thanks to a control lamp - if it lights up on the instrument panel, then this element of the circuit must be changed or the system’s functionality must be checked.
- Mechanical oil pressure gauge. Such a device, unlike its electronic counterpart, when connected, allows you to accurately determine the level of liquid pressure. The driver is notified using a warning lamp, as well as a scale located on the dashboard.
Mechanical sensor in dismantled form
Depending on the vehicle, two types of regulators can be used at once. Thanks to this, the driver has the ability to control the exact level of the parameter in the system, as well as immediately respond if a problem occurs.
Operating principle of electronic and mechanical oil pressure sensors
The operating principle of the oil pressure sensor depends on its type, so we will consider each process separately. For example, a remote electronic DDM is simpler in design, in contrast to a mechanical one; accordingly, the likelihood that the digital controller will fail is very low. The main purpose of the digital DDM is to check the pressure, as well as transmit information to the control panel located in the car interior that the pressure has disappeared.
By design, the digital DDM, which is located in the engine, consists of the following components:
- frame;
- membrane;
- contacts;
- as well as a pusher device.
Electronic regulator removed
The digital oil pressure sensor must be connected to the vehicle's on-board network. In particular, we are talking about the section of the circuit where the emergency indicator is also located. When the digital DDM is not working, that is, the engine is turned off, its diaphragm is straightened, the pusher device is pushed into its original position, and the contacts themselves are closed. If in this state you decide to connect a digital DDM, then the emergency pressure indicator located on the circuit section will begin to function - it lights up, flashes and blinks.
Accordingly, when the motor starts working, when starting the unit, the light always lights up at the very beginning. When starting the internal combustion engine, working fluid pressure appears in the system, which, in turn, begins to affect the membrane. This element begins to interact with the pusher device, which opens the contacts. If the parameter begins to decrease, the contacts of the digital DDM will close again - at this moment the emergency lamp on the instrument panel lights up, flashes or blinks. It should be noted that if the device itself breaks down, the lamp flashes, blinks or simply lights up.
As for a two-pin analog mechanical device, such a device has a more complex design. The mechanical oil pressure sensor, in addition to the membrane, housing and pusher device, also has a slider and a nichrome winding in its design. In addition, the two-pin analog mechanical oil pressure sensor also has several components in its design. It must be taken into account that if these components fail or operate incorrectly, the regulator will display incorrect information on the car’s dashboard or will fail altogether.
Checking the sensor
Checking the sensor involves only visual inspection. It is virtually impossible to find out whether it is working in home or “field” conditions.
So, if there are traces of oil on its DDM body, it means that the tightness of either the device itself or the threaded connection to the motor body is compromised. It often happens that the DDM, due to one or another circumstance, begins to pass oil through its own housing. If you start the engine, you can monitor its leakage through the place where the terminal for the electronic connector is fixed. In this case, the sensor needs to be replaced.
It happens that oil begins to ooze from under the DDM. This indicates that the connection density is broken. The pressure sensor has an aluminum O-ring, which becomes unusable from time to time. This problem can be resolved by replacing the ring.
Characteristics of sensors
Speeds
The Lada Granta speed sensor is located on the gearbox housing. This regulator is directly related to the transmission of data about how fast the vehicle is moving, how the car is idling, and what kind of gas mileage it is driving at.
To find this controller on a Priora or Grant, you need to open the hood and remove the air supply hose that goes from the air filter element to the throttle. Having done this, at the bottom of the gearbox housing you can see the controller with a wire connected to it. To replace the device, you simply need to disconnect the wiring and remove it from the installation location, and then replace it with a new one.
A coolant temperature sensor is necessary to measure the temperature of antifreeze in the cooling system. In accordance with the data from the temperature regulator on the Grant, the control unit adjusts the crankshaft speed, adjusts the composition of the combustible mixture, as well as the ignition timing.
As practice shows, such a device rarely fails, but in some cases it can give incorrect readings. Located in the engine compartment, in particular, in the thermostat cover, the controller has its own “diseases”. The wiring at the base of the connector may fray, resulting in the need to replace the DTOZH.
The mass air flow controller is located behind the air filter element of the power unit, it is also often called a flow meter. The main purpose of the device is to monitor the volume of air flow that enters the vehicle engine. In accordance with the data received, the on-board computer determines the required volume of gasoline, which is necessary to maintain a normal air-fuel ratio.
The idle speed sensor is one of the regulators designed to monitor and control the operation of the power unit. If the device breaks down, the motor immediately begins to work incorrectly - it will trip and the power will decrease. In turn, the needle on the tachometer will jump sharply from one value to another. The element itself is located on the throttle, in particular on its lower part. To get to it, you need to free the throttle valve from the pipes, there are four in total.
To replace and install a new IAC, you will need to disconnect the wiring from the regulator itself, as well as the throttle position controller. More detailed instructions for replacing the controller yourself are given in the video below (the author of the video is the channel In Sandro's Garage).
Sveta
As for the light sensor, it is installed in the same housing with the rain regulator. Its purpose is to activate and deactivate lighting based on the current state. For example, if it gets dark outside or you enter a garage or poorly lit tunnel, the device should automatically turn on the headlights along with the side lights. The controller itself is not repairable, so if it fails, the only option is to replace it.
Clutches and brakes
The clutch sensor allows you to determine the position of the pedal. When the pedal is not depressed, the regulator turns off the load adjustment on the power unit. The device is located in the pedal assembly, in the same place where the brake sensor is located.
The operating principle of the latter is quite simple:
- when the pedal is released, the rod is located inside and clamps the floating contact to the top;
- when the pedal is depressed, the rod clamps the contact to the bottom of the group.
As practice shows, one of the main problems of this controller is the poor quality of the contact itself. It can simply catch on the spring, and ultimately the control unit will receive an impulse to apply the brake.
Sorry, there are no surveys available at this time.