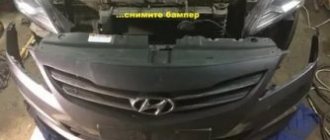
REAR BUMPER – DISASSEMBLY AND INSTALLATION
Place the vehicle on a two-post lift and brake it with the parking brake (electro-hydraulic lift type PZ, 2G). Separate the negative terminal from the battery (spanner 10). Raise the vehicle to a comfortable height for work. Unscrew three bolts 1, lower fixing the bumper to the body and self-tapping screws 2, fixing the mudguard apron to the bumper (replaceable head 10, wrench, Phillips screwdriver).
Lower bumper fastening: 1 – bolt of lower fixing of the bumper to the body 00001-0009022-21; 2 – self-tapping screw for fixing the mudguard apron to the bumper 11180-8212786-00
Unscrew the self-tapping screw 1 on the right and left sides, image 2-2, fixing the bumper to the rear fender, self-tapping screw 2 fixing the mudguard apron to the rear fender, remove the stopper 3 fixing the mudguard to the bumper (Torx head T20, wrench, flat screwdriver).
Lateral fastening of the rear bumper of a Lada Granta 2190: 1 – self-tapping screw fixing the bumper to the rear fender 00001-0076711-01; 2 – self-tapping screw for fixing the mudguard apron to the rear fender 00001-0076711-01; 3 – stopper for fixing the mudguard apron to the bumper 21080-5402270-00
Remove the rear lights in accordance with the requirements of TI 3100.25100.20553. Unscrew ten bolts 1 for the external fixation of the bumper (replaceable head 10, knob).
Upper mounting of the rear bumper of a VAZ Granta 2190: 1 – bolts for external fixation of the bumper to the body 00001-0009022-21
Disengage the bumper from the side brackets. Remove the rear bumper by unscrewing screws 1 and separating bracket 2 for fixing the license plate light (a Phillips screwdriver).
Bracket for fixing the license plate light for a Lada Granta 2190: 1 – screws for fixing the bracket for the license plate light to the bumper 00001-0076690-01; 2 – bracket for fixing the license plate light
Long-term operation of the vehicle over rough terrain, extreme temperature conditions, and aggressive driving style contribute to premature wear of the paintwork and peeling.
Characteristic differences between sedan and liftback bumpers
The front/rear “plastic” of both modifications is completely identical in terms of the mounting method. The main difference is in the exterior, color, and shape of the radiator grille. You can visually distinguish the first generation from the second by the color of the front grille of the cooling system.
In the first generation, she is in her original color - the natural color of plastic. In the second - to match the main color of the car. This rule also applies to the Grant liftback model, the so-called “bolt on” landing. This is such slang among motorists.
Typical bumper mounting locations:
- front: four bolts in the upper perimeter, two in the middle, four at the bottom, on each side;
- rear: two side fasteners, four upper and the same number of lower.
Reminder
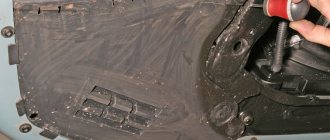
To remove the front/rear body kit, it is better to use a lift; You will need: a Phillips screwdriver, a 10mm socket wrench, a 20/30 Torx sprocket, a ratchet with a set of sockets; Simple, but important: wash the car before work, since we will be tinkering with the dirtiest part of the car; After dismantling all mounting points, check and disconnect all wiring, such as PTF, license plate lights or parking sensors.
Do you like working with Granta? See other articles. For example, how to install acoustics yourself.
Write comments
This is important - otherwise we will miss details or lose motivation
Domestic cars have finally become truly modern vehicles, the quality of which meets all the latest standards. However, breakdowns also occur on modern cars.
What is needed for a successful renovation
To remove the Grant liftback bumper you will need: a set of automotive tools, a Phillips-head screwdriver, rags, rust remover WD-40, restoration components.
The decision on the type of repair is made by the workshop specialist based on the results of a comprehensive diagnostic. If the impact occurred “head-on” at a speed of over 60 km/h, then replacement with a new one is guaranteed. When the scale of the damage is not large, the structure of the plastic fasteners is not damaged - restoration of the standard element is allowed.
Do-it-yourself front bumper removal
- We install the car on a flat platform, an inspection channel. In this case, it is not at all necessary to use an electric lifting mechanism;
- open the hood;
Unscrew the top row of mounting bolts (4 in total), two in the middle, four at the bottom.
First turn the steering wheel to the side for ease of work. We remove the front bumper of the Grant liftback, the dismantling process is completed. Subsequently, the master (car owner) carries out preventive maintenance, replaces the plastic product, and installs additional equipment as necessary.
Algorithm for step-by-step installation of the front bumper
- after diagnostics, prevention of fastening points, we install a new “plastic”, it must be painted in the original color of the car;
- we hang the upper perimeter, then the lower one, followed by snapping the plastic clips;
- Having made sure that the fit is tight, we proceed to fastening it with bolts.
Branded accessories
The choice of additional equipment and services at car dealerships is extensive. Branded accessories are divided into classic accessories and additional options (equipment).
Classic accessories can be called souvenirs; the car dealership even has a sales plan for these souvenirs. Among the accessories that have become widespread:
- Branded key rings
- T-shirts and baseball caps with the brand logo
- Mug with logo
- Flash drive with logo
- Soft toy or pillow
All this souvenir is not in demand among buyers of budget cars, if only key fobs.
And we know very well that all this in a regular store costs 2-3 times cheaper, but there are also lovers of this product. My wife's brother has his own auto parts store and ordered a windbreaker with the BMW logo from his supplier, and he didn't even know what it looked like, what material it was made of, but the fact that it was 50% cheaper than in the official store encouraged him to buy. As a result, he received a white sweatshirt with a small BMW logo on the chest for 3,800 rubles and is satisfied; for a premium BMW owner, this is not money.
The same goes for an amenity kit in a leather case for 15 thousand rubles with Porsche branded embossing. Is 15 thousand a lot of money for a Porsche buyer for several million rubles? This is his pocket money for “seeds”.
Removing the rear bumper
The process is the same as above, except for the placement of the fasteners.
So, how to remove the rear bumper of a grant liftback:
- Place the car on a level platform, open the trunk lid;
- remove the plastic latch, remove the lamps, unscrew the three nuts, remove the left/right lamp one by one;
- Having done the work described above, we proceed to unscrewing eight bolts in the upper perimeter and four in the lower. First remove the mudguards in the wheel arches;
- Carefully tear off the plastic clips and remove the bumper.
We carry out planned work, preventive maintenance, cleaning, etc.
Is native better?
But we could buy a non-original carpet for the trunk, we decided. The interior was original to the old owner and is in very good condition. The Chinese trunk litter we bought, there is no other way to call it, disappointed us. She warped immediately, although it was not winter. It was problematic to take it out for cleaning and put it back, we were afraid it would burst.
Car owners are right when they say that the original floor mats will not slip under the pedal at the most inopportune moment; the original ones fit like a glove, unlike the universal ones. Moreover, now the difference in price is not big; if you save on rugs, you will blame yourself later.
The same can be said about original covers, unlike universal ones, they fit great, and if we take a non-original one, at least not the cheapest one, this rag won’t last even a year.
DIY rear bumper installation
Replacing the Grant liftback bumper, hanging the upper perimeter, snapping the side and bottom, tightening the bolts. At this stage it is important to maintain the integrity of the plastic clips. In case of damage or deformation, tightness to the surface is not guaranteed.
If you accidentally damage the clip, consult a specialist. Restoring without experience does not always lead to guaranteed success. Self-replacement of the rear bumper on a Lada Granta liftback is completed.
How to remove step by step
Let's get to work.
Step 1: remove the license plate frame from the front bumper - there are 2 10mm bolts under it. Unscrew them.
For bolts, a socket wrench or ten-point socket is suitable. Photo from Drive2 website, Lada Granta MAGMA logbook
Step 2: open the hood. We unscrew 6 bolts: 4 hold the radiator frame from above, one more to the right and left of the frame.
Use the same head to unscrew the bumper mount from above.
Step 3: Remove the star screws (you need a Torx wrench) that secure the fender liners. 2 on each side.
If the wheels are in the way, you can turn them one by one to their extreme positions for better access.
Step 4: from below we find 2 screws (on the right and on the left) closer to the wings - unscrew them.
We remove the screws either from the hole or by lying under the bumper.
Step 5: remove the last three fastening bolts from the bottom closer to the protection. If the protection interferes, unscrew the edge that interferes with dismantling.
It is not necessary to remove all protection.
Step 6: along the edges near the wings, carefully pull the bumper towards you until it comes off the latches.
Are fog lights installed? Disconnect them before work!
Reassemble in reverse order.
In what cases is it necessary to replace the bumper?
- the consequence of a frontal collision, an accident, when the structure of the plastic is deformed, standard fasteners are destroyed, subsequent use is not rational;
- manufacturing defects at the assembly line stage;
- negative consequences of operation in critical negative / positive temperatures;
- mechanical damage caused by the driver;
- combustion, melting;
- installation of tuning elements, local upgrade, insertion of non-standard designs.
Regardless of the type of damage, carry out preliminary diagnostics in order to assess the general technical condition of the machine, components, and assemblies. Based on the results, choose the recovery method.
Assess the condition of the machine either independently or by turning to service station specialists for help.
The most popular extras are the most profitable
Car dealership managers have a list of priorities, what to offer the buyer first and what to offer last. And although they sell rugs with great profit, they are in the middle of this list. The salon receives the most profit from the alarm system and additional processing of the car body.
The dream of many car owners is for the car not to rust ahead of time. And car dealerships know this; they offer to apply anti-corrosion coating to the body without leaving the showroom. The main argument: we will apply a coating to a clean body, this will give a greater percentage of protection than coating elsewhere on a body that has been exposed to external influences. They will also offer to provide protection from gravel and sound insulation, and they will apply the same anti-corrosion compound, because all these properties are listed on its labels. This is already some kind of scam.
The second priority is the sale of alarm systems. In order not to miss out on the client, managers argue for installing the alarm directly in the salon by the fact that installation in a third-party organization will lead to disruption of the fastening of the trim elements and, as a result, to damage to the wiring. Well, in order not to let the client cool down, immediately tell him about the advantages of autostart, which he will receive right in their salon when installing an alarm system.
The concept and purpose of the front bumper amplifier on the Lada Granta
Many motorists practice strengthening the frontal structure of the car in order to minimize possible risks. One way is to install a metal amplifier. It is fixed on standard fasteners in the middle, covering the radiator and fan. A plastic bumper is placed on top of the metal tire. The location of the tire is secretive, invisible to the eye.
In the event of an accident or collision, the metal protection will take the blow, minimizing damage to the engine compartment. In the event of a frontal collision at a speed of no more than 50 km/h, the protection will maintain the integrity of the plastic. The maximum that can happen is damage to the paintwork.
| 59 LADA Granta 2190 rear bumper replacement | |
| Catalog article / OEM number | Price, rub.) |
| 21900280313100 | 430 — 460 |
| 21900280313118 | from 450 |
| 21900280313279 | from 450 |
| (21911428459) |
Results
Replacing the rear bumper of a Lada Granta is quite a simple task. You just need to take into account that the plastic from which the bumper is made can be easily broken. The same applies to fastenings. The fact is that screws made of metal can exert excessive pressure on the surface of the plastic, causing it to simply burst. To avoid this, you need to tighten the bolts with a certain force set on the handle.
But, in general, you shouldn’t have any problems with removing and then installing the bumper.
Reviews from car owner forums
flint334 (https://www.drive2.ru/l/8196664/): a new liftback from Grant is installed on the first generation. The car takes on a new look, streamlined, aerodynamic;
serov-ak: the side mirrors are especially attractive, they are larger, with an increased viewing angle;
Lucifer174: installation takes place within 10 minutes, fixation method is “bolt on”;
vellsvel (https://www.drive2.ru/l/6123257/): new bumper, electrically driven, heated mirrors, repeaters - this is luxury.
Dismantling tools
Naturally, to work you will need to acquire some tools. Most likely, you already have them, but preparing them in advance will not be superfluous even in this case.
The list of required tools includes:
- Phillips screwdriver with Phillips head;
- open-end wrench size 10. It can be replaced with a spanner wrench of the same size;
- In addition, you will need another pair of keys such as TORX T-20 and TORX T-30.
It would also be a good idea to take care to place cardboard or cloth under your back so as not to get it dirty and catch a cold. If the car is installed on a lift or overpass, then such safety measures will not be necessary.
Procedure for work
Placing the vehicle within the perimeter of the repair area;
- Open the hood/trunk lid;
- Unscrew the mounting bolts one by one. In the case of the rear bumper, first remove the rear lights to provide access to the bolts;
- Remove the plastic bumper and carry out maintenance;
- Put on a new one and secure it with clips.
DIY installation is complete.
Bottom line The process of replacing the front / rear bumper yourself is not at all difficult. If you have tools, equipment, and spare parts, prevention will take no more than 15 minutes. When it comes to the negative consequences of an accident, impact, collision, the time interval is impossible to predict. Before removing the Grant liftback bumper, be sure to conduct preliminary diagnostics using digital scanners to determine the geometry of the body.
general information
Manipulating the body kit takes no more than 20 minutes, even for a novice auto mechanic. Bolts with soured threads can complicate the situation and prolong the work time. Most often this happens with the four screws that secure the radiator and body kit. The bolts sit as if rooted, and it takes no effort to move them.
When installing the body kit, it is recommended to lubricate the screw threads with grease or grease, such as “Universal” or “Mobile”. Thanks to this treatment, it is possible to avoid souring and corrosion of fastening joints. This will make it easier to remove the bumper again and extend the life of the screw elements.
A removed body kit is a good reason to inspect devices and parts to which access was denied. Check the condition of the wires, fasteners, inspect the power bumper, etc. If rust is detected on the body, the area is treated with anti-corrosion treatment. This will prevent further damage and hole formation.
Source
Video - Result of replacing the bumper on Grant
The rear bumper of a modern car is an energy-absorbing device that can, in the event of light impacts, avoid deformation of the body by taking it upon itself. Usually hidden behind the bumper is a special amplifier made of directional metal, which programs a pre-designed deformation of the body during serious collisions to avoid more serious consequences for passengers and the driver.
In addition to mechanical properties, the bumper gives the car a certain aesthetic appearance and is the completion of a certain design. Sequence of work
Types of headlights
When listing the types of Lada Granta headlights, you should definitely mention the original parts and their analogues, usually used as an alternative or tuning optics. When dismantling and installing these headlights, the car owner will not need to redo the fastenings. Here are their descriptions with catalog numbers:
- Let's start with the original headlight, listed in catalogs under number 21900-3711010-00. It does not cause any difficulties during removal and installation, and its price can range from 1000 rubles and above.
- An analogue of the original headlight with xenon lenses is the headlight produced by the Volzhsky Automobile Plant, which has catalog number 21901-3711010-90. Such headlights are not widely used; in their design they differ little from the original, representing the same original part, but designed and intended for the installation of xenon. Their cost exceeds the cost of the original headlight by about 15%.
- The third type includes models used for tuning optics. So, two analogues of the original were released at once, one of which has built-in LED indicators and is listed in catalogs under the number DM-171052, and the other is equipped with different types of lenses for high and low beam and LED-backlit edging. The catalog number of the second model is DM-171118.
In addition, one of the most useful developments of our time is worthy of special mention - the ability to install lenses in the headlight unit.